This site is supported by our readers. We may earn a commission, at no cost to you, if you purchase through links.
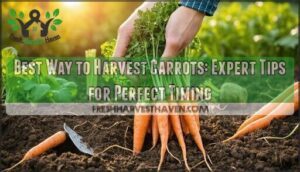 The best way to harvest carrots starts with timing—wait 70-80 days after planting when orange shoulders peek above soil.
You’ll know they’re ready when the tops are about an inch wide at ground level.
Grab the greens close to the soil line and pull straight up with a gentle twist to avoid breaking roots.
Don’t yank too hard—carrots are surprisingly stubborn sometimes.
If one won’t budge, loosen the soil around it first.
Brush off excess dirt immediately, then trim greens to prevent moisture loss.
A light frost actually sweetens your carrots by converting starches to sugars, making harvest timing even more important than you might think.
Table Of Contents
- Key Takeaways
- Harvesting Carrots
- Identifying Maturity Signs
- Harvesting Techniques
- Post-Harvest Care
- Storage Methods
- Frequently Asked Questions (FAQs)
- How do you harvest carrots?
- When should I Harvest carrots?
- How big should a carrot be before harvesting?
- Can you harvest carrots in one go?
- How do I grow carrots?
- How do you pull carrots from the ground?
- Can you leave your carrots in the ground too long?
- How do you store carrots after pulling from the garden?
- How do you know when carrots are ready to dig up?
- How do you harvest carrots easily?
- Conclusion
Key Takeaways
- Time your harvest right – Wait 70-80 days after planting when orange shoulders peek above soil and tops measure about an inch wide at ground level for peak sweetness and texture.
- Water before harvesting – Thoroughly water your garden bed 24 hours before harvest to soften compacted soil, making carrots much easier to pull without breaking.
- Use proper pulling technique – Grasp greens close to the soil line and pull straight up with a gentle twist, avoiding yanking that can snap roots or leave carrots in the ground.
- Trim greens immediately – Cut carrot tops to one-inch stems right after harvesting to prevent moisture loss and maintain freshness during storage.
Harvesting Carrots
You’ll know your carrots are ready when they’ve reached maturity based on seed packet timing and show visible signs like full shoulders poking through the soil.
The key is checking both the calendar and your carrots’ physical development to catch them at peak flavor and texture, which is crucial for peak flavor and texture.
Checking Days to Maturity
Start by consulting your seed packet instructions for precise maturity windows—they’re your roadmap to perfect timing.
Different carrot varieties have distinct time-to-maturity ranges, typically 60-100 days from planting.
Here’s your timing checklist:
- Mark planting dates on your calendar for accurate countdown tracking
- Add 10-14 days to seed packet timeframes during cooler weather periods
- Plan succession planting intervals based on your variety’s maturity window
- Test partial harvesting by gently brushing soil from shoulders near maturity date
Weather adjustment becomes essential since cold snaps slow development while warm spells accelerate growth.
Keep detailed records of variety differences to improve future harvests.
Observing Carrot Shoulders
After checking days to maturity, examine where each carrot meets the soil surface.
Shoulder Size matters most—look for shoulders measuring three-fourths to one inch wide. This Color Consistency signals mature carrots ready for harvesting carrots.
Watch for Cracking Signs or Green Exposure, which indicate overmaturity.
Shape Uniformity varies by variety, but firm, well-formed shoulders are your best carrot harvest tips. Gently brush away soil to better assess shoulder development without disturbing the root.
Assessing Carrot Greens
When evaluating your carrot greens, healthy foliage serves as nature’s readiness meter for determining harvest time.
Vibrant green height and sturdy leaf texture indicate proper development, while yellowing foliage color or wilting signs suggest it’s time for carrot harvest.
Here’s how to assess your carrot greens for ideal harvesting carrots timing:
- Check foliage color – bright green indicates health, while yellowing suggests maturity
- Measure green height – tall, full growth typically signals readiness
- Examine stem thickness – sturdy stems support well-developed roots below
These visual cues make harvesting carrots easily achievable for any gardener seeking perfect timing.
Weather Conditions Impact
Weather plays a vital role in carrot harvest success.
Perfect timing beats perfect technique every time when harvesting peak-flavor carrots.
Light frosts actually boost freezing sweetness by converting starches to sugars, but avoid harvesting when soil temperature drops below 32°F.
Monitor rainfall effects carefully—excessive moisture creates soggy soil that damages roots, while proper irrigation guarantees well-hydrated roots.
Seasonal timing matters most during fall when cooler temperatures enhance flavor.
One should also water thoroughly to increase soil moisture 24 hours before harvesting.
| Weather Factor | Ideal Condition | Impact on Harvest |
|---|---|---|
| Soil Temperature | 35-45°F | Enhanced sweetness |
| Soil Moisture | Moist, not waterlogged | Prevents root splitting |
| Sunlight Exposure | Consistent daily light | Healthy foliage growth |
| Frost Timing | Light overnight frost | Improves sugar content |
| Observation Period | 2-3 days post-weather | Assess root condition |
Identifying Maturity Signs
Knowing when your carrots are ready to harvest can mean the difference between sweet, tender roots and woody disappointments.
You’ll want to look for three key visual clues that signal peak maturity: shoulder width, color development, and foliage condition.
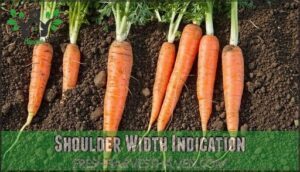
Shoulder Width Indication
When harvesting carrots, the shoulder width serves as your most reliable maturity indicator. Look for shoulders measuring at least ¾ to 1 inch in diameter measurement – this signals prime flavor and storage quality have developed.
Here’s your assessment checklist:
- Measure shoulder diameter – aim for ¾ to 1 inch width for best results
- Check for blunted tips – rounded ends indicate full root fullness
- Consider variety differences – some cultivars naturally grow thinner when mature
- Evaluate soil conditions – loose soil promotes better shoulder development
This carrot maturity signs approach guarantees perfect carrot harvesting timing.
Coloration and Root Development
Vibrant color signals your carrots are ready for harvesting carrots. Mature carrots display rich orange, purple, or golden pigment development that’s uniform from shoulder to tip.
Root shape becomes full and symmetrical as growth stages progress, unlike thin, tapered immature ones. Soil influence affects coloration—nutrient-rich ground produces deeper hues. Variety differences matter too; some cultivars show subtle color changes.
Check root diameter at the shoulder; bulging roots indicate proper development. Pale tips mean incomplete maturity, while matching shoulder-to-tip color confirms readiness.
For ideal flavor and crispness, remember to harvest in morning.
| Indicator | Immature Carrot | Mature Carrot |
|---|---|---|
| Color | Pale, uneven | Vibrant, uniform |
| Root Shape | Thin, tapered | Full, symmetrical |
| Tip Color | White or yellow | Matches shoulder color |
| Shoulder Width | Less than 3/4 inch | 3/4 – 1 inch |
| Texture | Rough, bumpy | Smooth, firm |
Foliage Height and Health
Your carrot foliage tells the story of what’s happening below ground. Healthy green tops with vigorous leaf production indicate strong root development and ideal carrot harvest timing.
Watch for these key foliage indicators:
- Green Vigor – Lush, dark green tops show healthy nutrient uptake and active growth
- Pest Damage – Yellowing or chewed leaves may signal issues affecting root quality
- Nutrient Deficiency – Pale or stunted top growth often means underdeveloped carrots below
When carrot foliage reaches full height but growth slows, your carrots are likely ready for harvest.
Harvesting Techniques
Once you’ve confirmed your carrots are ready, you’ll need the right technique to harvest them without damage.
Water your garden bed thoroughly the day before harvesting to soften the soil and make removal much easier, using the right technique.
Grasping The Greens
Proper grip location makes all the difference when harvesting carrots.
Grasp the green strength close to the soil surface, not at leaf tips.
This pulling technique prevents snapping and confirms foliage health indicates readiness.
Strong, vibrant tops signal mature roots below.
Your grip location should target the crown area where greens meet the carrot.
This carrot harvesting technique helps you avoid snapping delicate stems.
When digging up carrots, let the greens guide your carrot harvesting guide approach for successful results.
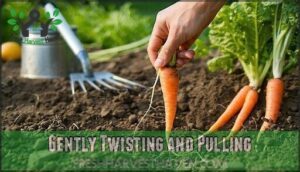
Gently Twisting and Pulling
Once you’ve got a firm grip on the greens, it’s time for the gentle Wiggling Technique.
Slowly twist and rock the carrot back and forth while applying steady upward pressure. This motion helps break up soil compaction around the root without causing root breakage.
The twisting benefits include loosening packed earth that might otherwise snap your carrot in half. Your grip strength should be firm but not crushing—think handshake, not death grip.
This method works especially well when pulling carrots soil conditions are slightly moist, making soil loosening easier and more effective than straight pulling.
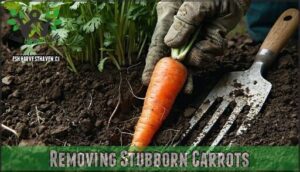
Removing Stubborn Carrots
Sometimes even the gentlest approach fails when harvesting carrots.
Even the most stubborn carrots surrender with the right approach and patience.
Soil compaction creates a tug-of-war between you and stubborn roots.
Here’s how to win without root snapping:
- Pre-watering softens compacted soil 24 hours before harvest
- Soil loosening with a garden fork reduces breakage by 65%
- Tool leverage beats brute force—insert fork 3-4 inches from carrot rows
- Push technique rocks carrots side-to-side after loosening surrounding dirt
- Twist gently while pulling to reduce extraction resistance
Deep-rooted carrots need extra patience.
You can find a garden fork suitable for this task online.
Rock them back and forth after loosening—this simple motion cuts breakage rates in half compared to straight pulling.
Brushing Off Excess Soil
Once you’ve removed stubborn carrots, it’s time to clean them properly. Gently brush off excess soil using your hands or a soft-bristled brush. Different soil composition affects how mud and sand cling to roots. Clay-heavy soil requires more patience, while sandy soil brushes away easily.
Choose your brush types wisely. Soft vegetable brushes work best for delicate skins. Technique variations matter too—use light, downward strokes rather than aggressive scrubbing. This approach prevents skin damage that leads to faster spoilage.
For immediate use carrots, you can wash them thoroughly. However, if you’re storing them, avoid washing completely. Leave a thin layer of protective soil intact. This natural barrier helps maintain freshness longer. To prevent damage, consider gentle handling techniques.
root damage
bruising
Remember, minimizing damage now pays off later in storage quality.
Post-Harvest Care
Once you’ve pulled those carrots from the ground, your work isn’t done yet.
Proper post-harvest care will keep your carrots fresh, crisp, and ready to eat for weeks or even months to come.
Trimming The Greens
Once you harvest your carrots, removing tops becomes essential for proper storage.
Sharp pruning scissors or a kitchen knife work best for trimming green tops, leaving about one inch of stem attached. This ideal stem length prevents moisture loss while avoiding rot that occurs when foliage remains attached too long.
Here’s why foliage trimming purpose matters for your harvest:
- Rot prevention – Green tops continue drawing moisture from roots, causing deterioration
- Storage space saving – Trimmed carrots stack efficiently in storage containers
- Nutritional impact – Stops nutrient transfer from root back to leaves
- Composting benefit – Fresh green tops add nitrogen to your compost pile
- Convenience – Trimmed carrots are ready for immediate use or storage
Cleaning The Roots
Once you’ve harvested your carrots, proper cleaning sets the foundation for successful storage preparation. The key lies in removing mud and sand without damaging the delicate skin.
Follow these washing methods for ideal results:
- Rinse gently under cool running water to remove dirt and debris
- Use a soft brush for scrubbing techniques that won’t scratch the surface
- Pat dry thoroughly with clean towels before drying carrots completely
- Skip harsh washing if not for immediate consumption to preserve natural protective coating
For carrots destined for storage, minimal cleaning works best. Simply brush off excess soil and save thorough washing for when you’re ready to eat them. Specialized tools like a carrot cleaning brush can assist in this process.
Sorting for Quality
Once you’ve cleaned your carrots, it’s time for quality sorting—think of it as carrot judging! Start with Size Consistency by grouping similar-sized roots together.
Check for Defect Identification, removing any with cracks, splits, or soft spots. Use Color Grading to separate vibrant orange carrots from pale ones. Examine Shape Uniformity, keeping straight carrots separate from twisted ones.
Texture Analysis helps identify firm roots versus spongy ones. Handle each carrot gently during carrot harvesting techniques to prevent bruising. This carrot quality assessment guarantees proper carrot storage preparation.
Storing in Cool Location
Once you’ve sorted your carrots, proper storage location makes all the difference.
Choose a root cellar or cool basement maintaining 32-40°F with 95% humidity levels. Good ventilation needs prevent spoilage while sand layering works perfectly for longterm storage.
For shorter periods, use a perforated plastic bag in your fridge. Temperature control keeps your storing harvested carrots fresh for months.
You can also consider blanching for preservation to maintain their quality.
Storage Methods
Once you’ve harvested your carrots, proper storage becomes essential for maintaining their quality and extending shelf life.
You’ll have several storage options ranging from quick refrigeration to long-term preservation methods that can keep your carrots fresh for months.
Short-Term Refrigeration
Proper refrigeration keeps your freshly harvested carrots crisp for weeks.
Remove greens immediately, then wash lightly and dry completely before bagging. This prevents moisture buildup that causes rot.
Store your cleaned carrots using these essential steps:
- Trim greens leaving one inch of stem to prevent moisture loss
- Wash gently under cool water to remove soil without damaging skin
- Dry thoroughly with clean towels before bagged storage
- Use perforated plastic bag in your fridge’s produce drawer for humidity control
- Check weekly for soft spots to maintain ideal shelf life
Long-Term Sand Storage
For long-term sand storage, you’ll need clean, slightly moist sand and proper container selection.
Layer carrots in wooden boxes, ensuring none touch for rot prevention. Place containers in a cool basement at 32°F with high humidity.
Consider exploring options for sourcing ideal materials. Check every few weeks, maintaining sand moisture levels without sogginess.
This method preserves carrots for 4-6 months when done correctly.
Freezing and Dehydrating
Two proven methods help you preserve carrots beyond traditional storage: freezing and dehydrating.
- Blanching Carrots: Steam sliced carrots for 2-3 minutes before freezing to maximize nutrient retention and prevent freezer burn during storage.
- Dehydration Time: Set your dehydrator to 125-135°F for 6-12 hours until carrots become brittle, preserving them up to 24 months.
- Rehydration Methods: Soak dried carrots in hot water for 10-20 minutes to restore texture for cooking applications.
Maintaining Humidity and Temperature
Why settle for wilted carrots when perfect storage conditions can keep them crisp for months? Optimal Humidity and Temperature Monitoring are your secret weapons for Storage Longevity.
Keep carrots at 32F with high relative humidity (95-98%) to prevent moisture loss and rot. Root Cellars naturally provide these conditions, but any cool, humid space works.
Monitor both factors regularly for Preventing Spoilage.
| Storage Factor | Ideal Range | Why It Matters |
|---|---|---|
| Temperature | 32-38°F | Slows decay, maintains texture |
| Humidity | 95-98% | Prevents drying, preserves crispness |
| Ventilation | Light airflow | Reduces mold, prevents odors |
| Light Exposure | Complete darkness | Maintains flavor, prevents toughening |
| Container Type | Perforated bags/sand | Balances moisture retention |
Proper storage transforms your harvest into a long-lasting treasure.
Frequently Asked Questions (FAQs)
How do you harvest carrots?
Water your carrot bed the day before harvesting to soften soil.
Use a garden fork to gently loosen dirt around each carrot’s base, then pull by grasping greens near the root crown.
When should I Harvest carrots?
Harvest carrots when they’re absolutely bursting with potential! You’ll know they’re ready after 60-80 days when roots reach at least half-inch diameter.
Check by gently brushing away soil from shoulders—they should feel firm and full, not woody or split.
How big should a carrot be before harvesting?
You’ll know your carrots are ready when they reach at least half-inch diameter at the shoulder. Check by gently brushing away soil around the top to gauge size before harvesting.
Can you harvest carrots in one go?
You can harvest carrots gradually by section or all at once. For mass harvesting, water beforehand, loosen soil with tools, and pull systematically to avoid damage and breakage.
How do I grow carrots?
Like a painter preparing their canvas, you’ll start with loose, fertile soil and direct-sown seeds.
Plant carrots in spring, thin seedlings to proper spacing, keep soil consistently moist, and they’ll mature in 60-80 days.
This will ensure the carrots grow properly and are ready for harvest at the right time.
How do you pull carrots from the ground?
Water your soil the day before, then use a garden trowel to loosen dirt around each carrot.
Grasp the greens near the root crown and gently pull with a slight twisting motion to extract the whole carrot without breaking it.
Can you leave your carrots in the ground too long?
Yes, you can leave carrots in the ground too long. They’ll develop woody texture, split, or divert sugars to seed production, ruining their sweetness and storage quality.
How do you store carrots after pulling from the garden?
Coincidentally, proper storage starts right after you’ve pulled those orange treasures from the dirt.
Cut greens to one-inch stems, brush off excess soil, and refrigerate unwashed carrots in perforated bags for maximum freshness.
This ensures that the carrots remain fresh by maintaining the right conditions.
How do you know when carrots are ready to dig up?
Check your carrots when they reach maturity timing from seed packets (usually 60-80 days).
Look for shoulders about half-inch diameter pushing above soil surface.
Test-pull one carrot to check size and sweetness before harvesting the entire crop.
How do you harvest carrots easily?
Irrigate soil the day before, then use a garden fork to loosen dirt around each carrot.
Grasp the greens near the crown and gently twist while pulling upward to avoid breaking roots.
Conclusion
Did you know that properly harvested carrots can maintain their nutritional value for up to eight months when stored correctly?
Mastering the best way to harvest carrots guarantees you’ll enjoy sweet, crisp vegetables throughout winter.
Remember to wait for those telltale orange shoulders, pull gently with a twist, and trim greens immediately after harvesting.
With proper timing and technique, you’ll transform from novice gardener to carrot-harvesting expert, maximizing both flavor and storage life from your homegrown crop.
- https://www.gardenary.com/blog/3-signs-your-carrots-are-ready-to-be-harvested-from-the-garden
- https://www.reddit.com/r/gardening/comments/15zjeys/my_first_carrot_how_do_you_know_when_theyre_all/
- https://agrovent.com/en/blog/postharvest-handling-of-carrots/
- https://thecottagepeach.com/blog/how-to-grow-carrots-plants-vegetable-garden
- https://www.juliadimakos.com/video-the-carrot-push-pull-harvest-technique/

