This site is supported by our readers. We may earn a commission, at no cost to you, if you purchase through links.
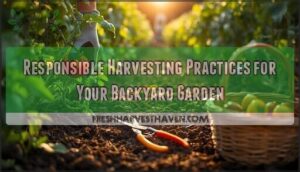
 Harvesting garlic bulbs properly starts when lower leaves turn brown but several green leaves remain—typically mid-summer.
Stop watering two weeks before harvest and let soil dry completely. You’ll want to use a garden fork rather than a shovel since it’s gentler on the bulbs.
Carefully loosen soil around each plant, then lift bulbs by their stems—never yank them from the ground as stems break easily. Brush off excess dirt but don’t wash or remove outer papery layers.
Timing matters more than you’d think, and there’s a sweet spot that separates mediocre garlic from storage-worthy bulbs, where proper harvesting and gentle handling are crucial.
Table Of Contents
- Key Takeaways
- Harvest Timing Considerations
- Preparing for Harvest
- Harvesting Techniques
- Curing and Drying
- Storing Garlic Bulbs
- Frequently Asked Questions (FAQs)
- What is the best way to store fresh garlic bulbs?
- How do you know when garlic is ready to dig up?
- Can I leave garlic in the ground too long?
- How long do you let garlic dry after picking?
- When to harvest garlic bulbs?
- How should one take powder garlic?
- How do you Dry garlic bulbs after harvesting?
- How do you dig up garlic bulbs?
- How do you plant garlic bulbs?
- How do you know if a garlic bulb is ready for harvest?
- Conclusion
Key Takeaways
- Watch for the right timing signals – You’ll know it’s harvest time when 40-60% of the lower leaves turn brown while the upper leaves stay green, and the bulbs feel firm when squeezed through the soil.
- Stop watering two weeks before harvest – This lets the soil dry completely and triggers the final bulb development, making extraction easier and preventing rot during storage.
- Use gentle lifting techniques with proper tools – Insert your garden fork 4-6 inches from the stem, loosen the soil carefully, then lift by supporting the bulb base rather than pulling on the stems.
- Cure properly for long-term storage – Hang the bulbs in bundles or spread them on racks in a well-ventilated, dark area for 3-4 weeks until the papery skins are crisp and the stems are completely dry.
Harvest Timing Considerations

Knowing when your garlic bulbs are ready for harvest makes the difference between perfectly developed cloves and disappointing results.
You’ll need to watch for specific visual cues and understand how your local climate and garlic variety affect the timing to guarantee the best bulb development, which involves recognizing complete concepts about the growth and readiness of garlic.
Signs of Readiness
Timing your garlic harvest requires reading specific plant signals that indicate bulb maturity.
Watch for leaf yellowing starting from the bottom, where 30-50% of foliage turns brown while upper leaves stay green. Test bulb firmness by gently squeezing through soil – mature bulbs feel tight and compact.
Ready bulbs feel firm when squeezed through soil—your garlic’s way of saying it’s harvest time.
Check clove formation by digging a test bulb to verify well-developed, distinct segments wrapped in papery skin.
Key harvest indicators to monitor:
- Leaf Yellowing: Bottom two leaves browning while top remains green
- Bulb Firmness: Tight, solid feel when gently pressed through soil
- Clove Formation: Well-separated, plump individual segments visible
- Skin Wrapping: Dry, papery outer layers protecting inner cloves
Seasonal Variations
Your garlic harvest time shifts dramatically based on geographic factors and regional climate. Northern growers typically harvest in July-August, while southern regions finish by June.
Weather patterns dictate your seasonal timing more than calendar dates.
| Region | Harvest Window |
|---|---|
| Northern Zones | July-August |
| Southern Areas | May-June |
| Mountain Regions | Late July-September |
Harvest schedules depend on your local conditions. Cool springs delay garlic maturity, while hot weather accelerates it.
Seasonal variations mean you’ll watch your bulbs, not your calendar, for perfect garlic bulb harvesting timing.
Climate Influence
Your local climate zone acts as the conductor for your garlic harvest symphony. Temperature effects and weather patterns directly impact bulb development timing across regional variations.
Understanding these climate factors helps you nail the perfect harvest window:
- Temperature Effects: Warmer zones accelerate maturation by 2-3 weeks
- Regional Variations: Northern climates delay harvest until late July-August
- Weather Patterns: Cool springs extend growing seasons substantially
- Soil Moisture: Dry weather conditions signal ideal harvest timing
- Climate Zones: Mediterranean areas often harvest in early June
Regional differences mean your neighbor’s timing mightn’t work for you. Climate resilience comes from reading your specific environment’s signals rather than following generic calendar dates.
Variety Differences
Different garlic varieties demand unique harvest timing strategies for ideal bulb development.
Hardneck Types mature earlier with fewer, larger cloves averaging 4-12 per bulb. These varieties require cooler climates and produce distinctive scapes that signal harvest readiness. Softneck Traits include later maturation, smaller but more numerous cloves (10-40 per bulb), and extended storage life up to 12 months.
- Hardneck garlic offers bold flavors but shorter storage (4-6 months)
- Softneck garlic provides milder taste with superior keeping qualities
- Garlic Classification affects harvest windows and bulb formation patterns
Understanding proper harvesting techniques is vital for maximizing yields. Your Variety Selection determines harvest timing, storage potential, and culinary applications.
Preparing for Harvest

Proper preparation sets the stage for successful garlic harvest and prevents damage to your precious bulbs.
You’ll need to stop watering, let the soil dry, and gather the right tools before you start digging.
Stopping Water Supply
When you stop watering your garlic two weeks before harvest, you’re basically sending a clear message to the plant.
This watering stoppage triggers final bulb development while reducing moisture levels that could cause rot.
Drought management and irrigation control help concentrate flavors and prepare bulbs for proper curing, making your garlic harvest timing more predictable as garlic leaf yellowing accelerates naturally.
Understanding fall growing seasons is vital for maximizing your harvest.
Drying The Soil
When soil preparation begins, dry weather becomes your ally for ideal garlic harvesting conditions. Allow natural water evaporation to create ideal soil moisture levels for easier bulb extraction.
Monitor these soil drying indicators:
- Soil aeration improves as moisture reduces, preventing compaction during harvest
- Soil loosening occurs naturally through dehydration cycles, making digging effortless
- Garlic drying begins underground as surrounding soil moisture decreases appropriately
Proper soil preparation guarantees clean bulb removal without damage. Effective soil drying tools are essential for achieving the right moisture levels using soil drying techniques.
Tool Preparation
Now that your soil has dried, proper tool preparation sets you up for a clean harvest.
Having the right digging tools ready prevents bulb damage and makes the job efficient.
Essential garlic harvesting tools include:
- Garden forks or standing fork – Best soil loosener for gentle bulb extraction
- Sharp pruning shears – Clean cuts prevent stem damage
- Harvest trowel or garden spade – Precision digging around individual bulbs
- Bulb brush – Removes soil without damaging papery skins
A quality gardening fork works better than a shovel for loosening compacted soil around bulbs.
Keep your tools clean and sharp – dull equipment tears stems and bruises bulbs, reducing storage life.
Using the right garden fork types is vital for a successful harvest.
Harvesting Techniques
You’ll need proper technique to extract your garlic bulbs without damage or waste. Follow these essential steps to harvest healthy bulbs that cure and store well.
Loosening The Soil

After preparing your garlic harvesting tools, begin soil loosening around each bulb. Insert your garden fork 4-6 inches from the plant stem to avoid bulb damage. Work systematically around the plant’s perimeter, creating gentle loosening motions rather than aggressive digging.
Soil preparation becomes critical here – moist but not waterlogged conditions allow easier extraction.
| Tool Type | Digging Depth | Best Soil Conditions |
|---|---|---|
| Garden Fork | 4-6 inches | Slightly moist, well-drained |
| Hand Spade | 3-4 inches | Dry to moderately moist |
| Standing Fork | 6-8 inches | Any moisture level |
| Trowel | 2-3 inches | Dry, sandy soils |
Fork usage requires patience – scoop soil away gradually rather than forcing entry. Monitor soil moisture levels; overly wet conditions create muddy clumps that stick to bulbs, while bone-dry soil becomes rock-hard.
This methodical approach guarantees bulb protection during extraction, preventing the bruising that shortens storage life.
Lifting The Bulbs

Position your garden fork alongside each bulb, working the tool into the soil to create adequate space around the root zone.
Apply gentle upward pressure while supporting the bulb’s base during extraction to prevent structural damage.
Here are three essential techniques for successful bulb extraction:
- Fork Usage – Insert your tool 4-6 inches from the plant stem to avoid piercing the bulb during soil loosening
- Gentle Lifting – Support the bulb’s weight from underneath while maintaining steady upward motion during garlic harvesting
- Damage Prevention – Keep lifting motions slow and controlled to preserve the papery outer skin at harvest time
Avoiding Damage
Handle your garlic with care—gentle handling prevents costly damage.
Treat your garlic like gold—one careless move ruins months of hard work.
Use fork usage techniques for proper soil loosening around each bulb before lifting. Focus on bulb protection by avoiding sudden movements that compromise delicate papery skins. Stem preservation requires lifting from the base, never pulling leaves.
Master these garlic harvesting fundamentals to prevent bulb damage. By implementing ideal harvesting techniques you can minimize damage and improve overall quality.
| Damage Type | Prevention Method | Recovery Action |
|---|---|---|
| Bruised skin | Support bulb base during lifting | Use immediately for cooking |
| Broken stems | Avoid pulling by foliage | Trim cleanly above damage |
| Puncture wounds | Use blunt-tined forks only | Consume within days |
| Split bulbs | Loosen soil thoroughly first | Separate cloves for storage |
| Root damage | Dig wide around bulbs | Monitor for early spoilage |
Harvesting at The Right Depth

Perfect harvest depth requires precise digging techniques to protect your garlic bulbs. Loosen soil 6-8 inches deep using proper fork usage to avoid bulb damage.
Bulb extraction demands patience and the right approach:
- Insert your garden fork 4-6 inches from the bulb base
- Work systematically down each row for consistent soil depth
- Lift gently to maintain root protection during bulb lifting
- Check extraction depth matches your original planting depth
Garlic digging success depends on reaching the sweet spot where harvesting becomes effortless without compromising bulb integrity.
Curing and Drying
Once you’ve harvested your garlic bulbs, proper curing transforms them from fresh produce into long-lasting pantry staples.
This critical drying process removes excess moisture and develops the protective papery skins that’ll keep your garlic fresh for months.
Methods for Drying

Once you’ve harvested your garlic bulbs, proper drying methods guarantee long-term storage success.
Choose between bundling 8-10 stems and hanging them bulb-side down, or spreading individual bulbs on wooden drying racks for better air circulation.
| Drying Method | Setup Requirements | Curing Time |
|---|---|---|
| Bundle Hanging | Twine, dark space, good airflow | 3-4 weeks |
| Rack Drying | Wooden racks, ventilated area | 2-3 weeks |
| Fan-Assisted | Box fans, controlled environment | 2 weeks |
| Natural Air | Shaded outdoor space, dry weather | 4 weeks |
Both techniques require consistent moisture control throughout the garlic curing process for ideal results, ensuring long-term storage and a successful harvest with proper drying.
Ideal Curing Conditions

With proper drying methods in place, you’ll need specific environmental conditions for successful garlic curing.
Temperature control between 60-70°F prevents quality degradation, while humidity levels around 60-70% balance moisture without causing mold.
Air circulation removes excess moisture from bulb layers, making well-ventilated spaces non-negotiable for the garlic curing process.
Essential curing conditions include:
- Temperature control – Maintain 60-70°F consistently
- Humidity levels – Keep at 60-70% relative humidity
- Air circulation – Provide constant airflow without drafts
- Sunlight exposure – Use shaded or dark locations only
- Curing duration – Plan for proper environmental stability
Duration of Curing Process

Patience becomes your greatest ally during the curing process. Most garlic requires three to four weeks of curing time for superior results.
Environmental factors like humidity and temperature directly influence cure duration. Monitor your bulbs weekly to confirm proper drying methods are working effectively.
| Curing Duration | Environmental Conditions | Storage Prep Status |
|---|---|---|
| 2-3 weeks | Warm, dry climate | Ready for short-term use |
| 3-4 weeks | Moderate humidity | Maximum garlic shelflife |
| 4+ weeks | Cool, humid conditions | Maximum storage potential |
Checking for Curing Completion

After your garlic has cured for the proper duration, you need to confirm it’s ready for storage. Three reliable curing signs tell you when the garlic curing process is complete:
- Stem dryness test – Cut the stem near the bulb; no moisture should appear
- Papery skin examination – Outer layers feel crisp and crackle when touched
- Bulb firmness check – Squeeze gently; properly cured bulbs feel solid and tight
The dry skin develops natural skin wrinkles as moisture evaporates. Bulb firmness increases during cure duration as internal moisture reduces.
These garlic harvest curing process indicators guarantee your curing garlic won’t spoil in storage. Following these garlic storage tips guarantees curing completion before you store your harvest.
Storing Garlic Bulbs

Once you’ve properly cured your garlic, you’ll need to prepare it for long-term storage to maintain quality and prevent spoilage.
The right storage methods can keep your harvest fresh for months, turning your hard work into a reliable pantry staple, and this is key to maintaining the quality of your garlic.
Cleaning and Trimming
Clean your freshly harvested bulbs with careful attention to detail. Handle each bulb gently during the cleaning process.
Brush away dirt without removing protective papery skin layers. Trim roots cleanly and cut stems precisely for ideal storage preparation.
Storage Containers and Materials
Successfully choosing storage containers makes the difference between months of fresh garlic and disappointing spoilage.
Your bulbs need breathable homes that promote air circulation while protecting against moisture buildup.
Consider these excellent options:
- Paper Bags with ventilation holes punched throughout the sides
- Mesh Baskets that allow continuous airflow around each bulb
- Cool Boxes with slatted wooden construction for temperature control
- Dry Racks positioned away from kitchen heat and humidity
- Breathable Containers like woven baskets or perforated storage bins.
Avoid plastic bags completely—they trap moisture and create perfect conditions for mold growth.
Your storage containers should maintain consistent airflow while keeping bulbs separated enough to prevent contact rot from spreading between them.
For best results, using breathable storage solutions is key to extend the shelf life of garlic bulbs.
Maintaining Optimal Storage Conditions
Once you’ve chosen proper containers, maintaining ideal cool temperatures between 32-50°F prevents sprouting while humidity control at 60-70% stops dehydration.
Dark storage locations block light that triggers growth, and air circulation through mesh bags prevents moisture buildup.
These conditions work together to maximize garlic shelf life, keeping your harvest fresh for months through proper longterm storage practices.
To further extend the life of your garlic and other produce, understanding food preservation methods is vital for a successful harvest.
Monitoring for Spoilage
Throughout your garlic storage period, conduct regular bulb inspection to detect spoilage signs early.
Check stored bulbs monthly for:
- Soft spots or mushy texture indicating rot detection needs
- Moldy wrappers or dark patches compromising garlic shelf life
- Green sprouting or shriveled appearance showing deterioration
Remove compromised bulbs immediately to prevent spread.
Proper storage monitoring extends your garlic’s shelf life substantially.
Frequently Asked Questions (FAQs)
What is the best way to store fresh garlic bulbs?
Store freshly harvested garlic bulbs in a cool, dry, dark place with good air circulation. Use mesh bags or braided bundles, avoiding plastic containers that trap moisture and cause spoilage.
How do you know when garlic is ready to dig up?
You’ll know it’s harvest time when those lower leaves start whispering their goodbyes—turning brown while upper leaves stay green.
Check when 40-60% of leaves have browned and test-dig a bulb to confirm cloves are fully wrapped.
Can I leave garlic in the ground too long?
Yes, you can absolutely leave garlic in the ground too long. Overripe bulbs develop split skins and loose cloves, making them prone to rot and substantially reducing storage life.
How long do you let garlic dry after picking?
Coincidentally, garlic’s drying timeline mirrors nature’s own rhythm.
You’ll cure your harvested bulbs for 3-4 weeks in a well-ventilated, shaded area with good airflow to reduce moisture and extend storage life.
When to harvest garlic bulbs?
Harvest garlic when 40-60% of leaves turn brown while upper leaves stay green. Check bulb firmness and dig test bulbs to confirm cloves are fully formed with papery skin protection.
How should one take powder garlic?
Take powdered garlic with food to avoid stomach irritation. Start with 1/8 teaspoon daily, gradually increasing to 1/2 teaspoon. Mix into sauces, soups, or sprinkle on meals for easy consumption.
How do you Dry garlic bulbs after harvesting?
Brush soil off bulbs gently without washing them. Bundle 8-10 stems together and hang bulb-side down in a cool, dark, well-ventilated area for 3-4 weeks until fully cured.
How do you dig up garlic bulbs?
Don’t be the gardener who yanks like they’re starting a lawnmower.
Use a garden fork to gently loosen soil around bulbs, then lift carefully by the base to avoid damaging those precious underground treasures.
How do you plant garlic bulbs?
Plant garlic cloves pointed-end up, 2 inches deep and 4-6 inches apart in well-draining soil. Choose healthy, large cloves from quality bulbs, then plant in fall for summer harvest.
How do you know if a garlic bulb is ready for harvest?
Check your garlic when lower leaves start browning—harvest when 40-60% of leaves are brown while upper leaves stay green. Test-dig one bulb to confirm cloves are fully developed.
Conclusion
Despite seeming complicated, harvesting garlic bulbs properly becomes straightforward once you understand the timing signals.
You’ve learned to read leaf color changes, prepare soil conditions, and use gentle lifting techniques that preserve bulb integrity.
The curing process transforms fresh garlic into storage-ready bulbs through controlled drying environments.
Your attention to proper harvesting techniques, from soil preparation through final storage, determines whether your garlic lasts weeks or months in prime condition.
This careful approach ensures that the garlic bulbs are handled correctly from the start, making a significant difference in their longevity and quality, which is crucial for them to remain in good storage-ready state.