This site is supported by our readers. We may earn a commission, at no cost to you, if you purchase through links.

Your garden just blessed you with forty pounds of tomatoes, and they’re all ripening at once. That beautiful harvest could turn into a heartbreaking waste if you don’t act fast—but here’s the good news: preserving tomatoes from your garden is easier than you think.
You don’t need fancy equipment or a degree in food science to keep that summer flavor alive all year. Whether you’ve got twenty minutes or a free weekend, there’s a preservation method that fits your schedule and skill level.
Freezing takes almost no prep, canning creates pantry-ready staples, and dehydrating concentrates those sweet-tart flavors into chewy, pizza-worthy bites. The key is matching your harvest size and kitchen setup with the right technique.
Table Of Contents
- Key Takeaways
- Freezing Tomatoes From Your Garden
- Canning Tomatoes for Long-Term Storage
- Dehydrating Tomatoes at Home
- Making and Preserving Tomato Sauces
- Top 6 Tools for Preserving Tomatoes
- Frequently Asked Questions (FAQs)
- What is the best way to preserve fresh tomatoes?
- What can I do with an abundance of tomatoes from my garden?
- How to store tomatoes after picking from the garden?
- Is it better to freeze tomatoes whole or chopped?
- What is the best way to store tomatoes?
- How to preserve summer tomatoes at the end of the season?
- How can I extend my tomato harvest?
- How do you preserve cherry tomatoes?
- What is the best way to preserve homegrown tomatoes?
- Can you just peel tomatoes and freeze them?
- Conclusion
Key Takeaways
- Freezing is the fastest preservation method, requiring minimal prep—you can freeze tomatoes whole, halved, or chopped without blanching, and they’ll stay good for 8-12 months while maintaining flavor for sauces and soups.
- Water bath canning creates shelf-stable tomatoes that last 12-18 months, but you must add bottled lemon juice (1 tablespoon per pint) to achieve safe acidity levels and prevent botulism.
- Dehydrating concentrates tomato flavor into chewy, pizza-worthy bites that store for 6-12 months in airtight containers, and you can use a dehydrator, oven, or just sunshine to get the job done.
- Making tomato sauces before preserving gives you restaurant-quality flavor you can customize—freeze in portions for convenience or can with proper acidification for long-term pantry storage.
Freezing Tomatoes From Your Garden
Freezing is hands-down the easiest way to preserve your tomato harvest without spending hours over a hot stove. You don’t need fancy equipment or special skills—just some freezer space and a few minutes of prep time.
If you’re picking tomatoes straight from the garden, timing your harvest properly means you’ll get fruit at peak ripeness that freezes beautifully.
Let’s walk through the different freezing methods so you can pick what works best for your kitchen and cooking style.
Freezing Whole Tomatoes

Freezing whole tomatoes is hands-down the quickest method for freezer storage! You don’t even need to peel them first—just a quick wash and they’re ready.
Here’s your simple game plan:
- Wash ripe tomatoes thoroughly under cool water
- Pat dry and freeze on a flat tray until solid
- Transfer to airtight containers for freezer burn prevention
- Label with tomato variety selection and date (they’ll last 8-12 months)
The skins slip right off after thawing! For more details, you can read about the importance of airtight bags for freezing.
Freezing Halved Tomatoes

Want to save a bit of freezer space? Halved tomatoes pack more efficiently than whole ones.
Rinse your tomatoes, cut along the equator, and blot the cut surfaces lightly—this helps with freezer burn prevention. Freeze halves on a parchment-lined tray until solid, then transfer to heavy-duty freezer bags.
They’ll keep 8-12 months and work beautifully in frozen tomato recipes like sauces or soups! For more details on the best freezing methods and guidelines, consult expert resources.
Freezing Chopped Tomatoes

Chopped pieces are your best bet for quick weeknight meals! Wash, pat dry, and chop tomatoes into uniform chunks—then spread on a lined tray for freezing.
Once solid, bag them up with minimal air exposure for freezer burn prevention. Label with dates, freeze flat to save space, and you’ll lock in frozen tomato quality for 8-12 months—perfect for sauces, soups, and chili!
Blanching Tomatoes Before Freezing

Before freezing, try blanching—it’s the secret to vibrant color and firm texture! Score an X on each tomato bottom, dip in boiling water for 30-60 seconds, then plunge into ice water.
This quick heat treatment inactivates enzymes that cause mushiness during freezer storage. Slip off the skins while warm, and you’ll enjoy restaurant-quality frozen tomatoes in soups and sauces for up to 12 months!
Best Containers for Frozen Tomatoes

The right vessel makes all the difference in protecting your harvest! Rigid plastic freezer containers with airtight seals guard against moisture loss, while glass jars resist staining.
Freezer bags work beautifully for chopped tomatoes—just squeeze out excess air. Square containers optimize chest freezer space, and vacuum-sealed options prevent freezer burn. Choose materials labeled freezer-grade for frozen storage that lasts!
How Long Frozen Tomatoes Last

Your frozen tomatoes keep their best quality for 8 to 12 months at 0°F or lower—talk about smart food preservation!
Here’s what affects your frozen tomato shelf life:
- Temperature consistency prevents texture breakdown
- Proper packaging stops tomato freezer burn cold
- Labeling dates ensures rotation for frozen tomato quality
- Vacuum sealing maximizes freezing tomato safety
- Minimal air exposure preserves flavor in food storage
They’re still safe beyond a year, but expect mushier texture!
Thawing and Using Frozen Tomatoes

The best thawing method? Pop those frozen tomatoes in the fridge overnight for peak texture and flavor enhancement.
Need speed? Run cool water over them for 10 minutes! Don’t worry about slight mushiness—ice crystals soften cell walls, making them perfect for soul-warming sauces and soups.
Safe thawing in the fridge prevents bacterial growth, and those loosened peels slip right off for easy meal preparation!
Canning Tomatoes for Long-Term Storage

Canning tomatoes is like putting summer in a jar—shelf-stable, full of flavor, and ready whenever you need them.
Canning tomatoes is like putting summer in a jar—shelf-stable, full of flavor, and ready whenever you need them
The process requires a bit more attention than freezing, but your reward is tomatoes that’ll last for years without taking up freezer space. Let’s walk through the essential steps to safely can your harvest from start to finish.
Preparing and Sterilizing Canning Jars
Before you start canning tomatoes, you’ll want your jars clean and ready to go. Here’s what matters for safe food preservation:
- Inspect jars for cracks or chips that could prevent a good seal
- Check lids for intact sealing compound—never reuse damaged ones
- Keep jars hot in warm water or dishwasher until filling time
- Skip pre-sterilization if your canning process exceeds 10 minutes
- Wipe rims clean before applying lids for proper headspace control
Adding Lemon Juice for Safe Acidity
When canning tomatoes, adding lemon juice isn’t optional—it’s your safety net against botulism. You’ll need 1 tablespoon of bottled lemon juice per pint to achieve safe acidity levels below pH 4.6.
Bottled lemon juice benefits include consistent citric acid content, while fresh lemons vary. This simple step in food preservation protects your family without compromising flavor in your canning techniques.
Canning Whole Tomatoes
Whole tomatoes pack beautifully into your prepared jars without added liquid—a raw pack method that keeps things simple. Fill each jar snugly, leaving that vital half-inch headspace.
Your acidification methods from earlier still apply here. Processing quart jars takes about 45 minutes in your boiling water bath, though you’ll adjust for altitude.
This home canning technique yields 15-21 quarts per bushel.
Canning Halved Tomatoes
Halving tomatoes before canning speeds up your tomato preparation while creating adaptable results. Pack those halves cut-side down in hot, sterilized jars—jar sterilization prevents spoilage down the road.
Acidification methods remain non-negotiable: add 2 tablespoons of lemon juice per quart for canning safety. Leave about an inch of headspace, then cover with boiling tomato juice. This home canning approach works beautifully for preserving tomatoes without pressure canning equipment.
Water Bath Canning Process and Timing
Once you’ve got your jars filled, it’s time for the water bath canning magic. Lower them into boiling water that covers the lids by 1-2 inches.
Processing times matter for canning safety:
- Pint jars need 35 minutes of active boiling
- Quart jars require 45 minutes
- Higher elevations demand longer processing times
Keep that water rolling throughout—no shortcuts here.
Proper Headspace and Sealing
After processing, headspace guidelines and sealing techniques become your safety net. You’ll need 1/2 inch between food and lid—too little causes boil-over, too much prevents proper vacuum formation.
Wipe jar rims spotless before applying new lids. Tighten bands fingertip-tight, not death-grip tight. Here’s your quick reference:
| Issue | Cause | Fix |
|---|---|---|
| Boil-over | Too little headspace | Use 1/2 inch gap |
| Failed seal | Dirty rim or overtight band | Wipe clean; tighten gently |
| Broken seal | Too much headspace | Measure carefully |
| Lid pops | Insufficient vacuum | Reprocess within 24 hours |
That concave lid center? That’s your victory sign for home canning success.
Shelf Life of Canned Tomatoes
Once sealed, your canned tomatoes become pantry gold. Properly processed jars stay safe for 12 to 18 months in a cool, dark spot—though quality peaks in the first year.
Check lids before using: if the center’s still concave and pops when pressed, you’re good to go. Any bulging, rust, or off-smell? Toss it. Food safety isn’t negotiable.
Dehydrating Tomatoes at Home

Dehydrating tomatoes is one of the easiest ways to preserve your garden harvest without taking up freezer space. The process concentrates all that sweet, tangy flavor into chewy, shelf-stable gems you can toss into pasta, soups, or salads all year long.
Whether you’ve got a dehydrator, an oven, or just a sunny spot, here’s how to turn those juicy tomatoes into something special.
Slicing Tomatoes for Even Drying
Think of each slice as its own little piece of sunshine—uniform thickness is the secret to even drying. Aim for 8 to 10 mm rounds using a sharp knife or mandoline, then arrange them in a single layer with space between.
For cherry tomatoes, just halve or quarter them. This simple prep step ensures every slice dries evenly, giving you perfectly dehydrated tomatoes every time.
Using a Food Dehydrator
A food dehydrator makes tomato preservation techniques almost foolproof. Here’s how to nail it every time:
- Set temperature to 135°F (57°C) for ideal dehydrating tomatoes
- Arrange slices on trays without overlapping for air circulation
- Rotate trays every 2-3 hours for uniform drying
- Check after 6-8 hours—they should feel leathery
- Cool completely before storing to guarantee food safety
Most units consume 300-600 watts, balancing energy efficiency with consistent results!
Oven Drying Method
No fancy equipment? Your oven works beautifully for dehydrating tomatoes! Set the oven temperature between 120-150°F to gently remove moisture while preserving flavor.
Arrange tomato slices on wire racks for even air contact, then check drying times every hour after the initial two—expect 4-8 hours total. You’ll know dehydration levels are perfect when they’re leathery but pliable, ready for storage!
Sun Drying Tomatoes
Nothing beats the old-fashioned charm of sun drying tomatoes—pure sunshine concentrated into sweet, chewy bites! Proper Tomato Prep means halving firm ripe tomatoes and arranging them on breathable mesh screens in full sun (80-95°F works best).
- Salting Tomatoes lightly draws moisture and prevents mold during the 2-5 day process
- Bring trays indoors for Night Care to avoid dew rehydrating your progress
- Drying Conditions require 6-8 hours of daily sunshine with low humidity
- Quality Cues include deep amber color and leathery texture when ready
- Turn pieces occasionally for uniform dehydrating and gorgeous sun dried tomatoes
Storing Dehydrated Tomatoes
Your hard work dehydrating tomatoes pays off only if you store them right. Once fully cooled, pack those sun dried tomatoes into airtight glass jars or vacuum-sealed bags to lock in flavor. Store in a cool dark pantry (50-70°F) away from humidity—moisture is your enemy here.
Properly stored dehydrated tomatoes stay fantastic for 6-12 months, extending to 24 months in the freezer. The storage method used can affect the shelf life of the dehydrated tomatoes.
| Storage Method | Shelf Life |
|---|---|
| Pantry (airtight jars) | 6-12 months |
| Freezer (vacuum sealed) | 12-24 months |
| With oxygen absorbers | Up to 12 months |
| Mylar bags (cool dark) | 8-12 months |
| Oil-packed (refrigerated) | 2-3 weeks |
Rehydrating Dried Tomatoes for Recipes
Bringing dried tomatoes back to life is easier than you think! Simply soak them in warm water, broth, or wine for 20-40 minutes—watch their texture plump up beautifully. One cup of sun dried tomatoes yields about 1½ cups rehydrated, perfect for recipe substitution.
Save that soaking liquid! Reducing it concentrates flavor for soul-warming sauces, and rehydrating with broth adds serious depth.
Making and Preserving Tomato Sauces

Turning your garden tomatoes into sauces is one of the most rewarding ways to preserve your harvest. You’ll get restaurant-quality flavor that beats anything from the store, and you can adjust seasonings to match your family’s tastes.
Let’s explore different sauce recipes and the best methods to preserve them for months of delicious meals.
Simple Homemade Tomato Sauce
Making a classic tomato sauce starts with simmering three to five pounds of ripe tomatoes with onion and garlic until they break down into a silky base. Add olive oil for depth, a pinch of salt to balance acid, and finish with fresh basil for bright flavor.
This cooking technique creates the perfect foundation for pasta, pizza, or canning later.
Roasted Tomato Sauce
Roasting transforms your sauce from simple to soul-warming! Toss halved tomatoes with olive oil and roast at 400°F for 30 to 90 minutes—the caramelization process creates deep, smoky flavor profiles you can’t get from stovetop simmering.
Blend to your preferred sauce texture, then preserve by canning or freezing tomatoes in portions for later use in tomato recipes.
Concentrated Tomato Paste
Want an even richer flavor enhancement? Concentrated tomato paste is your secret weapon!
Simmer fresh sauce down until you’ve reduced it by half—this concentrates the tomato solids to create an intense base for canning tomatoes or dehydrating food into tomato powder. Store your homemade paste in jars with proper headspace, and you’ll have deep, savory flavor ready whenever you need it!
Homemade Tomato Ketchup
You’ve mastered tomato paste—now let’s make tomato ketchup! This homemade condiment beats store-bought every time. Roma tomatoes work best for their thick pulp and rich flavor profiles.
Simmer them with vinegar, sugar, and your favorite spice blends (think garlic, onion, paprika) until you’ve got that perfect balance of sweetness and acidity levels. Cool it down, bottle it up, and refrigerate for about four weeks of fresh flavor!
Canning Tomato Sauces Safely
Canning tomato sauce requires proper acid testing and jar sterilization to keep your hard work safe. Add one to two tablespoons of bottled lemon juice per quart jar—this simple step ensures safe acidity levels for water bath canning.
Follow tested recipes exactly, process jars for the recommended time, and always check those seals before storing. Your homemade sauce deserves the best food preservation techniques!
Freezing Tomato Sauce in Portions
Freezing tomato sauce in single-serving portions gives you soul-warming meals on busy nights. Cool your sauce completely, then spoon it into freezer bags or containers—leave a bit of headspace for expansion.
Flat freezing speeds thawing and saves space. Label each portion with the date, and you’ll have garden-fresh flavor for up to twelve months.
Thaw overnight in the fridge, then reheat gently on the stove.
Top 6 Tools for Preserving Tomatoes
You don’t need fancy gadgets to preserve tomatoes, but having the right tools makes everything easier and faster. From reliable containers to equipment that takes care of the heavy lifting, a few smart investments can transform your preservation process.
Here are six must-have tools that’ll help you freeze, can, and dehydrate tomatoes like a pro.
1. Reditainer Freezeable Deli Containers
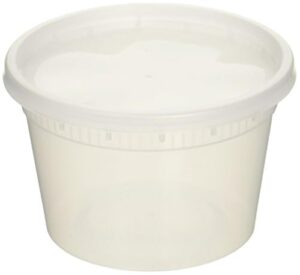
When you’re stashing away batches of chopped or sauced tomatoes, you need containers that won’t crack at freezer temps. Reditainer’s heavy-duty polypropylene deli containers handle minus 40 degrees without getting brittle, making them perfect for long-term storage.
They’re microwave and dishwasher safe, so reheating your garden bounty is a breeze! The tight-sealing lids prevent freezer burn, and their stackable design maximizes space. At around 32 ounces each, they’re ideal for portioning soups and sauces into ready-to-use servings.
| Best For | Home cooks who freeze homemade soups, sauces, and meal-prepped portions and want durable containers that go from freezer to microwave without hassle. |
|---|---|
| Material | Polypropylene plastic |
| Dishwasher Safe | Yes |
| Weight | 9.6 ounces |
| Color | Translucent |
| Brand | Reditainer |
| Reusable | Yes |
| Additional Features |
|
- Handles extreme cold down to -40°F without cracking, perfect for long-term freezer storage
- Microwave and dishwasher safe for easy reheating and cleanup
- Tight-sealing lids prevent freezer burn and keep food fresh
- Smaller capacity than some users expect (32 oz isn’t huge for family portions)
- Sides can feel flimsy when containers are completely full
- Lids can be tricky to snap on securely
2. Gefu Stainless Steel Food Mill
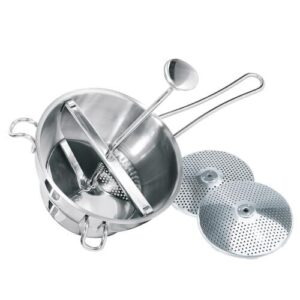
Turning bushels of ripe tomatoes into silky-smooth sauce gets a whole lot easier with the Gefu stainless steel food mill. Its two interchangeable discs—2 mm and 3 mm perforations—let you dial in exactly the texture you want, from baby-food smoothness to rustic marinara.
The built-in scraper pushes every bit of tomato through, leaving seeds and skins behind. With a generous 2-liter capacity and dishwasher-safe construction, this mill handles family-sized batches without breaking a sweat!
| Best For | Home canners and sauce makers who process large batches of tomatoes, apples, or berries and want professional results without the mess of seeds and skins. |
|---|---|
| Material | Stainless steel |
| Dishwasher Safe | Yes |
| Weight | 1.03 lbs |
| Color | Silver |
| Brand | GEFU |
| Reusable | Yes |
| Additional Features |
|
- Two interchangeable disks (2mm and 3mm) let you control texture from ultra-smooth to chunky
- Dishwasher-safe stainless steel construction makes cleanup easy after big canning sessions
- 2-liter capacity handles family-sized batches without constant emptying
- Handle can get uncomfortable during extended use, especially if you have arthritis or weaker grip strength
- The two disk sizes are pretty similar—many users wish there was a bigger difference between them
- No English instructions included, and replacement disks are hard to find in the US
3. LURCH Heavy Duty Stainless Steel Masher
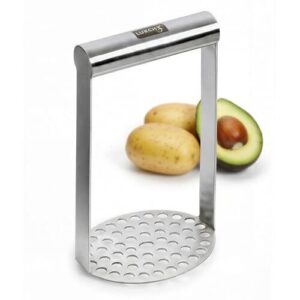
When you’re breaking down soft tomatoes for sauce or paste, the LURCH masher makes quick work of it. Its wide stainless steel base covers more surface area than most mashers, so you’ll spend less time smooshing and more time bottling.
The horizontal handle keeps your wrist in a natural position—no awkward angles when you’re working through a big batch! At 10.9 ounces and fully dishwasher safe, it’s built in Germany to last through years of harvest seasons.
| Best For | Home canners and gardeners who process large batches of tomatoes and soft vegetables regularly. |
|---|---|
| Material | Stainless steel |
| Dishwasher Safe | Yes |
| Weight | 10.9 ounces |
| Color | Gray |
| Brand | LURCH |
| Reusable | Yes |
| Additional Features |
|
- Wide stainless steel base covers more surface area so you can mash faster
- Horizontal handle keeps your wrist comfortable during extended use
- Dishwasher safe and built to last without rusting or bending
- Some units arrive dented due to poor packaging during shipping
- Size may not fit well in very small or very large pots
- Handle length might feel awkward depending on your hand size and grip preference
4. COSORI Food Dehydrator Machine
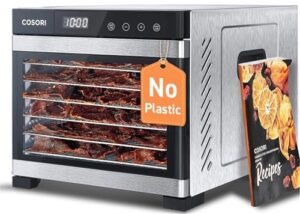
For drying sliced tomatoes into leathery, flavor-packed gems, the COSORI dehydrator is a breakthrough. You get six stainless steel trays with 6.5 square feet of drying space—enough for a serious harvest haul.
Set the digital panel anywhere from 95 to 165°F, and the rear-mounted fan circulates air evenly so everything dries at the same pace. The automatic shutoff and overheat protection mean you can walk away without worry, and it even comes with 50 recipes to spark ideas.
| Best For | Home cooks who want to preserve garden harvests or make bulk batches of healthy snacks like fruit leather, jerky, and dried herbs. |
|---|---|
| Material | Stainless steel |
| Dishwasher Safe | No |
| Weight | 18.1 pounds |
| Color | Silver |
| Brand | CP267-FD |
| Reusable | Yes |
| Additional Features |
|
- 6.5 square feet of drying space across six trays handles large batches in one go
- Precise digital temperature control (95–165°F) with even airflow means consistent results
- Auto shutoff and overheat protection let you run it safely overnight or while you’re out
- At 18 pounds and over a foot tall, it takes up serious counter or storage space
- Getting the hang of timing and temps for different foods takes some trial and error
- The trays need regular cleaning to prevent buildup and keep everything food-safe
5. Update International Steam Table Pan
After drying, you’ll need somewhere to cool and portion your harvest—that’s where the Update International Steam Table Pan shines. This full-size 20 by 12¾-inch pan is built from 20-gauge stainless steel with reinforced corners and a rolled edge for safe handling.
Use it to collect batches of dried tomatoes straight from the dehydrator, then transfer them to jars. The rounded corners make cleanup a breeze, and the pan nests neatly when you’re done.
| Best For | Home canners and gardeners who need a durable, easy-to-clean workspace for cooling and portioning dehydrated foods before storage. |
|---|---|
| Material | Stainless steel |
| Dishwasher Safe | Yes |
| Weight | 2.45 pounds |
| Color | Silver |
| Brand | Update International |
| Reusable | Yes |
| Additional Features |
|
- Reinforced corners and anti-jam design make it easy to grab, move, and clean without wrestling with stuck pans
- 22-gauge stainless steel construction holds up to heavy use and frequent washing
- Rolled edges keep you safe when handling hot or heavy batches
- Only comes in one size, so you can’t scale down for smaller projects
- No non-stick coating means dried tomato bits might stick and need extra scrubbing
- Doesn’t include a lid, so you’ll need to cover it separately if storing food temporarily
6. Amazon Basics Freezer Bags

Once your tomatoes are cooled and portioned, you’ll need reliable storage—and that’s where Amazon Basics Freezer Bags come through. These quart-size bags feature a stand-and-fill base that keeps them upright while you pour in chopped tomatoes or sauce, plus a double zipper seal to lock out freezer burn.
They’re BPA free and hold about a quart each, perfect for single-meal portions. Label each bag with the date and variety, then stack them flat in your freezer for up to twelve months of garden-fresh flavor.
| Best For | Home cooks who freeze fresh tomatoes in meal-sized portions and want an affordable, no-fuss storage solution that keeps freezer burn at bay. |
|---|---|
| Material | Plastic |
| Dishwasher Safe | No |
| Weight | 1.5 pounds |
| Color | Clear |
| Brand | C004391S |
| Reusable | Yes |
| Additional Features |
|
- Stand-and-fill base makes it easy to pour in sauce or chopped tomatoes without spilling
- Double zipper seal locks tight to prevent leaks and freezer burn over months of storage
- Clear plastic lets you see what’s inside at a glance, and the bags stack flat to save freezer space
- Thinner plastic than premium brands, so sharp tomato stems or bones from other foods might puncture them
- Limited to one-quart portions, which may be too small if you’re freezing for larger families
- Quality can be hit-or-miss compared to name-brand freezer bags
Frequently Asked Questions (FAQs)
What is the best way to preserve fresh tomatoes?
The best way depends on your needs. Freezing is quickest and easiest for everyday cooking. Canning provides shelf-stable tomatoes for years. Dehydrating concentrates flavor and saves space beautifully.
What can I do with an abundance of tomatoes from my garden?
You’ve got options! Freeze them whole or chopped, can them for shelf stability, dehydrate into flavor bombs, or simmer into sauces and pastes. Each method locks in that garden-fresh taste.
How to store tomatoes after picking from the garden?
Fresh tomatoes taste best when left at room temperature—yet that’s exactly what shortens their shelf life!
For long-term storage, you’ll want to freeze, can, or dehydrate them using proper techniques.
Is it better to freeze tomatoes whole or chopped?
It depends on how you’ll use them! Whole tomatoes save prep time now but need thawing for recipes. Chopped pieces are ready to toss straight into sauces and soups.
What is the best way to store tomatoes?
The best way to store fresh tomatoes depends on when you’ll use them.
Keep them at room temperature for a few days, refrigerate ripe ones, or freeze, can, and dehydrate for long-term preservation.
How to preserve summer tomatoes at the end of the season?
Some gardeners think late-season tomatoes lose flavor, but they’re actually bursting with sweetness! Freeze whole, can in jars with lemon juice, or dehydrate slices at 135°F to capture summer’s best.
How can I extend my tomato harvest?
You can extend your harvest by preserving tomatoes through freezing, canning, or dehydrating.
These methods lock in peak-season flavor, so you’ll enjoy your garden’s bounty for months after the vines stop producing.
How do you preserve cherry tomatoes?
Cherry tomatoes freeze like a dream! Just toss them whole onto a tray, freeze until solid, then transfer to heavy-duty bags. They’ll keep beautifully for up to 12 months.
What is the best way to preserve homegrown tomatoes?
The best way depends on how you’ll use them. Freezing is quickest for sauces and soups, canning creates shelf-stable pantry staples, and dehydrating concentrates flavor for long-term storage.
Can you just peel tomatoes and freeze them?
Peeling tomatoes before freezing is hands-down one of the easiest methods you’ll ever try. Peeled whole tomatoes freeze beautifully and thaw into smooth, ready-to-use ingredients for sauces and soups.
Conclusion
Last August, my neighbor Sarah turned sixty pounds of Roma tomatoes into thirty jars of sauce, two gallon bags of frozen halves, and a mason jar of sun-dried slices—all in one weekend. She’s still pulling from that stash in March.
Preserving tomatoes from your garden isn’t about flawlessness; it’s about choosing your method and getting started. Pick one technique today, and you’ll taste summer long after the first frost hits.