This site is supported by our readers. We may earn a commission, at no cost to you, if you purchase through links.

Most grocery store tomatoes travel over 1,500 miles before reaching your plate—picked green, gassed with ethylene, and bred for durability over flavor. When you grow your own vegetables from seed, you break free from this system entirely.
You control what touches your soil, skip the pesticides, and harvest varieties banned from commercial production because they bruise too easily or don’t ship well. Starting from seed costs pennies per plant compared to nursery transplants, and you’re not limited to the six sad varieties available at your local garden center.
The process demands attention to temperature, moisture, and timing, but the payoff is total independence from industrial agriculture and vegetables that actually taste like something.
Table Of Contents
- Key Takeaways
- Choosing and Preparing Vegetable Seeds
- Starting Seeds Indoors and Outdoors
- Essential Seedling Care and Garden Preparation
- Top 5 Products for Seed Starting Success
- Frequently Asked Questions (FAQs)
- What’s the easiest vegetable to grow from seed?
- What is the best month to start a vegetable garden?
- Can I grow vegetables from seeds?
- What is the easiest vegetable to grow from seeds?
- Can I just throw seeds on the ground?
- Is it cheaper to grow your own vegetables?
- Can you grow vegetables from seeds?
- What month should I start my vegetable seeds?
- What is the easiest vegetable to grow from seed?
- Can you grow vegetables from their own seeds?
- Conclusion
Key Takeaways
- Growing vegetables from seed gives you access to heirloom varieties bred for flavor that grocery stores won’t stock because they bruise easily or don’t ship well, costing pennies per plant compared to nursery transplants.
- Success depends on matching seeds to your climate zone, testing germination rates before planting, and controlling temperature (65-75°F for most vegetables) and moisture levels throughout the seedling stage.
- Starting seeds indoors 6-8 weeks before your last frost date and hardening off seedlings gradually over 7-14 days prevents transplant shock and builds stronger plants than direct outdoor sowing for warm-season crops.
- Open-pollinated and heirloom seeds let you save seeds season after season without buying new packets, breaking dependence on commercial seed suppliers while maintaining 70-80% germination rates with proper storage.
Choosing and Preparing Vegetable Seeds
Growing your own food starts with picking the right seeds for your garden. You can’t just grab any packet off the shelf and expect success.
Let’s walk through the essentials you need to know before you plant.
Selecting Seeds Suited to Your Climate
Your climate is the boss—not the seed catalog. Choose vegetable seeds with proven temperature tolerance and geographic suitability for your zone. Cool season crops like lettuce thrive in spring chill; warm season tomatoes demand summer heat. Check for climate adaptation traits—drought resistance, frost tolerance, weather resilience.
Gardening for beginners starts here: match seed regionalism to your actual conditions, not wishful thinking. Understanding the importance of methodological rigor is vital for making informed decisions.
Choosing Open-Pollinated and Organic Seeds
Break free from corporate seed monopolies. Open-pollinated and heirloom varieties give you true seed sovereignty—you can save seeds season after season. Organic farming standards mean no synthetic pesticides muddying your soil.
Open-pollinated and heirloom seeds break corporate control, letting you save seeds season after season without synthetic pesticides
Look for non-GMO options with clear certification. These seeds support sustainable gardening while delivering plants bred for flavor and resilience, not shipping durability.
Your garden, your rules—choose seeds that respect that.
Checking Germination Rates
You’ve chosen quality seeds—now test them before you commit. Germination rates tell you seed viability: place 10 seeds on a damp paper towel, keep them warm (65–75°F soil temperature), and count how many sprout in 7–10 days. Seven or more? You’re golden. Fewer means you’ll need extra seeds when starting seeds indoors.
This simple germination test saves frustration and guarantees strong seedling care for your vegetable gardening adventure.
Storing and Preparing Seeds for Planting
Store your seeds right and they’ll reward you with vigor. Keep them cool (32–41°F), dry (8–12% humidity), and sealed with silica gel in glass containers. Label everything.
Before seed starting, test viability with germination tests. Hard-coated seeds? Soak 2–24 hours. A quick hydrogen peroxide dip manages seed sterilization.
Proper moisture control and seed storage tips guarantee strong seedlings when starting seeds indoors.
Starting Seeds Indoors and Outdoors
Starting seeds is where your garden breaks free from the store-bought routine. You’ll decide whether to launch your seedlings indoors under controlled conditions or sow directly into outdoor beds where nature takes the wheel.
Here’s how to set up both approaches so your seeds germinate strong and your transplants thrive.
When to Start Seeds Indoors Vs. Outdoors

Timing your seed starting puts you in command of your harvest. Start warm-season crops indoors 6 to 8 weeks before your last frost date, then transplant after frost danger passes—mid- to late April in zones like Ashburn, VA. Cool-season vegetables tolerate earlier outdoor sowing as soon as soil can be worked.
Here’s your quick reference:
- Indoor transplant: Tomatoes, peppers, eggplants need 6–8 weeks indoors
- Indoor sowing: Cool crops start 4–6 weeks early for stronger stands
- Outdoor sowing: Peas, radishes, lettuce thrive when direct-seeded outside
Preparing Seed Trays and Pots

Clean containers give you control from day one. Seed tray sterilization with a 1:10 bleach solution eliminates pathogens before indoor sowing.
Choose trays with drainage hole importance—excess water escapes, roots breathe. Biodegradable pots cut transplant shock.
Seedling tray spacing matters: give each seed room to develop. Fill your seed trays with moistened seed-starting mix, label clearly, and you’re set for starting seeds indoors.
Soil Mix and Sterilization Tips

A sterile seed starting mix gives you the upper hand against damping-off and rot. Build your own with a soilless mix of peat or coir, perlite, and vermiculite at a 2:1:1 ratio for solid soil structure and moisture management.
For contamination control, sterilize reused media with dry heat at 180–200°F for 30 minutes or steam it thoroughly. Cool completely before sowing. Your soil preparation determines your seedlings’ future—don’t skip this step.
Proven seed starting mix strategies:
- Use sterile seedstarting mix to reduce pathogen load from day one
- Avoid garden soil—it brings inconsistent texture and hidden risks
- Sterilize with dry heat or steam; skip chemical methods at home
- Label trays and keep tools clean for solid soil management
- Bottom-water to maintain even moisture without surface stagnation
Optimal Temperature and Moisture for Germination

Germination temperature and soil moisture determine your seed-starting success—no guesswork needed. Most vegetables germinate at 65–75°F, while tomatoes and peppers prefer 70–80°F.
Keep your seed-starting mix consistently moist but never waterlogged to maintain ideal germination rates. Use bottom-watering and humidity control to prevent damping-off.
Track soil temperature with a thermometer and adjust conditions for reliable seed germination every time.
Light and Heat Requirements for Seedlings

Your seedlings need light—lots of it—to grow strong and avoid stretching. Position grow lights 2–4 inches above the canopy and provide 12–16 hours daily using full-spectrum LED grow lights.
Maintain seedling temperature at 65–75°F day and night. Heat mats keep soil warming consistent at the root zone when starting seeds indoors.
Deep green, compact growth signals you’re dialing in the right conditions.
Watering Techniques for Healthy Seedlings

Water from below, not above—that’s your secret weapon. Bottom watering or capillary mats deliver moisture directly to roots while keeping foliage dry and disease-free.
Keep soil moisture consistent at 60–70% capacity; you’ll spot proper seedling hydration when pale green growth stays firm without wilting. Check daily with your fingertip—soil surface can dry slightly between waterings without stressing root development.
Essential Seedling Care and Garden Preparation

Your seedlings have sprouted—now comes the real work. Weak or leggy plants won’t survive the garden, and unprepared soil means stunted growth and disappointing harvests.
Here’s how to give your seedlings the care they need and get your garden beds ready for transplanting success.
Thinning and Repotting Seedlings
Crowded seedlings compete like prisoners for freedom—light, nutrients, water. You’ll need to thin them soon after germination, snipping weak ones at soil level with clean scissors to avoid disturbing roots.
When 2-3 true leaves appear and roots peek through drainage holes, repot into slightly larger containers. Handle gently during transplanting to minimize transplant shock and support strong root development through proper seedling spacing.
Fertilizing and Promoting Strong Growth
Once your seedlings stand strong, feed them freedom through nutrient balance. Wait until true leaves emerge, then apply diluted fertilizer at quarter-strength—think compost tea or balanced NPK—to avoid burning tender roots.
Foliar feeding delivers a rapid micronutrient supply when soil amendments fall short. Monitor growth weekly: vibrant green leaves and thick stems signal you’re nailing fertilizer application.
Organic gardening methods and smart soil management give you total control over plant care.
Preventing Common Seedling Problems
Even with perfect feeding, seedling shock and fungal diseases can strike fast. Tackle threats head-on through vigilant plant care during seed starting:
- Keep soil barely moist—waterlogged soil breeds damping off and root rot within 2–4 weeks
- Position lights 2–4 inches above canopy to prevent weak, stretched stems
- Run a small fan to boost air circulation and block fungal diseases
- Bottom-water to avoid wet leaves and pathogens
- Maintain 65–75°F temperatures for sturdy growth before transplanting
Hardening Off and Transplanting Seedlings
Once your seedlings are tough enough to resist disease, they’re ready to break free from indoor confinement.
Hardening off through gradual outdoor exposure over 7–14 days prevents transplant shock and builds seedling acclimation. Start with 1–2 hours daily, protecting them from harsh wind and midday sun.
Check soil temperature—above 50–60°F signals proper transplant timing for seed starting success.
Preparing Garden Beds and Amending Soil
Before you plunge seeds into the ground, take control of your vegetable garden with proper soil preparation. Soil testing reveals pH levels—aim for 6.0–7.0—and identifies nutrient gaps you can fix head-on.
Build garden beds that perform:
- Work 2–4 inches of compost into the top 6–8 inches for better structure
- Adjust pH using lime or sulfur based on test results
- Shape raised beds 3–4 feet wide for easy access during seed starting
Installing Supports and Mulching
With climbing varieties in your vegetable garden, trellis systems and crop props must go in at planting time—driving stakes later damages roots. Position 4–8 foot frameworks for mature crop height, then lay 2–3 inches of mulch materials like straw around transplants for soil stabilization and moisture control.
Pair mulch with drip irrigation management under the surface to cut watering by 20–50 percent while keeping leaves dry.
Top 5 Products for Seed Starting Success
You don’t need fancy equipment to start seeds successfully. The right tools make germination faster and seedling growth stronger.
Here are five products that give you control over temperature, light, and seed quality from day one.
1. Sow Right Heirloom Tomato Seeds

Starting your vegetable garden with Sow Right Heirloom Tomato Seeds gives you control over your food supply from day one. This five-variety pack includes Cherokee Purple, Beefsteak, Large Red Cherry, Rutgers, and Roma—each offering distinct tomato nutrition profiles and fruit production potential.
These open-pollinated, non-GMO seeds maintain strong seed viability, usually 70–90% germination under proper conditions. You’ll get clear seed starting instructions for each variety, helping your seedlings thrive through transplanting.
Perfect for garden planning, these heirloom varieties deliver authentic flavor your grocery store can’t match.
| Best For | Home gardeners who want to grow flavorful heirloom tomatoes from seed and value non-GMO, open-pollinated varieties with reliable germination rates. |
|---|---|
| Brand | Sow Right Seeds |
| Material | GMO Free, Heirloom |
| Weight | 0.63 Ounces |
| Indoor/Outdoor Use | Indoor/Outdoor |
| Unit Count | 1 Count |
| Primary Use | Growing tomatoes |
| Additional Features |
|
- Five distinct heirloom varieties in one pack give you options for slicing, salads, sauces, and snacking
- High germination rates (70–90%) and included instructions make seed starting more predictable
- Open-pollinated seeds let you save seeds from your harvest for future seasons
- Needs full sun and consistent watering, which requires more attention than some vegetables
- Individual seed packets may not label varieties clearly once you’ve started multiple types
- At least one customer reported poor fruit production despite following care instructions
2. Sweet Bell Pepper Seeds Collection
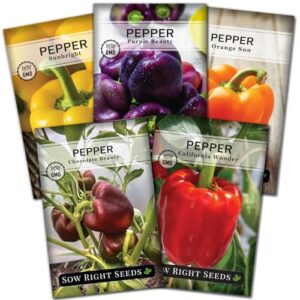
Your Sweet Bell Pepper Seeds Collection breaks the supermarket cycle with five colorful varieties—California Wonder, Sunbright, Orange Sun, Purple Beauty, and Chocolate Beauty. Each packet contains about 50 non-GMO heirloom veggie seeds ready for seed starting indoors.
You’ll want soil temperature between 70–85°F for germination, which takes 7–14 days with proper seed storage and moisture. These open-pollinated pepper varieties let you save seeds season after season.
Start seedlings 8–10 weeks before transplanting outdoors, and you’ll harvest peppers that actually taste like something.
| Best For | Home gardeners who want to grow multiple colorful bell pepper varieties from heirloom seeds and save seeds for future seasons. |
|---|---|
| Brand | Sow Right Seeds |
| Material | GMO Free, Heirloom |
| Weight | 0.63 ounces |
| Indoor/Outdoor Use | Indoor/Outdoor |
| Unit Count | 1 Count |
| Primary Use | Growing bell peppers |
| Additional Features |
|
- Five different pepper varieties in one pack give you a rainbow of colors and let you test what grows best in your garden
- Non-GMO heirloom seeds mean you can save seeds from your harvest and replant them next year
- Large packets with about 50 seeds each give you plenty of chances for successful germination and replanting
- Some customers reported low germination rates or seeds that didn’t sprout at all
- Quality control issues like receiving the wrong pepper variety (hot peppers instead of sweet ones)
- Requires specific soil temperature (70–85°F) and indoor starting 8–10 weeks early, which takes more effort than direct sowing
3. Sow Right Heirloom Vegetable Seeds Collection
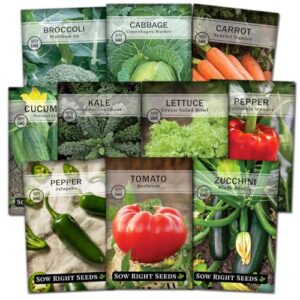
You’re breaking free from grocery store dependence with this ten-variety pack—broccoli, cabbage, carrot, cucumber, kale, lettuce, tomato, peppers, and zucchini all in one collection.
These non-GMO heirloom veggie seeds give you real crop rotation options for starting a vegetable garden that actually produces. Each packet includes seed starting instructions and germination rates, though you’ll want to test viability before planting season.
Start seedlings indoors 6–8 weeks before transplanting outdoors, timing your harvest around your local frost dates and garden planning needs.
| Best For | Home gardeners who want to grow multiple vegetable types from heirloom seeds without buying individual packets separately. |
|---|---|
| Brand | Sow Right Seeds |
| Material | GMO Free, Heirloom |
| Weight | 1.76 ounces |
| Indoor/Outdoor Use | Indoor/Outdoor |
| Unit Count | 1 Count |
| Primary Use | Growing vegetables |
| Additional Features |
|
- Ten different vegetable varieties in one pack give you good crop diversity for a starter garden
- Non-GMO heirloom seeds mean you can save seeds from your harvest for replanting next season
- Each packet comes with specific growing instructions and germination info printed right on it
- Germination rates vary across different seed types, so you might need to plant extras as backup
- Some varieties won’t thrive in every climate zone—you’ll need to check compatibility with your region
- Customer reviews mention inconsistent seed quality between packets, with some performing better than others
4. Seedfactor Seedling Heat Mat

You’re cutting germination time by 2–5 days with consistent bottom heat between 68°F and 77°F—no more waiting around for slow seeds. This mat delivers uniform soil warmth for seed starting through its multi-layer construction and waterproof design, though you’ll need a separate thermostat control for precision.
Mat installation requires a flat, dry surface with proper cord management to prevent heat hotspots. Pair it with grow lights once your seedlings emerge, and watch them develop stronger root systems faster than soil alone ever could.
| Best For | Home gardeners looking to speed up germination for warm-season vegetables and anyone starting seeds indoors who wants faster, more reliable results without complicated setup. |
|---|---|
| Brand | Not specified |
| Material | Heirloom |
| Weight | 1.54 pounds |
| Indoor/Outdoor Use | Indoor |
| Unit Count | 2 Count |
| Primary Use | Heating seedlings |
| Additional Features |
|
- Cuts germination time by 2–5 days with consistent bottom heat between 68°F and 77°F
- Waterproof multi-layer construction ensures uniform heating across the entire mat surface
- Available in four sizes with multiple wattage options to fit different seed tray configurations
- Requires a separate thermostat or temperature controller for precise temperature management
- May run too warm for certain seed starting methods without additional control equipment
- Not suitable for advanced growers who need specific temperature settings built into the unit
5. Aplant Ultra Thin Led Grow Light
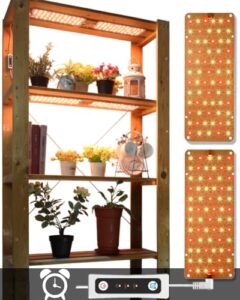
Once your heat mat gets those seeds moving, you’ll need consistent light—that’s where compact growing tools like the Aplant Ultra Thin LED Grow Light come in. This 20-watt fixture fits tight spaces with its rectangular 10.1 x 3.9-inch profile, delivering full-spectrum lighting for starting vegetable seeds indoors.
Position it 2–8 inches above your trays and use the 6/10/12-hour timer to automate daily cycles. Watch for grow light safety issues though—some users report connector problems and occasional overheating at the plug after extended use.
| Best For | Indoor gardeners starting seeds in tight spaces who need automated lighting but should monitor the unit closely for any electrical issues. |
|---|---|
| Brand | Not specified |
| Material | Aluminum |
| Weight | Not specified |
| Indoor/Outdoor Use | Indoor |
| Unit Count | 1 Count |
| Primary Use | Lighting plants |
| Additional Features |
|
- Ultra-slim 0.07-inch profile fits easily over seed trays without taking up much vertical space
- Built-in timer with 6/10/12-hour settings handles daily light cycles automatically so you don’t have to remember
- Full-spectrum 132 LEDs provide solid light coverage for germination and early seedling stages at 20 watts
- Multiple reports of power supply failures, connector problems, and burn marks on plugs after a few months of use
- Quality control seems inconsistent—some units arrive non-functional or stop working relatively quickly
- No clear warranty information available, which is concerning given the reported durability and safety issues
Frequently Asked Questions (FAQs)
What’s the easiest vegetable to grow from seed?
Radishes rule the beginner gardening world—they sprout in just 3-7 days with minimal fuss.
Peas and lettuce follow close behind as easy vegetable seeds, thriving with basic seed germination tips and forgiving growing conditions.
What is the best month to start a vegetable garden?
Start your vegetable garden in April or May, after the last frost date. Soil temperature and climate zones guide timing.
Cool-season crops can begin earlier; warm-season varieties need warmer conditions for successful seed germination.
Can I grow vegetables from seeds?
You absolutely can grow vegetables from seeds—it’s your ticket to freedom in the garden.
Most common varieties germinate reliably when you nail the basics: proper soil quality, consistent moisture, and attention to climate considerations.
What is the easiest vegetable to grow from seeds?
Looking for easy growers? Try radishes—they germinate in just three to seven days and reach harvest in under a month.
Lettuce, spinach, and green onions also offer fast results with minimal fuss for beginners.
Can I just throw seeds on the ground?
Hope isn’t a strategy when planting seeds. Direct sowing needs shallow burial and seed protection for real success. You can toss them on bare ground, but without seed contact with soil moisture, germination rates tank.
Is it cheaper to grow your own vegetables?
Growing your own food delivers real cost savings once initial garden expenses are covered.
Home harvest yield optimization through smart budget planning transforms vegetable gardening into a money-saving rebellion against grocery store prices.
Can you grow vegetables from seeds?
Picture turning a tiny packet into a summer harvest. You can grow vegetables from seeds—most common varieties germinate well with proper seed viability, germination tips, soil quality, and basic seedlings care using proven seed starting techniques.
What month should I start my vegetable seeds?
Start cool-season crops indoors 4 to 6 weeks before your last frost date. Warm-season varieties need 6 to 8 weeks.
Check local frost dates and soil temperature to time germination rates perfectly for your climate zone.
What is the easiest vegetable to grow from seed?
Radishes claim the top spot for beginner gardening—Fast Germination in just 3–7 days makes them perfect for newcomers.
Leafy greens and bush beans follow close behind, offering simple harvesting and reliable veggie seeds performance.
Can you grow vegetables from their own seeds?
Most home-saved veggie seeds retain 70-80% germination rates when properly stored.
You can grow vegetables from their own seeds if they’re open-pollinated varieties; hybrid seeds won’t breed true, affecting genetic integrity and seedling quality.
Conclusion
Last season, a reader planted Cherokee Purple tomatoes—a variety grocery stores won’t touch because the fruit splits if you look at it wrong. She harvested 47 pounds from three plants.
That’s the difference when you grow your own vegetables from seed: access to genetics built for flavor, not freight trucks. Your garden becomes a catalog of tastes that supermarkets deliberately bred out decades ago. Plant what they won’t sell you.