This site is supported by our readers. We may earn a commission, at no cost to you, if you purchase through links.

Most fruit trees never reach their potential—not because of poor soil or bad weather, but because nobody taught their owner how to prune. A neglected apple or peach tree grows into a tangled thicket of competing branches, where sunlight can’t reach the interior, air stagnates, and fruit stays small and flavorless.
One well-timed cut redirects years of growth. That’s the quiet power of pruning: a few deliberate decisions each season compound into a healthier, more productive tree over time.
Fruit tree pruning for beginners starts with understanding what you’re trying to achieve—then building the confidence to act on it.
Table Of Contents
- Key Takeaways
- Fruit Tree Pruning Basics
- Best Time to Prune
- Top 8 Pruning Essentials
- 1. Kynup Stainless Steel Pruning Shears
- 2. Colwelt Light Duty Bypass Loppers
- 3. Amazon Basics Aviation Straight Cut Snips
- 4. VNIMTI Round Garden Shovel with D Handle
- 5. Krewey Garden Grafting Pruner Kit
- 6. ZALALOVA Garden Grafting Tool Kit
- 7. Carbon Steel Garden Lopper Shears Saw
- 8. Cass Turnbull Guide to Pruning
- Tools and Pruning Safety
- Pruning Cuts That Work
- Step-by-Step Pruning for Beginners
- Remove Dead or Diseased Branches First
- Choose The Tree’s Training System Before Cutting
- Select a Central Leader or Open Center Structure
- Keep 3–5 Well-spaced Scaffold Branches
- Shorten Young Growth to Build Strong Branching
- Remove Suckers Below The Graft Union
- Finish by Checking Balance, Height, and Airflow
- Common Mistakes and Aftercare
- Avoid Overpruning and Removing Too Much at Once
- Don’t Leave Stubs or Make Flush Cuts
- Skip Heavy Pruning During Wet or Freezing Weather
- Water Deeply After Pruning During Dry Periods
- Mulch Properly Without Touching The Trunk
- Protect Trunks From Deer and Rodents
- Watch for Disease, Pests, and Vigorous Regrowth
- Frequently Asked Questions (FAQs)
- Which fruit trees should be pruned first?
- Is October too late to prune?
- What is the 1/2/3 rule of pruning?
- How to prune fruit trees for beginners?
- What are the 5 D’s of pruning?
- What is the 123 rule of pruning?
- How do you prune a fruit tree for beginners?
- What are the 3 C’s of pruning?
- What is the 1 3 rule for tree pruning?
- How often should I prune my fruit trees?
- Conclusion
Key Takeaways
- Pruning at the right time — late winter, just before bud swell — gives your tree the best chance to heal fast and push strong spring growth.
- Opening the canopy through thinning cuts isn’t just aesthetic; it directly improves fruit flavor, size, and disease resistance by letting light and air reach every branch.
- Never remove more than one-third of a tree’s growth in a single session — staying within that limit protects the tree’s energy reserves and keeps fruiting wood intact.
- Match your tool to the branch size every time: hand pruners for anything under ¾ inch, loppers up to 2 inches, and a pruning saw for anything thicker.
Fruit Tree Pruning Basics

Pruning is one of those skills that looks complicated until someone breaks it down for you. Before you pick up a pair of shears, it helps to understand what you’re actually trying to achieve — and why it matters.
The right pruning shears for spring planting can make all the difference between a clean, healthy cut and one that stresses the plant.
Here’s what every beginner should know about the basics.
Why Pruning Improves Light, Airflow, and Fruit Quality
When you open up a fruit tree’s canopy through pruning, two things happen immediately: light penetration increases and air circulation improves.
More sunlight means fruit flavor development and uniform fruit ripening across every branch.
Meanwhile, enhanced air circulation dries foliage faster after rain, which directly cuts disease pressure reduction.
These light penetration benefits alone justify following any solid step-by-step guide to pruning for better fruit quality.
Implementing proper pruning techniques promotes improved fruit quality.
How Pruning Helps Control Tree Size and Shape
Pruning doesn’t just improve fruit quality — it puts you in control of your tree’s size and shape. Through crown density control and canopy height management, you decide how tall and wide your tree grows.
Choosing between a central leader or open center pruning system determines your tree’s entire form balance.
Strategic pruning cuts, guided by solid pruning ratio guidelines and branch angle optimization, keep structure stable and harvests manageable.
What Beginners Should Know Before Making The First Cut
Before your first cut, take a moment to read the tree. Evaluating vigor — how much new growth it pushed last season — shapes your First Cut Planning from the start. Structural Defect Identification comes next: spot crossing limbs, tight crotch angles, and weak attachments before touching a blade.
Keep these fundamentals close:
- Walk around the tree and get a Light Penetration Estimate from every angle
- Choose your Pruning Angle Choice based on bud direction, not convenience
- Identify your scaffold branches before removing anything
- Start small — targeted cuts beat aggressive ones every time
Common Signs a Fruit Tree Needs Pruning
Your tree speaks before you do.
Watch for canopy overgrowth where branches crowd the interior and block light, crossing branches or rubbing branches that wear away bark, and dead and diseased wood that lingers past one season.
Uneven fruit set, a lopsided canopy, and structural weakness like narrow-angle limbs all signal problem branches — and a crowded center starving for air circulation.
Best Time to Prune

Timing is everything regarding pruning fruit trees — cut at the wrong moment and you’re working against the tree instead of with it. Each season carries its own rules, and knowing which window to use makes the difference between healthy regrowth and costly mistakes.
Prune at the wrong moment and you work against the tree, not with it
Here’s what you need to know about when to prune and when to put the tools away.
Dormant-season Pruning for Most Deciduous Fruit Trees
Most deciduous fruit trees rely on dormant season pruning to reset their structure before spring energy kicks in. When leaves drop and roots hold their carbohydrate reserve, you get the clearest view of the canopy — and the tree’s strongest chance to heal.
Here’s what this seasonal timing for pruning accomplishes:
- Root Carbohydrate Reserve stays intact, fueling spring regrowth after cuts
- Crotch Angle Optimization is easier to assess on bare branches
- Winter Sun Exposure reveals crowded or crossing limbs instantly
- Tree Vigor Control improves when you cut before bud swell
- Bud Placement Timing guides where each cut lands for best shoot direction
Why Late Winter is Usually The Safest Window
Late winter hits a sweet spot most gardeners underestimate. Sap Flow Reduction means cuts seal faster, while Pathogen Activity: Low temperatures slow disease spread before wounds close.
Wood Firmness prevents tearout on larger branches, and Dormant Tree Healing channels stored reserves directly into callus formation.
Stable Ground Conditions reduce slip risk, making seasonal timing for pruning safer and more precise than any other dormant season pruning window.
When Light Summer Pruning Makes Sense
Once your fruit has set, summer light pruning becomes a smart, targeted move rather than an afterthought. Mid-Season Vigor Management keeps trees from outgrowing their space while supporting Post-Set Fruit Enlargement through better sunlight exposure. Here’s when summer thinning delivers real results:
- water sprouts crowding the canopy for improved air circulation
- Trim long shoots to 6–8 leaves beyond the last spur for Spur Development Support
- Time cuts during cool mornings to reduce Heat Stress Mitigation risks
- fruit quality by letting light reach inner clusters
- Clear dense growth early to support Future Bud Formation for next season
Why Fall and Early Winter Pruning Can Be Risky
Pruning in fall feels productive, but it’s one of the costlier pruning mistakes you can make. Cuts made before winter dormancy heal slowly — cold soil and short days stall callus formation, leaving wounds open to disease transmission and fungal pathogens.
Fall heavy pruning also triggers soft new growth vulnerable to Cold Injury, Structural Weakness, and Delayed Budbreak come spring.
Top 8 Pruning Essentials
Having the right tools makes pruning less frustrating and a lot more effective. Each one on this list is built for a specific job, so you’re not forcing the wrong tool on the wrong branch.
Here are eight essentials worth keeping in your kit.
1. Kynup Stainless Steel Pruning Shears
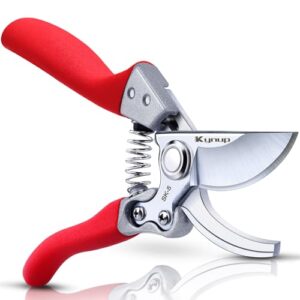
At under $9, the Kynup Stainless Steel Pruning Shears punch well above their price tag. The SK-5 carbon steel blades hold a sharp edge through extended sessions and resist rust in humid conditions — exactly what you need when working through a canopy in damp spring weather.
They handle branches up to 1 inch cleanly, and the ergonomic silicone-matte grip keeps hand fatigue in check. The one-button safety lock is a small detail that makes transport and storage genuinely safer.
| Best For | Hobbyist gardeners and small-scale landscapers who want reliable, sharp pruning shears without spending more than $9. |
|---|---|
| Price | $8.99 |
| Primary Use | Pruning |
| Material | SK-5 carbon steel |
| Weight | 8.5 oz |
| Handle Material | Aluminum alloy/silicone |
| Skill Level | Beginner |
| Additional Features |
|
- SK-5 carbon steel blades stay sharp and resist rust, even in wet conditions
- Ergonomic silicone-matte grip reduces hand fatigue during longer pruning sessions
- One-button safety lock makes storage and transport safer and more convenient
- The sliding latch can feel stiff and awkward, especially when you’re switching it back and forth frequently
- The wider handle opening may feel uncomfortable if you have smaller hands
- No warranty information included, so you’re on your own if something goes wrong
2. Colwelt Light Duty Bypass Loppers
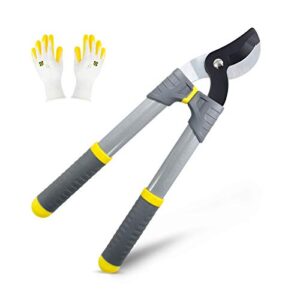
When branches push past the reach of hand pruners, the Colwelt Light Duty Bypass Loppers step in. At 17 inches long and just 1.6 lb, they’re easy to carry through a full pruning session without wearing out your arms.
The hardened carbon steel blades cut cleanly up to 1.25 inches in diameter — enough for most young fruit tree scaffold branches. Ergonomic grips and a built-in shock-absorbing system reduce wrist strain, making them a solid pick for beginners tackling medium-sized growth.
| Best For | Home gardeners and beginners who need a lightweight, easy-to-handle lopper for pruning small to medium branches on trees, shrubs, roses, and vines. |
|---|---|
| Price | $N/A |
| Primary Use | Pruning |
| Material | Carbon steel |
| Weight | 1.6 lb |
| Handle Material | Steel |
| Skill Level | Beginner |
| Additional Features |
|
- At just 1.6 lb and 17 inches long, these loppers are easy to carry for extended pruning sessions without arm fatigue.
- The built-in shock absorbers and ergonomic grips are a real help for anyone dealing with hand or wrist strain.
- Hardened carbon steel blades make clean cuts on branches up to 1.25 inches — plenty of capacity for most light garden work.
- Not built for heavy-duty or professional use — branches over 1.25 inches will give these loppers a hard time.
- Some users have noticed the blades losing their edge faster than expected, especially on thinner stems.
- The materials feel a bit cheap, so longevity could be a concern if you’re pruning frequently or in large volumes.
3. Amazon Basics Aviation Straight Cut Snips
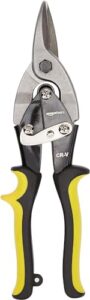
Not every pruning task involves wood. Sometimes you’re trimming wire mesh around a trunk or cutting through metal-coated PVC pipe — that’s where the Amazon Basics Aviation Straight Cut Snips earn their spot in your kit.
The chrome-vanadium blades handle up to 18-gauge steel cleanly, and the high-leverage design keeps your hand from tiring out mid-task. The rubberized grip stays secure even on slick surfaces, and the built-in safety latch means you can toss them in your bag without worry.
| Best For | Gardeners and hobbyists who occasionally need to cut wire mesh, sheet metal, or metal-coated PVC pipe without investing in heavy-duty tools. |
|---|---|
| Price | $N/A |
| Primary Use | Cutting |
| Material | Chrome-vanadium steel |
| Weight | N/A |
| Handle Material | Rubberized grip |
| Skill Level | Beginner |
| Additional Features |
|
- Chrome-vanadium blades cut cleanly through up to 18-gauge steel, so light metal tasks are no problem.
- The high-leverage design reduces hand fatigue, making it easier to work longer without strain.
- A built-in safety latch and rubberized grip make it safe to store and comfortable to use.
- Straight-cut only — no left or right angle cuts, which limits it on more complex sheet-metal work.
- Not built for thick or hardened materials above 18 gauge, so it’s strictly a light-duty tool.
- Blades may need occasional lubrication or sharpening if you’re putting them through heavy regular use.
4. VNIMTI Round Garden Shovel with D Handle
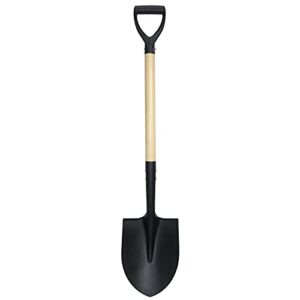
Beyond trimming and snipping, pruning also means clearing around your trees — and that’s where the VNIMTI Round Garden Shovel steps in. Whether you’re working mulch away from the trunk or edging out root suckers, this shovel takes care of it without fuss.
The cold-rolled steel blade cuts into compacted soil cleanly, and the D-shaped handle gives you real control with both hands. At 3.3 pounds and 41 inches long, it’s sturdy enough to do the job without wearing you out.
| Best For | Gardeners, older users, or anyone who needs a compact, reliable shovel for digging, edging, and light snow removal without hauling around something heavy. |
|---|---|
| Price | $N/A |
| Primary Use | Digging |
| Material | Cold-rolled steel |
| Weight | 3.3 lb |
| Handle Material | Wood |
| Skill Level | All levels |
| Additional Features |
|
- Cold-rolled steel blade cuts through compacted soil without bending or dulling quickly.
- D-shaped handle gives you a solid two-handed grip, especially useful for tight, controlled digging.
- At 3.3 lbs and 41 inches, it’s easy to toss in the trunk and light enough for extended use.
- The shorter length can be a real strain for taller folks who need more leverage.
- The blade needs occasional sharpening to stay effective, especially in harder soil.
- The wooden handle can swell or crack over time if you leave it out in wet conditions.
5. Krewey Garden Grafting Pruner Kit
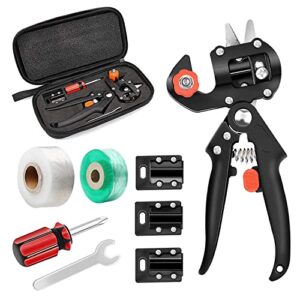
If pruning is the science, grafting is the art — and the Krewey Garden Grafting Pruner Kit lets you practice both with one tool.
It combines bypass shears with three interchangeable blades: Omega, U, and V cuts, each matched to branch diameters between 5 mm and 12 mm.
The 65 high‑carbon steel blades stay sharp through repeated passes, and the ABS grips keep your grip steady.
At $15.99, it’s an accessible entry point for anyone ready to start propagating their own trees.
| Best For | Hobbyists, backyard growers, and bonsai enthusiasts who want to prune and graft without juggling multiple tools. |
|---|---|
| Price | $15.99 |
| Primary Use | Pruning & Grafting |
| Material | 65 high-carbon steel |
| Weight | 0.77 kg |
| Handle Material | ABS plastic |
| Skill Level | Intermediate |
| Additional Features |
|
- Three interchangeable blades (Omega, U, and V cuts) give you real flexibility for different branch types and grafting styles.
- 65 high-carbon steel blades with an oil-coated surface make clean, precise cuts that help grafts actually take.
- At $15.99, it’s a genuinely affordable way to get into plant propagation without a big upfront commitment.
- No manual included — you’ll want to practice on spare twigs before working on anything you care about.
- Struggles with thicker or tougher stems, and forcing it can mess up the cut quality.
- The blade sharpness fades faster than you’d hope, and the included securing tape tends to wear out around the one-month mark.
6. ZALALOVA Garden Grafting Tool Kit
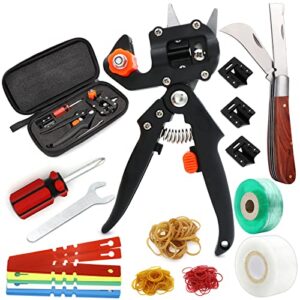
The ZALALOVA Garden Grafting Tool Kit takes things a step further. At $24.99, it’s still budget-friendly but packs in noticeably more: three interchangeable high-carbon steel blades, a dual-purpose grafting knife with a wooden handle, plus grafting tape, rubber bands, and 50 color-coded label cards.
That last detail matters more than you’d think — labeling your graft dates and varieties saves real headaches come harvest time.
The included case keeps everything organized, so you’re not hunting for blades mid-session.
| Best For | Beginner gardeners and orchardists who want an all-in-one grafting setup without buying a bunch of separate tools. |
|---|---|
| Price | $24.99 |
| Primary Use | Pruning & Grafting |
| Material | 65 high-carbon steel |
| Weight | 0.85 kg |
| Handle Material | ABS plastic/wood |
| Skill Level | Beginner |
| Additional Features |
|
- Three interchangeable blades (Ω, U, and V-cut) give you real flexibility across different stem types and grafting methods.
- Comes with everything you need out of the box — tapes, rubber bands, and labeled cards included.
- The rust-resistant coating and durable build mean this thing should last you more than one season.
- The carrying case can be a bit clunky, so grabbing what you need quickly isn’t always easy.
- Cutting through harder wood takes some grip strength — lighter-handed users might feel it after a while.
- Blades need regular oiling to stay sharp; skip that and you’ll notice the difference fast.
7. Carbon Steel Garden Lopper Shears Saw
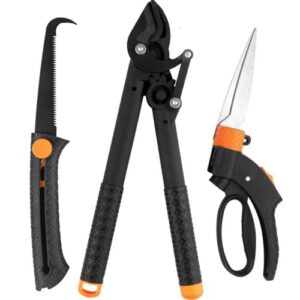
At $14.99, the YIAD DRAGON HORSE 3-piece set offers exceptional value for occasional pruning tasks. It includes a gear-assisted lopper, rotating-head shears, and a folding saw, eliminating the need to purchase three separate tools. This set is ideal for handling most light fruit-tree work.
The lopper efficiently manages branches up to 1.5 inches, while the compact saw folds down to 9 inches for easy storage. These features ensure versatility and convenience for small-scale gardening projects.
However, the lightweight construction is best suited for weekend gardeners rather than heavy seasonal work. This set prioritizes portability and affordability over durability for demanding tasks.
| Best For | Weekend gardeners who need an affordable, all-in-one set for light pruning, hedge trimming, and occasional branch removal without breaking the bank. |
|---|---|
| Price | $27.99 |
| Primary Use | Pruning & Grafting |
| Material | High-carbon steel |
| Weight | 0.98 kg |
| Handle Material | ABS plastic/wood |
| Skill Level | Beginner |
| Additional Features |
|
- Three tools in one $14.99 set — lopper, shears, and folding saw — so you’re not buying each piece separately.
- The gear-assisted lopper cuts branches up to 1.5 inches with less effort, which is handy for fruit trees and garden shrubs.
- Rotating shear head and retractable saw blade make the whole kit easy to maneuver and safe to store.
- Construction feels flimsy to several reviewers, which raises real questions about how long it’ll hold up.
- The anvil-style lopper doesn’t fully close and can struggle with green or thicker branches, sometimes needing an extra yank.
- Shear blades can run loose and bend grass rather than cut it cleanly if you push too hard.
8. Cass Turnbull Guide to Pruning
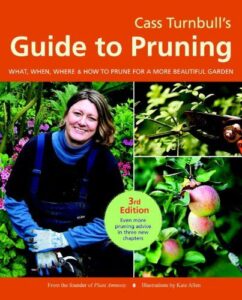
If you want one resource that ties everything together, Cass Turnbull’s Guide to Pruning is worth keeping on your shelf. At $11.99, this 384-page reference covers around 160 plant species — fruit trees, shrubs, vines, and more — with step-by-step diagrams showing exactly where to cut and what to expect afterward.
The Ten Gardener Commandments alone can save you from the most common pruning errors. It’s practical, direct, and built for anyone serious about getting pruning right.
| Best For | Home gardeners, orchardists, and landscaping pros who want a reliable, plant-specific pruning reference they can actually trust. |
|---|---|
| Price | $14.99 |
| Primary Use | Pruning |
| Material | Hardened carbon steel |
| Weight | N/A |
| Handle Material | Plastic/composite |
| Skill Level | Beginner |
| Additional Features |
|
- Covers around 160 species with clear diagrams showing exactly where to cut and what regrowth to expect
- The Ten Gardener Commandments give you a quick, memorable way to avoid the most common pruning mistakes
- At $11.99 for 384 pages, it’s a solid reference without a steep price tag
- Line drawings only — no photos, which can make some cuts harder to visualize for beginners
- Leans heavily Pacific Northwest in its regional assumptions, so gardeners in drier or colder climates may need extra resources
- Thin paper and a bulky format make it less than ideal to bring out into the garden with you
Tools and Pruning Safety

The right tools make pruning safer and a lot less frustrating — but only if you know which ones to reach for. Using the wrong tool on the wrong branch can tear bark, dull your blade, or strain your wrist before you’ve finished the first tree.
Here’s what you need to have on hand before you make a single cut.
Choosing Pruners, Loppers, and Saws for Branch Size
Think of your pruning tools as a matched set — each one sized for a specific job. Use secateurs (bypass pruners) for branches up to ¾ inch.
Switch to bypass loppers or long-handled loppers for stems up to 2 inches, where the ergonomic handle length and leverage ratio selection do the heavy lifting.
Anything thicker needs a pruning saw.
Why Sharp Blades Make Cleaner, Healthier Cuts
A dull blade doesn’t cut — it tears. That tearing causes reduced tissue trauma to go unaddressed, leaving ragged wounds that heal slowly and invite disease.
Sharp bypass pruning shears and bypass loppers rely on precise edge geometry to slice cleanly through wood, preserving the cambium layer. The result? Improved callus formation, lower infection risk, and better operator control with every cut.
How to Disinfect Tools Between Trees
Your tools can carry disease from one tree to the next without you realizing it. Set up a portable disinfectant station with a sealed container of sanitizing solution — mix 1 part bleach to 9 parts water for reliable pruning sanitation.
contact time guidelines: keep blades wet for 10 minutes.
Prefer alcohol vs bleach? Alcohol works faster but evaporates in 30 seconds.
Always dry tools completely before moving on.
Protective Gear Every Beginner Should Wear
Good gear doesn’t slow you down — it keeps you in the game.
For eye protection, wear shatterproof polycarbonate goggles to block flying debris and sap.
Pair them with cut-resistant hand gloves for grip and dexterity.
Sturdy footwear with ankle support and traction manages uneven ground safely.
Add a head helmet and weather clothing for long sessions, and your pruning safety is solid.
Cutting Just Outside The Branch Collar
Your gear protects you — now your technique protects the tree.
Every cut should land just outside the branch collar, that swollen ridge where the branch meets the trunk. This Branch Collar Anatomy is your guide: it holds the Collar Healing Zone, packed with defensive cells.
Match your Cut Angle Precision to the bark ridge, and you’ll get a clean, circular Wound Seal Shape that closes fast.
Pruning Cuts That Work

Knowing which cut to make is the real difference between a tree that thrives and one that struggles. Each type of cut does a specific job — opening the canopy, redirecting growth, or clearing out problem wood.
Here are the six cuts every beginner should have in their toolkit.
Thinning Cuts for Better Canopy Openness
Thinning cuts are the backbone of smart canopy management.
Unlike other cuts, they remove an entire branch back to its origin — no stub, no regrowth surge.
That precision creates light corridors and airflow lanes deep inside the tree, enabling interior thinning that targets crowded scaffolds.
The result: better scaffold balance, real moisture reduction, and a canopy that actually breathes.
Heading Cuts to Encourage New Growth
thinning opens the canopy, heading cuts actively build it back up. Cut just above an outward-facing bud — your bud selection strategy determines growth direction control entirely.
That single cut triggers seasonal bud activation, pushing multiple shoots from latent buds nearby, increasing canopy density management over time.
Angle the blade slightly, keep tools sharp, and always practice basic post-cut wound care by letting small cuts air‑seal naturally.
Reduction Cuts for Controlling Length and Weight
Where heading cuts add density, reduction cuts manage reach. Shorten an overgrown limb by cutting just above a strong lateral branch — this lowers Wind Load, improves Structural Symmetry, and triggers Apical Suppression so the tree stops racing outward.
Three situations call for reduction cuts:
- A limb extending beyond the canopy edge
- A top-heavy branch creating uneven Weight Distribution
- A leader outgrowing its scaffold neighbors
Removing Dead, Damaged, or Diseased Wood
Dead and diseased wood is where trouble starts.
Use Wood Inspection Techniques to spot cracks, cankers, or peeling bark — these signal decay that compromises Structural Integrity Assessment at the branch junction.
Cut back past the affected zone to healthy tissue, just outside the branch collar to support Branch Collar Healing.
Follow strict pruning sanitation practices: bag debris using proper Sanitation Disposal Methods, and disinfect your pruning tools and equipment between each cut to stop Disease Spot Identification from becoming Disease Spread.
Using The Three-cut Method on Large Branches
When a branch is too thick for loppers, the threecut method is your step‑by‑step guide to a clean removal. Start with Undercut Positioning — saw one-third through the underside first. Then apply your Top Cut Angle slightly beyond it to release the weight. Finally, remove the stub near the collar.
- Controls Weight Distribution, preventing bark tearing
- Allows clean Stump Healing at the collar
- Reduces risk — practice Safety Spotting with a partner
Cutting Back Crossing, Rubbing, and Inward Growth
Crossing limbs aren’t just an eyesore — every friction point is a future wound. For effective Branch Intersection Control, identify which branch is thinner, then use thinning cuts to remove it cleanly at its origin.
Rubbing Damage Mitigation and Inward Growth Pruning follow the same logic: prune downward, upward, and inward growing branches back to healthy laterals, opening the Inner Canopy Clearance that your tree needs to thrive.
Step-by-Step Pruning for Beginners
Now that you know your cuts, it’s time to put them in order. Good pruning isn’t random — there’s a logical sequence that protects the tree and keeps you from second-guessing every branch.
Work through these seven steps and you’ll finish with a tree that’s balanced, open, and ready to grow.
Remove Dead or Diseased Branches First

Think of dead or diseased wood as dead weight — it drains the tree and opens the door to pathogens.
Start every session with a Branch Health Inspection: look for brittle, brown tissue, sunken cankers, or fungus on the bark.
Remove dead or diseased wood first, cutting back to healthy tissue.
This simple pruning sanitation practice stops Pathogen Spread Prevention before structural cuts begin.
Choose The Tree’s Training System Before Cutting

Before you make a single cut, decide how you want your tree to grow — your training system is the blueprint for everything that follows.
Consider these three factors:
- Rootstock Compatibility — matches vigor management to your soil and space constraints.
- Climate Suitability — guides whether central leader, open center, or modified central leader works best.
- Harvest Access — shapes canopy height for practical picking.
Training systems for fruit trees determine your entire step-by-step guide going forward.
Select a Central Leader or Open Center Structure

Your choice comes down to two proven training systems for fruit trees. Central leader suits apples and pears — one dominant trunk, light reaching every tier. Open center works better for peaches and plums, where canopy shape opens wide for airflow and sun.
Match your decision to rootstock compatibility, fruit variety suitability, and natural growth habit.
Your beginner guide to pruning depends on getting this right first.
Keep 3–5 Well-spaced Scaffold Branches
Once your training system is set, scaffold branch placement and spacing become your next focus.
Aim for 3–5 branches, each separated by 12–18 inches vertically and arranged with radial symmetry — like spokes on a wheel.
Follow scaffold angle guidelines: 45–60 degrees gives you the attachment strength you need. Selection criteria are simple — strong, outward-facing, no included bark.
Shorten Young Growth to Build Strong Branching

With your scaffold branches set, now focus on shortening new growth — this is where Bud Activation Techniques and Structural Balance Pruning do their real work.
Use heading cuts to shorten shoots by 25–50%:
- Cut above an outward-facing bud
- Target shoots exceeding 18 inches
- Repeat annually for consistent Shoot Length Reduction
This controls Growth Hormone Management, encouraging thicker lateral branching over vertical dominance.
Remove Suckers Below The Graft Union

Once your young shoots are shaped up, turn your attention downward. Suckers growing below the graft union steal energy from your grafted variety — that’s Energy Allocation working against you.
Sucker Detection is straightforward: look for vigorous, oddly-leafed shoots near the trunk base. Snap or cut them off cleanly at the source.
For Seasonal Sucker Management, check monthly and remove immediately.
Finish by Checking Balance, Height, and Airflow

With suckers gone, step back and do a full Canopy Balance Check — walk around the tree slowly. Look for lopsided weight or gaps breaking your Structural Symmetry Review.
Verify your Height Verification target is met, then perform an Airflow Inspection by peering through the canopy. Good air circulation and Light Penetration Assessment confirm your tree shape, central leader, and balancing tree structure and fruit production are on track.
Common Mistakes and Aftercare

Even a well-executed pruning session can go sideways if you make a few common errors afterward — or during. Knowing what to avoid is just as important as knowing the right technique.
Here’s watch for before, during, and after you make that first cut.
Avoid Overpruning and Removing Too Much at Once
Overpruning is one of the most common pruning mistakes to avoid — and it’s easy to do without realizing it. Stick to incremental canopy reduction, removing no more than 20 percent per session.
Your tree’s energy reserve management depends on enough leaf area remaining to fuel recovery. Gradual branch removal across multiple seasons keeps stress low and fruiting wood intact.
Don’t Leave Stubs or Make Flush Cuts
Two cuts trip up most beginners: leaving stubs and making flush cuts. Both block callus development and wound sealing, raising your decay risk and opening doors for pest invasion.
Cut just outside the branch collar — that slightly swollen ridge where the branch meets the trunk. Angle cutting slightly downward keeps water from pooling. Done right, your tree heals cleanly without dressing.
Skip Heavy Pruning During Wet or Freezing Weather
Weather matters more than most beginners realize. Heavy pruning on a wet day with sterilized equipment still isn’t ideal — moisture slows callus formation and invites Moisture-Driven Disease right into open wounds.
- Cold-Induced Tissue Cracking leaves jagged, hard-to-heal wounds
- Frost-Related Wound Delays extend infection windows considerably
- Freezing conditions mask dead wood, causing misjudged cuts
- Minimal Wet-Weather Cuts reduce exposure when pruning timing can’t wait
Water Deeply After Pruning During Dry Periods
Pruning opens wounds — and a thirsty tree heals slowly. During dry periods, Root Zone Hydration is non‑negotiable.
Use Slow Drip Irrigation to water fruit trees deeply, reaching 12–18 inches down where roots actively recover. Soil Moisture Sensors help confirm you’re hitting that depth.
Time your Morning Watering Schedule to cut evaporation losses and support plant stress reduction as your tree rebuilds.
Mulch Properly Without Touching The Trunk
Think of mulch as a helpful neighbor — generous, but not clingy.
Use the Donut Mulch Shape: keep a 3–6‑inch bare zone around the trunk to prevent bark rot, then extend Organic Mulch Materials like wood chips 2–4 inches deep, outward.
Follow Mulch Depth Guidelines, do Mulch Maintenance Inspection annually, and make Seasonal Mulch Adjustments to retain soil moisture and replenish organic matter and nutrients.
Protect Trunks From Deer and Rodents
A pruned tree is vulnerable — and wildlife knows it.
Start with Tree Guard Installation: rigid wire mesh around the trunk, buried 1–2 inches deep for Rodent Exclusion Fencing.
Use Burlap Wrapping Techniques during winter months for added bark protection.
Apply Deer Repellent Strategies like rotating scent-based sprays every 4–6 weeks.
Keep Base Mulch Management tight — bare soil within 6 inches discourages tunneling.
Watch for Disease, Pests, and Vigorous Regrowth
Once the trunk is protected, your attention shifts upward. Walk your trees weekly and look closely — yellowing leaves, powdery white film, or dark browned shoots all signal trouble worth catching early.
Early symptom scouting paired with pest trap placement keeps problems manageable.
Control canopy humidity through smart spacing, and apply pruning sanitation practices consistently.
Regrowth shading techniques and vegetative growth control prevent vigorous new shoots from outcompeting your fruiting wood.
Frequently Asked Questions (FAQs)
Which fruit trees should be pruned first?
"First things first" holds in the orchard too.
apple trees and pear trees in early spring, then time stone fruit like peach and cherry last to avoid late frost damage.
Is October too late to prune?
October sits in a gray zone. Light removal of dead or diseased wood is fine, but fall heavy pruning risks frost damage.
To stay safe, prune in winter once full dormancy settles.
What is the 1/2/3 rule of pruning?
The 1/2/3 rule is simple: never remove more than one-third of a tree’s total growth in a single session, leaving two-thirds intact to maintain energy balance and canopy proportion.
How to prune fruit trees for beginners?
Think of your first pruning session like editing a rough draft — cut what doesn’t serve the story. Start dormant, remove dead wood, then shape with purpose.
Less, done right, always beats more.
What are the 5 D’s of pruning?
The 5 D’s are Dead wood removal, Diseased limb cut, Damaged branch trim, Growth direction shaping, and Sucker suppression — a simple framework that keeps your tree healthy, open, and productive year after year.
What is the 123 rule of pruning?
The 1-2-3 rule is a beginner-friendly cut sequencing method: remove one dead or damaged branch, open two crossing limbs, then balance three scaffold branches — minimizing stress while building a healthier, more productive canopy.
How do you prune a fruit tree for beginners?
Start by removing dead or diseased branches, then select 3–5 scaffold limbs for your chosen structure. Shorten new growth, clear suckers, and check canopy balance when done.
What are the 3 C’s of pruning?
The 3 C’s of pruning are Cut Angle, Clean Tools, and Care Timing. Each one protects your tree from stress, disease, and poor healing — simple pillars every beginner should master first.
What is the 1 3 rule for tree pruning?
The 1/3 rule means you remove no more than one-third of a tree’s branches in a single season.
It’s your built-in safety buffer against overpruning — keeping growth balance intact while still making meaningful pruning cuts.
How often should I prune my fruit trees?
Like a tree’s growth rings, your pruning schedule should reflect age and purpose.
Young trees need annual shaping; mature ones thrive on biennial cycles aligned with dormancy period and regional climate cycles.
Conclusion
Funny how the trees that look the worst after a prune often grow the best, come harvest season. A few removed branches, a little exposed sky through the canopy—and suddenly everything thrives.
That’s the real lesson behind fruit tree pruning for beginners: the right cuts don’t diminish a tree, they define it.
Start small, stay consistent, and trust the process.
Your tree will tell you when you’re getting it right.