This site is supported by our readers. We may earn a commission, at no cost to you, if you purchase through links.

A $2.50 seed packet holds enough basil to fill a window box three times over—yet most gardeners still pay $6 per transplant at the nursery, one plant at a time. Growing herbs from seeds costs a fraction of that, offering significant savings. This method also grants full control from soil to harvest, allowing gardeners to customize every aspect: the mix, timing, and varieties.
Mediterranean herbs like thyme and oregano thrive in sharper drainage than most commercial potting soils provide, a need nurseries won’t tailor to. By starting from seeds, you bypass these limitations. What follows walks you through every stage—sowing, raising, and harvesting—highlighting the specifics that actually make a difference.
Table Of Contents
- Key Takeaways
- Why Start Herbs From Seed
- Choose Herbs and Planting Dates
- Prepare Trays, Pots, and Mix
- Sow Seeds for Fast Germination
- Grow On, Transplant, and Harvest
- Give Seedlings Enough Daily Light
- Position Grow Lights Close Overhead
- Improve Airflow to Prevent Damping Off
- Water Carefully to Avoid Leggy Growth
- Thin Crowded Seedlings Early
- Feed Lightly After True Leaves Form
- Harden Off Before Outdoor Planting
- Transplant After Frost Risk Passes
- Pinch Flower Buds for Leafy Growth
- Harvest No More Than One-third
- Dry, Freeze, or Refrigerate Herbs
- Fix Yellow Leaves, Bolting, and Root Rot
- Top 7 Herb Seed-Starting Products
- Frequently Asked Questions (FAQs)
- What is the easiest herb to grow from seed?
- What are common herb growing mistakes?
- What is the best way to start herbs from seed?
- What’s the easiest herb to grow from seed?
- Is it worth growing herbs from seeds?
- How long does it take to grow herbs from seeds?
- What is the easiest herb to grow from seeds?
- What herbs should not grow from seed?
- Should you soak your herb seeds before planting?
- How long can I store unused herb seeds?
- Conclusion
Key Takeaways
- A $2.50 seed packet can replace 10–20 nursery transplants, giving you full control over soil composition, pH, and drainage that store-bought starts never offer.
- Mediterranean herbs like thyme (Thymus vulgaris) and oregano (Origanum vulgare) need sharper drainage than commercial mixes provide, so building your own blend with horticultural sand at a 1:2 ratio makes a real difference.
- Soil temperature between 65–75°F triggers enzyme activation inside seeds, making a heat mat and soil thermometer more reliable than any calendar date for timing your sowing.
- Never harvest more than one-third of a plant at once — your herbs are solar panels, and stripping too many leaves at a time slows regrowth and cuts your long-term yield.
Why Start Herbs From Seed

Starting herbs from seed is one of those small decisions that pays off in a big way. You get more control, more variety, and a lower cost than grabbing transplants off a garden center shelf.
If you’re growing from seed, pairing that effort with a solid setup like raised beds for herbs gives those seedlings the best possible start.
Here’s why it’s worth doing from the very beginning.
Lower Cost Than Buying Transplants
Seeds cost a fraction of what nursery transplants do — and that gap adds up fast. A $3 packet holds enough seeds to fill several pots, while buying individual starts at $3–$10 each drains your budget before you’ve planted a single bed.
- Seed Bulk Savings: One packet often replaces 10–20 transplants
- Labor Cost Reduction: You skip paying for nursery germination time
- Seasonal ROI: Leftover seeds carry over to next year’s planting
- Perennial Return Value: Cheap seeds become years of free harvests
- Container Economy: Fill multiple pots for the cost of one start
Remember to practice hardening off seedlings before transplanting them outdoors.
More Variety From a Single Packet
Beyond the savings, a single mixed seed packet offers something transplants rarely can — range. One pack often contains 10 or more herbs, making mixed-pack budgeting genuinely practical for small spaces. Seed count leverage allows you to conduct flavor pairing trials across basil, dill, and thyme before committing to larger harvests.
| Variety Selection Matrix | Space-Saving Splits |
|---|---|
| Basil + Oregano | Window box |
| Dill + Parsley | Two 6-inch pots |
| Chives + Thyme | Shared seedling tray |
| Cilantro + Mint | Separate containers |
| Chamomile + Lemon Balm | Balcony planter |
Successional seed plantings stretch one packet across the entire season through smart succession planting. Sow early herbs now, and reserve slower-growing varieties for later plantings.
Better Control Over Soil and Inputs
Starting from seed gives you control. You decide the soil composition for herb germination — no mystery mix, no inherited pH problems. Before sowing, run a quick pH adjustment check; most herbs prefer 6.0–7.0.
- Drainage Management — Build your DIY seed starting mix with perlite and sand.
- Organic Amendments — Compost feeds seedlings without synthetic overload.
- Precision Fertilization — Feed only after true leaves appear.
- Moisture Sensors — Track soil moisture instead of guessing.
Easy Way to Grow Culinary Favorites
Once you control your soil, the next win is right on your cutting board. Growing culinary favorites from seed—basil, dill, parsley, chives—is genuinely straightforward with solid Indoor Seed Starting Techniques and a Minimalist Tool Kit. Use Seasonal Succession Planting and Herb Companion Pairings to keep harvests rolling.
Choosing herb varieties for culinary uses starts here.
| Herb | Culinary Use |
|---|---|
| Basil | Sauces, salads |
| Dill | Pickling, fish |
| Parsley | Garnish, soups |
| Chives | Eggs, dips |
Ideal for Indoor and Outdoor Gardens
Whether you’ve got a sunny windowsill or a backyard bed, herbs from seed fit both. Space-Saving Layouts let you tuck pots into Microclimate Zones near south-facing glass for Sunlight Optimization.
Container Mobility means you move plants as seasons shift. Outdoor herb planting, indoor gardening, Seasonal Succession—seed starting methods adapt to your space, giving you fresh, harvestable growth year-round.
Choose Herbs and Planting Dates

Picking the right herbs and knowing when to plant them is where your garden either gains traction or loses it before it starts. Not every herb plays by the same rules — some want to go straight into the ground, while others need a few weeks indoors first.
Here’s what you need to know to make smart choices from the start.
Best Beginner Herbs From Seed
Not every herb gives beginners an easy win — but the right low-maintenance varieties stack the odds in your favor. Basil, chives, dill, and oregano rank among the best herbs to grow from seed for beginners, offering reliable germination, forgiving care, and strong aromatic profiles that translate directly into culinary pairings.
These pest-resistant options also store seeds well between seasons, making smart seed storage tips a natural next step.
Basil, Dill, Chives, and Parsley
Four herbs worth mastering first: basil (Ocimum basilicum), dill (Anethum graveolens), chives (Allium schoenoprasum), and parsley (Petroselinum crispum).
Each brings distinct flavor pairings to your kitchen — basil with tomatoes, dill with fish, chives over eggs, and parsley nearly everywhere.
They’re also reliable for seed germination, offer real nutrient boosts, and respond well to basic companion planting and pest management strategies.
Annual, Biennial, and Perennial Herbs
Knowing your herb’s life cycle shapes every garden decision.
Annual herbs like basil complete their growth in one season, necessitating Seed Saving and Harvest Rotation annually.
Biennial herbs, such as parsley, require two seasons to complete their cycle.
Perennial herbs—thyme, chives, oregano—reward soil longevity through climate adaptation, returning reliably without replanting.
Herbs Best Direct-sown Outdoors
Some herbs just don’t like being moved. Cilantro, dill, and chives all perform better when direct sowing after your last frost date, once soil temperature hits 60–70°F. Soil Temperature Monitoring gives you that edge.
- Cilantro — cool soil, succession planting schedule every 2–3 weeks
- Dill — deep taproot, avoid transplanting; enhances Companion Planting Benefits
- Chives — tolerates cool soil, reliable germination
Match your timing to your USDA Growing Zone.
Herbs Best Started Indoors
Some herbs simply need a head start under your roof. Basil, parsley, thyme, rosemary, and sage all benefit from indoor starting—their seed dormancy cycles and slow germination reward patience and temperature monitoring.
Use seedling trays filled with seed starting soil, a reliable seed starter kit, and an LED grow light tuned to the right light spectrum. These tools provide the controlled environment needed for successful germination.
Match your watering schedule and pot size to each herb’s indoor lighting requirements for herb seeds. This ensures balanced growth and prevents common issues like overwatering or stunted development.
Match Sowing Time to Last Frost
Once your indoor herbs are settled, timing the move outdoors hinges on your last frost date. However, this date is an average, not a guarantee. Local frost calendars and your climate zone provide a baseline, while weather forecast integration helps manage real-time risk.
Microclimates—such as a sheltered south-facing wall—can significantly influence planting schedules. These adjustments may shift your seasonal herb planting calendar by a week or more, allowing for earlier or safer transitions based on localized conditions.
Use Warm Soil for Better Germination
Soil temperature is where germination really begins. Once you’ve mastered timing your frosts correctly, ensure your soil sits between 65–75°F — warm enough to trigger enzyme activation inside each seed, converting stored starches into the fuel seedlings need to push upward.
A heat mat maintains this ideal warm range steadily. Use a soil thermometer for accurate temperature monitoring, and consider employing clear plastic cloches as a simple method to retain warmth outdoors.
Pick Herbs Based on How You Cook
Once your soil is warm and ready, the next step is personal — what do you actually cook?
- Mediterranean sauces — grow basil and oregano
- Fresh salads — cilantro and chives brighten every bowl
- Grill rubs — rosemary and thyme hold up to heat
- Stew aromatics — sage and parsley add earthy depth
- Dessert infusions — mint and chamomile shine here
Choosing herbs based on cooking preferences makes herb flavor development and usage feel purposeful, not random.
Prepare Trays, Pots, and Mix

Before a single seed goes in the ground, your containers and growing mix need to be ready to go. The right setup makes germination faster and cuts down on early problems like rot and poor drainage.
Here’s what to have in place before you start sowing.
Indoor Trays Versus Outdoor Beds
Think of it as choosing between a controlled lab vs. open field.
Indoor trays give you temperature regulation, space efficiency, and precise watering frequency — perfect for slow germinators like oregano.
Outdoor beds suit direct-sown herbs like cilantro and dill, where root development happens naturally without transplant shock.
Your choice comes down to what each herb needs and when your season actually starts.
Containers With Strong Drainage
Drainage isn’t optional — it’s the difference between thriving herbs and rotting roots.
Selecting containers with proper drainage for indoor herbs means checking for these five features:
- Multiple bottom holes for even water escape
- Porous pot materials like clay or wood for airflow
- Raised pot feet so runoff doesn’t pool underneath
- Detachable saucers you can empty after watering
- Size-matched containers that won’t hold excess moisture
Good drainage keeps roots breathing.
Soilless Seed-starting Mix Basics
What goes into your containers matters just as much as the containers themselves. A sterile mix — soilless, fine-textured, and low in nutrients — gives seeds the cleanest possible start.
| Property | Why It Matters |
|---|---|
| Air porosity | Roots need oxygen to establish |
| Moisture balance | Even dampness without waterlogging |
For a DIY seed starting mix, combine equal parts coco coir, perlite, and sand.
Adding Compost for Steady Growth
Once your soilless base is ready, compost turns it into something seeds actually thrive in. Mixing in finished compost boosts microbial activity and support and delivers slow-release nutrients that won’t shock tender seedlings.
For soil preparation and amendment for herbs, incorporate a 2-inch layer—enough to enhance soil structure and ensure reliable moisture retention without waterlogging containers.
Extra Sand for Mediterranean Herbs
Mediterranean herbs like rosemary, thyme, and lavender evolved in rocky, lean soil — they thrive in conditions that are not rich, prioritizing sharp drainage.
For soil preparation, the selection of coarse sand matters: use horticultural sand or builder’s sand, and avoid beach sand, which compacts and contains salt. A practical sand-to-soil ratio is roughly 1:2, creating a grit mix that keeps roots dry and ensures air circulates freely.
Labeling Varieties Before Sowing
Before you sow a single seed, label every container clearly — memory is unreliable when multiple herb varieties sit side by side. Write the legal variety name (not just "basil") and include a lot number traced back to your seed packet or container. Add source provenance notes and brief trait descriptions, such as flavor or maturity time.
Use waterproof markers to ensure label longevity.
Moisture-friendly Versus Fast-drying Containers
Not all containers are created equal — and matching the right one to your herb matters more than most beginners expect. Moisture management starts with understanding what each plant actually needs.
- Basil and parsley: moisture-friendly self-watering planters maintain steady soil moisture without constant checking
- Rosemary and sage: fabric grow bags with open-weave drainage strategies prevent soggy roots
- Windowsill containers: prioritize sealing mechanisms and humidity control to offset dry indoor air
- Mediterranean herbs: fast-drying containers with strong airflow management and breathable container materials reduce rot risk
Sow Seeds for Fast Germination
Getting seeds into the ground the right way makes all the difference between a fast start and weeks of waiting. A few small decisions — timing, depth, moisture — can either facilitate quick germination or stall it completely.
Here’s exactly what to do at each step.
When to Start Seeds Indoors

Count backward from your last frost date — that’s your planning anchor. Most herbs need 6 to 10 weeks indoors before transplanting. Though your seed packet timeline will give you the exact window.
Keep indoor temperatures between 65°F and 75°F, use a heat mat for basil, and run LED grow lights on a 14- to 16-hour daily schedule.
When to Direct Sow Outdoors

Once your seedlings are hardened off, outdoor direct sowing becomes your next tool. Wait until soil temperature holds steady between 60–70°F and your frost forecast shows no surprises ahead.
Dill, cilantro, and parsley all respond well to early soil prep and a reliable weather window. Check local seasonal herb planting calendars — timing seed planting according to climate zones makes a real difference in germination success.
Planting Depth by Seed Size

Depth is where germination either starts strong or stalls. As a general rule, follow these seed depth guidelines:
- Tiny seeds (chamomile, thyme): surface-sow with tiny seed coverage of just a light dusting — no burial
- Small seeds (basil, dill): 3–6 mm deep keeps seed germination rates high
- Medium seed depth (chives, parsley): 6–12 mm balances moisture retention and oxygen
- Large seed placement (nasturtium): 1–2.5 cm works because stored energy carries them up
- Soil texture effect: sandy mixes dry faster, so plant slightly deeper for moisture balance at depth
Leave Light-exposed Seeds Uncovered

Burial depth matters — but some seeds flip that rule entirely. Chamomile (Matricaria chamomilla) is a classic example of a positive photoblastic seed: it needs light to trigger germination, so covering it kills you’re chances.
Your surface sowing technique is simple: press seeds gently onto moist mix, skip the soil layer, and use bottom watering to keep moisture even without displacing them.
Mix Tiny Seeds With Sand

Tiny herb seeds — oregano, thyme, mint — are genuinely tricky to spread evenly by hand. Mix them with coarse horticultural sand using a seed-sand ratio of roughly 1:5 by volume, though some gardeners go up to 1:10.
Blend the mixture in a clean jar, then broadcast in two perpendicular passes. The sand’s lighter color also shows you exactly where you’ve already sown.
Soak Slow Seeds Before Planting

Some seeds just take their time — and that’s usually down to hard seed coats blocking water absorption. A warm water soak breaks that barrier fast. Here’s when it actually helps:
- Parsley seeds germinate days sooner after an overnight soak
- Beans and peas hit ideal soak duration at 6–12 hours
- Use a pre-soak container with clean, tepid water only
- Move straight to post-soak sowing before seeds sit too long
Keep Moisture Even, Not Soggy

Getting moisture right is the single biggest factor separating strong seedlings from failed ones. Bottom watering — setting your tray in a shallow water bath so drainage holes pull moisture upward — keeps the mix evenly damp without blasting tender roots. Check after 10–15 minutes and pour off excess.
A consistent watering schedule and a moisture sensor beat guesswork every time, making overwatering prevention genuinely simple.
Use Covers Carefully for Humidity

A humidity dome creates a small greenhouse effect, speeding germination — but only if you use it right. Breathable cover selection matters more than most beginners realize.
- Choose air-permeable materials for condensation prevention tips that actually work
- Apply vent placement strategies: side openings keep air moving
- Check clearance and fit — never let the cover touch the soil
- Follow post-rain cover care: lift, shake dry, replace only when the surface is dry
Avoid Cold Soil During Germination

Cold soil is a silent germination killer. Most warm-season herbs require 70–80°F to sprout reliably—a soil thermometer provides precision beyond human touch.
To combat this, employ black plastic mulch or row cover heating to warm beds before sowing. These methods actively elevate soil temperatures, creating optimal conditions for seed viability.
Raised beds offer a distinct advantage: their soil warms faster than in-ground plots, accelerating germination timelines.
Ultimately, pre-warm strategies matter more than calendar dates when managing soil temperature. Prioritizing warmth over arbitrary schedules ensures successful germination.
Grow On, Transplant, and Harvest

Getting seeds to sprout is satisfying, but the real work starts once those seedlings push through the soil. From managing light and airflow indoors to harvesting at the right moment, each step shapes the flavor and yield you’ll eventually get.
Here’s what you need to know to carry your herbs from seedling to harvest.
Give Seedlings Enough Daily Light
Light is the engine behind every strong seedling — and getting the daily dose right makes all the difference. Aim for 14–16 hours of artificial grow lights or natural light, paired with at least 8 hours of darkness. That daily dark period isn’t optional; without it, seedlings stretch weak and thin.
- Use timer-controlled lighting for consistency
- Target 14–16 hours for light intensity and growth
- Watch for leggy stems — a sign of poor light requirements for seedlings
- Preventing light burn means avoiding 24-hour exposure
Full-spectrum LEDs cover spectrum choice without overheating tender leaves.
Position Grow Lights Close Overhead
Once your timer is set, the next move is positioning LED grow lights. This setup gives you control over light distance and intensity calibration. Start with fixtures 12–24 inches above the canopy for stronger lights, then gradually lower them. Adjustable hangers simplify this process.
| Growth Stage | Light Distance | Light Intensity |
|---|---|---|
| Germination | 18–24 in | Low (25–50 PPFD) |
| First true leaves | 14–18 in | Medium (25,000 lux) |
| Established seedlings | 12–16 in | Full (35,000 lux) |
| Pre-transplant | 12–14 in | Full |
| Heat-sensitive herbs | 16–20 in | Dimmed for heat tolerance |
Maintain the fixture centered to ensure uniform canopy coverage. Edge cells stretch when light exposure for seedlings is uneven.
Improve Airflow to Prevent Damping Off
Good light positioning sets up your seedlings for strong growth — but stale air undoes that work fast. Damping off, a fungal disease that collapses stems at the soil line, thrives where air sits still.
For reliable seedling air circulation, place a small fan on low speed several feet away. Open vent covers once seeds sprout, separate trays so air moves freely between them, and keep that fan running continuously.
Steady air circulation timing beats short bursts every time.
Water Carefully to Avoid Leggy Growth
Air and water work as a team — getting one wrong and your seedlings pay for it. Bottom watering is your best tool: fill the tray with about an inch of water and let pots absorb it within 30 minutes.
This method keeps surface dryness intact while delivering steady moisture timing below, where roots actually need it.
Thin Crowded Seedlings Early
Crowded seedlings create early growth stress fast — competition for light, water, and nutrients stunts everything in the tray. Once you spot the first true leaves, it’s time to thin.
- Check stem thickness, not height — thicker stems signal stronger plants
- Cut extras at soil level to avoid root disturbance
- Use small scissors for thinning techniques on tiny herb seedlings
- Follow spacing guidelines that match each herb’s mature size
- Remove weak, pale seedlings first — no hesitation needed
One strong seedling per cell always outperforms three struggling ones.
Feed Lightly After True Leaves Form
Once true leaves appear, your seedlings are ready for their first light feeding. Seed-starting mixes hold little nutrients, so container nutrient monitoring matters early.
Use diluted fertilizer ratios—half-strength liquid feed, or roughly 50–100 ppm nitrogen targets—every 7–10 days. Organically fertilizing herb gardens with compost tea works well too.
Preventing fertilizer burn means keeping doses consistent but modest throughout seedling care.
Harden Off Before Outdoor Planting
Before your seedlings ever touch garden soil, they need an acclimation period — roughly 7 to 14 days of hardening off seedlings before transplant. Skipping this step invites transplant shock, which can set plants back weeks.
- Gradual Sun Exposure: Start in shade, adding 1–2 hours of direct light daily
- Wind Acclimation: Let gentle breezes toughen stems before full outdoor exposure
- Cold Frame Use: Buffer temperature fluctuations by venting the frame a little more each day
- Moisture Management: Keep soil consistently moist — never bone-dry — as outdoor conditions increase water demand
Transplant After Frost Risk Passes
Once your hardening off seedlings before transplant process wraps up, timing the actual move outdoors comes down to two things: nighttime warmth gauge and soil temperature target. Wait until nights stay above 45°F and soil reaches 60°F — your seedling transplant timing sweet spot.
A strong root ball settles in fast, while cold ground invites transplant shock. Knowing your last frost date through Understanding USDA Growing Zones for Herb Seeds ensures optimal conditions for successful transplantation.
Pinch Flower Buds for Leafy Growth
Once flower buds appear, pinch them off immediately — that’s your cue for a leaf yield boost. Cutting technique matters: snip just above a leaf node using clean scissors or fingers, removing about 1–2 inches of the soft tip.
This growth hormone shift breaks apical dominance, triggering two new shoots below. Regular pinching back is your best bolting prevention strategy, keeping basil, cilantro, and mint producing tender leaves longer.
Harvest No More Than One-third
Think of your herb plant as a solar panel — the leaves are doing the actual work. Taking too many at once depletes its energy reserves, slowing regrowth substantially. Stick to the one-third rule: harvesting beyond this threshold stresses the plant and reduces long-term harvest frequency.
Your herb plant is a solar panel — never harvest more than one-third of its leaves at once
Clean pruning cuts at leaf nodes promote branching, create a balanced canopy, and enhance moisture retention throughout the growing season. This practice supports overall plant health and sustainable yields.
Dry, Freeze, or Refrigerate Herbs
Once harvested, act fast — herbs lose flavor quickly without proper preservation.
For refrigeration, wrap unwashed soft herbs like parsley or cilantro in a damp paper towel, seal them in a zip-top bag, and use within five days.
Freezing techniques work well long-term: press chopped herbs into ice cube trays with water and store up to three months.
Drying methods suit woody herbs best — hang rosemary, thyme, or sage upside down for about a week until leaves crumble easily.
Fix Yellow Leaves, Bolting, and Root Rot
Yellow leaves, bolting, and root rot each have a fix once you know what’s causing the problem.
- Yellowing leaves: Adjust light adjustment and fertilizer timing — add 14–16 hours of grow light daily and apply fish emulsion every two weeks.
- Bolting: Temperature control matters; mulch roots, use shade cloth above 85°F, and harvest tops weekly.
- Root rot: Root hygiene first — trim black roots, soak in 3% hydrogen peroxide, repot into fresh mix with 30% perlite.
- Moisture Management: Let the top inch dry between waterings; solid watering practices for young herb plants prevent most soil drainage failures.
- Nutrient gaps: A magnesium deficiency shows as yellow patches between veins — one tablespoon of Epsom salt per gallon, sprayed on leaves, corrects it fast.
Top 7 Herb Seed-Starting Products
The right tools make herb seed-starting far less frustrating and far more consistent.
You don’t need to buy everything at once, but a few well-chosen products will genuinely move the needle.
Here are seven worth knowing about.
1. Portable Mini Greenhouse Kit
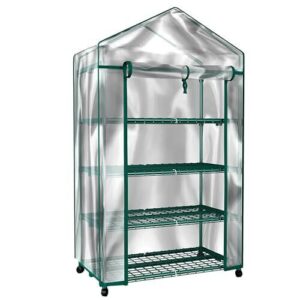
A portable mini greenhouse offers control over your growing environment from day one. This four-shelf unit occupies a compact 27.1 × 19.3-inch footprint and supports up to 24 lb per shelf, accommodating seed trays, pots, and starter herbs with ease.
The clear PVC cover effectively shields young seedlings from frost and wind while maintaining high light transmission for healthy growth.
Equipped with wheels for easy mobility, the unit allows you to chase sunlight between spaces like a porch or sunroom. Priced at $44.95, it’s a practical, low-cost solution to extend your growing season without committing to a permanent structure.
| Best For | Gardeners who want an affordable, easy-to-move setup for starting seeds, growing herbs, or protecting small plants through cooler months. |
|---|---|
| Price | $44.95 |
| Primary Use | Seed starting environment |
| Organic Certified | No |
| Indoor Suitable | Yes |
| Reusable | Yes |
| Form Factor | Shelved unit |
| Additional Features |
|
- Four shelves give you plenty of room for seed trays, starter pots, and small herbs — all in a tight footprint.
- The clear PVC cover keeps frost and wind off your plants while still letting light through.
- Wheels make it easy to chase sunlight or drag it inside when the weather turns.
- The anchoring straps are pretty flimsy — a strong gust can tip it over if you don’t add extra weight or stakes.
- The PVC zipper tends to jam or tear over time, and the bottom flap can leave a gap at ground level.
- The steel frame isn’t built for the long haul outdoors; expect some rust or paint wear after a season or two.
2. Mars Hydro Led Grow Light System
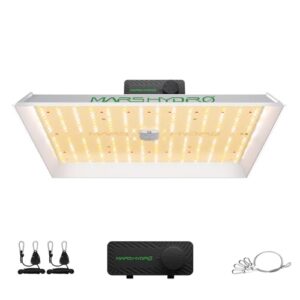
Once your seedlings are inside that greenhouse, light becomes the next thing you need to nail. The Mars Hydro LED grow light fits well here.
Its 354 SMD LEDs deliver full-spectrum output from seedling to harvest, and at 150W it matches a 250W HPS while cutting your electricity bill by roughly 30%. The built-in dimmer lets you dial back intensity for young seedlings without raising the fixture. Fan-less design keeps things quiet, which matters in shared spaces.
| Best For | Indoor growers working with small spaces (2×2 or 2.5×2.5 ft tents) who want a quiet, energy-efficient light they can control from seedling to flower without swapping fixtures. |
|---|---|
| Price | $89.99 |
| Primary Use | Indoor lighting |
| Organic Certified | No |
| Indoor Suitable | Yes |
| Reusable | Yes |
| Form Factor | Panel fixture |
| Additional Features |
|
- Cuts energy use by around 30% compared to a 250W HPS, so it pays for itself over time
- The dimmer lets you adjust intensity at any growth stage without moving the light up or down
- Fan-less design runs silently, which is a real plus in bedroom grows or shared living spaces
- Coverage tops out at 3×3 ft, so bigger grows will need multiple units
- The external driver runs warm and needs decent airflow — not ideal tucked inside a small tent
- The power inlet fits snugly and can be fiddly to plug in, so you’ll want to align it carefully
3. Premier Pro Mix Potting Soil
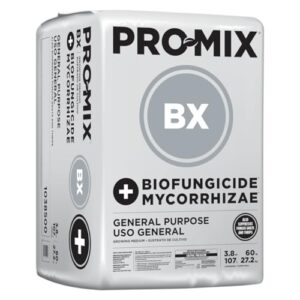
Good light gets seedlings started, but what’s underneath matters just as much. Premium Pro-Mix provides a professional-grade foundation for your herbs.
It is a peat-based medium enriched with bio-fungicide and mycorrhizal inoculum—beneficial fungi that expand root reach and enhance nutrient absorption.
Arriving dry, it lets you control moisture and customize the mix by blending in perlite or compost to suit each herb’s specific needs.
At $107.34 for a 60 lb bale, it’s an investment that pays off across dozens of trays, ensuring robust growth from the ground up.
| Best For | Serious growers, greenhouse operators, and anyone propagating a high volume of seedlings who want a professional-grade substrate they can customize. |
|---|---|
| Price | $107.34 |
| Primary Use | Growing medium |
| Organic Certified | No |
| Indoor Suitable | Yes |
| Reusable | No |
| Form Factor | Bale |
| Additional Features |
|
- Comes loaded with bio-fungicide and mycorrhizal inoculum, so your roots get a real head start without extra products
- Sold dry, which means you control the moisture and can dial in the mix with perlite, vermiculite, or compost
- Helps keep fungus gnats and soil-borne pests in check, cutting down on the need for separate pest treatments
- Packaging can arrive damaged, with holes or leaks that compromise part of the bale
- A 60 lb bale is heavy and awkward to move around without help or equipment
- Pricier than bulk or store-brand peat mixes, and you still need to add water and amendments before it’s ready to use
4. Bootstrap Farmer Seed Starter Tray
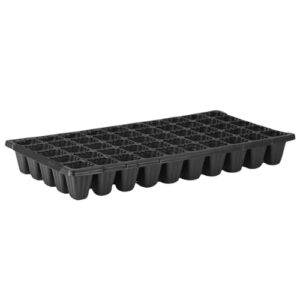
Bootstrap Farmer’s 72-cell seed starter tray is built to last — made from recycled, food-safe plastic that resists cracking, even when hauling a fully loaded tray across the greenhouse.
Each cell measures 1.5 inches wide and 2.25 inches deep, providing herb seedlings with ample space to develop robust roots before transplanting.
Priced at $38.99 for five trays, the cost per tray drops fast, making it an economical choice for bulk purchases.
One minor consideration: the ¼-inch drain holes are small, so removing seedlings requires a little patience to avoid damage.
| Best For | Home gardeners and small-scale growers who start seeds in batches and want trays that hold up season after season. |
|---|---|
| Price | $38.99 |
| Primary Use | Seed starting trays |
| Organic Certified | No |
| Indoor Suitable | Yes |
| Reusable | Yes |
| Form Factor | Tray set |
| Additional Features |
|
- Built from tough, recycled food-safe plastic — handles full loads without cracking or collapsing
- Five trays for $38.99 is solid value, especially if you’re reusing them year after year
- Fits standard 1020 trays and humidity domes, so it slots right into most seed-starting setups
- The ¼-inch drain holes are pretty small — getting seedlings out without damaging roots can be fiddly
- 72 cells are on the compact side for larger plants like full-size brassicas; you might want a 50-cell tray for those
- Heavier than most comparable trays, and occasional manufacturing defects have been reported
5. FoxFarm Liquid Plant Food
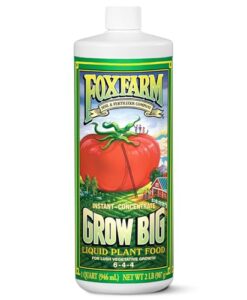
FoxFarm’s liquid trio gives herb seedlings a targeted nutritional push right when they need it most. Grow Big supports vegetative development with a formula containing 6% nitrogen, 4% phosphate, and 4% potash — the foundation for strong stems and full canopy growth.
Once true leaves appear, mix about 2 teaspoons per gallon every other watering. This low-pH formula keeps micronutrients stable and absorbable, ensuring optimal uptake. At $30.99 per quart, the product stretches across a full season, offering cost-effective nourishment.
Before harvest, flush to avoid mineral salt buildup in the plant tissue, preserving quality and flavor.
| Best For | Home gardeners and indoor growers who want a fast-acting liquid fertilizer to boost vegetative growth in vegetables, herbs, and houseplants. |
|---|---|
| Price | $30.99 |
| Primary Use | Liquid fertilizer |
| Organic Certified | No |
| Indoor Suitable | Yes |
| Reusable | No |
| Form Factor | Liquid concentrate |
| Additional Features |
|
- Fast-absorbing liquid formula that delivers nutrients quickly, great for seedlings that need a quick recovery
- Low-pH concentrate keeps micronutrients stable, so your plants actually get what you’re feeding them
- A quart at $30.99 goes a long way — you’re only using 2 teaspoons per gallon each feeding
- Not organic, so mineral salts can build up in plant tissue if you skip the pre-harvest flush
- You’ll want to keep an eye on your water’s pH after mixing, which adds a step to your routine
- Standard teaspoons aren’t the most precise measuring tool — a syringe makes life easier here
6. Espoma Organic Garden Fertilizer
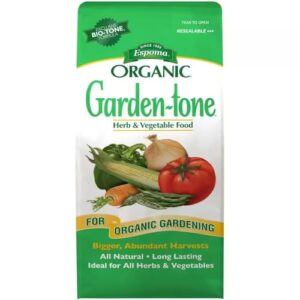
Espoma’s Garden-tone brings something most synthetic fertilizers can’t — a living soil partnership. Its 3-4-4 NPK formula, paired with Bio-tone beneficial microbes, feeds roots gradually without burning tender herb tissue.
This balanced phosphorus and potassium promotes both leafy growth and strong root development. The gradual nutrient release ensures sustained health without damaging delicate plants.
For potted herbs, apply 1.5 teaspoons per 4 inches of pot diameter monthly. This precise dosing supports consistent growth in confined environments.
The added calcium strengthens cell walls, reducing susceptibility to common stress. This fortification enhances overall plant resilience and vigor.
Certified organic and naturally low in salts, Garden-tone is safe around people and pets. Its eco-friendly composition prioritizes sustainability without compromising effectiveness.
| Best For | Home gardeners growing vegetables like tomatoes, peppers, leafy greens, or squash who want an easy organic option that won’t burn their plants. |
|---|---|
| Price | $19.99 |
| Primary Use | Granular fertilizer |
| Organic Certified | Yes |
| Indoor Suitable | Yes |
| Reusable | No |
| Form Factor | Granules |
| Additional Features |
|
- Certified organic with a balanced 3-4-4 NPK formula plus calcium — covers most vegetable garden needs in one product
- Granules are ready to use straight from the bag, no mixing or measuring complicated ratios
- Steady nutrient release means you’re not stressing about over-feeding or causing damage
- It smells — that’s just the reality of nitrogen-rich organic fertilizers, so keep that in mind if you’re gardening in tight spaces
- You have to reapply every month and water it in well, which takes more effort than a set-it-and-forget-it option
- Only works as a soil application — not an option if you’re doing hydroponics or want to foliar feed
7. Earth Science Blood Meal Fertilizer
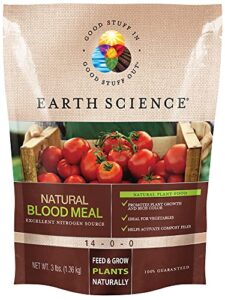
When seedlings start looking pale and slow, nitrogen is usually the missing piece. Earth Science Blood Meal offers a solution with its pure organic nitrogen formula.
The product features a 14-0-0 formula, meaning it provides nitrogen without phosphorus or potassium. Priced at $21.95 for 48 oz, it’s an affordable way to promote growth in leafy herbs like basil and parsley.
To use, mix a light dose into potting soil before sowing or apply 3 cups per 100 square feet and water it in. This encourages faster, greener growth.
For ongoing benefits, reapply every 2–3 months during the growing season.
| Best For | Gardeners who want a fast, organic nitrogen boost for leafy plants, vegetables, and herbs that are showing slow or pale growth. |
|---|---|
| Price | $21.95 |
| Primary Use | Granular fertilizer |
| Organic Certified | Yes |
| Indoor Suitable | Yes |
| Reusable | No |
| Form Factor | Granules |
| Additional Features |
|
- Pure organic nitrogen gets to work quickly, greening up plants fast
- Doubles as a compost accelerator, speeding up your pile’s breakdown
- Can help deter small critters like squirrels and rabbits from flower beds
- Too much can burn foliage, so you have to apply it carefully
- Doesn’t cover all your bases — you’ll need other fertilizers for phosphorus and micronutrients
- The smell is pretty strong and can be off-putting during application
Frequently Asked Questions (FAQs)
What is the easiest herb to grow from seed?
Basil wins that title easily. It sprouts fast, tolerates small pots, and rewards beginners quickly — usually within a week or two of sowing. Chives and dill follow close behind.
What are common herb growing mistakes?
The biggest mistakes are overwatering, weak light, and poor timing. Check soil 2 inches deep before watering, keep grow lights 4 inches overhead, and never sow in cold soil below 60°F.
What is the best way to start herbs from seed?
Start with the right mix, sow at the right depth, and keep soil warm — those three steps decide everything.
Aim for 70°F, use a soilless blend, and stay consistent with moisture.
What’s the easiest herb to grow from seed?
If you’re after a quick win, basil is your best bet — it germinates fast, grows reliably in warm soil, and rewards regular harvesting with fresh, bushy growth all season.
Is it worth growing herbs from seeds?
Yes — a $3 seed packet can yield dozens of plants that would cost $50 or more at a nursery. You get more variety, fresher harvests, and full control over what goes into your soil.
How long does it take to grow herbs from seeds?
Most herbs sprout within 2 to 15 days, then reach their first harvest in 6 to 12 weeks. Parsley runs slower at about 3 months, while basil often delivers leaves in 60 days.
What is the easiest herb to grow from seeds?
Basil is your easiest bet. It sprouts in 5–7 days at 65–70°F, thrives in a sunny windowsill, and rewards even the most impatient gardener with fragrant leaves fast.
What herbs should not grow from seed?
Some herbs simply don’t cooperate from seed. French tarragon produces sterile seeds, rosemary takes years to mature, and bay laurel germinates poorly.
For these, cuttings or divisions are your smarter move.
Should you soak your herb seeds before planting?
Soaking slow-germinating seeds like parsley and coriander overnight cuts sprout time by 2–4 days. Stick to 8–12 hours in warm water, then plant immediately. Skip soaking basil — those tiny seeds rot fast.
How long can I store unused herb seeds?
Most herb seeds stay viable for 1 to 4 years when stored cool, dry, and dark. Basil pushes 3 to 5 years; parsley fades faster. Always label packets with the date.
Conclusion
Like a chef who insists on fresh ingredients, growing herbs from seeds puts full control in your hands—over variety, soil, and timing that no nursery shelf can match.
You’ve learned when to sow, how to raise sturdy seedlings, and when to harvest without weakening the plant. That $2.50 packet isn’t just economical; it’s a season’s worth of flavor, entirely on your terms.
Start one tray, and the process quickly becomes second nature.
- https://dl.acm.org/doi/10.1145/3498537
- https://www.mdpi.com/2223-7747/10/9/1884
- https://extension.wvu.edu/lawn-gardening-pests/gardening/gardening-101/herb-gardening-for-beginners
- https://cmg.extension.colostate.edu/Gardennotes/731.pdf
- http://herbsocietyorg.presencehost.net/grow/hsa-publications/hsa-quick-fact-sheets.html