This site is supported by our readers. We may earn a commission, at no cost to you, if you purchase through links.

A single hard frost can wipe out weeks of careful work in under an hour. Most beginner gardeners learn this the hard way—covering plants too late, using the wrong material, or skipping protection entirely during a forecast that "probably won’t be that bad."
Cold weather cloches change that equation. These simple covers trap warmth at soil level, extending your growing season on both ends without a greenhouse budget or a steep learning curve. A clear polycarbonate bell over a tomato seedling can raise its immediate environment by up to 6°C—enough to mean the difference between thriving and dead by morning.
Knowing which cloche to reach for, when to place it, and how to manage what happens underneath it separates a productive cold-season garden from a frustrating one.
Table Of Contents
Key Takeaways
- Matching your cloche material to the task matters more than price — glass maximizes light and heat retention, polycarbonate survives impact, fleece breathes to prevent fungal buildup, and mesh controls pests without trapping warmth.
- Cover plants before sunset, not after dark, since soil loses stored heat fast and waiting even an hour can mean the difference between a thriving seedling and a dead one.
- Managing what builds inside the cloche — heat, humidity, and condensation — is just as critical as placing it correctly, since unchecked interior temperatures can damage plants as badly as the frost you’re trying to block.
- When removing cloches after frost risk passes, harden plants gradually over 7–14 days rather than pulling covers all at once, or you risk transplant shock that rivals cold damage.
Best Cold Weather Cloches
Not all cloches are built the same, and the right pick depends on what you’re growing and how cold your winters get.
For a deeper look at matching protection methods to your specific climate and crops, winter frost protection strategies for garden plants breaks down the options clearly.
The options below cover a range of materials, formats, and price points — so there’s something here whether you’re protecting a single tomato plant or an entire row of seedlings. Here are seven cold weather cloches worth considering.
1. Agfabric Plant Freeze Protection Frost Blankets
The Agfabric Plant Freeze Protection Frost Blanket covers a generous 10′ x 50′ area, making it practical for full rows rather than individual plants. At 1.2 oz per square yard, the UV-stabilized spun polypropylene balances frost protection down to 28°F with enough breathability to prevent heat buildup on milder days.
Light transmission sits between 30% and 85% depending on weight, so photosynthesis continues under the cover. Handle it carefully — the fabric snags easily on sharp edges or clips.
| Best For | Gardeners and small-scale growers who want an affordable, reusable way to protect full rows of vegetables, fruit trees, or shrubs from frost, pests, and harsh weather across multiple seasons. |
|---|---|
| Material | Woven spun polypropylene |
| Color | White |
| Dimensions | 10 ft x 50 ft |
| Pack Quantity | 1 roll |
| Reusable Design | Yes, multiple growing seasons |
| Airflow Feature | Breathable fabric construction |
| Additional Features |
|
- Covers a large 10′ x 50′ area, making it ideal for protecting entire garden rows rather than individual plants
- Breathable, UV-stabilized fabric lets in 30–85% light and air, so plants stay healthy without overheating
- Works as both a frost shield (down to 28°F) and an insect barrier, cutting down on the need for separate protective measures
- Thin fabric snags and tears easily around sharp edges, clips, or rough surfaces, which can shorten its lifespan
- Durability depends heavily on how it’s handled and stored, so longevity isn’t guaranteed across many seasons
- Some users have noted slight inconsistencies in the actual dimensions compared to what’s listed
2. Haxnicks Original Bell Jar Cloches
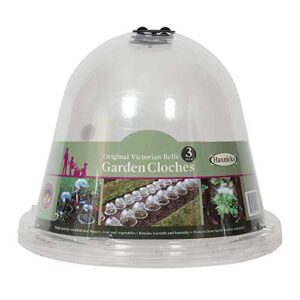
Where the Agfabric blanket covers an entire row in one sweep, the Haxnicks Bell Jar Cloche works at the opposite scale — one plant, one dome, total control.
Vacuum-formed from clear APET plastic, each cloche sits roughly 13–14 inches wide and 10 inches tall, fitting neatly over seedling beds or pots. The adjustable top vent lets you regulate airflow without lifting the whole cover, which matters when a sunny afternoon can push interior temperatures past 65°F.
Sold in packs of three, they’re lightweight but need anchoring in wind.
| Best For | Home gardeners who want precise, individual protection for seedlings, tender perennials, or winter crops — especially in smaller plots or container gardens. |
|---|---|
| Material | Clear plastic |
| Color | Clear |
| Dimensions | Bell-shaped, multi-pot compatible |
| Pack Quantity | 3 cloches |
| Reusable Design | Yes, season-to-season reuse |
| Airflow Feature | Integrated top vents |
| Additional Features |
|
- The clear APET plastic keeps plants visible so you can monitor growth without disturbing them
- The adjustable top vent makes it easy to manage heat and airflow on warmer days without removing the cloche entirely
- Bell-shaped design fits over a range of pot sizes and works as a solid barrier against birds, slugs, and other pests
- Lightweight construction means they can shift or tip in wind unless you secure them
- The plastic feels thinner than you might expect for the price, and dents easily under pressure
- At three per pack, covering a larger bed gets expensive and time-consuming compared to row-cover alternatives
3. Haxnicks Pop Up Tomato Cloche
If the bell jar suits compact seedlings, the Haxnicks Pop Up Tomato Cloche steps up for taller crops that need serious real estate. At 43 inches high and 19 inches wide, it pops open without tools and drops ground pegs into soil in under a minute.
The clear PVC transmits enough light to keep tomatoes and peppers productive during cool spells. One real limitation: there’s no top zipper, so accessing the plant means lifting the whole cover — something worth planning around as fruits develop.
| Best For | Gardeners growing tall crops like tomatoes and peppers who need full-season protection from frost, wind, and pests without any complicated setup. |
|---|---|
| Material | 60% cotton, 40% polyester |
| Color | Assorted |
| Dimensions | Small to 3XL |
| Pack Quantity | 6 shirts |
| Reusable Design | Yes, machine washable |
| Airflow Feature | Breathable cotton-poly blend |
| Additional Features |
|
- Pops open and stakes into the ground in under a minute — no tools needed
- At 43 inches tall and 19 inches wide, it gives larger plants plenty of room to grow
- Clear PVC lets in enough light to keep plants productive through cool or unpredictable weather
- No top zipper or opening, so you have to lift the entire cover just to water or check on your plants
- Can blow over in even light wind, despite the included ground pegs
- Clear PVC can trap too much moisture inside, and the material contains DEHP, which carries health warnings in California
4. Tierra Garden Micromesh Plant Cover Cloche
Where the tomato cloche focuses on height, the Tierra Garden shifts the goal entirely — pest exclusion over heat retention. Its 0.6 mm high-density polyethylene mesh blocks aphids and thrips while still letting rain and airflow reach the soil below.
The accordion-style, one-piece design deploys in seconds and folds flat when the season ends. Drawstring ends let you dial ventilation without removing the whole cover. At 118 inches long, it suits full raised beds, though tall brassicas may outgrow the 12-inch clearance quickly.
| Best For | Gardeners who want reliable pest protection for low-growing crops like kale, cabbage, and green beans across full raised beds or allotment rows. |
|---|---|
| Material | Clear PVC and steel |
| Color | Clear |
| Dimensions | 43 in H x 19 in diameter |
| Pack Quantity | 1 cloche |
| Reusable Design | Yes, foldable flat storage |
| Airflow Feature | Built-in air vents |
| Additional Features |
|
- The 0.6 mm micromesh keeps out even tiny insects like aphids and thrips without blocking rain or airflow
- Accordion design sets up in seconds and folds flat for easy off-season storage
- UV-stabilized materials and rust-proof galvanized steel hoops hold up to long-term outdoor use
- At just 12 inches tall, it won’t suit taller plants like broccoli or Brussels sprouts
- Accessing plants for pruning or harvesting can be awkward with the tunnel structure in place
- Some gardeners find the overall size smaller than expected for larger growing setups
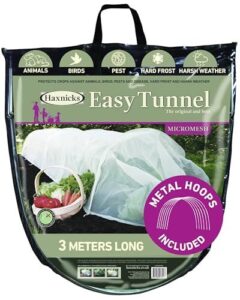
5. Haxnicks Micromesh Pest Wind Barrier
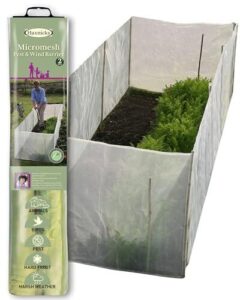
Where the Tierra Garden wraps a single bed, the Haxnicks barrier surrounds the entire plot — two 13-foot panels that link together to enclose up to 26 linear feet of growing space. The 0.6 mm woven micromesh blocks carrot fly and low-flying insects without shutting out sunlight, rain, or pollinators.
For best results, pair this barrier with advice on growing tomatoes through summer heat, since timing your mesh deployment around peak sun hours keeps crops protected without unnecessary shading.
Integrated bamboo canes keep it upright fast, though hard or loose soil may snap them. That’s why keeping spare canes on hand is smart from the start.
| Best For | Gardeners with larger plots or raised beds who want a versatile, easy-to-configure barrier that protects against carrot fly, wind, and curious animals while still letting in light, rain, and pollinators. |
|---|---|
| Material | UV-stabilized polyethylene and galvanized steel |
| Color | Natural |
| Dimensions | 118 in L x 18 in W x 12 in H |
| Pack Quantity | 1 tunnel |
| Reusable Design | Yes, accordion fold for storage |
| Airflow Feature | Adjustable drawstring ends |
| Additional Features |
|
- Covers up to 26 linear feet, making it one of the more generous options for protecting bigger growing spaces
- The 0.6mm micromesh keeps out carrot flies and low-flying insects without blocking sunlight, rainfall, or bees
- Flexible enough to wrap around different plot shapes — raised beds, container gardens, and pallet collar planters all work
- Bamboo support canes can snap in hard or loose soil, so you may need to buy replacements fairly quickly
- Doesn’t stop slugs or very small insects that can squeeze through or crawl under the edges
- May need extra clips or stakes in exposed or windy spots to stay properly in place
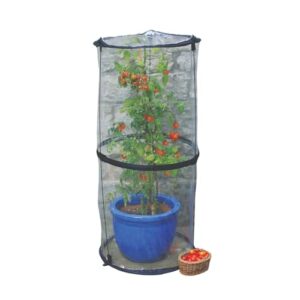
6. Miracle-Gro 4 Tier Mini Greenhouse Plant Tent
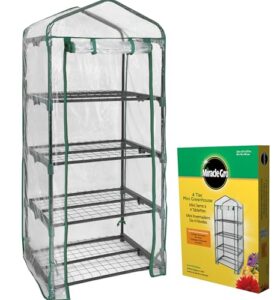
Think of this as a compact indoor nursery — four wire-mesh shelves stacked inside a clear PVC cover that traps warmth while letting daylight through. The 23" × 17.25" footprint fits a balcony or sunroom without crowding, yet holds full 10×20 seedling trays across all tiers.
The roll-up zipper door is for ventilation, but you’ll need to open it manually on sunny afternoons — the tent has no built-in vents. Anchor it with sandbags; the lightweight steel frame catches wind easily.
| Best For | Gardeners with limited outdoor space who want a simple, affordable way to start seeds, propagate cuttings, or protect tender plants through cooler months. |
|---|---|
| Material | Woven polypropylene micromesh |
| Color | Green |
| Dimensions | 13 ft L x 2.25 ft H per panel |
| Pack Quantity | 2 panels |
| Reusable Design | Yes, removable panel system |
| Airflow Feature | Openable crop access section |
| Additional Features |
|
- Four spacious wire-mesh tiers fit standard seedling trays, giving you serious growing capacity in a 23" × 17" footprint
- The clear PVC cover traps heat and lets in daylight, creating a warm microclimate that speeds up germination and extends your growing season
- Tool-free snap-together assembly means you’re up and running in minutes, with no hardware or extra equipment needed
- No built-in ventilation — on warm sunny days you’ll need to manually roll up the door (or add a small fan) to prevent overheating and mold
- The lightweight frame catches wind easily, so anchoring with sandbags or stakes is a must for any outdoor placement
- Long-term outdoor use can lead to rust or frame wear, making this better suited as a seasonal or semi-protected setup rather than a year-round outdoor fixture
7. The Planket Frost Protection Plant Cover
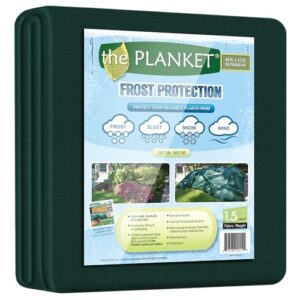
Round, draped, and cinched at the base, The Planket works like a fitted blanket for shrubs, citrus, and tropical container plants that rigid cloches can’t reach. Its spun-bonded nonwoven fabric breathes while still blocking frost and cold wind — no moisture trap, no fungal setup like you’d get with plastic.
The drawstring edge pulls tight around pots or stakes into ground-level soil, keeping cold air from sneaking underneath. At 10 ft × 12 ft, it covers up to 120 square feet and folds flat for storage.
| Best For | Gardeners with shrubs, citrus, or tropical container plants that need frost protection but won’t fit under a standard rigid cloche. |
|---|---|
| Material | PVC and polyethylene with powder-coated steel |
| Color | Clear |
| Dimensions | 23 in L x 17.25 in W x 57 in H |
| Pack Quantity | 1 greenhouse |
| Reusable Design | Yes, tool-free disassembly |
| Airflow Feature | Roll-up double zipper door |
| Additional Features |
|
- Breathable spun-bonded fabric blocks frost and cold wind without trapping moisture the way plastic covers do
- Generous 10 ft × 12 ft size covers up to 120 square feet, with a drawstring base that seals out cold air
- Folds flat for easy storage when the season’s over
- The included plastic stakes can snap in hard soil, so you may need to buy sturdier ones separately
- Grommets can tear or pull free if the cover catches strong wind
- Tricky to install solo on a breezy day — an extra set of hands helps
Choose The Right Cloche Material

The material your cloche is made from determines how well it protects your plants — and how much work it creates for you. Each option carries its own trade-offs between warmth, durability, ventilation, and cost. Here’s what you need to know before choosing.
Glass for Light and Warmth
Clear glass cloches transmit 80 to 90 percent of visible light — among the highest of any cloche material. Low iron glass reaches 92 percent, cutting the greenish cast that mutes photosynthesis. The greenhouse effect keeps nights warmer than open soil.
Why glass works:
- Excellent heat retention overnight
- Resists UV degradation over time
- Steady light transmission year-round
- Low-emissivity coating option available
Using low-e coatings can further help reflect heat back to its source to protect your plants.
Polycarbonate for Durability
Polycarbonate cloche panels absorb impact up to 200 times better than glass, so hail and accidental knocks won’t crack your setup. UV stabilization prevents surface yellowing across years of outdoor exposure, and thermal stability keeps panels from warping through cold mornings and warm afternoons alike. Optical clarity stays high enough to support photosynthesis even on overcast days.
| Property | Performance | Garden Benefit |
|---|---|---|
| Impact resistance | 200× stronger than glass | Survives hail and knocks |
| UV stabilization | Resists yellowing over years | Retains clarity season-long |
| Thermal stability | Stable from frost to heat | No warping during storage |
Fleece for Frost Protection
Fleece is the most forgiving cold-weather cover you can own. At 17 gsm, it controls light frosts down to -2°C; 30 gsm pushes that to -6°C while trapping a warm air layer around stems.
It transmits 60–90% of daylight, wicks moisture from leaf surfaces, and breathes well enough to prevent fungal buildup — a balance rigid materials rarely achieve.
Plastic for Budget Coverage
Fleece costs more per square metre than most beginners expect. Clear polyethylene film fixes that — it transmits up to 92% of daylight and raises near-ground temperatures by 2–6°C during cold snaps, all for under a few dollars per sheet.
The trade-off is lifespan. Without UV stabilization, thin plastic turns brittle within weeks. Choose UV-stabilised or polyolefin film to stretch that to a full season.
Mesh for Airflow
When plastic starts to fail, mesh is already doing a different job entirely. Breathable garden cloches made from fine mesh don’t trap heat — they manage it, letting air move freely while blocking insects and wind.
Mesh porosity determines how much air passes through, and that directly affects whether your plants cook on a sunny afternoon or stay protected overnight.
Match Cloches to Garden Tasks

Not every cloche does the same job, and picking the wrong one can cost you a harvest. The format you choose should fit the task at hand — protecting a single seedling calls for something different than covering an entire row. Here are the main types and what each one does best.
Bell Cloches for Seedlings
A bell-shaped cloche works like a personal greenhouse for your most vulnerable seedlings, trapping a warm microclimate right at soil level. The dome channels light evenly while holding heat near the roots, which can accelerate germination noticeably.
Open the adjustable vent cap on sunny afternoons to prevent overheating, and press the ground pegs firmly into the soil so wind doesn’t displace it overnight.
Tunnel Cloches for Rows
When a single bell cloche won’t stretch far enough, a tunnel cloche takes over — covering an entire row in one continuous canopy. Standard widths run 0.5 to 1.0 meters, leaving room to work between beds.
Connect segments as your row grows, use durable fiberglass or metal hoops, and you’ll see faster germination while blocking wind desiccation from stripping young transplants overnight.
Pop-up Cloches for Convenience
A pop-up cloche springs into position in seconds — no tools, no assembly.
When frost threatens overnight, you want coverage now, not twenty minutes from now. That’s where these shine:
- Rapid frost protection down to -3°C
- Foldable frames for compact shed storage
- Zip panels for easy watering access
- Ground pegs for wind resistance
- Lightweight build for portable garden mobility
Mesh Cloches for Pests
Unlike frost covers, mesh cloches aren’t about warmth — they’re about keeping pests out without reaching for chemical pesticides.
Mesh size determines protection level. Ultrafine 0.3–0.6 mm blocks thrips and aphids; standard 1.3 mm stops moths and beetles but lets smaller insects through.
| Mesh Size | Pests Excluded | Key Limitation |
|---|---|---|
| 0.3–0.6 mm | Thrips, aphids | Minimal airflow reduction |
| 0.8 mm | Whitefly, leaf miners | Slight resistance increase |
| 1.3–1.4 mm | Moths, large beetles | Small insects pass through |
One critical mistake: leaving mesh on during flowering blocks pollinator access, so remove it at bloom. Check regularly that no foliage presses against the netting — pest bypass happens exactly there. UV-stabilised polypropylene lasts multiple seasons; uninspected mesh degrades quietly.
Mini Greenhouses for Starts
Multi-tier shelving transforms a compact unit into a propagation powerhouse — most models fit 6–24 trays within a 20–40 inch footprint. Clear covers maintain 18–24°C for germination, while integrated grow lights compensate when natural light falls short.
Portable units on casters let you wheel starts indoors during cold snaps, keeping germination rates consistently above 80%.
Cover Plants at The Right Time

Timing your cloche use correctly makes the difference between plants that thrive and ones that quietly decline under the wrong conditions.
A well-chosen cover applied at the wrong moment won’t save anything, so knowing when to act is just as important as knowing what to use. Here’s what you need to pay attention to throughout the season.
Watch Frost Forecasts
A frost forecast isn’t just a number — it’s your cue to act. Most apps assign a frost risk score from 0 to 10 using overnight temperature and dew point, so watch for scores above 6.
Pay attention to:
- Microclimate variability — valleys and low spots frost earlier than open ground
- Coastal vs inland differences — marine air buffers coastal gardens
- Forecast accuracy limits — predictions beyond 24 hours become unreliable
Cover Before Sunset
Soil absorbs heat all day, but that warmth escapes fast once the sun drops. Cover plants before sunset to trap that stored heat close to the root zone, where it matters most.
Waiting until dark means you’re already behind — temperatures can fall several degrees in under an hour. Build a simple pre-sunset routine: check your forecast, then cover before the light goes golden.
Cover before the light goes golden — temperatures can drop several degrees in under an hour
Warm Soil Before Sowing
Place your cloche at least one week before sowing — cold soil stalls germination even when air temperatures seem mild. Most vegetables need 60–75°F (15–24°C) at root depth to sprout reliably.
South-facing beds warm fastest, so use microclimate advantages where you have them. Moist soil also conducts heat better than dry, so water lightly before covering.
Protect Autumn Crops
Late-ripening crops like tomatoes and chillies are the most vulnerable once nights start dipping toward 32°F (0°C).
A cloche raises the microclimate around them by 2 to 6°C, which is often enough to buy another two or three weeks of productive growth. Cover when forecasts predict two or more consecutive frost nights — that’s your reliable trigger.
Remove After Frost Risk
Once the danger has passed, keeping garden cloches on too long trades frost protection for a new problem: overheating and humidity disease risks that cut photosynthesis efficiency in tender plants.
- Stage removal over several days to reduce transplant shock
- Vent first, then lift fully once nights stay above 2°C for three consecutive days
- Watch for sunscald on leaves during sudden full exposure
- Store covers dry to protect them for next season’s season extension
Set Up Cloches Step-by-Step
Getting your cloches in place the right way makes the difference between plants that thrive and ones that struggle through the night. Before you set anything down, a few simple prep steps will help your covers actually do their job. Work through each one in order and you’ll have a solid, secure setup ready before temperatures drop.
Clear Weeds and Debris

Pull weeds before placing any cloche — competing roots and debris undermine everything you’re trying to protect. Work after rain when soil is soft, using a sharp hoe for effective root removal without leaving fragments behind.
Rake the surface level, then lay organic mulch to suppress regrowth. Bag any seed-bearing weeds rather than composting them to avoid spreading trouble.
Water Soil First

Once the surface is clear, water the bed thoroughly before setting down any garden cloche.
Moist soil transfers heat more efficiently than dry soil, meaning your cloche will hold warmth longer overnight. Wet soil also provides the moisture gradients seeds need for radicle emergence — without that baseline, germination stalls even under ideal cover conditions.
Place Covers Securely

Lower your cloche straight down without dragging it across foliage, then press the base firmly into the soil so no gaps remain at the perimeter.
Lightweight covers lift easily — secure them immediately with landscape staples or rebar stakes driven at 45-degree angles. For bell cloches, engage the ground pegs before winds arrive, not after. A shifted cover loses most of its thermal value overnight.
Seal Edges Tightly

Run a finger along every edge after placing your cloche — any gap you can feel is heat escaping all night. Press soil firmly against the base perimeter where no seal exists.
EPDM or silicone edge seals handle temperatures well below freezing and close gaps up to 5 mm wide. Self-adhesive edge tape reduces lift by roughly 40 percent on rigid covers and takes seconds to apply.
Add Stakes or Weights

Stakes and weights are your last line of defense against a cloche that becomes a sail in strong winds.
Drive stainless steel stakes 15–25 cm into the soil at a slight outward angle — this creates a counteracting lever rather than simple resistance. On concrete or gravel, use 5–10 kg weighted anchors per leg instead.
Manage Heat, Moisture, and Airflow

Once your cloches are in place, the real work begins — keeping the environment inside them balanced. Too much heat or moisture can damage plants just as badly as frost. Here’s how to manage airflow, water, and temperature to keep everything on track.
Vent on Sunny Afternoons
A garden cloche works against you on a bright afternoon if you don’t vent it. Interior temperatures can climb 15–20°F above ambient, pushing seedlings past their stomatal conductance threshold and triggering leaf scorch.
Open vents by mid-afternoon — or rely on automatic vent openers — to maintain microclimate control and keep humidity low enough to discourage fungal problems before evening closing.
Check Soil Moisture Manually
Cloches slow evaporation dramatically, so your usual watering schedule won’t apply. Clay beds retain moisture far longer than sandy ones, so adjust your intervals accordingly.
Push a finger 2–4 inches into the soil — it should feel cool and slightly damp. If it clumps heavily or oozes, hold off. A quick soil ball test confirms this: pliable holds shape, crumbling means dry.
Avoid Overhead Watering
Overhead watering inside a plant cover is a fast track to powdery mildew. Trapped humidity on wet foliage—with nowhere to escape—creates exactly the warm, damp conditions fungal spores love.
- Use drip irrigation to deliver water directly to the root zone
- Lay soaker hoses under mulch to minimize surface evaporation
- Water in the morning so any incidental splash dries quickly
- Keep foliage dry when protecting seedlings under a garden cloche
Prevent Condensation Buildup
Moisture on foliage isn’t just a humidity problem — it’s a temperature problem. When the cloche surface cools faster than the air inside, condensation follows.
Morning sun exposure helps burn it off quickly, but a small hygrometer tells you when interior humidity creeps past 70 percent. At that point, open a passive vent or lift one edge briefly to flush the damp air out.
Harden Plants Gradually
Removing a garden cloche too abruptly can shock transplants harder than frost ever would.
Ease seedling protection away gradually:
- Start with 1–2 hours outdoors on calm, mild days
- Introduce indirect light before direct sun to prevent leaf scorch
- Build wind exposure slowly, moving transplants to breezier spots each day
- Bring plants inside if temperatures drop below 5°C
Tomatoes and peppers usually need 7–14 days; leafy greens acclimate faster.
Make Simple DIY Cloches

You don’t need to spend much to protect your plants from frost — a few common household items can do the job just as well as store-bought cloches.
Building your own also gives you the flexibility to customize size and coverage for whatever you’re growing. Here are five simple options worth keeping in your cold-weather toolkit.
Plastic Bottle Cloches
Repurposing a standard beverage bottle into a garden cloche costs nothing and works surprisingly well. Cut the bottom off a 1–2 liter PET bottle, press it over a seedling, and you’ve created an insulated dome that traps heat and shields transplants from frost.
Loosen the cap for airflow ventilation on warm afternoons — condensation buildup is your main enemy here, so check daily.
Inverted Glass Jars
Glass jars from your kitchen make surprisingly effective bell-shaped cloches. Place one inverted over a vulnerable vegetable start, and its thermal retention is immediate — the thick borosilicate walls trap a stable microclimate around the plant.
Unlike plastic, glass won’t react with soil or foliage, and it won’t yellow over time. Anchor each jar with a rock to prevent wind displacement.
Bucket Plant Covers
A spare plastic bucket from the garage can stand in as a surprisingly competent bell-shaped cloche. Smooth interior walls matter here — rough surfaces abrade foliage during placement and removal.
Choose a bucket 2 to 3 times wider than the plant, then anchor its rim with rocks or soil to prevent wind displacement. Check interior humidity daily and lift one edge on warm afternoons.
PVC Tunnel Frames
A PVC grow tunnel is one of the most flexible DIY structures you can build for under $30. Use 16 to 32mm diameter pipes bent into hoops, spaced roughly 60cm apart, then connected with elbow fittings for a modular frame.
UV-stabilized PVC resists sun degradation season after season. Add crosswise bracing to handle wind loads without the frame shifting mid-season.
Weighted Edge Anchors
Anchoring any cover — whether a popup cloche or bell cloches — comes down to pullout force analysis: how much wind load can your edges resist before the whole frame lifts?
Distribute soil stability weights along each edge evenly, so no single point bears the strain. Sandbags, rebar stakes, or packed soil all work to protect your vegetable starts reliably.
Frequently Asked Questions (FAQs)
Will cloches protect from frost?
Yes — a cloche creates a sheltered microclimate around vulnerable plants, trapping solar heat to raise air and soil temperatures by up to 10°C, which delivers reliable frost mitigation for seedlings and tender transplants overnight.
How long do cloches typically last before replacing?
Ironically, the one tool you buy to protect your garden often needs protecting itself. Glass bell cloches can outlast a decade; cheap plastic domes rarely survive four seasons before cracking.
Can cloches protect plants from heavy snowfall?
Heavy snowfall can crush or bury unanchored covers, so structural strength matters. Rigid bell-shaped and polycarbonate cloches shed snow loads better than fleece, which sags. Stake edges firmly to prevent displacement during storms.
Do cloches work for container or potted plants?
Cloches work well for container and potted plants, trapping solar heat to raise the microclimate by several degrees. A bell-shaped cloche over a single pot cuts wind chill and slows moisture loss noticeably.
Are cloches safe around children and pets?
Most cloches are reasonably safe, but glass and sharp edges demand attention around children and pets. Keep bell-shaped designs away from play zones, and anchor all covers securely so curious hands — or paws — can’t knock them over.
Can I use cloches in a raised garden bed?
Raised beds are practically a natural home for cloches. Yes, you can use them — they rest on the frame edges, boost microclimate temperatures, and protect vegetable starts without sinking into loose soil.
Conclusion
The frost forecast looks manageable—until it isn’t. That’s the moment cold weather cloches for beginner gardeners shift from a nice idea to a non-negotiable tool. One uncovered seedling on the wrong night undoes weeks of careful work.
But when you’ve matched the right cloche to the right task, timed your coverage, and managed what builds underneath, you control the season. The garden doesn’t stop growing. You just learned how to keep it going.
- https://www.rhs.org.uk/prevention-protection/cloches
- https://www.growveg.com/guides/effective-cold-weather-protection-for-vegetable-gardens
- https://permies.com/t/127537/permaculture-upcycling/Improvising-making-sourcing-DIY-garden
- https://millcreekgardens.com/cloches-winter-gardening
- https://yardandgarden.extension.iastate.edu/how-to/how-protect-plants-frost-and-freeze