This site is supported by our readers. We may earn a commission, at no cost to you, if you purchase through links.
 If you’re after the proper way to harvest potatoes, start by waiting until the plant tops turn yellow and flop over—nature’s way of waving a checkered flag.
Use a garden fork, not a shovel, and dig 8–12 inches from the stem to avoid stabbing your spuds. Gently lift the soil, then brush off excess dirt.
Handle each potato like it’s a fragile egg; bruises can ruin your harvest.
Timing and technique matter more than fancy gadgets, but the right tools sure help. Curious about storage tricks and tools that make potato harvesting a breeze?
There’s plenty more to dig up ahead.
Table Of Contents
- Key Takeaways
- Harvesting Potato Basics
- Top 5 Harvesting Tools
- Harvesting Techniques
- Post Harvest Care
- Frequently Asked Questions (FAQs)
- Is it better to harvest potatoes or leave them in the ground?
- How long do you let potatoes dry after harvesting?
- How do you harvest potatoes?
- How can I lose weight fast by eating potatoes?
- What do you need to harvest potatoes?
- When do you harvest potatoes?
- What can I do with harvested potatoes?
- Do potatoes need to be dug before harvesting?
- Can you leave potatoes in the ground too long?
- What is the best way to harvest potatoes?
- Conclusion
Key Takeaways
- Wait for the right timing – You’ll know it’s ready when plant tops turn yellow and die back, then wait another 2-3 weeks for skin hardening
- Use a garden fork, not a shovel – Start digging 8-12 inches from the stem to avoid stabbing tubers, and work from the outer edge inward
- Handle potatoes like fragile eggs – Gently brush off dirt without washing, and avoid rough handling that causes bruises and storage problems
- Cure before storing – Let potatoes sit in a dark, well-ventilated area at 45-60°F for two weeks to thicken skins and heal minor cuts
Harvesting Potato Basics
Knowing when your potatoes are ready makes all the difference between perfect spuds and disappointment.
You’ll need to master three key skills: checking skin thickness for maturity, handling tubers without damage, and timing your harvest just right, which includes understanding when to check for readiness and how to handle tubers.
Checking Maturity Through Skin Thickness
Determining potato maturity through skin thickness is your key to successful harvests. Simply rub your thumb across a tuber’s surface—if the skin peels away easily, you’re dealing with new potatoes. Mature potatoes develop thick, firmly attached skins that resist this thumb test, signaling they’re ready for long-term storage.
Perfect spuds start with the simple thumb test—mature potatoes resist peeling, while young ones give way easily.
Understanding proper storage techniques is essential for maintaining potato quality.
Here are the essential maturity indicators to watch for:
- Test skin adherence by gently rubbing several tubers from different plants
- Wait 10-14 days after foliage dies back to allow skin thickness development
- Look for waxy, resistant skin that won’t scratch off with light pressure
Harvest timing depends on your storage plans—thin-skinned spuds work great for immediate cooking, while thick-skinned varieties excel in root cellars.
Avoiding Damage During Harvest
When digging around your potato plants, gentle handling starts with soil loosening techniques.
Start every harvest with gentle hands and loose soil—your potatoes will thank you with fewer bruises and better storage.
Position your garden fork 8-12 inches from the plant base for bruise prevention—never dig directly into the root zone.
Fork usage should involve careful, shallow movements that lift rather than pierce.
Wet soil creates bruised potatoes, so wait for dry conditions.
Rough handling turns perfect spuds into mashed disappointments.
Practice gentle digging with extra care, working systematically from the plant’s outer edge inward for damagefree harvesting.
Harvest timing matters too—rushing leads to careless mistakes.
Ideal Harvest Time and Conditions
Timing is everything when harvesting potatoes. Harvest time arrives 2-3 weeks after foliage yellows and dies back, signaling crop maturity.
Test skin thickness—mature tubers resist rubbing off, indicating harvest readiness. Soil conditions matter; dry soil prevents rot and makes lifting easier.
Weather factors influence success—cool, dry days create ideal harvesting conditions. Avoid wet soil that clings to tubers and promotes disease.
Monitor these indicators for perfect potato harvest timing. For the best results, consider the proper harvest techniques to guarantee a successful crop.
Top 5 Harvesting Tools
Having the right tools makes potato harvesting faster and safer for both you and your precious tubers.
You’ll need specific equipment that can gently lift potatoes from soil without causing damage that leads to storage problems, and having the right tools is crucial for a successful harvest with precious tubers.
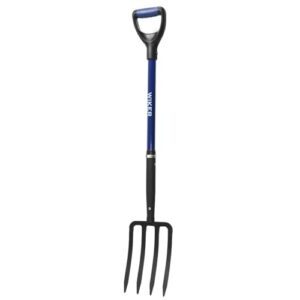
1. WIKER 4 Tine Garden Pitchfork
 View On Amazon
Now that you know the basics of timing and technique, let’s examine the tools that’ll make your potato harvest smooth and successful.
The WIKER 4 Tine Garden Pitchfork stands out as your go-to garden fork for digging potatoes without damage.
This tool handling champion features a forged steel head with four sharp tines that excel at soil loosening around delicate tubers.
Its 43-inch fiberglass handle provides excellent leverage, while the rubber Y-grip prevents slippage during extended harvesting potatoes sessions.
What makes this fork special for potato harvesting? The tines penetrate soil smoothly, creating minimal disturbance that protects your crop.
Regular tine maintenance keeps them sharp for maximum harvest efficiency.
Best For: Gardeners wanting reliable performance when harvesting potatoes in various soil conditions.
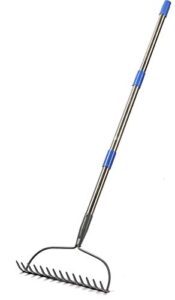
2. 5 FT Metal Garden Rake
 View On Amazon
While potato harvesting demands precision, a 5 FT Metal Garden Rake transforms tedious soil clearing into streamlined yard work. This versatile tool excels at soil loosening after you’ve used your garden fork for the heavy lifting of digging potatoes.
Its adjustable head (8-16 inches) clears debris without damaging tubers during potato harvest operations. The anti-rust coating guarantees this essential piece among garden tools withstands seasons of harvesting potatoes.
Its adjustable length accommodates different gardener heights, preventing back strain during extended potato harvesting sessions. Metal rakes like this one efficiently separate soil clumps from your precious harvest.
Perfect for final cleanup after rake usage in your potato beds, it’s the finishing touch that makes your harvest complete.
Best For: Gardeners seeking efficient debris removal and soil preparation during potato harvest operations.
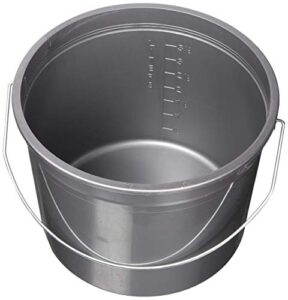
3. Encore Plastics Silver Promotional Pail
 View On Amazon
While you’re clearing debris with your rake, you’ll need something to collect your precious potato harvest.
The Encore Plastics Silver Promotional Pail becomes your trusty companion for harvesting potatoes efficiently.
This 5-quart capacity bucket handles small to medium harvests perfectly.
Its heavy-duty polypropylene construction resists cracking and withstands repeated use in garden conditions.
The sturdy handle guarantees comfortable carrying, even when loaded with fresh tubers.
Pail Uses extend beyond collection – it’s excellent for transporting potatoes from field to storage area without bruising.
The smooth interior prevents scratches that could damage delicate skins.
Best For: Home gardeners seeking reliable Storage Solutions and efficient potato harvest collection methods.
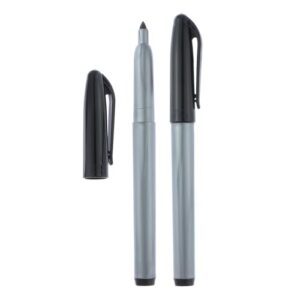
4. Black Freezer Markers Waterproof Labeling Pens
 View On Amazon
You’ll want to mark down your harvest details, and Black Freezer Markers deliver exactly what potato harvesting demands.
These waterproof labeling pens write clearly on plastic storage bags, glass containers, and foil wraps without smudging or fading over time.
Their ink quality stands up to freezer conditions, making them perfect for organization systems where you need lasting storage marks.
When harvesting potatoes, proper labeling tips include noting harvest dates and variety names on containers.
The pen durability means your harvesting tips and variety information stay readable months later.
Whether you’re tracking when to harvest different types or organizing how to harvest notes, these markers handle moisture and temperature changes without bleeding.
Their fast-drying formula prevents mess-free organization, letting you focus on properly curing and storing your potato harvest instead of worrying about illegible labels.
To maintain essential storage conditions, understanding proper storage techniques is vital for extending the shelf life of your potatoes.
Best For: Reliable, smudge-proof labeling for potato storage organization.
5. Fiskars Bypass Pruning Shears Garden Clippers
 View On Amazon
After proper labeling, you’ll need precision cutting tools to complete your harvest properly. Fiskars Bypass Pruning Shears deliver surgical accuracy for potato harvesting tasks that require delicate touch.
These gardening tools excel at trimming potato vines and stems without crushing delicate plant tissue. The sharp, stainless steel blades slice through stems up to 5/8" diameter cleanly, while the low-friction coating resists rust and sap buildup.
Pruning techniques matter here—make clean cuts at ground level to prevent disease entry points. The lightweight design reduces hand fatigue during extended harvesting techniques sessions.
Shear maintenance keeps them sharp: wipe blades clean after each use and apply light oil periodically. Clipper safety means keeping fingers clear of the cutting zone.
Pruning tips: Store with blades closed and handles locked to protect the cutting edge.
Best For: Gardeners needing precise, rust-resistant shears for trimming delicate stems during potato harvesting operations.
Harvesting Techniques
Now that you’ve got the right tools, it’s time to master the harvesting technique itself.
The method you choose depends on whether you’re after tender new potatoes or fully mature storage spuds.
Harvesting New Potatoes

New potatoes offer gardeners the first taste of their harvest, typically ready 7-8 weeks after planting when flowers appear. New Potato Timing matters—you’ll want to harvest when skins are thin and easily rubbed off.
Gentle Handling prevents bruising these tender tubers. Use your hands rather than tools, reaching into loose soil from the plant’s side. You can harvest selectively, leaving others to mature.
- Check soil 2-3 inches deep after flowering begins
- Harvest on dry days when soil isn’t saturated
- Use Soil Loosening techniques to avoid plant damage
Potato Varieties differ in timing, but most Early Harvest types are ready when tuber diameter reaches 1-2 inches. To maintain freshness, consider harvesting in the morning.
Harvesting Main Crop Potatoes

Main crop potatoes reach maturity when foliage dieback signals harvesting timeline. Wait 2-3 weeks after plants yellow and die back—this skin hardening period creates firm skins that won’t rub off easily.
These maturity indicators mean your potato crop is ready for long-term storage preparation.
A garden rake assists in the potato harvesting. Start your potato harvest by inserting a garden fork 12 inches from plant stems.
Work inward carefully to avoid nicking tubers. This how to harvest approach protects your main crop potatoes investment perfectly.
Handling and Curing After Harvest

Once you’ve harvested your potatoes, bruise prevention starts immediately. Gently brush off loose soil—don’t wash them yet, as moisture invites rot. Sort damaged tubers for quick use since they won’t store well.
Consider researching solutions for potato damage to minimize losses.
Curing your potato harvest properly makes all the difference. Place potatoes in a dark, well-ventilated area at 45-60°F with humidity levels around 85-95% for two weeks. This process thickens skins and heals minor cuts, giving you better rot control.
Airflow importance can’t be overstated—spread potatoes in single layers, avoiding stacking. Keep them away from apples and other fruits for ethylene avoidance, which prevents premature sprouting.
Proper postharvest care sets up months of successful potato storage.
Post Harvest Care
You’ve just finished digging up your potato harvest, but your work isn’t done yet. Proper post-harvest care determines whether your potatoes last weeks or months in storage.
Curing Potatoes for Storage

After harvesting, you’ll want to cure your potatoes properly for storage duration up to six months.
Set your curing temperature between 45-60°F with humidity levels at 85-95%.
This potato curing process takes two weeks, allowing bruise prevention through wound healing and skin thickening.
Proper airflow is essential, so consider perforated bags usage to maintain air circulation.
Make certain good ventilation needs are met in your dark curing area.
This potato harvest step transforms fresh tubers into storage-ready gems for your pantry.
Storing Potatoes in Ideal Conditions

Once you’ve cured your potatoes, creating the perfect storage environment keeps them fresh for months.
Optimal Temperature between 45-50°F prevents cold-sweetening while slowing sprouting. Humidity Control at 90-95% stops shriveling without promoting rot. Darkness Importance can’t be overstated—even brief light exposure triggers toxic greening.
Storing potatoes at the correct temperatures matters is crucial for their longevity.
Store in perforated bags or open bins for Ventilation Needs:
- Root cellars or cool basements provide stable conditions
- Paper bags protect from light while allowing airflow
- Never store with apples—their ethylene gas accelerates sprouting
Proper potato storage extends shelf life from weeks to months.
Avoiding Common Mistakes in Storage

While many believe storing potatoes is foolproof, several common mistakes can ruin your harvest quickly.
Avoid temperature extremes by never refrigerating potatoes, which converts starches to sugar. Store in dark storage away from light to prevent green, toxic solanine formation.
Humidity control matters—maintain 90-95% humidity levels for rot prevention. Make certain ventilation importance with perforated containers, never sealed bags.
Keep potatoes away from apples and onions to avoid ethylene exposure that triggers sprouting.
humidity levels
Frequently Asked Questions (FAQs)
Is it better to harvest potatoes or leave them in the ground?
You should harvest potatoes when they’re ready rather than leaving them indefinitely.
Time your harvest based on maturity indicators—yellow dying foliage signals readiness for storage potatoes, while flowering indicates new potatoes are ready.
How long do you let potatoes dry after harvesting?
Surprisingly, you’ll want to let your freshly dug potatoes cure for about two weeks before storing them.
This drying period at 45-60°F with high humidity thickens their skins and heals minor cuts, which is a complete concept for preparing potatoes for storage.
How do you harvest potatoes?
Use a garden fork to loosen soil around the plant’s base, working from the outer edge inward.
Gently lift tubers by hand to avoid bruising.
Handle carefully and brush off excess soil before storage.
How can I lose weight fast by eating potatoes?
Chasing quick weight loss is like trying to catch lightning in a bottle—tempting but risky.
Potatoes aren’t a magic bullet for rapid weight loss.
Sustainable weight loss requires balanced nutrition, portion control, and regular exercise, not single-food approaches.
What do you need to harvest potatoes?
You’ll need a garden fork to loosen soil, gentle hands for lifting tubers, and a container for collection.
Choose dry weather and work from the plant’s outer edge inward to minimize damage.
When do you harvest potatoes?
Like waiting for fruit to ripen, potato harvest timing depends on plant signals.
Harvest new potatoes 2-3 weeks after flowering begins.
For storage potatoes, wait until vines yellow and die back completely, then harvest 2-3 weeks later, which is a signal similar to waiting for fruit to ripen.
What can I do with harvested potatoes?
After harvest, you’ll cure potatoes at 45-60°F with high humidity for two weeks.
Then store them in dark, cool conditions.
Eat fresh new potatoes immediately, save mature ones for long-term storage up to six months.
Do potatoes need to be dug before harvesting?
Yes, you’ll need to dig potatoes from the soil.
Use a garden fork starting about 10-18 inches from the plant stem, loosening soil carefully to avoid damaging tubers, then lift them gently by hand.
Can you leave potatoes in the ground too long?
Leaving potatoes in the ground too long can cause problems. They’ll start sprouting, become bitter, or rot from moisture. Harvest when foliage dies back naturally.
What is the best way to harvest potatoes?
Gently gather your golden tubers using a garden fork, working from the plant’s outer edge inward. Lift carefully by hand to avoid bruising, then brush off excess soil without washing.
Conclusion
Just like uncovering buried treasure, the proper way to harvest potatoes means watching for the right signals and using smart tools.
You’ll want sturdy gear and gentle hands to keep your spuds safe from bruises. Don’t rush—patience pays off in flavor and shelf life.
Remember, curing and storing potatoes in cool, dark spots keeps them fresh longer. Stick to these techniques, and you’ll dig up a harvest worth bragging about for seasons to come.
- https://resprout.com/when-to-harvest-potatoes-6-signs-theyre-ready/
- https://www.youtube.com/watch?v=TQqEvubvH5Y
- https://vric.ucdavis.edu/pdf/POTATOES/potatoharvesting.pdf
- https://www.gardeningknowhow.com/edible/vegetables/potato/how-and-when-to-harvest-potatoes.htm
- https://ourfrugalfloridahomestead.com/how-to-harvest-and-store-potatoes/