This site is supported by our readers. We may earn a commission, at no cost to you, if you purchase through links.

Perennials are one of gardening’s best-kept secrets—plant them once, and they show up every spring like a reliable old friend. While annuals demand fresh money and fresh effort each season, a well-chosen perennial quietly builds stronger roots, feeds early pollinators, and holds your soil together through wet springs, dry summers.
The catch? Most gardeners either rush the planting or skip the soil prep, then wonder why their blooms look halfhearted by June. Getting spring perennials right comes down to a handful of decisions made before you ever put a plant in the ground—and they’re simpler than you think.
Table Of Contents
- Key Takeaways
- Choosing Spring Perennials Wisely
- Preparing Soil and Garden Beds
- Planting at The Right Time
- Caring for Perennials Through Spring
- Top 7 Spring Perennial Garden Items
- Frequently Asked Questions (FAQs)
- What are the common mistakes in spring planting?
- How to prepare a perennial garden for spring?
- What do you do with perennials in the spring?
- When should I fertilize perennials in the spring?
- What is the 3 year rule for perennials?
- What are the best perennials to plant in the spring?
- Should you fertilize perennials in the spring?
- What to do with perennials in the spring?
- What is the 3 year perennial rule?
- Do all perennials need to be cut back in the spring?
- Conclusion
Key Takeaways
- Perennials are a one-time investment that pay you back every spring — but only if you prep the soil right, aiming for a pH of 6.0–7.0 and working in 2–3 inches of compost before planting.
- Stagger your bloom selection across early, mid-, and late spring so pollinators always have a reason to visit and your garden never hits a dull stretch.
- Timing is everything — wait until soil temps hit 45–60°F, watch your last frost date closely, and don’t rush plants outside before they’ve been hardened off.
- Once plants are in the ground, deep watering every 5–7 days, a 2–3 inch layer of mulch, and weekly deadheading are the three habits that separate a thriving garden from a struggling one.
Choosing Spring Perennials Wisely

Picking the right perennials is honestly where the magic starts — get this part right, and everything else falls into place. There’s a lot to keep in mind, from bloom timing to how much sun your yard actually gets.
If you’re planting in autumn, this guide to fall perennials worth adding to your garden makes it much easier to match the right plants to your space.
Here’s what to keep in mind before you start filling that cart.
Benefits of Perennials in Spring Gardens
Perennials are the gift that keeps on giving. Once established, they return each spring with less fuss than annuals — delivering continuous spring color, pollinator support, and real long-term cost savings on replanting. Their deep roots aid in erosion mitigation and even carbon sequestration in your topsoil.
Low-maintenance perennials with low water demand offer a smarter garden working harder for you. These plants thrive with minimal effort, conserving resources while maximizing ecological benefits.
Verbena exemplifies the benefits of full sun requirements, flourishing with 6–8 hours of direct light daily. This resilience makes it an ideal choice for vibrant, sustainable gardens.
Native and Drought-Tolerant Perennial Choices
Native plants are your garden’s best allies. Their deep root systems tap into groundwater, making drought-resistant foliage a low-effort win. Think Echinacea, black-eyed Susan, or Salvia — all champions of water-use efficiency and pollinator support.
When choosing drought-tolerant and native perennials, prioritize native seed sourcing from regional suppliers. These pollinator-friendly spring perennials genuinely thrive where they belong.
Early, Mid, and Late Spring Bloomers
Your seasonal color palette matters more than you might think.
Bloom succession is everything — start with crocuses and hellebores in early spring (lasting just 1–2 weeks), then let daylilies and bleeding heart carry mid-season. Late spring hands off to alliums and lupines. This sequence keeps pollinators returning and ensures your garden looks intentional, not accidental.
Matching Plants to Hardiness Zones
Once your bloom sequence is set, you need the right plants for your climate. The USDA Plant Hardiness Zone Map is your starting point for plant hardiness assessment — but don’t stop there.
- Track zone shifts yearly
- Apply zone buffer mulching around roots
- Plan cold snap protection for early spring flowers
- Account for elevational zone variation and microclimate adjustments
Sun-Loving, Part-Shade, and Shade Options
Light is everything in a perennial garden. Sun-loving perennials like coneflower and lavender need 6–8 hours daily and reward you with serious pollinator attraction and heat tolerance. Partial shade suits hostas and heuchera, where foliage texture and leaf variegation steal the show. For deep shade, ferns and tiarella shine.
Think companion planting—pair plants with matching sun requirements and placement of spring perennials for a garden that actually works.
Selecting Perennials for Continuous Color
Think of your garden as a relay race — each plant passes the baton to the next. Color pairing early, mid, and late spring bloomers ensures continuous vibrancy without gaps.
Use bloom staggering with foliage accents to fill quieter weeks, maintaining visual interest. This approach bridges seasonal transitions seamlessly.
Repeating color blocks create rhythm, while seasonal color mapping helps design a dynamic, year-round display worth stepping outside for.
Preparing Soil and Garden Beds
Good soil is where every successful perennial garden begins. Before you drop a single plant in the ground, a little prep work goes a long way toward keeping your perennials happy season after season.
Here’s what to focus on when getting your beds ready.
Ideal PH Range for Spring Perennials

Soil pH is the silent gatekeeper of your garden’s success. Get it wrong, and even the healthiest plants struggle to absorb nutrients. Most spring perennials thrive between pH 6.0 and 7.0 — but species matter. Before any acidic amendment or lime application, always test soil pH first.
Soil pH is the silent gatekeeper of your garden — get it wrong, and even healthy plants can’t absorb what they need
Different plants have distinct preferences:
- Peonies and daylilies: pH 6.0–7.0
- Ferns and bleeding heart: prefer 5.5–6.5
- Lavender: leans toward 6.5–7.5
- Azaleas: happiest around 5.5–6.5
Soil testing and pH management are critical for nutrient availability. Phosphorus, iron, and potassium perform better in balanced soil. Use sulfur to lower pH or lime to raise it gradually. Soil pH preferences of common spring perennials vary significantly, so test before assuming anything.
Adding Compost and Aged Organic Matter

Compost is your garden’s best investment. Working 2–3 inches of organic compost or aged manure into your beds kick-starts microbial activation, builds humus, and improves soil structure almost immediately.
This process unlocks a cascade of benefits: the slow, steady nutrient release nourishes plants over time, while carbon sequestration operates quietly yet powerfully beneath the surface.
| Compost Benefit | What It Does |
|---|---|
| Humus buildup | Feeds roots long-term |
| Cation exchange | Locks in nutrients |
| Moisture retention | Raises capacity ~20% |
| Microbial activation | Boosts root partnerships |
| Soil amendment | Eases root penetration |
Improving Drainage in Heavy Soils

Clay soil holds water like a bathtub — and perennials hate wet feet. Fix it by mixing in 20–30% coarse sand and biochar amendment to open up those tight pores. Gypsum treatment also helps break apart compacted clay minerals.
For serious drainage issues, French drains or surface swales reliably move excess water away.
Raised beds and organic compost provide well-drained soil almost instantly.
Clearing Weeds, Debris, and Old Mulch

Before your perennials go in the ground, the bed needs a clean slate. Old mulch, winter debris, and early weeds will steal nutrients and harbor disease if left behind. Garden cleanup after winter sets everything up for success.
- Weed Pulling Techniques: Pull roots completely — don’t just snap stems
- Old Mulch Removal: Scoop out degraded layers showing mold or fungus
- Debris Bagging Tips: Bag leaves and sticks to stop pest hitchhikers
- Tool Sanitation Practices: Sanitize tools after use to prevent spreading soil-borne disease
Keep weeds under control early to ensure a thriving garden.
Avoiding Wet or Compacted Soil Conditions

Avoid planting in wet or compacted soil to protect roots from rot and suffocation. Once your bed is clear, prioritize well-drained, aerated conditions before introducing plants.
To improve drainage in heavy soil, mix in sand and incorporate a gravel base under waterlogged areas. Elevate crowns above standing water to prevent stem damage.
Use moisture sensors to achieve effective soil moisture management. Well-drained soil and proper aeration are critical for healthy root development.
Planting at The Right Time

Timing your planting is everything — get it wrong and even the healthiest perennial struggles to recover. Spring weather can be unpredictable, so knowing when and how to plant makes all the difference.
Here’s what to keep in mind before you put anything in the ground.
Watching Last Frost Dates Closely
Your last frost date isn’t just a number — it’s your garden’s green light. Use a soil thermometer to confirm ground temps, and don’t skip microclimate monitoring; frost pockets and shaded corners stay cold longer than you’d think.
Frost forecast apps make tracking easy. Keep row covers handy — spring planting timing and frost dates rarely play nice together.
When to Plant Spring Perennials
Once your frost forecast looks clear, timing for spring perennial planting comes down to three things:
- Soil Warmth — wait until ground temps hit 45–60°F
- Ground Moisture — beds should be damp, not soggy
- Bed Elevation — raised beds warm faster, great for early season planting
Follow this simple spring planting schedule, and your root zone timing will be spot-on.
Starting Seeds Indoors Successfully
Starting seeds indoors early gives you a serious head start on the season. Grab your seed trays, fill them with sterile mix, and get things going 6–12 weeks before your last frost.
| Indoor Seed Starting Setup | Why It Matters |
|---|---|
| Heat mats (70–75°F) | Speeds up germination |
| Grow lights (12–16 hrs) | Prevents leggy seedlings |
| Humidity dome | Locks in moisture early |
| Bottom watering | Reduces damping off risk |
| Seed labeling | Avoids transplant mix-ups |
Hardening Off Young Plants
Think of hardening off seedlings as teaching them to toughen up — slowly.
Start with just one hour outside in a sheltered spot, then add time each day. Gradual Sun Exposure matters: move from shade into morning light first. Wind Acclimation builds resilience too.
Keep up Root Moisture Management daily, and track progress in an Acclimation Log.
Harden off seedlings gradually for healthy spring perennials.
Protecting Tender Growth From Late Frost
Even after hardening off seedlings gradually, a surprise cold snap can undo your hard work overnight. Keep frost blankets and row covers within reach once you’ve moved plants outside. Use row cover techniques around vulnerable growth when temperatures threaten to drop below 32°F.
Microclimate positioning — tucking pots near a south-facing wall — adds a buffer. Soil moisture insulation helps too, so mulch well and monitor temperature forecasts closely.
Spacing Plants for Airflow and Growth
Crowding your perennials is a shortcut to disease. Proper plant spacing for airflow and disease reduction keeps your garden thriving all season. Follow these guidelines from your Spring Perennials Planting Guide:
- Space plants properly for airflow — 12–18 inches between mixed border plants
- Use staggered planting rows to improve canopy gap and light penetration
- Allow root zone clearance of 2–4 inches around each root ball
- Apply disease prevention spacing — 1–2 feet between dense clumps
- Increase airflow spacing by 2–4 inches in humid conditions
Raised Beds for Warmer Spring Soil
Raised beds are a secret weapon for getting a jump on spring. They warm up 5–10°F faster than ground soil, thanks to better drainage, solar-facing orientation, and dark bedding materials that pull in heat.
Add compost to boost thermal mass, then layer mulch as a bed insulation technique. These steps further enhance soil warmth and moisture retention.
Use raised beds for warm soil, and your perennials hit the ground running.
Caring for Perennials Through Spring

Getting your perennials in the ground is just the beginning. The real magic happens in how you care for them once spring is fully underway.
Here’s what to focus on to keep your garden healthy and blooming strong.
Watering Deeply Without Overwatering
Drowning your perennials with kindness is easier than you’d think. Stick to early morning watering and let a soaker hose run 45–60 minutes — that’s your deep soaker timing sweet spot, pushing moisture 6–12 inches down where roots actually live.
Use a moisture meter for root zone monitoring before watering again. Good irrigation scheduling means every 5–7 days, not daily.
Mulching for Moisture and Temperature Control
Think of mulch as your garden’s comfort blanket. Smart mulch material selection — straw, wood chips, or shredded leaves — delivers real moisture retention benefits, cutting evaporation by up to 70%. These mulching techniques also provide temperature insulation effects, keeping roots 2–4°F cooler during heat.
Follow application thickness guidelines of 2–3 inches, leaving a small gap around crowns. This ensures proper root protection without suffocating plants.
Seasonal mulch timing matters — apply right after planting for optimal results, safeguarding young roots and establishing a healthy foundation.
Deadheading to Extend Bloom Time
Just like mulch keeps roots happy beneath the surface, deadheading keeps your blooms thriving above it.
Removing spent flowers redirects energy toward fresh buds — and your ideal deadheading schedule makes all the difference:
- Clip just above a healthy leaf node for fast regrowth
- Use clean pruners for thicker stems — tool selection tips matter for disease prevention
- Watch for bud formation cues before cutting
- Deadhead coreopsis and salvia weekly to extend bloom time
- Remove faded heads on spring perennials for seed set prevention
Dividing Overcrowded Perennials
Overcrowded perennials stop performing — fewer blooms, weaker stems, sad centers. That’s your cue to divide.
| Division Timing | Tools Preparation |
|---|---|
| Spring: new growth emerging | Sharp spade or garden knife |
| Fall: post-bloom dormancy | Garden fork for lifting |
Dig, lift, and separate each clump so every section has roots and shoots. Water thoroughly after replanting. Label your divisions — future-you’ll appreciate it.
Pruning Dead Growth for New Shoots
Once you’ve divided and replanted, turn your attention to what’s dead. Pruning dead growth before spring begins in full gives your perennials room to breathe.
Make a clean basal cut down to healthy white wood, just above an outward-facing bud for good bud exposure.
Use sharp pruning shears — and always practice tool sanitation between plants.
New shoots usually follow within weeks.
Fertilizing Only When Soil Needs It
Your soil tells you what it needs — you just have to ask. Soil test timing matters most. Before reaching for any fertilizer, run a test. It pinpoints exact nutrient gaps, so you’re practicing targeted nutrient feeding, not guessing.
Layer in compost for slow-release options, use banding placement near roots, and split fertilizer application across early spring. These methods ensure efficient nutrient delivery.
Balanced fertilization means never overdoing it.
Monitoring Pests and Diseases Early
Catch problems before they spiral — that’s the whole game.
Walk your beds each morning and practice Leaf Spot Scouting on new growth. Set out Pheromone Traps in three spots and perform Sticky Trap Checks every few days. Monitor humidity levels closely, as fungal issues thrive in warm, moist air.
Early detection and management of pests and diseases saves your season. Use organic pesticides only when truly needed.
Keeping a Spring Garden Care Journal
Think of your garden journal as a second brain for your beds. Log your entry cadence — weekly during peak bloom, biweekly in early spring.
Weather tracking helps you spot frost patterns before they catch you off guard. Add photo documentation with dates, growth metrics like height and spread, and a tool inventory.
Keeping a garden journal for seasonal recordkeeping turns guesswork into a reliable spring garden preparation checklist.
Keep a garden journal for success.
Top 7 Spring Perennial Garden Items
The right tools make spring gardening a whole lot easier — and a lot more enjoyable.
Whether you’re starting from scratch or leveling up your garden game, having the right gear in your corner changes everything.
Here are seven items worth adding to your toolkit this season.
1. Rapitest Garden Soil Test Kit
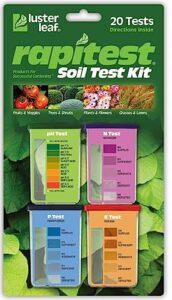
Before you buy a single bag of lime or fertilizer, you need to know what your soil is actually asking for. The Rapitest Garden Soil Test Kit makes that easy.
For about $13, you get 20 capsule tests covering pH, nitrogen, phosphorus, and potassium — five of each. The color comparator chart tells you exactly where you stand, and a plant list covering 450+ species helps you match results to real action.
It’s not fancy, but it works.
| Best For | Home gardeners who want a simple, affordable way to understand their soil before spending money on fertilizers or amendments. |
|---|---|
| Price (USD) | $13.14 |
| Primary Material | Plastic capsules |
| Skill Level | Beginner–Expert |
| Reusable | No |
| Outdoor Use | Yes |
| Includes Instructions | Yes |
| Additional Features |
|
- Covers all four key soil nutrients (pH, N, P, K) in one kit for just $13 — solid value for the price
- The color comparator chart makes reading results straightforward, even if you’ve never tested soil before
- The 450 plant species pH list actually helps you do something useful with your results
- Only five tests per nutrient, so you’ll need a whole new kit if you want to test multiple beds thoroughly
- The capsules can be fiddly to open and easy to spill, which can throw off your results
- The pH test takes 24 hours to show results, and some users report capsules losing effectiveness within a year
2. Nazhura Dual Chamber Compost Tumbler
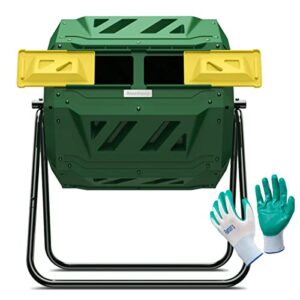
Once your soil test results are in, the next step is feeding your garden with rich, homemade compost — and the Nazhura Dual Chamber Compost Tumbler makes that surprisingly doable. Its dual-chamber design lets you fill one side while the other finishes breaking down, ensuring you’re never waiting around.
At 43 gallons total, the tumbler is compact enough for most yards. The insulated walls retain heat effectively, accelerating decomposition even on cooler spring days. Gardening gloves are included, adding a thoughtful, practical touch.
| Best For | Home gardeners who generate kitchen and yard waste daily and want a steady supply of finished compost without a long wait. |
|---|---|
| Price (USD) | $39.99 |
| Primary Material | HDPE plastic & steel |
| Skill Level | Beginner–Intermediate |
| Reusable | Yes |
| Outdoor Use | Yes |
| Includes Instructions | Yes (diagram only) |
| Additional Features |
|
- Dual-chamber design means you can keep adding scraps to one side while the other finishes — no downtime in your compost cycle.
- Built-in paddles and airflow speed things up, so you’re looking at weeks instead of months for usable compost.
- Comes with gardening gloves, so you’re ready to go right out of the box.
- Assembly is a real project — 52 bolts, minimal instructions, and you’ll want a socket wrench and some patience before you start.
- The doors are small and the tumbler can fling "compost tea" when you spin it, which gets messy fast.
- At 43 gallons total, it fills up quickly for larger households, and the thin plastic and frame may not hold up well after years outdoors.
3. Maotong 240ft Drip Irrigation Kit
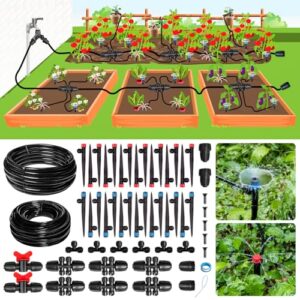
Watering perennials doesn’t have to mean dragging a hose around every morning. The Maotong 240ft Drip Irrigation Kit puts water exactly where roots need it — quietly, efficiently, and without waste.
With 240 feet of tubing, 30 adjustable emitters, and quick-connect fittings, you can cover roughly 250 square feet with minimal fuss.
Setup takes a weekend, not a contractor. And at $39.99, it’s genuinely good value for something that can cut your water use by up to 80%.
| Best For | Home gardeners and beginners who want a low-effort, affordable way to automate watering for small garden beds or greenhouse rows. |
|---|---|
| Price (USD) | $39.99 |
| Primary Material | Polyethylene |
| Skill Level | Beginner–Intermediate |
| Reusable | Yes |
| Outdoor Use | Yes |
| Includes Instructions | Yes |
| Additional Features |
|
- 240 feet of tubing and 30 adjustable emitters cover up to 250 sq ft right out of the box — no extra parts needed for smaller setups.
- Quick-connect fittings mean no tools, no heating, no hassle — most people can get it running in a weekend.
- At $39.99, it bundles everything into one kit that would cost more to assemble piece by piece.
- The main line connector doesn’t swivel, so it can twist or kink where it meets your garden hose.
- Vortex emitters tend to run low on output, which may mean leaning more heavily on the stream emitters for adequate coverage.
- 40 feet of main tubing goes fast on larger plots — bigger gardens will likely need a second kit or extra tubing.
4. Rocklin 48 Inch Stand Up Weed Puller
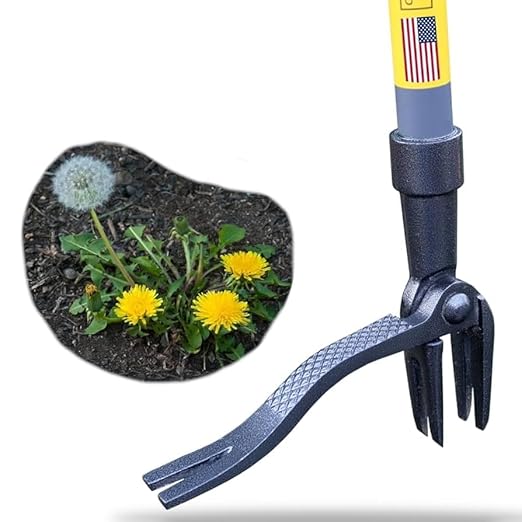
Weeding on your knees is basically a form of self-punishment. The Rocklin 48 Inch Stand Up Weed Puller changes that entirely.
Just under $32, it’s a lightweight, all-steel tool that drives four hardened claws into the root zone with a simple step-and-twist motion — no bending required. It pulls dandelions, thistles, and taprooted weeds out cleanly without chemicals or back strain.
| Best For | Anyone who wants to pull weeds without wrecking their back — especially seniors or people with joint or mobility issues. |
|---|---|
| Price (USD) | $31.99 |
| Primary Material | Hardened steel |
| Skill Level | Beginner–Expert |
| Reusable | Yes |
| Outdoor Use | Yes |
| Includes Instructions | Yes |
| Additional Features |
|
- Standing operation means zero kneeling or bending, which is a game-changer for your back and knees
- Hardened steel claws pull the whole root out, so weeds are less likely to grow back
- At just under $32 and under 3 lbs, it’s affordable and easy to carry around the yard
- The handle connection point can break if you’re wrestling with deep, stubborn roots
- No auto-eject — you have to shake or manually toss each weed yourself
- Struggles with large, mature weeds that have wide-spreading root systems
5. Scuddles Stainless Steel Garden Tool Set
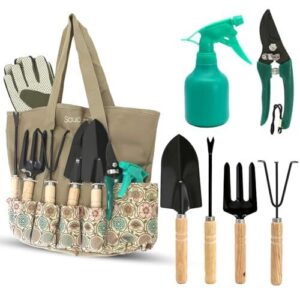
Once you’ve handled the weeds, you need tools that can keep up with everything else. The Scuddles 8-piece set — including a shovel, fork, rake, transplanter, and more — covers your spring planting basics without costing a fortune. At $34.99, it’s a solid everyday kit.
The stainless steel heads resist rust, while the ergonomic wooden grips ensure comfort even after an hour in the beds.
Just know it’s built for loamy soil, not dense clay.
Perfect for container gardening and border work.
| Best For | Casual gardeners, seniors, and beginners who want an affordable all-in-one kit for light planting, container gardens, and raised beds. |
|---|---|
| Price (USD) | $34.99 |
| Primary Material | Stainless steel & wood |
| Skill Level | Beginner–Expert |
| Reusable | Yes |
| Outdoor Use | Yes |
| Includes Instructions | Yes |
| Additional Features |
|
- Eight tools in one bag for under $35 — great value for everyday gardening needs
- Stainless steel heads resist rust and the wooden handles feel comfortable over longer sessions
- Lightweight and compact enough to toss in the car for community garden trips
- Tool heads can bend or break in heavy clay or compacted soil
- Some metal-to-handle connections feel flimsy, so it’s not built for heavy-duty use
- Budget price means you may need to replace pieces sooner than with a higher-end set
6. Open Seed Vault Heirloom Garden Seeds
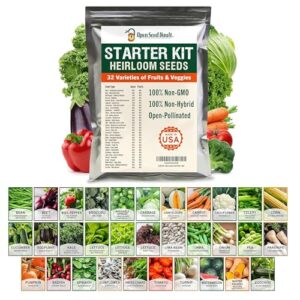
Good tools get you digging — but what you plant matters just as much. The Open Seed Vault Heirloom Garden Seeds kit offers 32 non-GMO, heirloom varieties (roughly 15,000 seeds) for just $27.99, delivering serious value for starters or expanding gardens.
Each packet is individually sealed and resealable, ensuring unused seeds stay viable for future seasons. This kit simplifies growing fresh produce or achieving long-term self-sufficiency without unnecessary complexity.
Whether you’re cultivating for immediate harvests or building resilience, this collection covers diverse needs efficiently.
| Best For | Beginner gardeners, homesteaders, and anyone building a long-term food supply who wants a solid variety of heirloom seeds without breaking the bank. |
|---|---|
| Price (USD) | $27.99 |
| Primary Material | Paper/foil packets |
| Skill Level | Beginner–Expert |
| Reusable | No |
| Outdoor Use | Yes |
| Includes Instructions | Yes |
| Additional Features |
|
- 32 non-GMO, heirloom varieties with ~15,000 seeds for just $27.99 — great bang for your buck
- Individually sealed, resealable packets keep unused seeds fresh for future seasons
- Works equally well for a backyard veggie garden or emergency food storage planning
- Germination rates can vary by species, and some seeds may not be true heirlooms despite the labeling
- Packets are glued shut, so opening them cleanly takes a little patience
- No guidance on pest control or soil prep — you’re on your own once the seeds are in the ground
7. NadaKin T Shape Plant Labels
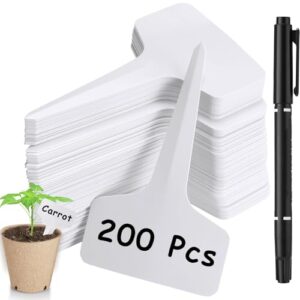
Once your seeds are in the ground, knowing what’s growing where becomes half the battle. That’s where NadaKin T Shape Plant Labels earn their spot. Each pack provides 200 white PVC markers—waterproof, UV-resistant, and reusable season after season.
The 2.36 × 3.94-inch writing surface offers ample space for plant names and transplant dates. At $7.79, they’re practically free insurance against mystery seedlings.
Simply stick them in, write clearly, and your spring bed stays organized from first sprout to full bloom.
| Best For | Home gardeners and greenhouse growers who want a simple, affordable way to keep track of seedlings and plant varieties across multiple growing seasons. |
|---|---|
| Price (USD) | $7.79 |
| Primary Material | PVC plastic |
| Skill Level | Beginner–Expert |
| Reusable | Yes |
| Outdoor Use | Yes |
| Includes Instructions | No |
| Additional Features |
|
- 200 labels for under $8 — that’s a lot of garden coverage without spending much at all.
- Waterproof and UV-resistant PVC means they hold up through rain, heat, and whatever else the season throws at them.
- Reusable season after season, and easy to clean with basic household cleaners.
- The marker ink can fade or wash off with repeated use, so you may need to restock pens over time.
- The plastic feels a bit thin compared to some other brands, which might bother you if you’re heavy-handed in the garden.
- Years of intense sun exposure could eventually wear down the material, even with the UV resistance.
Frequently Asked Questions (FAQs)
What are the common mistakes in spring planting?
The biggest traps? Planting too early, skipping soil prep, and watering wrong. Each one quietly sets your garden back before it even gets started.
How to prepare a perennial garden for spring?
Think of your garden bed as a blank canvas — clear the debris, test your soil, aim for a pH of 0 to 0, and work in 2 to 3 inches of compost before planting.
What do you do with perennials in the spring?
In spring, you wake perennials up by cutting back dead growth, dividing crowded clumps, enriching soil with compost, mulching beds, and watering deeply — all to set them up for their best season yet.
When should I fertilize perennials in the spring?
Like waking someone from a deep sleep, timing matters. Feed established perennials in March when soil hits 50°F and new shoots emerge. Stop by mid-May to avoid frost-vulnerable tender growth.
What is the 3 year rule for perennials?
The three year rule means most perennials sleep, creep, then leap.
Year one builds roots, year two builds strength, and year three delivers the full, confident bloom display you’ve been waiting for.
What are the best perennials to plant in the spring?
Peonies, coneflowers, and hellebores are top picks. Add hostas for shade and Russian sage for drought tolerance. These reliable bloomers establish quickly and return stronger each season.
Should you fertilize perennials in the spring?
Yes, but keep it light. A slow-release balanced fertilizer in early spring gives most perennials what they need. Skip it if your soil is already rich — more isn’t always better.
What to do with perennials in the spring?
Spring is the season to get your hands dirty. Wake up your beds by dividing crowded clumps, cutting back dead growth, adding compost, and watering deeply as new shoots emerge.
What is the 3 year perennial rule?
Patience is the secret ingredient nobody warns you about.
The 3-year rule means perennials sleep, creep, then leap — building roots in years one and two before exploding into full, glorious bloom by year three.
Do all perennials need to be cut back in the spring?
Not all perennials need cutting back in spring. Peonies, trilliums, and ferns do better left alone.
Focus your cuts on mums, Russian sage, and ornamental grasses — only where dead growth is clearly visible.
Conclusion
Rome wasn’t built in a day, and neither is a thriving perennial garden. But here’s the truth: you don’t need a perfect plan—you need a decent start.
Good soil, the right plant in the right spot, and a little attention each spring compounded into something genuinely beautiful over time.
The best spring perennials gardening advice anyone can give you is simply this: put in the work now, then let the plants do the rest.
- https://planthardiness.ars.usda.gov/
- https://www.ncagr.gov/divisions/agronomic-services/soil-testing
- https://x.com/intent/tweet?url=https%3A%2F%2Fthegardeningcook.com%2F%3Fp%3D17779&text=%F0%9F%8C%B1%20Ready%20to%20wake%20up%20your%20garden%20after%20winter%3F%20These%20spring%20garden%20prep%20tips%20will%20help%20you%20clean%20up%20beds%2C%20improve%20soil%2C%20prune%20plants%2C%20and%20get%20everything%20ready%20for%20a%20healthy%20growing%20season.%20Grab%20a%20printable%20spring%20gardening%20checklist%E2%80%A6&via=agardeningcook&related=agardeningcook
- https://www.plantologyusa.com/