This site is supported by our readers. We may earn a commission, at no cost to you, if you purchase through links.

Most gardeners lose more plants to poor fall prep than to the actual cold. A hard frost doesn’t kill a healthy, well-mulched perennial—but an exposed root system in compacted, waterlogged soil? That won’t make it to spring.
The difference usually comes down to what you do in those few weeks before the ground freezes. Good winter garden preparation tips aren’t about doing more work—they’re about doing the right tasks at the right time. Protect your soil, put your tools away properly, and your garden will come back stronger than ever.
Table Of Contents
- Key Takeaways
- Essential Winter Garden Preparation Steps
- Protecting Plants and Soil From Winter Stress
- Preparing Tools and Equipment for Winter
- Top 5 Products for Winter Garden Preparation
- Frequently Asked Questions (FAQs)
- What should I do to prep my garden for winter?
- What are the four common mistakes landscapers make when planting?
- Is October too early to cut back perennials?
- How do I prepare my garden for winter?
- How can I Keep my Garden in a good shape during winter?
- How do I prepare my garden soil for winter?
- Can You winterize your garden?
- What are winter gardening guidelines?
- How to prepare garden soil for winter?
- How do I succeed in winter gardening?
- Conclusion
Key Takeaways
- Mulch your plant beds with 5–10 cm of straw or shredded leaves after the first hard frost, keeping it a few centimeters away from stems to protect roots through freeze-thaw cycles.
- Time your winter prep to your climate zone — gardeners in Zones 3–5 should start 4–6 weeks before the first frost, while those in Zones 8–10 only need 2–3 weeks of lead time.
- Deep-water plants 24–48 hours before a hard freeze, pushing moisture 10–12 inches down, then mulch immediately after to lock that hydration in.
- Clean, sharpen, and dry all tools before storing them — rust starts in a single wet winter, but a wipe of mineral oil and proper hanging keeps blades sharp for decades.
Essential Winter Garden Preparation Steps
Before the first hard freeze hits, it pays to take a good look at what your garden actually needs. Not every plant, bed, or tool requires the same attention, and knowing where to focus your time makes the whole process easier.
A quick walk-through with a checklist of winter garden plant protection tips helps you spot vulnerabilities before the cold does real damage.
Here are the key steps to get your garden ready before winter sets in.
Assessing Your Garden’s Needs and Vulnerabilities
Before you winterize, take a walk through your garden on a clear, frosty morning. Notice where frost lingers longest — those low spots are cold-air traps. This microclimate mapping shapes your whole winter garden preparation strategy.
Check your USDA hardiness zone, then compare it against each plant’s rating.
Soil evaluation matters too: soggy clay signals drainage trouble that worsens with freeze-thaw cycles, threatening garden resilience and plant protection.
Clearing Debris and Removing Spent Plants
Once you know your garden’s weak spots, it’s time for garden cleanup. Pull spent plants at soil level — yanking disturbs roots nearby. Wear gloves, since diseased stems carry fungal spores.
Toss healthy material into your compost bin, but bag anything showing blight or rot. Clearing debris removes overwintering pest sites and preps your garden beds for mulch and soil preparation ahead.
Pruning: What to Cut Back and What to Leave
Not everything in your garden needs a hard cut before frost hits. Smart pruning techniques make a real difference in winter garden preparation — and sometimes, doing less is the right call.
- Summer bloomers like butterfly bush: cut to 15–30 cm
- Spring shrubs like lilac: leave flower buds intact, remove dead stems only
- Soft perennials like hosta: trim to 2–5 cm above soil
- Ornamental grasses: leave standing to protect crowns from freeze
Timing Tasks for Your Local Climate
Timing winter prep right depends on where you live. Your USDA hardiness zone and local frost dates are your best starting points for building smart winter schedules.
| Climate Zone | Start Prep | Key Focus |
|---|---|---|
| Zones 3–5 | 4–6 weeks before first frost | Deep mulching, wrapping |
| Zones 6–7 | 2–4 weeks before | Frost cloth, root watering |
| Zones 8–10 | 2–3 weeks before | Wind protection, light cover |
Watch your microclimates too — low spots freeze earlier than sheltered beds near walls.
Protecting Plants and Soil From Winter Stress
Once temps start dropping, your plants and soil need a little backup to get through the cold months intact. The good news is that a few targeted steps go a long way toward preventing frost damage, root stress, and winter dieback.
For a full checklist that covers everything from mulching roots to draining faucets before the freeze hits, winter garden maintenance and care tips walk you through each step in order.
Here’s what to focus on first.
Mulching to Insulate Roots and Soil

Think of mulch as your garden’s winter coat. For solid root protection and soil insulation, spread 5 to 10 centimeters of shredded leaves, straw, or pine needles over plant beds after the first hard frosts. Keep mulch a few centimeters away from crowns and stems.
This simple winterizing step buffers soil health against freeze-thaw cycles and reduces frost damage all season.
Using Frost Cloths and Row Covers for Protection

Frost cloth is one of the most reliable tools in cold weather gardening. A medium-weight row cover — around 1 to 1.5 ounces per square yard — gives solid freeze damage prevention while still letting light through.
For row cover installation, drape fabric over hoops and seal edges tightly. Even small gaps let cold air in. This simple step makes season extension methods practical for almost any winter garden preparation plan.
Watering Strategies Before The Ground Freezes

Water is your plants’ last line of defense before the ground locks up. A good pre-freeze watering pushes moisture 10–12 inches deep — roots stay hydrated long after the surface hardens. Time it 24–48 hours before the first hard frost. Proper fall plant preparation is essential for their survival.
For solid winter hydration, follow these steps:
- Check soil moisture 3–4 inches down before watering
- Deep soak evergreens — they keep losing water through leaves all winter
- Run soaker hoses 30–60 minutes for thorough coverage without runoff
- Mulch right after to lock that moisture in and buffer freeze-thaw swings
Preparing Tools and Equipment for Winter

Your tools work hard all season, and winter is the perfect time to return the favor. A little care now means you won’t be scrambling with rusty shears or a sputtering mower when spring rolls around.
Here’s what to do with each piece of your kit before the cold sets in.
Cleaning and Sharpening Garden Tools
Clean tools last decades. Dirty ones don’t survive a single winter.
Clean tools last decades; neglect them one winter and they won’t survive to see spring
Start by scraping caked soil off shovels and hoes, then soak blades in warm soapy water. For rust prevention, rub light surface rust away with steel wool, then wipe on mineral oil. Blade sharpening follows the existing bevel — usually 15–25 degrees. Handle maintenance is simple: rub wooden grips with boiled linseed oil.
| Task | Method |
|---|---|
| Soil removal | Stiff brush + soapy water |
| Rust removal | Steel wool or white vinegar soak |
| Blade sharpening | Diamond file at bevel angle |
| Tool sanitizing | 70% rubbing alcohol wipe |
| Handle maintenance | Boiled linseed oil rub |
Draining and Storing Hoses and Irrigation Systems
Leaving a hose connected when frost hits is one of the fastest ways to crack it. Disconnect and drain hoses when nights consistently drop to 32°F. Walk the hose on a slight slope, lifting it waist-high to push water out. For hose storage, coil in loops 18–24 inches wide and hang indoors.
Good irrigation drainage and proper winterization tips like these add years to your equipment. Proper winterization steps are essential for protecting your drip irrigation system during the cold months.
Caring for Power Equipment and Lawn Tools
Your power equipment needs attention before it sits idle all winter. Add a fuel stabilizer to your mower’s tank and run the engine for five to ten minutes so treated fuel moves through the carburetor — this prevents gumming.
Change the engine oil, inspect the air filter, and disconnect or remove the battery. A light oil wipe on blades manages rust prevention beautifully.
Organizing and Storing Tools for Spring Readiness
Once your power equipment is sorted, turn your attention to shed organization. Group tools by task — digging, pruning, cleanup — so spring startup takes minutes, not a scramble. Hang long-handled garden tools with heads down to aid rust prevention.
Label bins clearly for solid inventory management. Good storage solutions now mean you’ll open that shed door in March completely ready to go.
Top 5 Products for Winter Garden Preparation
The right tools and products can make winter prep much easier on both you and your plants. A few well-chosen items go a long way toward keeping your garden protected until spring.
Here are five products worth having on hand before the cold sets in.
1. Floating Row Cover Garden Fabric
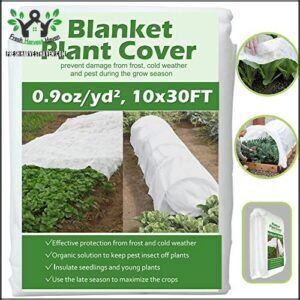
This 10×30 ft floating row cover is a go-to for protecting cool-season crops when temperatures dip. Made from lightweight 0.9 oz/yd² polypropylene fabric, it adds roughly 4–6°F of frost protection and still lets about 70% of sunlight through.
You can drape it directly over plants or prop it on hoops to keep frost off leaves. It’s breathable, so moisture doesn’t trap inside. Cut it to fit any bed, and secure the edges with soil or stones.
| Best For | Gardeners who want to protect cool-season crops from frost, extend their growing season, or shield seedlings from harsh weather across large garden beds. |
|---|---|
| Material | Non-woven polypropylene |
| Outdoor Use | Yes |
| Weight | 0.9oz/yd² |
| Eco Friendly | Reusable fabric |
| Ease of Use | Cut to size |
| Durability | Tear-resistant fabric |
| Additional Features |
|
- Covers a big area (10x30ft) without weighing plants down — the lightweight fabric lets in plenty of light and air
- Works for way more than just frost protection — germination, wind blocking, shade — it’s a versatile tool to have on hand
- Easy to customize — just cut it to size and pin it down with soil or stones, no special tools needed
- Strong winds can tear it, so you have to make sure it’s fastened down well or it won’t last
- Rain may not pass through easily, which could mean your plants miss out on natural watering
- Folding and storing it after use is kind of a hassle, especially with a piece this large
2. Burloptuous Natural Burlap Fabric Roll
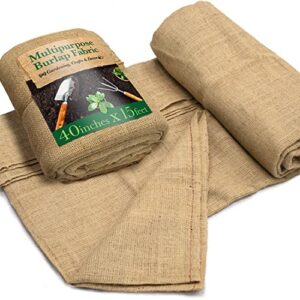
While row covers work well for low beds, taller shrubs and young trees need something sturdier. That’s where the Burloptuous Natural Burlap Fabric Roll earns its place.
The 40-inch-wide roll lets you spiral-wrap trunks from base to tip, blocking winter sunscald and drying winds without suffocating bark. Start at the base, overlap each pass by about one-third, and tie it off with soft twine.
It’s breathable, biodegradable, and reusable — solid value for a natural material.
| Best For | Gardeners, landscapers, and DIYers who need a natural, breathable wrap for protecting shrubs, young trees, and outdoor plants through tough weather. |
|---|---|
| Material | Natural jute fiber |
| Outdoor Use | Yes |
| Weight | 1.9 pounds |
| Eco Friendly | Carbon neutral |
| Ease of Use | DIY customizable |
| Durability | Weather-resistant jute |
| Additional Features |
|
- Big 40" x 15 ft roll gives you plenty of material for wrapping trunks, covering plants, or tackling multiple projects at once
- Natural jute is breathable and biodegradable — better for your garden and the planet than plastic alternatives
- Versatile enough to go from tree wrapping to rustic party decor without missing a beat
- Some users reported a strong gasoline-like smell right out of the package
- Tends to fray when cut, so you’ll likely need to finish the edges if you want clean results
- Quality isn’t always consistent — a few buyers received loosely woven fabric that didn’t hold up as expected
3. Walensee Manual Lawn Aerator 15 Spikes
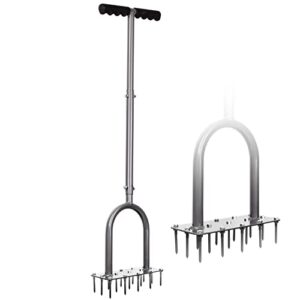
Once your shrubs and trees are wrapped up, it’s time to think below the surface. Compacted soil sheds water instead of absorbing it, and that’s bad news heading into winter.
The Walensee Manual Lawn Aerator punches 15 iron spikes 2.8 inches deep with each press, opening up channels for fall rain and snowmelt to reach roots. The footplate lets your body weight do the work. Use it in late fall before the ground freezes, then fertilize right after for best results.
| Best For | Homeowners with small to medium-sized yards who want an easy, no-power-needed way to keep their lawn breathing and healthy. |
|---|---|
| Material | Powder-coated iron |
| Outdoor Use | Yes |
| Weight | 4.49 pounds |
| Eco Friendly | Long-lasting iron |
| Ease of Use | Pre-assembled |
| Durability | Rust-resistant coating |
| Additional Features |
|
- 15 spikes punch 2.8 inches deep, so water and fertilizer actually reach the roots instead of running off
- The cushioned T-handle and foot bar make it comfortable to use — your body weight does most of the heavy lifting
- Comes pre-assembled with extra spikes and wrenches, so you’re ready to go right out of the box
- Spikes aren’t stainless or coated, so you’ll need to dry them off after use or rust becomes a problem
- Bigger yards or really hard soil will wear you out fast — it’s a manual tool with real limits
- A handful of buyers reported receiving units that showed up used or damaged
4. PeoMev Metal Hose Holder
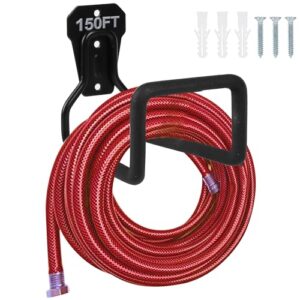
After aerating, don’t leave your hose coiled on the ground where freezing temps can crack it. The PeoMev Metal Hose Holder mounts directly to your wall or fence, keeping your hose off icy surfaces and ready to drain fully between uses.
Built from heavy-duty iron with a painted finish, it supports up to 50 pounds — enough for any standard garden hose. It works for extension cords too.
Simple to install, it keeps your storage area clean and organized all winter long.
| Best For | Homeowners who want a simple, wall-mounted solution to keep garden hoses and cords off the ground and organized year-round. |
|---|---|
| Material | Heavy-duty iron |
| Outdoor Use | Yes |
| Weight | 70 pounds |
| Eco Friendly | Durable metal |
| Ease of Use | Easy installation |
| Durability | Heavy-duty metal |
| Additional Features |
|
- Built from heavy-duty iron, so it’s sturdy enough to handle daily use without rusting or bending
- Foam rubber coating keeps your hose from slipping or getting scratched while it hangs
- Versatile enough to hold extension cords and air hoses, not just garden hoses
- At 70 pounds, it’s on the heavier side, which can make installation a bit tricky solo
- May feel bulky or oversized if you’re working with a smaller wall space or compact setup
- Color can look slightly different in person compared to the product photos
5. Vivosun Outdoor Compost Bin
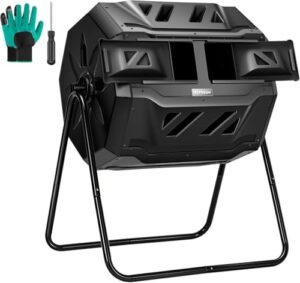
Compost doesn’t stop being useful just because temperatures drop. The Vivosun Outdoor Compost Bin keeps working through winter thanks to its black plastic body, which absorbs sunlight and holds heat longer than an open pile.
At 43 gallons, it accommodates kitchen scraps and yard trimmings without taking much space. The enclosed design blocks rain and snow from waterlogging your pile, and the lower access door lets you pull finished compost right when spring planting starts.
| Best For | Home gardeners and small-scale farmers who want a low-maintenance way to turn kitchen scraps and yard waste into usable compost year-round. |
|---|---|
| Material | Galvanized steel |
| Outdoor Use | Yes |
| Weight | 21.67 pounds |
| Eco Friendly | Reduces waste |
| Ease of Use | 360° tumbling |
| Durability | Premium PP plastic |
| Additional Features |
|
- Twin chambers let you keep adding fresh scraps while the other side finishes—so you always have compost in the pipeline
- The 360° tumbling design makes mixing easy without digging around with a pitchfork
- Black body soaks up sunlight and holds heat, which helps keep decomposition going even in cooler weather
- Assembly can be a real headache—instructions aren’t the clearest, and some parts may not fit together perfectly
- At 21 pounds, it’s not the lightest thing to move around once it’s built
- The center divider has been known to fit loosely, which can be frustrating if you’re counting on a clean separation between chambers
Frequently Asked Questions (FAQs)
What should I do to prep my garden for winter?
You don’t need a big weekend to get this done. A few focused steps — clearing spent plants, mulching roots, and storing tools properly — keeps your garden healthy and ready to bounce back in spring.
What are the four common mistakes landscapers make when planting?
Landscapers most often make four planting mistakes: choosing the wrong location, setting plants at the wrong depth, skipping proper soil preparation, and mishandling root balls before and during planting.
Is October too early to cut back perennials?
It depends on your climate and the plant. In most zones, October is too early unless foliage has yellowed or a hard frost below 28°F has already knocked plants into dormancy.
How do I prepare my garden for winter?
Start in fall by clearing debris, cutting back dead plants, mulching roots, and storing tools clean and dry. A little work now means a much easier spring ahead.
How can I Keep my Garden in a good shape during winter?
Keep your garden in good shape by mulching beds, watering deeply before the ground freezes, clearing debris, and protecting vulnerable plants with burlap or row covers throughout the cold months.
How do I prepare my garden soil for winter?
Healthy soil is your garden’s foundation. Test pH in early fall, spread 2–4 inches of compost over beds, and mulch bare soil to protect it through freeze-thaw cycles.
Can You winterize your garden?
Yes, you can winterize your garden, and it’s easier than you might think.
A few key steps — mulching, pruning, and protecting tender plants — can make a real difference when temperatures drop.
What are winter gardening guidelines?
Winter gardening means working with the seasons, not against them. Clear debris, protect roots with mulch, wrap delicate plants, and store tools properly. These simple steps keep your garden healthy through cold months.
How to prepare garden soil for winter?
Start with a soil test in early fall to check pH and nutrient levels. Most gardens do best with a pH between 0 and Then add 2 to 3 inches of compost.
How do I succeed in winter gardening?
Pick the right plants, protect the soil, and time your tasks well.
With cold-hardy crops, good mulch, and a few season-extension tools, you can keep harvesting long after the first frost.
Conclusion
What separates a garden that bounces back in April from one that just survives? It’s not luck — it’s the work you put in before the first hard freeze.
These winter garden preparation tips aren’t extra tasks; they’re the foundation your plants, soil, and tools are counting on. Mulch the roots, drain the hoses, and store your gear clean and dry.
Do that now, and spring won’t feel like a recovery — it’ll feel like a reward.