This site is supported by our readers. We may earn a commission, at no cost to you, if you purchase through links.
 Most gardeners assume frost signals the end of their growing season, but winter garden protection using cold frames can extend harvests by two full months without electricity or heating costs. These simple structures—basically boxes with transparent lids—trap solar energy during the day and release it at night, creating a microclimate that keeps plants thriving when everything else has frozen solid.
You can build one in an afternoon with basic materials, or purchase a ready-made unit that’ll protect leafy greens, root vegetables, and cold-hardy herbs straight through January.
The real advantage isn’t just longer growing seasons, though—it’s having fresh spinach, kale, and carrots when grocery store prices peak and quality plummets.
Table Of Contents
- Key Takeaways
- How Cold Frames Protect Winter Gardens
- Building and Positioning Your Cold Frame
- Managing Temperature and Ventilation
- Winter Gardening Strategies With Cold Frames
- Top 10 Products for Cold Frame Success
- 1. Outsunny Wooden Cold Frame Greenhouse
- 2. Duck Brand Small Bubble Wrap
- 3. Garden Netting Plant Vegetable Protection
- 4. Burpee 36 Cell Seed Starter Tray
- 5. Miracle-Gro Seed Starting Mix
- 6. Gardeners Basics Survival Vegetable Seeds Kit
- 7. JINGOU Automatic Greenhouse Vent Opener
- 8. ANSIKE Soil Heating Cable 49ft
- 9. Sereniseed Organic Herb Seed Variety Pack
- 10. Outsidepride Perennial White Sweet Alyssum
- Frequently Asked Questions (FAQs)
- Conclusion
Key Takeaways
- Cold frames extend growing seasons by two months without electricity by trapping solar heat during the day and releasing it at night, creating a protective microclimate that keeps frost-sensitive plants alive when outdoor temperatures drop below freezing.
- Proper ventilation is critical—you’ll need to monitor internal temperatures twice daily and prop open the lid when readings exceed 50°F to prevent overheating on sunny winter days, while adding insulation layers like straw bales or foam boards during severe cold snaps.
- Cold-hardy vegetables like kale, spinach, and carrots not only survive in cold frames but actually improve in flavor as they convert starches to sugars when exposed to frost, making them sweeter and more productive than their summer-grown counterparts.
- Automatic vent openers and soil heating cables eliminate the guesswork in cold frame management—automated vents respond to temperature changes without electricity, while buried heating cables maintain consistent soil warmth for seed germination and root development during the coldest months.
How Cold Frames Protect Winter Gardens

When winter threatens your garden, a cold frame acts as a simple yet powerful shield against frost, wind, and freezing temperatures. This unheated structure traps solar warmth during the day and holds it through cold nights, creating a protected microclimate for your plants.
Let’s explore what cold frames are, how they function in winter conditions, and why they’ve become an essential tool for extending your growing season.
What is a Cold Frame?
Think of a cold frame as a greenhouse’s scrappy little sibling—it’s a simple, bottomless box with a transparent lid that sits right over your garden bed, trapping warmth and keeping your plants cozy when frost threatens. These mini-greenhouses rely on sunlight capture and basic insulation rather than artificial heating, making them ideal for season extension without breaking your budget.
Cold frame construction generally includes:
- A low wooden or block frame that sits directly on garden soil
- A transparent glass or plastic lid angled to get the most out of sun exposure
- Hinges for easy ventilation access during warmer days
- No bottom, allowing plant roots direct soil contact
- Protective walls that shield against wind and cold snaps
This straightforward design delivers reliable frost protection for cold frame gardening enthusiasts seeking improved plant hardiness through winter months.
How Cold Frames Work in Winter
Cold frames capture solar energy during daylight hours, trapping that warmth inside their transparent enclosure much like your car heats up on a sunny winter afternoon, then slowly release it overnight to keep soil temperatures several degrees above freezing.
This heat retention creates a stable microclimate where light penetration stimulates plant growth even during dormancy periods.
The insulation impact from the frame’s walls regulates moisture control while protecting against temperature swings that damage root systems.
Benefits of Using Cold Frames
Beyond basic frost protection, you’ll gain practical advantages that make winter gardening more manageable. Season extension means you can start seed starting up to six weeks earlier in spring and keep extending harvests through November or December.
The enclosed microclimate provides natural pest protection while creating space efficiency—you’re working with a compact footprint that delivers greenhouse benefits.
Cost savings add up quickly compared to heated structures, making cold frame winter gardening accessible without major investment. Cold frames also help in extending the growing season by up to 60 days.
Versatility in Plant Selection
With that solid foundation in place, your cold frame won’t lock you into growing just one type of plant—you can rotate hardy lettuces, root vegetables, herbs, and even perennials through the same structure as seasons shift. Succession planting keeps beds productive, while companion planting maximizes limited space.
You’ll find cold hardy varieties of lettuce and winter vegetables thrive alongside microgreens, giving you continuous harvests. Crop rotation prevents soil depletion, and some gardeners even experiment with vertical growing to stack production layers efficiently.
Building and Positioning Your Cold Frame
Building a cold frame doesn’t require complex carpentry skills or expensive materials—just a few basic supplies and a solid plan. The structure you create will serve as a mini-greenhouse, extending your growing season by weeks or even months.
Let’s walk through the materials you’ll need, construction steps, placement tips, and design considerations to get your cold frame up and running.
Essential Cold Frame Materials

Building your own cold frame doesn’t require a contractor’s expertise or a trip to the specialty garden center—you just need a few basic materials and a free afternoon. Start with frame materials like pressure-treated wood or concrete blocks, then choose your glazing options—plastic sheeting, an upcycled window, or polycarbonate panels work well.
Don’t forget these essentials:
- Sturdy hinges to attach your lid and allow ventilation
- Wood screws or fasteners to secure your wood frame
- Insulation choices like foam boards for extra cold protection
Step-by-Step Cold Frame Construction

Once you’ve gathered your materials, assembling the cold frame is straightforward—think of it as building a simple wooden box with a slanted, hinged lid that captures sunlight like a solar oven for your plants.
Cut your frame materials to size, then attach the sides using wood screws to create a sturdy base construction. Slope the back higher than the front for proper lid design and drainage considerations.
Secure your transparent top with quality hinge selection that allows easy opening. This DIY project works beautifully with reclaimed wood or a pallet cold frame approach.
Choosing The Right Location

Your cold frame’s success hinges on location—setting it in the right spot can mean the difference between thriving greens and disappointing losses. Position your cold frame where it receives maximum sunlight exposure, ideally facing south to capture solar energy throughout short winter days.
Guarantee adequate wind protection by placing it near a wall or fence, creating a sheltered microclimate for your winter garden. Check soil drainage to prevent waterlogging, and prioritize accessibility for daily monitoring and space availability within your garden planning scheme.
DIY Tips and Design Considerations

When you’re building a cold frame from scratch, think of it as assembling a puzzle where each piece—from hinge placement to insulation layers—directly impacts your winter harvest’s survival rate. Smart DIY garden projects require thoughtful garden design choices that balance functionality with your available resources.
Consider these cold frame gardening essentials for successful garden DIY:
- Frame materials: Use rot-resistant lumber like cedar or reclaimed windows for durability and cost savings
- Lid design: Install sturdy hinges on the highest side for easy access and rain runoff
- Size planning: Build 3-4 feet wide for comfortable reach-in maintenance without stepping inside
- Angle optimization: Slope your lid 30-45 degrees southward to get the most winter sunlight capture
- Drainage solutions: Raise slightly or drill bottom-edge holes to prevent waterlogging
Managing Temperature and Ventilation

Once your cold frame is built and in place, keeping the inside temperature just right becomes your main job. You’ll need to watch the thermometer closely, know when to crack open the lid, and understand how to add extra insulation when winter really bites.
Let’s look at the practical steps that’ll keep your plants thriving without frying them on sunny days or letting them freeze on bitter nights.
Monitoring and Regulating Temperature
Think of your cold frame as a solar oven that needs a careful eye—without proper temperature monitoring, you’ll either bake your plants on a sunny February afternoon or let them freeze when nighttime temperatures plummet. Place a thermometer inside to track conditions throughout the day, aiming to keep temperatures between 50°F and 75°F for most cold-hardy vegetables.
| Temperature Range | Action Required | Timing |
|---|---|---|
| Below 32°F | Add insulation materials around frame | Evening before frost |
| 32°F – 50°F | Close lid, monitor closely | Night/early morning |
| 50°F – 75°F | Ideal range, maintain current setup | All day |
| 75°F – 85°F | Prop lid open 2-4 inches | Late morning |
| Above 85°F | Open lid fully for ventilation | Midday |
Check your cold frame twice daily during winter—morning and afternoon—to catch temperature swings before they damage plants.
Effective Ventilation Techniques
Ventilation isn’t just about cracking open a lid—it’s the difference between nurturing thriving seedlings and accidentally steaming them into oblivion. You’ll need to master manual adjustments by propping the lid open gradually on mild days, watching for condensation that signals poor air circulation and excess humidity control issues.
Automated vents respond to seasonal changes without constant monitoring, lifting when internal temperatures climb—a practical solution for cold frame maintenance and microclimate management that guarantees proper ventilation while maintaining essential weather protection for your plants.
Insulation Methods for Extra Protection
Once ventilation is dialed in, stacking extra insulation around your cold frame becomes your next line of defense when temperatures take a serious plunge below freezing. You can boost garden insulation and soil insulation using these proven methods:
- Straw bales positioned against exterior walls trap air pockets for excellent cold frame protection.
- Foam boards cut to fit sidewalls create reliable thermal barriers.
- Mulch types like shredded leaves or wood chips layered inside maintain soil insulation.
- Snow cover acts as natural mulching when allowed to accumulate around the frame.
- Thermal mass elements—water jugs painted black—absorb daytime heat and release it overnight.
Preventing Overheating and Frost Damage
Balancing these insulation strategies against the opposite risk—overheating during sunny winter days—requires you to stay alert and adjust your approach as conditions shift.
Track ventilation timing with monitoring equipment like thermometers to catch temperature spikes before frost damage or wilting occurs. Open vents when internal readings exceed 50°F, and install automatic openers for consistent cold frame management.
During sudden cold snaps, emergency measures—extra frost protection layers and plant acclimation checks—keep overwintering crops thriving without shocking their systems.
Winter Gardening Strategies With Cold Frames

Once you’ve built your cold frame and learned to manage its temperature, you’re ready to put it to work protecting plants through the coldest months. Your success depends on choosing the right plants, preparing your soil properly, and maintaining a consistent schedule.
Here’s how to get the most from your cold frame’s potential from fall through early spring.
Choosing Cold-Hardy and Frost-Resistant Plants
Your success in the winter garden hinges on matching plants to your Hardiness Zones and their frost tolerance. Cold frames offer frost protection, but crop selection determines your winter yields. Hardy vegetables don’t just survive the cold—they undergo flavor enhancement, converting starches to sugars when temperatures drop. Consistent moisture is also vital, as plants need sufficient protection to survive the winter.
- Kale, collard greens, and Brussels sprouts tolerate hard frosts between 25–28°F and continue growing through winter.
- Root crops like carrots and beets withstand temperatures down to 15°F, gaining sweetness after frost exposure.
- Spinach, mache, and arugula remain productive at 20°F or lower, making them ideal for cold frame cultivation.
Preparing Soil and Mulch for Winter
Your plant choices are set, but winter-hardy crops won’t reach their potential without soil that’s been properly amended and insulated before the first hard freeze arrives.
Conduct soil testing now to identify pH imbalances and nutrient deficiencies. Work aged compost and organic soil amendments into the top 6–8 inches to improve drainage and boost soil health.
Apply 2–4 inches of straw or shredded leaves as mulch types that provide soil insulation, retain moisture, and regulate temperature fluctuations throughout winter.
Hardening Off Seedlings in Cold Frames
When seedlings jump straight from your cozy indoor setup to the garden bed, the shock of wind, temperature swings, and direct sunlight can stunt their growth or kill them outright—but cold frames give you a controlled middle ground where plants gradually toughen up over 7–10 days. Matching your transplant timing to local frost dates and soil temperature thresholds—covered in detail at when to transplant seedlings outdoors—ensures your hardened-off plants go into the ground when conditions support strong root establishment instead of triggering setbacks.
Cold frames give seedlings a controlled middle ground to toughen up gradually over 7–10 days, preventing the shock that stunts or kills plants moved straight from indoors to garden beds
Here’s your gradual acclimation protocol for reducing shock:
- Days 1–3: Close the cold frame lid at night, crack it open 2–3 inches during the day for light exposure and humidity control.
- Days 4–6: Increase ventilation by propping the lid halfway open, exposing seedlings to more direct wind and temperature fluctuations.
- Days 7–8: Leave the lid fully open during daylight hours, monitoring for wilting or leaf scorch.
- Days 9–10: Open the cold frame overnight if frost protection isn’t needed, simulating actual garden conditions.
- Timing considerations: Start seed starting indoors 6–8 weeks before your last frost date, then begin hardening off two weeks prior to transplanting.
Scheduling and Maintenance Through Winter
From mid-July through March, your cold frame demands consistent attention to temperature, moisture, and plant health. Check ventilation daily when daytime highs exceed 50°F, water between 8–10 AM to prevent overnight ice formation, and remove diseased foliage promptly to reduce fungal risks in humid winter conditions.
| Task | Frequency |
|---|---|
| Ventilation adjustments and seal integrity checks | Daily |
| Watering schedule and pest control inspection | Weekly |
| Crop rotation planning and compost refresh | Monthly |
| Frost protection verification and garden maintenance | As needed |
Top 10 Products for Cold Frame Success
The right tools and materials can make the difference between a thriving cold frame garden and a frustrating winter experiment. From the frame itself to heating solutions and quality seeds, each product you choose plays a role in your success.
Here are ten essential products that will help you build, maintain, and get the most from your cold frame throughout the coldest months.
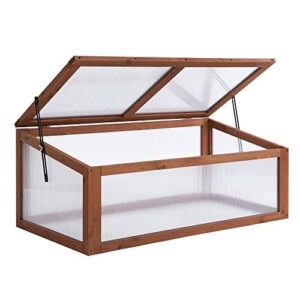
1. Outsunny Wooden Cold Frame Greenhouse
 View On Amazon
The Outsunny Wooden Cold Frame Greenhouse offers an accessible entry point into winter gardening, though you’ll need to manage expectations regarding long-term durability. This compact unit measures 39.25 inches by 25.5 inches by 15.75 inches, featuring a fir wood frame paired with polycarbonate panels that trap solar heat while allowing light transmission for frost protection.
You’ll appreciate the openable slanted top that permits ventilation during unexpectedly warm winter days, preventing heat buildup that can damage tender plants. However, user reviews consistently highlight assembly issues and design flaws, particularly with the polycarbonate panels becoming brittle after two to three years of UV exposure.
For weather resistance, you must anchor this lightweight cold frame securely, as its 10-pound weight makes it vulnerable to wind displacement without proper ground attachment. Consider this a practical DIY project for short-term use rather than a permanent garden structure.
Best For: Gardeners seeking an affordable, temporary solution for winter plant protection or seedling cultivation who can commit to regular maintenance and understand it’s designed for short-term use rather than as a permanent garden structure.
- Openable slanted top provides excellent ventilation control to prevent overheating on sunny winter days while the polycarbonate panels retain warmth for frost protection.
- Lightweight and portable at 10 pounds, making it easy to reposition around your garden or patio as seasonal needs change.
- Quick assembly with standard hardware and a compact footprint suitable for small gardens, balconies, or patios where space is limited.
- Polycarbonate panels become brittle and degrade after 2–3 years of UV exposure, requiring replacement for continued effectiveness.
- Requires secure anchoring with ground stakes or heavy base to prevent wind displacement, as the lightweight frame is vulnerable to being blown over in storms.
- Users frequently report assembly difficulties, missing parts, and limited customer support, along with wood frame susceptibility to rot without proper weather protection.
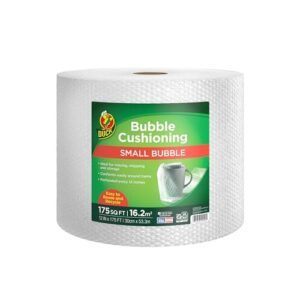
2. Duck Brand Small Bubble Wrap
 View On Amazon
Duck Brand Small Bubble Wrap transforms your cold frame into a winter fortress by adding insulation that retains air better than competing products, even after compression testing. With an R-value of approximately 1.7, this bubble wrap insulation reduces heat transfer through glass or polycarbonate surfaces, maintaining overnight temperatures several degrees warmer than outdoor air.
You’ll appreciate the reusability and durability—AIR LOCK TECHNOLOGY ensures that certain bubbles hold air across multiple seasons, making this an economical choice for DIY projects.
Installation practicality couldn’t be simpler: spray water on clean surfaces, press the wrap bubble-side toward the glass, and you’ve created effective condensation control that prevents mold while still transmitting light for plant protection throughout your winter gardening efforts.
Best For: Gardeners needing affordable, reusable insulation for cold frames and greenhouses that maintains warmth without blocking light.
- Superior air retention with AIR LOCK TECHNOLOGY outlasts competitors even after compression, providing reliable insulation across multiple seasons
- Simple water-spray installation on clean surfaces creates effective thermal barrier with R-value of 1.7, reducing heating needs by up to 20%
- Controls condensation and moisture while transmitting light, preventing mold growth and maintaining ideal conditions for winter plant protection
- Perforations can be difficult to tear cleanly according to some users, complicating precise sizing during installation
- Large 175-foot roll may be excessive for small cold frame projects or limited storage spaces
- Quality concerns from some customers suggest possible inconsistency in manufacturing or material degradation over time
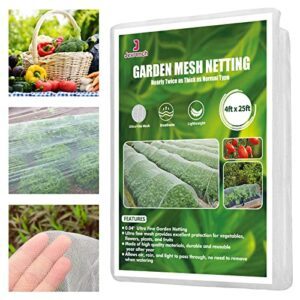
3. Garden Netting Plant Vegetable Protection
 View On Amazon
Garden Netting Plant Vegetable Protection acts like a shield against the harsh realities of cold weather gardening, offering a dual layer of defense when draped over your cold frame structure.
This ultra-fine mesh PE material provides pest exclusion that reduces crop damage by up to 80% while maintaining material durability across 3-5 years of consistent use. Beyond garden protection, the transparent polyethylene allows sunlight penetration for plant protection without chemical interventions, which improves yield impact in vegetables by approximately 40%.
Installation tips are straightforward—secure the netting two feet beyond your cold frame gardening beds to prevent gaps that compromise cold frame effectiveness during winter months.
Best For: Gardeners seeking reliable, long-term protection for vegetables and fruit crops against pests, birds, and harsh weather without using chemical pesticides.
- Reduces pest damage by up to 80% with ultra-fine mesh that blocks insects while allowing sunlight, water, and air to reach plants naturally.
- Durable and reusable for 3-5 years, providing cost-effective protection across multiple growing seasons compared to single-use chemical treatments.
- Versatile year-round use in gardens, orchards, and pastures with transparent PE material that maintains plant growth conditions.
- Edges may fray over time since the product doesn’t have a finished border, requiring careful handling during installation.
- Material can tear when secured with clips or in windy conditions, potentially needing replacement sections or additional support stakes.
- Some users report inconsistent quality and durability issues that fall short of the advertised 3-5 year lifespan.
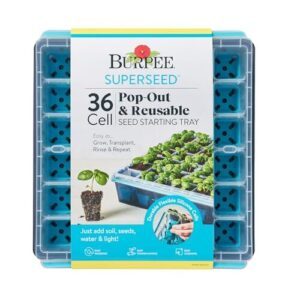
4. Burpee 36 Cell Seed Starter Tray
 View On Amazon
Burpee 36 Cell Seed Starter Tray streamlines seed starting techniques for winter gardening by providing 36 individual silicone material compartments that measure 11.5 by 11.25 by 2.25 inches—compact enough for windowsills or seed warming mats.
Each cell features molded corner slots that boost cell drainage and soil aeration, which improves germination rates for seedlings destined for cold frames.
The flexible silicone bottoms let you pop out transplants without damaging roots, reducing seedling stress during the move to your cold frame environment.
Reusability stands out here—this tray withstands repeated seasonal cycles without cracking, and its dishwasher-safe construction simplifies cleaning between planting rounds.
Best For: Gardeners who want a compact, reusable seed starting system with flexible silicone cells that make transplanting easier and protect delicate roots.
- Flexible silicone bottoms pop out seedlings cleanly, reducing transplant shock and root damage during the move to cold frames or garden beds.
- Molded corner slots in each cell improve drainage and aeration, which boosts germination rates and prevents waterlogged soil.
- Dishwasher-safe and built to last through multiple seasons without cracking, making it a cost-effective choice for annual planting cycles.
- Small cell size limits root growth for larger seedlings like tomatoes or pumpkins, requiring earlier transplanting than some gardeners prefer.
- Some users report durability issues with cracked cells or thin lids after extended use, though others have had no problems over several years.
- No dome cover included and no built-in labeling system for tracking different seed varieties across the 36 cells.
5. Miracle-Gro Seed Starting Mix
Miracle-Gro Seed Starting Mix delivers a 0.03-0.03-0.03 N-P-K formula enriched with Miracle-Gro Plant Food that promotes fast root development—critical when you’re launching seedlings in cold frame environments.
Trial reviews across 14 commercial mixes ranked it top-tier for seedling germination and early leaf emergence, with some vegetables reaching second true leaves in under 19 days.
Its peat-and-perlite base guarantees water retention without waterlogging, reducing disease resistance risks like damping-off. You’ll find the fine, airy texture fosters strong root systems while maintaining excellent drainage, making it ideal for seed starting trays before transplanting into your cold frame for continued plant protection.
Best For: Gardeners starting seeds in cold frames or indoor trays who need fast germination and strong root development before transplanting.
- Achieved up to 100% germination rates in trials and produced second true leaves in under 19 days, outperforming many competitors
- Fine peat-and-perlite texture promotes strong root systems while maintaining high moisture retention without waterlogging or damping-off disease
- Affordable at $4.99-$6.99 per 8-quart bag and widely available for both small-scale home gardeners and larger seed starting projects
- May be hydrophobic when dry and require lukewarm water for proper absorption before use
- Some users report finding small sticks and mulch pieces mixed into the product
- Not recommended to mix with other mediums like coconut coir, as it may reduce seedling strength and performance
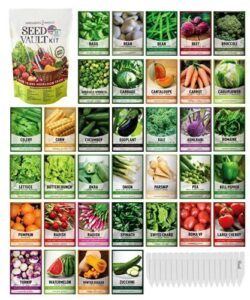
6. Gardeners Basics Survival Vegetable Seeds Kit
 View On Amazon
Once your seedlings sprout in a quality starting mix, you’ll need strong seed viability for sustained winter harvest and emergency preparedness. The Gardeners Basics Survival Vegetable Seeds Kit packs over 16,000 heirloom seeds across 35 varieties—Roma tomato, spinach, turnip, and other cold-hardy options ideal for cold frame seed starting.
Germination success rates hit 4.7 out of 5, with reviewers documenting sprouting even after two years of refrigerated storage. Heirloom benefits include seed-saving potential for multi-season planting adaptability, while resealable water-resistant packets preserve viability for long-term food security.
The kit covers USDA zones 1–13, letting you launch seedlings indoors, then move them into your cold frame for continuous winter gardening.
Best For: Gardeners wanting a comprehensive survival seed collection with 35 heirloom varieties and proven 4.7/5 germination rates for year-round growing across all U.S. climate zones.
- Over 16,000 non-GMO heirloom seeds let you save and replant for multi-season food security, with successful germination documented after two years of refrigerated storage.
- Covers 35 vegetable varieties adaptable to USDA zones 1–13, supporting both traditional gardens and indoor hydroponic systems for continuous harvests.
- Water-resistant resealable packaging preserves seed viability for long-term emergency preparedness while included instructions guide planting for each variety.
- Germination rates vary depending on your growing conditions and care routine, so some seeds may not perform as expected in challenging environments.
- Packaging requires proper cool, dry storage practices to maintain long-term viability beyond the initial years.
- Large seed quantities (20–410 per variety) may exceed needs for smaller gardens or single-season growers without succession planting plans.
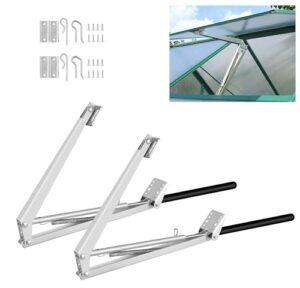
7. JINGOU Automatic Greenhouse Vent Opener
 View On Amazon
Your cold frame thrives when ventilation matches temperature changes automatically. The JINGOU Automatic Greenhouse Vent Opener starts lifting your lid at 59°F, reaches full opening by 77°F–86°F, and closes again at 55°F—all without batteries or wiring.
Installation takes minutes via screw-mounting brackets on wood, metal, or polycarbonate frames, though you’ll want to remove it during extreme cold to preserve the wax-cylinder actuator.
It accommodates vents up to 15 lbs and opens 18 inches, but annual lubrication keeps the piston moving smoothly for its 5–10 year lifespan.
Best For: Greenhouse owners who want hands-free temperature control without dealing with batteries, wiring, or constant manual adjustments.
- Works completely solar-powered through a wax-cylinder actuator—no electricity or batteries needed, so you’ll never deal with dead power sources.
- Opens automatically at 59°F and fully expands by 77°F–86°F, then closes at 55°F, giving your plants consistent airflow without you lifting a finger.
- Installs in minutes on wood, metal, or polycarbonate frames with included mounting hardware and handles vents up to 15 lbs.
- Needs to be removed during harsh winter conditions to prevent damage to the actuator mechanism.
- Some users report durability issues and product quality inconsistencies, with occasional faulty units arriving damaged.
- Requires annual lubrication of the piston rod to maintain smooth operation throughout its 5–10 year lifespan.
8. ANSIKE Soil Heating Cable 49ft
 View On Amazon
Automatic vents regulate the air, but roots need warmth when ambient temperatures hover near freezing. The ANSIKE Soil Heating Cable 49ft delivers bottom heat through nickel alloy and silicone rubber construction, activating below 131°F and shutting off above that threshold to prevent energy waste.
You’ll bury it 3–4 inches deep in soil or raised beds—enough coverage for seed germination and early transplant vigor without scorching tender root hairs.
At $43.99, this waterproof cable fits multiple cold frame layouts, accelerating plant growth when frost threatens your winter garden. Pair it with soil insulation like straw mulch, and you’ll maintain consistent temperature control that heat mats alone can’t match across larger planting areas.
Best For: Gardeners who need to extend their growing season with reliable bottom heat for seed germination and early transplants in cold frames or raised beds.
- Automatic temperature control activates below 131°F and shuts off above it, preventing energy waste and root damage while maintaining consistent warmth for germination.
- Durable waterproof construction with nickel alloy and silicone rubber withstands moisture and repeated seasonal use in soil, raised beds, or outdoor environments.
- Affordable at $43.99 for 49ft of coverage, making it a cost-effective solution for heating larger planting areas compared to multiple heat mats.
- Requires burial 3–4 inches deep for proper function, which means more installation effort compared to plug-and-play heat mats.
- Fixed 131°F threshold limits flexibility if you’re growing crops that need higher or lower soil temperatures for optimal germination.
- May struggle in extreme cold without additional insulation like straw mulch, since the cable alone can’t compensate for severe ambient temperature drops.
9. Sereniseed Organic Herb Seed Variety Pack
 View On Amazon
Oregon Tilth certifies this pack’s ten culinary herb varieties—basil, cilantro, dill, parsley, and six others—as 100% organic and non-GMO, ideal for starting seedlings under cold frame protection before spring transplants.
Seed germination rates vary by species; some users report strong sprouting in parsley and basil, while others note inconsistent performance with certain herbs. Stratification or soil warmth adjustments may boost results.
Organic herb quality shines when you save seeds from your most flavorful plants, building a resilient culinary herb variety adapted to your microclimate.
Beginner gardening suitability is high—each packet includes video guidance—and pairing these seeds with proper overwintering techniques and plant protection extends your organic gardening calendar well into colder months.
Best For: Home gardeners wanting certified organic culinary herbs with beginner-friendly guidance and climate flexibility across USDA zones 2-9.
- Oregon Tilth organic certification ensures 100% non-GMO, open-pollinated varieties you can save and replant year after year
- Ten diverse culinary herbs with video tutorials make it accessible for beginners while offering enough variety for experienced growers
- Wide hardiness zone range (2-9) adapts to various climates when paired with proper timing and protection methods
- Germination rates vary significantly by herb species, with some users reporting inconsistent sprouting or complete failure
- Requires attention to specific soil warmth and stratification needs that aren’t always clearly marked on packets
- Not suited for hydroponic setups and performance depends heavily on proper care, sunlight, and moisture management
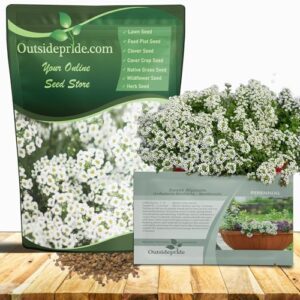
10. Outsidepride Perennial White Sweet Alyssum
 View On Amazon
You’ll find this 5,000-seed packet from Outsidepride especially valuable for Alyssum cold frames, where early spring sowing under Plant Protection extends your Winter Garden bloom window by six to eight weeks.
Its honey-scented white flowers attract pollinators while serving as Companion planting allies that distract aphids from tender vegetables.
In USDA Zones 7–9, the Perennial overwintering habit means you’ll enjoy Fragrance and blooms year after year, and Cold Frames shield seedlings from unpredictable frosts, boosting germination success.
With proper ventilation and Garden Protection Methods, you’ll harvest continuous Pollinator attraction from late winter through fall.
Best For: Gardeners in USDA Zones 7–9 seeking a low-maintenance, pollinator-friendly ground cover that reseeds naturally and thrives with cold frame protection for extended blooms.
- 5,000 non-GMO seeds provide excellent coverage at 1 ounce per 1,000 square feet, ideal for borders, beds, and rock gardens with honey-scented white blooms that attract bees and butterflies.
- Drought-tolerant and deer-resistant perennial that blooms continuously from spring through fall with proper deadheading, and year-round in mild climates.
- Cold frame compatible for early spring sowing 8 weeks before last frost, protecting seedlings from unpredictable weather while serving as companion planting to distract aphids from vegetables.
- Limited to USDA Zones 7–9 as a true perennial; cooler zones treat it as a fast-reseeding annual that dies back after the first frost.
- Multiple customer reports cite low or inconsistent germination rates, requiring patience and precise surface sowing with consistent moisture and light exposure.
- Requires full sun to partial shade and well-drained soil with 6-inch spacing to prevent root rot, plus regular trimming to maintain compactness during midsummer heat slowdowns.
Frequently Asked Questions (FAQs)
Can cold frames withstand heavy snow accumulation?
Heavy snow can damage or collapse poorly built cold frames, so your choice of materials matters. Use sturdy timber or reinforced wood rather than flimsy plastic.
Angle your lid at 30–45 degrees to help snow slide off naturally, and brush away accumulation promptly to prevent strain on the structure.
What plants shouldnt be grown in cold frames?
Tropical plants, heat-sensitive species, and tall vegetables won’t thrive in cold frames. These structures suit compact, cold-hardy crops—not plants craving warmth or excessive space.
Overwintering tender perennials risks frost damage, while disease-prone plants may struggle with poor airflow, jeopardizing your winter gardening success and plant protection efforts.
How often should cold frames be cleaned?
You should clean your cold frame every two to four weeks to prevent algae buildup and maintain sunlight penetration, which are essential for plant protection and care while helping extend growing season effectively.
Do cold frames work in extremely windy areas?
Strong winds can damage cold frames, but proper windbreak strategies and frame anchoring make them viable.
Use durable materials like thick polycarbonate, secure the frame with stakes or weights, and position behind natural windbreaks to protect plants effectively.
When should you remove plants from cold frames?
You’ll know it’s time when nighttime temperatures stay consistently above 50°F and daytime heat threatens to stress your plants. The hardening process requires gradual exposure—prop open ventilation wider each day, monitoring weather patterns and plant maturity.
Once seasonal shift stabilizes and frost protection strategies are no longer needed, your cold frame graduates from protector to pest control barrier for delicate seedlings before full garden planting.
Conclusion
What would your January dinner table look like with crisp spinach and sweet carrots grown in your own backyard? Winter garden protection using cold frames transforms that vision into reality.
Once you’ve positioned your frame correctly, established your ventilation routine, and selected the right cold-hardy varieties, you’ll discover that winter gardening isn’t about fighting nature—it’s about working alongside it.
Your cold frame becomes a reliable partner, quietly extending your harvest while neighbors scrape frost off windshields and settle for wilted supermarket greens.
- https://gardenbetty.com/cold-hardy-vegetables/
- https://www.seedsnow.com/blogs/news/47143105-19-frost-hardy-vegetables-to-plant-this-fall
- https://www.sustainablemarketfarming.com/tag/winter-kill-temperatures-of-cold-hardy-vegetables/
- https://bonnieplants.com/blogs/garden-fundamentals/these-vegetables-take-a-chill
- https://www.rootwell.com/blogs/12-frost-tolerant-vegetables-plant-early-spring