This site is supported by our readers. We may earn a commission, at no cost to you, if you purchase through links.

The row of garlic quietly settling into cool autumn soil isn’t a fancy greenhouse, it’s a surest sign of a confident gardener. While the rest of the garden winds down, planting garlic in the fall garden sets the stage for fat spring bulbs and jars of cloves tucked away for winter cooking.
The trick lies in timing, choosing the right type for your climate, and preparing soil that drains well but still holds moisture. Get those details right, add the right mulch at the right moment, and your future self will pull up heavy, beautifully formed heads next summer.
Table Of Contents
- Key Takeaways
- Best Time to Plant Garlic in Fall
- Choosing The Right Garlic Variety
- Preparing Soil for Garlic Success
- Step-by-Step Garlic Planting Techniques
- Essential Garlic Care Through Winter
- Harvesting and Storing Fall-Planted Garlic
- Top Tools and Fertilizers for Garlic Planting
- Frequently Asked Questions (FAQs)
- Can I plant garlic in October?
- Is early November too late to plant garlic?
- How late can I plant garlic in the fall?
- What not to plant near garlic in the fall?
- Should I water newly planted garlic in the fall?
- How to prepare a garlic bed in the fall?
- Can garlic be planted in containers or pots?
- How do you prevent pests in garlic crops?
- What companion plants work well with garlic?
- Is crop rotation necessary for growing garlic?
- Conclusion
Key Takeaways
- Timing your planting to the weeks just before the ground freezes — when soil temperatures hover around 50°F — is the single biggest factor in getting fat, well‑formed bulbs in summer.
- Matching your garlic variety to your climate matters more than most gardeners realize: hardneck types thrive in cold zones with bold flavor, while softnecks handle warmth and store up to a year.
- Soil preparation is non‑negotiable — garlic needs loose, well‑draining ground with a pH between 6.2 and 6.8, enriched with compost or aged manure worked in two to four weeks before planting.
- A 2–4‑inch layer of straw mulch applied after planting is your best winter insurance, keeping soil temperature stable, locking in moisture, and protecting cloves from frost heave until spring.
Best Time to Plant Garlic in Fall
Choosing the right fall planting time is the first big step toward fat, healthy garlic bulbs next summer.
For more ideas on what to tuck in alongside your garlic, check out this guide to fall-hardy vegetables for your zone.
The catch is “fall” looks a little different depending on where you garden.
Here’s how to time your planting by region, USDA zone, and key signs in your own backyard.
Ideal Planting Window by Region
Although your climate sets the pace, you can master Fall Planting by watching regional cues more than the calendar.
Use: 1. Northern Zone Timing and Northeast Planting Dates for cooler areas favoring Hardneck Garlic. 2. Mid Zone Schedule where both Garlic Varieties thrive. 3. Southern Zone Window and West Coast Timing for Softneck Garlic, paired with careful Soil Preparation practices. A cold period needed(https://www.ruralsprout.com/plant-garlic-fall/) ensures proper bulb development.
Planting by USDA Hardiness Zones
Now that you’ve eyed regional timing, sharpen your Fall Planting by using USDA zones as your control knobs.
Variety selection zones match Hardneck Garlic or Softneck Garlic to winter lows, while Cold protection strategies, Zone depth guidelines, Mulch thickness zones, Fertilizer timing zones, careful Soil Preparation, and strong Garlic Varieties work together for your beds.
In zone 7, plant garlic by October 15th for best bulbing.
| Zone | Depth | Mulch |
|---|---|---|
| 3–5 | 4–6in | 4–6in-straw |
| 5–7 | 3–4in | 3in-mulch |
| 7–9 | 2–3in | 1–2in-mulch |
Signs of Too Early or Late Planting
Even with your zones dialed in, timing still has a way of humbling you. Plant too soon and you’ll see early leaf shoots stretching 4–6 inches before winter — tender growth that hard freezes love to kill. Plant too late and late root establishment leaves cloves loose, prone to frost heaving damage.
Come spring, uneven rows and undersized bulbs tell the whole story.
Choosing The Right Garlic Variety

Not all garlic is created equal, and picking the wrong type can mean a disappointing harvest before you even break ground.
Your climate, storage needs, and flavor preferences all play a role in finding your best match. Here’s what you need to know to choose wisely.
Hardneck Vs. Softneck Garlic
Think of hardneck and softneck garlic as two different teammates — each with its own strengths.
- Bulb structure: Hardneck has one tight clove ring; softneck layers cloves like an onion.
- Clove size: Hardneck cloves are larger and easier to peel.
- Scape production: Only hardneck sends up scapes — trim them for bigger bulbs.
- Storage life: Softneck wins, lasting up to 12 months versus hardneck’s 4–6 months.
Flavor profile also differs — hardneck tastes bolder, softneck milder.
Selecting Garlic Based on Climate
When you match garlic varieties to your climate conditions, fall planting feels controlled instead of risky. Cold gardens favor higher Chill Requirements, while soggy beds punish Moisture Sensitive Cultivars that simply rot. Dry sites give bulbs room to size up.
| Factor | Choice |
|---|---|
| Zone-specific Varieties | hardneck garlic, cold zones |
| Heat Tolerant Types | softneck garlic, warm zones |
| Storage Compatibility | longest keeping bulbs |
Popular Garlic Varieties for Fall Planting
Fall garlic planting shines brightest when you pick the right variety. Flavorful Hardnecks like Music and Chesnok Red deliver Cold‑Hardy Classics with bold taste.
When it’s time to dig them up, gentle garlic harvesting techniques help you pull those prized hardneck bulbs without bruising or breaking the stems.
Long‑Storage Softnecks, Nootka Rose’s Heirloom Pink Cloves keep nearly a year. California Early promises Early‑Season Harvests from reliable Softneck Garlic.
Whatever Garlic Varieties you choose, thoughtful Fall Garlic Planting starts with matching bulb to purpose.
Preparing Soil for Garlic Success

Before you even pop a single clove into the ground, the soil has to be set up to work in your favor.
Garlic is picky about how loose, balanced, and well‑fed its soil is, but getting that right isn’t complicated once you know what to check.
In the next section, you’ll see the key soil factors to line up for a strong, reliable harvest.
Ideal Soil Texture and Drainage
Garlic is picky about its feet — it wants soil that drains well but never dries out completely. Loamy soil benefits your bulbs most, giving roots room to breathe and spread. Here’s what healthy soil preparation looks like in practice:
- Sandy soil amendments like compost prevent drought stress
- Clay drainage solutions such as raised bed aeration keep roots from rotting
- Organic matter balance steadies moisture between rains
- Mulch locks in warmth and reduces surface crusting
Soil PH and Nutrient Requirements
Ever notice how garlic sulks in sour soil?
For strong bulbs, keep pH between 6.2 and 6.8—too low and roots struggle, too high and leaves yellow.
Use pH Adjustment and Lime Application as needed. Blend in balanced Fertilizer for Garlic, monitor Sulfur Management, and keep an eye on micronutrients.
Here’s a quick cheat sheet:
| pH Range | Nutrient Focus | Action Needed |
|---|---|---|
| 5.8–6.0 | Calcium, Phosphorus | Lime Application |
| 6.2–6.8 | Balanced | Nutrient Balancing |
| 7.0+ | Iron, Zinc | Micronutrient Monitoring |
Incorporating Compost and Manure
Think of compost and manure as a slow-release bank account for your garlic. Nail your Compost Timing by working amendments in two to four weeks before planting. Here’s your mixing guide:
- Spread 1–2 inches of aged manure over the bed
- Choose your Manure Types wisely — cow, horse, or mushroom compost work great
- Follow smart Mixing Ratios: aim for 25–30% organic matter by volume
- Hit the right Integration Depth: fork everything into the top 6–8 inches
- Trust steady Nutrient Release to feed bulbs all winter long
Step-by-Step Garlic Planting Techniques
Now that soil is prepped and ready, it’s time to get those cloves in the ground. The way you plant makes a real difference in how well garlic grows, so the details here matter.
Here’s exactly what to do.
Separating and Preparing Cloves

Want your bulbs to size up beautifully? Start this Garlic Planting Guide by gently cracking Garlic Cloves, protecting the base for proper Basal Plate Care.
Do simple Clove Size Sorting, keeping damaged ones for the kitchen.
If you use Pre‑Plant Soaking, follow with careful Moisture Management and good Clove Storage Conditions, supporting Soil Preparation Techniques and Mulching Garlic later.
Planting Depth and Spacing Guidelines

Once your Garlic Cloves are ready, Soil-Based Depth becomes the focus.
Follow Clove Depth Rules: set cloves so they finish about 2 inches deep, tips up.
Use Hardneck Spacing of 6 inches, softnecks 4–5 inches, and Row Width of 10–12 inches to tune Planting Density in the planting bed for fall planting, after careful soil preparation in this Garlic Planting Guide.
Planting Garlic in Raised Beds or Rows

With depth and spacing set, your next choice is layout.
Raised beds shine for Fall planting, pairing good Bed Construction with natural Drainage Solutions and rich Compost from earlier soil prep.
Traditional rows still work; aim for north–south row orientation.
Surround Garlic Cloves with straw Mulch Types for Weed Management, keeping Mulch thick enough to block winter swings in beds.
Essential Garlic Care Through Winter

Once your garlic is in the ground, the real work shifts underground — and your job is to make sure it has everything it needs to get there strong.
Winter care isn’t complicated, but a few key habits make all the difference between a so-so harvest and a great one.
Here’s what to focus on from planting day through the cold months ahead.
Mulching for Insulation and Moisture
Layering mulch over your garlic bed is one of fall gardening’s smartest moves. Good soil management starts here — mulch provides insulation, moisture retention benefits, and weed suppression strategies all at once.
Follow these Mulch Depth Guidelines for effective garlic care:
- Apply 2–4 inches after soil drops below 50°F
- Use straw for breathable insulation materials
- Keep mulch slightly away from clove bases to prevent rot
- Replenish if it compresses after heavy rain — that’s seasonal mulch maintenance done right
- Thin it in spring once shoots emerge consistently
Watering Schedules After Planting
Mulch manages the heavy lifting above ground — but what happens below matters just as much. Initial Soil Moisture is your first priority: water deeply right after planting, delivering about 1 inch to settle the soil around cloves.
| Garlic Care Stage | Weekly Water Targets |
|---|---|
| After planting (fall) | 1 inch, then rely on rain |
| Winter dormancy | None unless soil feels powdery |
| Spring Moisture Check | Resume at 1 inch/week |
| Bulb-forming (early summer) | 1–2 inches/week |
| Pre‑Harvest Dry‑Down | Stop 2–3 weeks before harvest |
Soil Type Adjustments matter too — sandy beds dry fast, so check every few days. Fall Gardening Tips that actually stick: push a finger 2–3 inches in. Dry? Water. Still damp? Walk away. Simple Garlic Growing, honestly.
Early Fertilization Practices
Think of fall fertilization as setting the table before your guests arrive.
Work an Organic Compost Mix into the top 4–6 inches during soil prep, then add bone meal for a Phosphorus Boost that builds strong roots. A Slow‑Release Fertilizer manages Pre‑plant Nitrogen without overwhelming young cloves. Balance Potassium Timing by pairing it with phosphorus, and your organic fertilizer for garlic does the rest quietly all winter.
Harvesting and Storing Fall-Planted Garlic

You’ve done the hard work of planting in fall and caring for your garlic through winter and spring; now the payoff comes down to how you harvest and store it. The way you time your harvest and handle the bulbs will decide their flavor, size, and how long they’ll keep.
Below, you’ll see the key signs of maturity and the simple steps to follow for a successful harvest and storage.
Identifying Garlic Maturity
Your garlic will tell you when it’s ready — you just need to know how to listen. leaf browning cues: garlic maturity arrives when roughly one-third to one-half of leaves have dried from the bottom up.
Your garlic is ready when a third to half of its leaves have browned from the bottom up
Do a quick bulb firmness test by gently squeezing — solid means ready. wrapper layers too.
Three to five brown leaves usually means good protection for storage.
Proper Harvesting Methods
Digging in at the right moment makes all the difference. Gentle lifting starts about 10–15 cm away from the row — push your fork deep, rock the handle back, and ease bulbs free.
Bulb damage prevention means no tossing, no dropping.
- Use a digging fork, not a shovel
- Lay bulbs in shallow crates immediately
- Label varieties as you go
Curing, Cleaning, and Storage Tips
Handled well, your Garlic Harvest from Fall Garlic Planting becomes a masterclass in Harvesting and Storing Garlic plus practical Food Storage Techniques.
Cure bulbs in shade with strong Airflow Management, careful Humidity Control, and a steady Temperature Range, then brush soil off and use breathable Packaging Materials for Shelf Life Extension and long‑term Garlic Care and Maintenance in cool storage.
Top Tools and Fertilizers for Garlic Planting
Once you’ve got your garlic and beds ready, the right tools and fertilizer make the work faster and the results more reliable.
You don’t need a shed full of gadgets, just a few well-chosen helpers that suit how you like to plant.
Here are some trusted options to review for your fall garlic setup.
1. Flora Guard Stainless Steel Garden Dibber
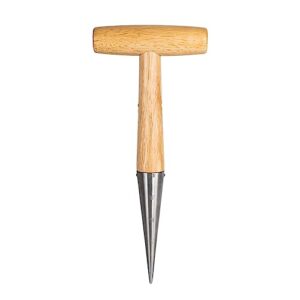
Want cleaner, faster Stainless Steel Garden Dibber instead of fumbling with a trowel? The Flora Guard Stainless Steel Garden Dibber gives you a thick, rust‑resistant 5‑inch spike that punches uniform holes at perfect clove depth, even in clay or compacted beds.
The 4.6‑inch wooden T‑handle lets you twist to widen holes without wrecking your wrists, and its compact 11‑inch length keeps you close to the row so spacing stays consistent, row after row, for an even, high‑yield garlic bed each fall season.
| Best For | Home gardeners who want a simple, sturdy tool to quickly punch clean, uniform planting holes for seeds, bulbs, and seedlings without straining their hands. |
|---|---|
| Material | Stainless steel & wood |
| Primary Use | Seed & bulb planting |
| Soil Compatibility | Standard garden soil |
| User Skill Level | Beginner-friendly |
| Garden Type | Outdoor garden beds |
| Limitations | Not for rocky soil |
| Additional Features |
|
- Durable stainless steel spike with depth markings makes it easy to create precise, consistent planting holes for better germination.
- Ergonomic wooden T-handle gives a comfortable grip and reduces hand fatigue during longer planting or transplanting sessions.
- Corrosion- and dirt-resistant design, plus the included metal dibber and non-slip gloves, make it a handy all-in-one set for everyday garden tasks.
- Some users report the handle connection can feel a bit loose over time, which may affect confidence in heavy use.
- Wooden handle needs to be stored indoors and kept dry to avoid swelling, cracking, or other moisture damage.
- Not ideal for very hard or rocky soil, where the spike may struggle or risk bending under too much force.
2. Flora Guard Automatic Bulb Planter
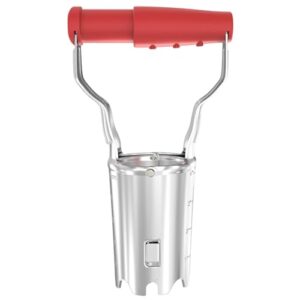
Think of this as your garlic-planting autopilot: the Flora Guard Automatic Bulb Planter punches a clean hole, drops the clove, then returns the soil plug with one squeeze of the spring‑loaded handle.
Reinforced chrome‑plated steel keeps the cup from bending in firmer beds, while stamped 1–4 inch depth markers lock in that ideal 2–3 inch planting depth.
At about 9 inches tall, it eases strain when you’re planting long rows before the ground freezes.
You stay faster, steadier, and cleaner.
| Best For | Home gardeners who want a quick, low-effort way to plant lots of bulbs or small plants—especially if they deal with hand strain or arthritis. |
|---|---|
| Material | Alloy steel |
| Primary Use | Bulb transplanting |
| Soil Compatibility | Standard garden soil |
| User Skill Level | Beginner-friendly |
| Garden Type | Outdoor garden beds |
| Limitations | Max 4 inch depth |
| Additional Features |
|
- Ergonomic, spring-loaded handle makes digging and releasing soil much easier and faster.
- Built-in depth control (up to 4 inches, 3.2-inch diameter) is ideal for most bulbs and small plants.
- Lightweight but sturdy alloy steel design is easy to carry around the garden for longer planting sessions.
- Handle can feel flimsy to some users, especially when used in tougher soil.
- Blade may struggle to cut into very hard, rocky, or compacted ground.
- Some people may need two hands to operate it smoothly, reducing the “one-squeeze” convenience.
3. TPS Garlic Liquid Fertilizer
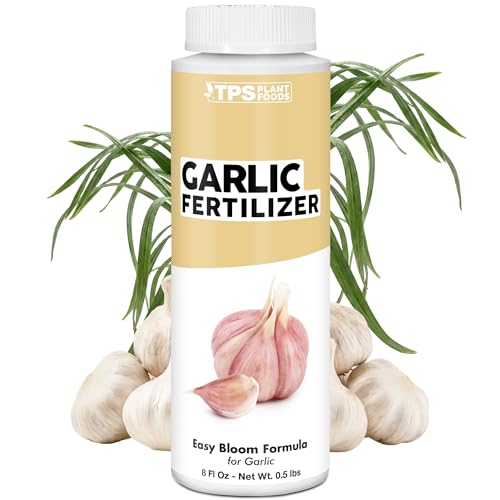
Once your cloves are planted at the perfect depth, what you feed them next shapes everything. TPS Garlic Liquid Fertilizer brings a balanced NPK plus 5.9 percent sulfur and 2 percent calcium — nutrients garlic genuinely craves.
Before planting, soak your cloves in a diluted tablespoon-per-gallon solution for 30 minutes to cut pathogens and jumpstart root development.
Come spring, broadcast it every 10 to 14 days after sprouting.
Bigger bulbs, richer flavor, longer shelf life — it earns its spot in your garlic toolkit.
| Best For | Home gardeners and small-scale growers who want stronger garlic plants, bigger bulbs, and an easy liquid fertilizer made specifically for garlic and related crops. |
|---|---|
| Material | Liquid formula |
| Primary Use | Garlic fertilization |
| Soil Compatibility | Garden beds & raised rows |
| User Skill Level | Beginner-friendly |
| Garden Type | Outdoor garden beds |
| Limitations | 8 oz size only |
| Additional Features |
|
- Promotes strong roots and consistent bulb development for garlic and related crops.
- Simple liquid form that’s easy to mix, soak cloves in, and broadcast over beds or rows.
- Versatile enough for backyard gardens, raised beds, and other allium crops like onions.
- Small 8 oz bottle may not go far for larger plots or frequent applications.
- No clear, detailed instructions on exact application rates or long-term schedule.
- May not be ideal for every plant type or soil condition, and there’s little info on environmental or safety considerations.
Frequently Asked Questions (FAQs)
Can I plant garlic in October?
Yes, you can plant garlic in October. For most temperate regions, it’s actually the sweet spot — soil is still workable, cloves can root before winter, and you’re right on schedule.
Is early November too late to plant garlic?
Early November usually isn’t too late to plant garlic as long as your soil isn’t frozen, especially in zones 6–10;
colder zones 4–5, you may get smaller bulbs, so mulch extra deeply for protection.
How late can I plant garlic in the fall?
Most gardeners should wrap up planting by late October. In warmer zones, November still works. Once the ground freezes solid, though, you’ve missed your window — wait for spring instead.
What not to plant near garlic in the fall?
Like bad neighbors in a small apartment, some plants just don’t get along with garlic. Keep legumes, asparagus, other alliums, sage, parsley, and strawberries well away from your garlic bed.
Should I water newly planted garlic in the fall?
Water your newly planted garlic once, deeply, right after planting. That single soak is usually enough for fall. Skip extra watering if rain has already done the job.
How to prepare a garlic bed in the fall?
Start by testing your soil pH, aiming for 0 to Till the bed 6 to 8 inches deep, work in compost, and clear out rocks and weeds so bulbs have room to grow.
Can garlic be planted in containers or pots?
Planting garlic in pots is a bit like managing a tiny orchard: you can, if you respect space and roots.
containers at least eight inches deep, a rich draining mix, and maintain moisture all winter.
How do you prevent pests in garlic crops?
You prevent garlic pests by rotating with non-alliums, hot-water treating certified seed cloves, using floating row covers and buried hardware cloth, adding beneficial nematodes and predators, and removing infested plants plus all debris after harvest.
What companion plants work well with garlic?
Garlic is a natural team player in the garden.
Its sulfur compounds repel aphids, cabbage worms, and spider mites, making it a great neighbor for tomatoes, roses, peppers, and most brassicas like broccoli and kale.
Is crop rotation necessary for growing garlic?
Rotational wisdom says it isn’t strictly required, but skipping rotation with garlic invites long-term trouble.
Three to four-year gaps cut soil diseases, bloat nematodes, and nutrient imbalance, especially after other alliums.
Small beds demand care.
Conclusion
Each clove you press into autumn soil is a quiet act of faith—a promise made between gardener and earth. Planting garlic in the fall garden is less about following steps and more about learning to trust the season’s rhythm.
You’ve chosen the right variety, built the soil, and laid the mulch. Now winter does its quiet work.
Come summer, those heavy heads you pull up won’t just feed your kitchen. They’ll prove you listened.
- https://alifewellplanted.com/15516/planting-garlic-in-the-fall/
- https://www.epicgardening.com/plant-fall-garlic/
- https://www.groworganic.com/blogs/articles/preparation-for-planting-garlic-in-the-fall
- https://dug.org/gardening-resources/growing-garlic/
- https://smallfarms.cornell.edu/2019/10/six-mistakes-to-avoid-when-planting-garlic-shallots/