This site is supported by our readers. We may earn a commission, at no cost to you, if you purchase through links.

Most gardeners treat autumn as a finish line—time to put tools away and wait for spring. That instinct costs them. The work you do between the first frost and frozen ground directly determines how healthy, productive, and pest-free your garden will be next year. Neglect it, and you’re effectively handing slugs, fungal spores, and compacted soil a head start on your seedlings.
Autumn gardening tasks aren’t about tidying up—they’re about setting traps for problems before they hatch. From sanitizing tools to planting garlic at exactly 2 inches deep, every task here builds the garden you want come May.
Table Of Contents
- Key Takeaways
- Essential Autumn Garden Cleanup Tasks
- Prepare Soil for Winter
- Protect Plants From Frost
- Plant for Spring Harvests
- Top 6 Fall Gardening Tools
- Frequently Asked Questions (FAQs)
- What do gardeners do in the fall?
- What should I be doing in my garden in October?
- What to do in the garden in fall?
- What is the best plant to grow in autumn?
- What crops do farmers plant in the fall?
- How do you prepare soil for autumn?
- When should I harvest root vegetables?
- How do I winterize my irrigation system?
- What vegetables can I grow indoors?
- Should I fertilize before winter dormancy?
- Conclusion
Key Takeaways
- Autumn cleanup isn’t just tidying — it’s pest and disease prevention, and skipping it gives slugs, fungal spores, and compacted soil a head start on your spring seedlings.
- Soil prep before the ground freezes — adding 1–2 inches of finished compost, mulching bare beds, and checking moisture levels at a 6-inch depth — directly determines how productive your garden will be next year.
- Planting garlic 2 inches deep, setting spring bulbs once soil dips below 15°C, and dividing crowded perennials now is your highest-leverage move for a strong spring harvest.
- Sanitizing tools with a 200–2,000 ppm bleach solution, wrapping young tree trunks against sunscald, and mulching after the first hard freeze is the frost-season task most gardeners skip — and later regret.
Essential Autumn Garden Cleanup Tasks

Autumn cleanup isn’t just about tidying up — it’s about giving your garden a real head start on next year.
A solid fall garden cleanup checklist takes the guesswork out of knowing what actually needs doing before the first frost hits.
A few focused hours now can mean healthier soil, fewer pests, and stronger plants come spring.
Here’s exactly what to tackle first.
Remove Dead Crop Residue
Start your fall garden cleanup by pulling all crop residues — dead stems, spent flowers, and rotting fruit — before pathogens settle in for winter. Mechanical raking and residue shredding both work well; shredding speeds decomposition by improving soil contact.
For diseased material, biosecurity disposal rules apply in many areas, so bag it separately. Timing matters: dry autumn days make the whole job faster and cleaner.
Leaving a layer of surface residues protect soil helps reduce erosion.
Clear Beds and Pathways
Once the beds are cleared of old crop residue, shift focus to the paths between them.
Rake out fallen leaves—wet ones turn slippery fast. Address uneven gravel with surface leveling, reset loose stones through realignment, and trim edges where plants overgrow. Apply non-slip coating on pavers for safety, and ensure good pathway lighting to maintain a hazard-free garden.
Dispose Diseased Debris Safely
Now, any debris showing rot, lesions, or mold needs a different approach than your regular pile.
- Bagging Protocols: Seal diseased foliage in thick plastic bags on-site — don’t carry it across the garden.
- Protective Gear: Wear gloves and a mask during hazardous plant disease management to avoid spreading spores.
- Dedicated Disposal Sites: Check local regulatory compliance rules; many municipalities ban composting infected material due to pathogen overwintering risks.
Pull Weeds Before Seeding
With handling diseased debris addressed, shift focus to autumn weed control—specifically pulling before you seed. Timing strategies are critical: clear weeds a few days prior to sowing to allow proper soil settling.
Moist, loamy soil simplifies root extraction, enhancing soil preparation for planting. Prioritize working in these conditions to improve efficiency.
After removal, rake for bed leveling, check moisture management with a meter, and identify regrowth early to maintain optimal planting conditions.
Clean and Sanitize Tools
Don’t put your tools away dirty — autumn is the time to reset them properly. Wash each tool with warm water and mild dish soap, then sanitize metal heads with a bleach solution (200–2,000 ppm) for one to two minutes. Thorough tool drying prevents rust before winter storage.
- Bleach sanitizing kills overwintering pathogens on blades
- Handle oiling with mineral oil prevents cracking
- Inspection logging tracks damage and replacement needs
- Storage ventilation stops mold before spring
Prepare Soil for Winter

Once the beds are cleared, your soil needs some attention before winter locks everything in. A few targeted steps now will make a real difference come spring.
Here’s what to work through before the ground freezes.
Add Finished Compost
Finished compost is your soil’s winter insurance policy. Work 1–2 inches into your garden beds now to kick-start microbial activity and build soil structure before the ground freezes. As a soil amendment, it delivers a slow-release nutrient boost — nitrogen, phosphorus, potassium — right where roots need it.
Work compost into your beds now to feed soil, lock in structure, and give roots a head start before winter
Follow basic safety guidelines: skip immature compost near seedlings, and always screen it first.
Shred Leaves for Mulch
Run them over with your mower or a shredder to achieve the right particle size for leaf litter mulching. Smaller pieces ensure faster nutrient release and less matting.
Rake, shred, and mulch leaves by spreading a 2–4 inch mulch depth around beds, while keeping it clear of crowns for optimal moisture management.
Protect Bare Garden Beds
Bare soil in autumn is just an open invitation for problems — erosion, temperature swings, and compacted structure come spring. Protect your soil now before winter settles in.
- Lay a straw insulation mat across empty beds to reduce soil temperature swings by 2–4°C
- Use light fabric rowcovers secured with hoops for frost-sensitive areas
- Mulch with chipped leaves in a 5–7 cm layer, leaving a 2–3 cm gap around plant bases
- Try vented plastic covers on sunny days to trap heat without overheating
- Use weighted mulch edging or stakes to keep covers anchored through autumn winds
Prevent Erosion and Compaction
Winter rain doesn’t forgive loose soil — it strips topsoil fast if unprepared. Implement contour planting along slopes to slow runoff, and establish grass buffer strips where sheet flow accumulates. These measures mitigate erosion risks by intercepting water flow and stabilizing soil.
Living ground cover rapidly occupies 70–90% of bare surfaces within one season, leveraging root networks to anchor soil. Crucially, avoid foot traffic on wet soil to prevent compaction, which exacerbates vulnerability.
| Erosion Control Method | Key Benefit |
|---|---|
| Contour planting | Slows runoff on slopes |
| Grass buffer strips | Intercepts sheet flow |
| Living ground cover | Holds soil with root networks |
| Terracing benches | Reduces overland flow on steep grades |
| Check dams | Traps sediment in small channels |
Mulching with 2–3 inches of wood chips absorbs raindrop impact, shielding soil structure and health. Shallow-rooted cover crops further protect topsoil during fallow periods while minimizing compaction.
Check Soil Moisture Levels
Soil doesn’t lie — your sensor does if you skip calibration methods. Push moisture probes to root-zone sensor depth, around 6 inches, to ensure accurate measurements.
Take readings at dawn across 3–5 spots for a reliable baseline. This timing minimizes environmental interference and provides consistent data points.
Factor in temperature correction on cold mornings, as chilly soil skews numbers. Stick to a weekly reading schedule to track trends and maintain precision.
Keep moisture thresholds between 40–60%, and adjust watering before problems appear. Proactive management prevents drought stress or waterlogging in plants.
Protect Plants From Frost
Once the temperatures start dipping, your plants need a little help making it through to spring. Frost can sneak up fast, and the right protection now saves you a lot of heartbreak later.
Here’s exactly what to do to keep your garden standing strong all winter.
Mulch After Hard Freeze

Once the ground has experienced its first hard freeze, grab your mulch and get to work. Spread 3–4 inches around perennials and woody plants, extending 6 inches beyond the stems. This depth ensures frost heave prevention all winter.
Keep mulch away from trunks to avoid rodent shelter. Shredded leaves offer solid organic mulching practices.
Water deeply first for smart moisture management, then fluff periodically to prevent compaction issues.
Cover Overwintering Crops

Once your mulch is down, turn your attention to the crops still growing. Row Cover Timing matters—install garden fleece before temperatures dip below freezing to lock in warmth. Secure fleece edges properly by weighing them down with soil or stones.
- Choose breathable cover materials like lightweight polypropylene
- Use cold frame insulation with bubble wrap on hard-freeze nights
- Monitor microclimates near south-facing walls for warmer spots
- Lift covers midday to protect overwintering crops from heat buildup
Move Tender Herbs Indoors

Your herbs need different cold protection than your brassicas. Before night temperatures drop below 54°F (12°C), start hardening off tender plants by bringing them outside a few hours daily for a week.
Then, bring houseplants back indoors into 6- to 8-inch pots with a perlite-rich potting mix. Place them where Light Needs are met—six to eight hours near a south-facing window. Temperature Control matters: keep nights above 54°F and away from drafts.
For Watering Timing, check the top inch of soil before watering. Watch for aphids—Pest Management is easier early.
Wrap Young Tree Trunks

Young trees are more vulnerable than you’d think—thin bark splits fast when warm afternoons shift to freezing nights. That’s sunscald, and tree wrap stops it cold. Start at the base, spiral upward with one-third wrap overlap per layer, and secure loosely to allow airflow.
Your winter protection checklist for plants includes:
- Use Breathable Wraps like paper or burlap
- Prioritize Sunscald Prevention on maples and ornamentals
- Add rodent guarding against voles from late fall onward
- Schedule Spring Removal after the last hard frost
Shield Containers and Perennials

Containers lose heat fast—especially ceramic and terracotta. That’s why shielded containers with modular panel installation make such a difference, cutting temperature swings by up to 4°C and trimming watering needs by roughly 20 percent.
For overwintering perennials like Persian Shield, pair thermal shielding with smart container plant pairings—evergreens with trailing spillers—then apply seasonal pruning strategies and moisture-retention mulch at the base for complete cold protection for plants.
Plant for Spring Harvests

Fall is actually the best time to get a head start on next year’s harvests. A few smart moves now — garlic in the ground, bulbs tucked in, trees in their new spots — mean less scrambling come spring.
Here’s exactly what to do before the ground freezes.
Plant Garlic Cloves
Fall is the perfect window to plant garlic — and getting it right starts well before you push a clove into the ground. Your variety selection matters: hardneck types thrive in cold zones, softnecks store longer in milder climates.
- Test soil pH between 6.0–7.0 and work in compost
- Complete clove preparation just before planting to protect skins
- Set planting depth at 2 inches, pointed end up
- Keep row spacing 12–18 inches for airflow
Set Spring Bulbs
Once soil temperature dips below 15°C, you’re in the final bulb planting window—don’t wait. For spring-flowering bulbs, Depth Guidelines matter: plant large bulbs 6–8 inches deep, smaller ones 4–5 inches.
Bulb Orientation is simple—pointed end up, basal plate down.
Factor in Color Planning and Companion Planting for layered interest.
Water lightly; cold stratification of bulbs does the rest.
Divide Hardy Perennials
Overcrowded hostas, daylilies, and echinaceas practically beg for perennial division timing in early autumn. Root Ball Lifting is straightforward — water the plant the day before, then lift the whole clump cleanly.
- Target clumps with 3–5 healthy shoots per division
- Cut cleanly; maintain a 1:1 Division Ratio
- Add compost for Soil Amendment at replanting
- Match original planting depth to avoid crown rot
- Water deeply for Transplant Shock Prevention
Plant Bare-root Fruit Trees
Bare-root fruit trees are a smart fall investment—cheaper, lighter, and they establish surprisingly fast. Start with Rootstock Selection suited to your climate’s winter lows, then soak roots 4–6 hours before planting.
For Hole Preparation, dig wide and shallow, mounding the center. Inspect roots, trim any damage, then set the Graft Union above soil.
Finish with deep Post-Plant Watering.
Plan Next Year’s Beds
Autumn is the best time to think ahead — when the season’s lessons are fresh. Sketch your layout now using these five principles:
- Crop Rotation Design — Move heavy feeders like tomatoes to new beds.
- Sun Exposure Mapping — Assign your sunniest spots to warm-season crops.
- Aisle Width Planning — Keep paths 4 feet wide for wheelbarrow access.
- Companion Plant Layout — Pair pest deterrents with vulnerable crops.
- Bed Succession Scheduling — Stagger cool and warm-season blocks by frost date.
Top 6 Fall Gardening Tools
Having the right tools makes every fall task feels less like a chore and more like something you can actually get done well. Whether you’re raking leaves, aerating the lawn, or checking soil moisture before the ground freezes, good gear saves you time and effort.
Here are six tools worth keeping in your shed this season.
1. Centurion Garden Cutting Tool Set
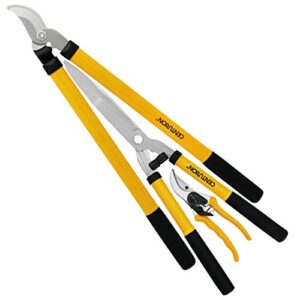
When fall pruning season hits, having the right cutting set makes all the difference. The Centurion Garden Cutting Tool Set covers the bases — carbon-steel blades hold an edge through woody perennials and vine cleanup, while the aluminum handle ensures durability.
The non-slip PVC foam grip reduces wrist strain during repetitive cuts, and the entire kit weighs just 4.2 lb, balancing comfort and control. At $39.99, it efficiently tackles stems, lavender, and light shrub work.
Skip it for thick, heavy limbs, though — it’s not built for that.
| Best For | Home gardeners who want an affordable, lightweight set for everyday trimming tasks like vines, stems, and light shrub work. |
|---|---|
| Price | $39.99 |
| Weight | 4.2 lb |
| Primary Material | Carbon steel |
| Primary Use | Pruning/trimming |
| Rust Risk | Moderate |
| Skill Level | Beginner |
| Additional Features |
|
- Carbon-steel blades hold a sharp edge through regular pruning seasons
- Lightweight at 4.2 lb with a non-slip foam grip that’s easy on the wrists
- Covers multiple cutting jobs at a solid $39.99 price point
- Some units have shown up with missing parts, rust, or dirty packaging
- Feels flimsy to some users — not ideal for heavy-duty work
- Struggles with thick, woody branches that need more serious loppers
2. Oliynedy Adjustable Metal Leaf Rake
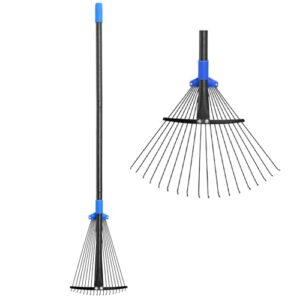
Once the cutting work is done, you need something that manages the aftermath. The Oliynedy Adjustable Metal Leaf Rake is built for exactly that. Its head adjusts from 8 to 17 inches—narrow enough to work around shrubs, wide enough to clear open beds fast.
The telescoping handle stretches from 30 to 58 inches, so you’re not hunching over. At roughly 1 lb and $21.99, it’s light, packable, and genuinely easy to use. Just don’t expect it to muscle through heavy, dense leaf piles.
| Best For | Gardeners who need a lightweight, versatile rake for tidying up flower beds, shrubs, and medium-sized lawns without hauling multiple tools around. |
|---|---|
| Price | $21.99 |
| Weight | ~1 lb |
| Primary Material | Metal/plastic |
| Primary Use | Leaf raking |
| Rust Risk | Low (painted) |
| Skill Level | Beginner |
| Additional Features |
|
- Head adjusts from 8 to 17 inches, so you can squeeze into tight spots or open it up for wider sweeps
- Telescoping handle (30–58 in) means people of different heights can use it comfortably without stooping
- At about 1 lb and $21.99, it’s easy on your back and your wallet—and packs down small for storage or travel
- The outer tines can curl at the narrowest (8 in) setting, which cuts down on effectiveness in really tight spaces
- The plastic clamp holding the head width in place feels a bit flimsy and can loosen with heavy use
- Struggles with thick, dense leaf piles—it’s really built for light to medium debris, not big fall cleanups
3. Michigan Peat Compost Manure Blend
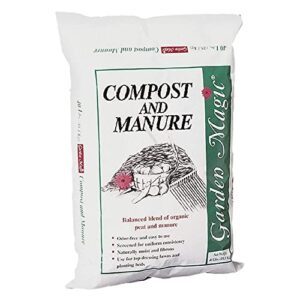
Once your beds are cleared, the soil needs replenishment. Garden Magic’s Michigan Peat Compost Manure Blend ($26.99 for a 40-lb bag) delivers exactly that — a ready-to-use mix of reed-sedge peat and composted animal manure.
This blend improves drainage, loosens compacted soil, and feeds your plants with organic nutrients. Apply it in fall by spreading 1–2 inches across your beds, allowing winter to naturally integrate it into the soil.
One bag covers 0.75 cubic feet, requiring no mixing for effortless use.
| Best For | Home gardeners who want a no-fuss, ready-to-use organic soil booster for raised beds, containers, or in-ground planting. |
|---|---|
| Price | $26.99 |
| Weight | 40 lb |
| Primary Material | Organic peat/manure |
| Primary Use | Soil amendment |
| Rust Risk | None |
| Skill Level | Beginner |
| Additional Features |
|
- Pre-mixed and ready to go — no blending needed, just open the bag and apply.
- Improves both soil structure and nutrition in one shot, thanks to the peat and manure combo.
- Works for a wide range of plants, from tomatoes and squash to ornamentals and turf.
- Can lower soil pH over time, so acid-sensitive plants may need a lime adjustment.
- The 40-lb bag is heavy and bulky — overkill if you’re working with a small pot or planter.
- Some buyers have received short-weight bags, which means you might need to chase down the vendor for a fix.
4. Walensee Manual Lawn Aerator Spike
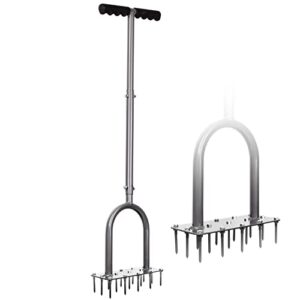
Good soil amendments won’t do much if your lawn is too compacted to absorb them. That’s where the Walensee Manual Lawn Aerator Spike earns its place in your fall toolkit.
Its 15 sharp iron spikes—arranged in three rows—punch 2.3-inch channels into the soil with each step, letting air, water, and nutrients reach roots directly. The 34.6-inch T-handle with a built-in foot pedal keeps you upright and in control. Best for small lawns and spot treatments.
| Best For | Homeowners with small yards who want to spot-aerate problem patches, edges, or bare areas without hauling out heavy equipment. |
|---|---|
| Price | Not listed |
| Weight | 4.91 lb |
| Primary Material | Powder-coated steel |
| Primary Use | Lawn aeration |
| Rust Risk | High if wet |
| Skill Level | Beginner |
| Additional Features |
|
- 15 spikes in three rows means decent coverage per step—you’re not poking one hole at a time.
- The 34.6-inch T-handle with foot pedal keeps you standing upright, so your back won’t hate you after 20 minutes.
- At under 5 lbs, it’s easy to carry around and store when the season’s done.
- Big lawns will wear you out fast—this is a spot-treatment tool, not a full-yard solution.
- Steel spikes can rust if you leave them wet, so you’ll need to dry and store it properly after each use.
- Compacted clay or rocky soil will fight back hard; don’t expect great results in those conditions.
5. Briliantwerk Lawn Aerator Shoes
If you’d rather walk your lawn than stab it, the Brilliantwerk Lawn Aerator Shoes are worth strapping on.
Attach them over your regular footwear using the three hook-and-loop straps — they fit sizes 5 through 14 — and every step drives steel spikes up to 2 inches into the soil.
Choose the shorter 1.5-inch spikes for dethatching, the longer ones for compacted ground.
Just retighten the spike nuts every few minutes; they’ll loosen faster than you’d expect.
| Best For | DIY homeowners and small contractors who want an easy, low-effort way to aerate their lawn or prep floors for epoxy without renting equipment. |
|---|---|
| Price | Not listed |
| Weight | 1.96 kg |
| Primary Material | Metal spikes/velcro |
| Primary Use | Lawn aeration |
| Rust Risk | High if wet |
| Skill Level | Beginner/DIY |
| Additional Features |
|
- Fits a wide range of shoe sizes (5–14) and straps right over your existing footwear
- Comes with two spike lengths so you can switch between light dethatching and deeper aeration
- Lightweight enough to wear for extended sessions without wearing yourself out
- The Velcro straps can slip, so you’ll need to stop and readjust more than you’d like
- Spike nuts loosen quickly on hard ground — retightening every few steps gets old fast
- Some spikes arrive dull out of the box, which means they pull up clumps instead of punching clean holes
6. XLux Soil Moisture Meter
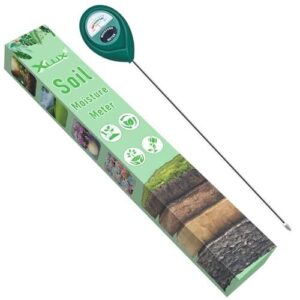
Guessing whether your soil needs water wastes time and risks your plants. The XLux Soil Moisture Meter removes that guesswork entirely.
Push its 5.5-inch probe down to root level, wait a moment, and read the color-coded dial — red means dry, green is moist, blue signals wet.
This reliable $14.99 analog tool requires no batteries or charging and works across pots up to 24 inches wide.
Wipe the probe clean after each use to keep readings accurate.
| Best For | Indoor gardeners and plant hobbyists who want a simple, no-fuss way to know exactly when to water their plants. |
|---|---|
| Price | $14.99 |
| Weight | 0.13 kg |
| Primary Material | Metal probe |
| Primary Use | Moisture testing |
| Rust Risk | High if wet |
| Skill Level | Beginner |
| Additional Features |
|
- No batteries or charging needed — just push it in and read the dial
- The 5.5-inch probe reaches deep into larger pots where moisture really matters
- At $14.99, it’s an easy, affordable upgrade over guessing
- The metal tip can rust if you leave it in soil too long or skip drying it after use
- Won’t hold up well in rocky or heavily compacted soil
- Some users report the probe wearing out after extended use, so it may not last forever
Frequently Asked Questions (FAQs)
What do gardeners do in the fall?
Fall is when gardeners shift from harvesting to protecting. You’re clearing debris, amending soil, planting garlic and bulbs, and setting everything up so spring gets a strong, clean start.
What should I be doing in my garden in October?
October is your garden’s reset moment.
Clear out dead crops, pull weeds before they seed, add compost to beds, plant garlic and spring bulbs, and mulch after the first hard freeze.
What to do in the garden in fall?
Your garden needs four things before winter: a thorough cleanup, soil protection, frost-proofing for plants, and some smart planting that sets you up for a strong spring harvest.
What is the best plant to grow in autumn?
Think of ornamental kale as autumn’s jewel — its leaves deepen into rich purples and greens as temperatures drop, tolerating light frosts down to around -2°C with minimal fuss.
What crops do farmers plant in the fall?
Farmers commonly plant winter rye, wheat, and barley in September and October, along with oilseed rape and spinach.
These crops establish roots before frost and deliver a solid harvest by late spring.
How do you prepare soil for autumn?
Start by adding 1–2 inches of finished compost and working it into the top 6–8 inches of soil.
Pull weeds, mulch bare beds with shredded leaves, and check that moisture runs 6–8 inches deep.
When should I harvest root vegetables?
Ever wondered if your carrots are actually ready? Pull when roots hit 1½–2 inches wide. Let parsnips sweeten after first frost. Harvest beets at 1–3 inches for the best tenderness.
How do I winterize my irrigation system?
Shut off your irrigation controller, close the main supply valve, then blow out each zone with an air compressor set to 50 psi max, working from the farthest zone back.
What vegetables can I grow indoors?
Even in winter, your kitchen windowsill can pull real weight. Lettuce, spinach, arugula, radishes, cherry tomatoes, peppers, and herbs like basil and chives all grow well indoors with the right light and containers.
Should I fertilize before winter dormancy?
Yes, but timing is everything. Apply a low-nitrogen fertilizer like 5-10-10 about four to six weeks before the ground freezes so roots absorb nutrients without triggering frost-vulnerable new growth.
Conclusion
Spring doesn’t actually begin in March—it begins right now, in everything you do before the ground freezes. Every garlic clove you push two inches deep, every weed you pull before it seeds, every tool you sanitize before storing: these are the moves that make May feel smooth.
Your autumn gardening tasks aren’t the end of the season—they’re the opening moves of next year’s best garden. Start them before the frost wins.
- https://phsonline.org/for-gardeners/gardeners-blog/planting-bulbs-fall-guide-beautiful-spring-garden
- https://joegardener.com/podcast/fall-bulb-planting-a-to-z/
- https://www.provenwinners.com/learn/garden-design/your-step-step-guide-fall-bulb-planting
- https://www.carmenjohnstongardens.com/blog/daffodil-tulip-bulb-planting-101
- https://us.mammotion.com/blogs/news/fall-lawn-care-schedule?srsltid=AfmBOoqn-Yy0X9O0KVc5HEJFzgNoWt-00204hHKm2q1JMEAPdg_uQTnt