This site is supported by our readers. We may earn a commission, at no cost to you, if you purchase through links.

Most fruit doesn’t spoil in storage—it spoils in the first hour after harvest.
A single bruise from careless handling triggers a cascade of cellular breakdown that no refrigerator can reverse.
By the time you notice the soft spot, the damage is already three days old.
Temperature, humidity, and ethylene control determine whether your harvest lasts days or weeks.
Each fruit type follows its own metabolic timeline, and matching your storage method to that biology separates a 3-day shelf life from a 3-week one.
The difference isn’t luck—it’s procedure.
Table Of Contents
- Key Takeaways
- Harvest Fruit at Peak Ripeness
- Sort and Prepare Fruit for Storage
- Match Storage Method to Fruit Type
- Control Temperature, Humidity, and Ethylene
- Top 5 Fruit Storage Essentials
- Freeze, Dry, or Can Extra Fruit
- Frequently Asked Questions (FAQs)
- What are the 7 preservation methods?
- Can fruit help lower blood pressure?
- How do I preserve my homegrown fruit harvest?
- What are the best methods for preserving fruits?
- How do you preserve a jar of homegrown fruit?
- How are fruits and Vegetables stored?
- How do you store a ripe fruit?
- How do you choose a vegetable storage method?
- What are the methods of storing fruit?
- What’s the best way to store cut-up fruit?
- Conclusion
Key Takeaways
- Bruising at harvest — not in storage — triggers the cellular breakdown that quietly ruins fruit days before you notice any soft spots.
- Temperature, humidity, and ethylene are the three variables that separate a 3‑day shelf life from a 3‑week one, and small errors in any of them compound quickly.
- Matching your storage method to each fruit’s biology — cold and humid for apples, room temperature for mangoes, 32–34°F for berries — is what actually prevents spoilage, not luck.
- When fresh fruit runs out or surplus builds up, flash‑freezing, dehydrating, and water‑bath canning each extend your harvest by months — but only if surface moisture, pH, and seal integrity are controlled at every step.
Harvest Fruit at Peak Ripeness

Picking fruit at the right moment is where good storage actually begins. Get it wrong and no technique in the world will save what’s already lost.
Timing really is everything—these fruit harvesting tips for peak ripeness can help you catch that window before it closes.
what to check before you cut.
Check Color, Firmness, and Aroma Before Picking
Before you pick a single fruit, let the three-point check guide you: Visual Ripeness Indicators, like uniform color and blemish‑free skin, a Tactile Firmness Test near the stem — slight yield, no dent — and an Aroma Sweetness Cue at the stem end.
Nail all three, and your Harvest Timing and Techniques will directly determine fruit shelf stability and long‑term fresh produce quality.
For gentle removal, use the twist-and-lift method to avoid damaging the stem or skin.
Use The Twist-or-cut Method to Avoid Bruising
Once you’ve confirmed ripeness, how you detach the fruit determines everything downstream. Twist Angle and Stem Pressure work together — cup the fruit, rotate 90°, and release. If resistance holds, a shallow Cut Depth with a sharp blade protects underlying flesh.
- Confirm Tool Sharpness before each session
- Apply Grip Technique using your palm, not fingertips
- Rotate at a controlled Twist Angle — never yank
- Monitor Stem Pressure; stop if the fruit resists
- Limit Cut Depth to the stem joint only
These postharvest handling practices directly support fruit shelf stability.
Handle Fruit Gently to Prevent Hidden Damage
Once the fruit releases cleanly, how you carry it matters just as much. Use a Cupping Technique — palm open, fingers relaxed — and apply only Light Thumb Pressure when lifting.
Support the Stem Support end and crown to prevent torsional stress on the flesh. Transfer immediately into Padded Bin Handling with Spacing Arrangement between pieces.
These postharvest handling practices protect cellular integrity and directly support fruit shelf stability.
Remove Any Cracked, Diseased, or Overripe Fruit Immediately
Gentle handling gets you far, but it won’t help if cracked, diseased, or overripe fruit rides along into storage.
fruit health monitoring starts the moment you spot anything off — fungal fuzz, soft lesions, split skin. Pull it immediately.
Use dedicated disposal containers, keep separate waste streams from healthy stock, and sanitize any tools that made contact. That’s integrated postharvest disease control in practice.
Keep Harvested Fruit Shaded and Dry
Once fruit leaves the plant, sunlight and heat become its first enemies. Place harvested fruit in cooling shade within minutes — not hours — to slow moisture loss and surface temperature rise.
- Choose breathable shade cloth types that block direct sunlight exposure without trapping heat
- Maintain steady air circulation to support moisture evaporation without blowing debris
- Keep ambient temperature between 60–75°F to avoid temperature fluctuations
- Spread fruit in a single layer for dry storage conditions
- Apply daily humidity control checks to catch damp clusters early
Sort and Prepare Fruit for Storage
What happens right after harvest matters more than most people realize.
Before a single piece of fruit goes into storage, there’s a short but critical sequence you need to follow. Here’s what to do first.
Separate Fruit by Variety, Ripeness, and Quality

Think of your harvest as a population that needs zoning, not a single batch. Variety sorting starts at the bin level — separate peaches from apples immediately, since different ethylene production rates drive ripening at different speeds.
Use ripeness bins to isolate fully ripe from underripe fruit, then run a defect inspection pass, pulling anything bruised or cracked. batch coding before fruit reaches cold storage.
Sanitize Tools, Bins, and Packing Surfaces First

Before any fruit touches a surface, sanitation comes first — not after. Start with a detergent pre-wash to lift soil and organic residue, then rinse completely.
Apply sodium hypochlorite (liquid bleach) at a verified sanitizer concentration using test strips. Key non‑negotiables:
- Air drying bins upside-down prevents recontamination
- Color-coded gloves separate fruit‑handling zones
- Sanitation log maintenance tracks every session
Wash Only When Needed With Potable Water

Not every fruit needs a full rinse — washing introduces moisture that accelerates decay. Use potable water only after trimming and sorting, and confirm potable water verification before each session.
Rinse Batching: work in small basin loads, reusing wash water only while it stays clear. Follow basin reuse guidelines strictly, limit chlorine bleach to 1 tsp per gallon, and cool produce before washing to manage moisture management effectively.
Dry Fruit Fully Before Packing or Chilling

Surface moisture is the hidden enemy — even a thin film of water creates the conditions mold needs to colonize your batch overnight. Complete your drying cycle before any fruit enters airtight packaging or the chill chain.
Surface moisture is mold’s invitation — always dry fruit completely before sealing or chilling
- Achieve Moisture Uniformity by conditioning fruit for 30–60 minutes post-dehydration
- Target leathery, pliable texture — not brittle — as your dryness standard
- Keep drying temperature between 130–150°F for consistent moisture loss reduction
- Use Desiccant Integration inside sealed containers to maintain safe humidity
- Verify no off-odors before sealing — fermentation signals incomplete dehydration
Label Containers With Harvest Date and Variety

A mislabeled container is a liability. Use waterproof materials rated for freezer and refrigerator temperatures — water-resistant ink and adhesive that won’t peel during condensation cycles.
Place labels on container sides at eye level for consistent label placement and faster scanning.
Record harvest date in YYYY-MM-DD format alongside the full variety name.
Add a batch coding reference for digital traceability, inventory management, and seasonal organization across storage cycles.
Match Storage Method to Fruit Type

Not every fruit plays by the same rules regarding storage. The method that keeps your apples crisp for months will turn your berries into mush overnight.
Here’s how to match each fruit to the approach that actually works.
Refrigerate Berries and Other Highly Perishable Fruit
Berries don’t forgive delays. Once picked, raspberries last just 1–3 days; strawberries push 3–7 days only when stored correctly.
Get it right with these four non-negotiables:
- Set refrigerator temperature to 32–34°F using Temperature Stabilized Drawers
- Line containers with Paper Towel Liners and Moisture Control Trays to control condensation
- Apply Low-Impact Packing — single shallow layers only
- Start Shelf-life Tracking from harvest date
Skip refrigeration versus freezing for produce longevity debates — unless you’re cooking them, don’t freeze fresh berries.
Store Apples and Pears in Cold, Humid Conditions
Apples and pears thrive in cold storage at 32–39°F with 90–95% relative humidity. Use Insulated Shelving with proper Shelf Spacing to allow airflow, and maintain Dark Storage conditions to slow ripening. Humidity Buffering with damp sand trays prevents shriveling without promoting mold.
| Condition | Target Range |
|---|---|
| Temperature | 32–39°F (0–4°C) |
| Relative Humidity | 90–95% |
| Darkness | Full or dim |
| Airflow | Gentle, consistent |
| Storage Duration | Up to several months |
Keep Ethylene-producing Fruit Away From Sensitive Produce
Cold, humid storage works great for apples and pears — until ethylene gas disrupts neighboring produce.
Ethylene management in apple storage means designating dedicated ethylene zones with physical barrier separation and separate storage racks.
Even modest concentrations above 1 ppm accelerate spoilage in berries and leafy greens.
- Label ethylene sources clearly to prevent accidental mixing
- Use scavenger sachet placement inside enclosed bins to reduce buildup
- Monitor impact of ethylene on neighboring produce through routine inspections
Use Short-term Room-temperature Holding for Fruit That Needs Ripening
Not every fruit needs cold storage right away. Bananas, mangoes, and peaches actually require room temperature storage at around 20°C to develop full flavor — cold halts that process entirely.
Place fruit in breathable containers with proper Airflow Management, away from direct Light Exposure. Monitor Aroma and texture daily for Ripening Timing cues.
| Condition | Target Range |
|---|---|
| Temperature | 20°C (68°F) |
| Humidity | 60–70% |
Choose Storage Methods Based on Shelf-life Goals
Your shelf-life goal should drive every storage decision you make.
Short-term fruit storage calls for cold chain logistics and humidity control; medium-term preservation benefits from low-oxygen packaging to slow respiration.
For extended shelf-life freezing, flash-freeze in single layers.
Sugar concentration preservation through dehydration and organic acid canning seal in quality for up to a year — matching the method to your timeline prevents waste before it starts.
Control Temperature, Humidity, and Ethylene

Getting these three variables right — temperature, humidity, and ethylene — is what separates fruit that lasts weeks from fruit that fades in days. Each one works against you quietly, and small errors add up fast.
Here’s what to keep in check.
Keep Cold Storage as Close to 32°F as Possible
Target 32°F and don’t waver — apples ripen four times faster at 50°F than at 30–32°F.
Place calibrated thermometers in the warmest zone and log readings twice daily as part of your cold storage best practices. Set temperature alarm settings to trigger above 34°F and perform monthly seal integrity checks to maintain insulation integrity. consistent temperature monitoring is non-negotiable for serious fruit storage.
Maintain High Humidity for Fruit That Loses Moisture Quickly
Strawberries and raspberries can lose significant weight within days if relative humidity drops below 90 percent.
Target 90–95% RH using evaporative humidifiers or ultrasonic mist systems, and back them up with breathable clamshells, moisture-retentive liners, or packaging humidity packs stabilized near 90% RH.
A hygrometer keeps you honest — verify readings daily to protect your fruit storage investment.
Avoid Temperature Swings That Trigger Quality Loss
Temperature swings are the silent saboteur of post-harvest quality. Fluctuations beyond 2–3°C trigger condensation, accelerate enzymatic browning, and cause cell damage in berries through ice crystal formation.
Apply a gradual chill ramp after harvest, practice door opening minimization, and use zonal cooling balance with real-time sensors for temperature spike prevention. Thermal inertia works in your favor — don’t waste it.
Ventilate Storage Areas to Reduce Ethylene Buildup
Ethylene gas is the invisible clock ticking down your fruit’s shelf life. Managing ethylene gas to prevent spoilage starts with a deliberate ventilation scheduling protocol — targeting 2–6 air changes per hour, scaled to your load.
- Airflow directionality: Direct flow outward, never recirculating ethylene back in.
- Fan sizing guidelines: Match fan capacity to bay volume and fruit load.
- Ethylene scrubber integration: Install potassium permanganate scrubbers in line with ducts.
Sensor placement strategy — position detectors at fruit eye level — confirms your system is working.
Monitor Storage Conditions Regularly With a Thermometer and Hygrometer
You can’t fix what can’t measure. Place calibrated thermometers and hygrometers away from doors and airflow sources — sensor positioning matters.
Log temperature and relative humidity readings every shift, and review those logs weekly to catch drift before it damages fruit.
Set alarms with a 15-minute response window, back up data monthly, and build a calibration routine into your standard operating schedule.
Top 5 Fruit Storage Essentials
The right tools make the difference between fruit that lasts and fruit that doesn’t. Having the proper equipment on hand — from funnels to jar lifters — keeps your storage process efficient and safe.
Here are five essentials worth adding to your setup.
1. Delove Stainless Steel Funnel with Strainer
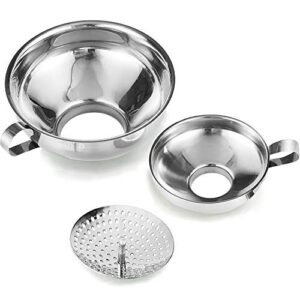
When you’re ladling hot jam into jars at the end of a long harvest day, spills aren’t just messy — they’re a contamination risk. The Delove Stainless Steel Funnel with Strainer (Model WF-2) solves that directly.
Its wide-mouth opening reduces spillage, and the built-in mesh strainer captures fruit pulp and solids mid-pour.
Food-grade 304 stainless steel resists acidic fruit residues and won’t harbor bacteria the way plastic can.
Dishwasher-safe and stackable, it fits standard mason jars and keeps your canning workflow clean and controlled.
| Best For | Home canners and meal preppers who want a cleaner, more hygienic way to fill mason jars with jams, soups, sauces, or dry goods without the mess or microplastic concerns of plastic funnels. |
|---|---|
| Material | Stainless steel |
| Food Safe | Yes, food-grade |
| Primary Use | Canning and storage |
| Easy to Clean | Dishwasher safe |
| Package Count | 3 pieces |
| Storage Method | Stackable |
| Additional Features |
|
- The wide-mouth opening cuts down on spills significantly, and the built-in strainer means you’re not juggling a separate sieve while pouring hot liquids.
- Food-grade stainless steel won’t absorb odors, resist acidic foods well, and won’t harbor bacteria the way worn plastic tools can.
- All three pieces stack together neatly, so storage is a non-issue — toss them in a drawer and forget about it.
- The shorter funnel lip means you need to pour carefully and keep it centered, especially with hot liquids — a little tilt and things get messy fast.
- The wide top makes it wobbly on flat surfaces, so you’ll often need a free hand to brace it against something while pouring.
- The mesh is a fixed size, so if you need to filter out really fine particles, you’ll still need a separate fine-mesh sieve on top of this one.
2. Magic Mill Food Dehydrator Stainless Steel Trays
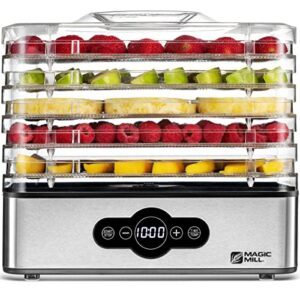
Once your jars are sealed and labeled, drying is your next line of defense against spoilage.
The Magic Mill MFD-5000’s five stainless-steel trays resist corrosion and won’t transfer off‑flavors into fruit slices, herbs, or jerky.
The rear-mounted fan distributes heat evenly across all trays, so you won’t spend time rotating batches mid‑cycle.
Set the digital panel anywhere between 95–167°F, run it up to 48 hours, and dried fruit retains up to 97% of its original vitamins and minerals.
| Best For | Home cooks and health-conscious snackers who want to make their own jerky, dried fruit, or herbs without a lot of fuss. |
|---|---|
| Material | BPA-free plastic / stainless steel |
| Food Safe | Yes, BPA-free |
| Primary Use | Food dehydrating |
| Easy to Clean | Detachable trays |
| Package Count | 5 trays |
| Storage Method | Compact countertop |
| Additional Features |
|
- Five stainless-steel trays won’t rust or mess with the flavor of your food — great for everything from apple slices to beef jerky.
- The digital panel lets you dial in exact temps (95–167°F) and run it up to 48 hours, so you can set it and forget it overnight.
- It’s compact and quiet enough to leave running on the counter without driving anyone crazy.
- The trays feel a bit flimsy and can rattle, which gets annoying over a long drying session.
- The touch controls are overly sensitive — easy to overshoot your time or temp settings by accident.
- The power cord is only about 3 feet long, so you’ll likely need an extension cord depending on your kitchen setup.
3. Fresh Blueberries Natural Antioxidant Snack
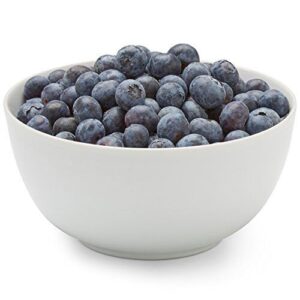
While the dehydrator processes your bulk batches, sometimes the best storage win is choosing produce that’s already optimized for shelf stability. Fresh blueberries hit that mark.
Refrigerate them immediately at 32–40°F, skip washing until you’re ready to eat, and they’ll hold their anthocyanin content and firm texture for several days.
At $6.29 per pint with no additives — just berries — they’re a reliable, low-maintenance option to keep stocked between harvests.
| Best For | Anyone who wants a quick, healthy snack or a versatile ingredient to toss into smoothies, salads, or baked goods without a lot of fuss. |
|---|---|
| Material | Natural fruit |
| Food Safe | Yes, fresh produce |
| Primary Use | Fresh snacking |
| Easy to Clean | Rinse before eating |
| Package Count | 1 pint |
| Storage Method | Refrigerated |
| Additional Features |
|
- Pure, no-additive ingredient — just fresh blueberries packed with antioxidants and anti-inflammatory compounds
- Saves you around $2 per pint compared to typical grocery store prices
- Ready to use straight from the fridge for snacking or cooking
- Highly perishable, so you need to refrigerate them right away and use them within a few days
- Quality can vary between shipments — some batches may come in smaller and tarter than expected
- You have to remember to wash them before eating, which is a small but easy-to-forget extra step
4. Luxardo Gourmet Cocktail Maraschino Cherries

Not all preserved fruit starts in your kitchen. Luxardo Gourmet Maraschino Cherries are candied from whole Marasca cherries — sourced from the Adriatic region — then packed in a syrup of cherry juice, citric acid, and natural maraschino flavor.
No artificial dyes, no mushy texture.
Each 400 g jar holds 63 firm cherries with a deep, almond-tinged flavor that holds up in cocktails and desserts alike.
Store at room temperature, refrigerate after opening, and use clean utensils every time.
| Best For | Home bartenders and cocktail enthusiasts who want a premium, authentic cherry garnish for classic drinks like Manhattans and Old Fashioneds. |
|---|---|
| Material | Glass jar |
| Food Safe | Yes, Kosher certified |
| Primary Use | Cocktail garnish |
| Easy to Clean | Wipe jar exterior |
| Package Count | 63 cherries |
| Storage Method | Room temperature |
| Additional Features |
|
- Made from real Marasca cherries with no artificial dyes — the flavor and color are the real deal
- Kosher certified, so they work for a wider range of dietary needs
- Firm texture and consistent size make them easy to skewer and drop into any drink
- At around $24.50 a jar, they cost noticeably more than standard cocktail cherries
- 63 cherries per jar won’t last long if you’re running a busy bar
- Natural color can vary slightly between batches, so don’t expect every jar to look identical
5. Ball Jar Lifter Tool
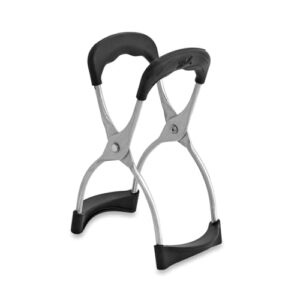
When hot jars come out of the water bath, the right tool makes all the difference.
The Ball Jar Lifter’s spring-hinged grip opens automatically, cradles the jar bead securely, and releases without fumbling — reducing burn risk and hand strain in one motion.
At 8.4 inches long, your hands stay well clear of boiling water.
The molded grip surface increases contact area by roughly 150%, so even heavy quart jars won’t slip.
Hand-wash only to preserve the spring mechanism’s tension.
| Best For | Home canners — especially seniors or anyone with limited grip strength — who want a safer, more confident way to handle hot jars. |
|---|---|
| Material | Heat-resistant plastic |
| Food Safe | Yes, heat-resistant |
| Primary Use | Jar handling |
| Easy to Clean | Hand wash only |
| Package Count | 1 unit |
| Storage Method | Countertop storage |
| Additional Features |
|
- Spring-hinged grip opens automatically, so placing and removing hot jars is quick and fuss-free
- Molded surface grips ~150% more contact area, keeping even heavy quart jars secure
- At 8.4 inches long, your hands stay well away from boiling water
- Hand-wash only — the dishwasher will wear down the spring mechanism over time
- Material listed as both plastic and metal, so it’s unclear exactly what you’re getting
- The spring hinge may weaken with heavy use or repeated heat exposure
Freeze, Dry, or Can Extra Fruit

When you’ve got more fruit than you can eat fresh, preservation isn’t just smart — it’s how you stay ahead of waste.
Freezing, drying, and canning each protect your harvest in different ways, so the method you choose depends on how long you need it to last and how you plan to use it later.
Here’s what to do with that extra fruit.
Flash-freeze Fruit in a Single Layer Before Sealing
Single-layer tray arrangement is the foundation of effective flash freeze technique. Spread fruit pieces without touching on a parchment-lined tray — this airflow optimization ensures each piece solidifies evenly, preventing ice crystal formation.
A pre-freezing chill in the fridge speeds solidification at −18 °C. Once solid, transfer to vacuum-sealed bags with air removed for freezer burn prevention and shelf life extension up to 12 months.
Use a Dehydrator for Long-term Dried Fruit Storage
When long-term fruit storage is the goal, dehydrating fruit for long-term storage outperforms most methods in simplicity and shelf life extension.
Preheat dehydrator to 130–150 °F before loading trays — slice thickness uniformity matters here, so keep cuts consistent.
Airflow optimization ensures even drying. Moisture testing confirms readiness: no stickiness, clean snap.
Finish with airtight packaging to lock in up to 12 months of quality.
Water-bath Can High-acid Fruit Safely
Water-bath canning locks in your harvest when the pH stays at or below 4.6 — that’s the threshold separating safe preservation from dangerous guesswork. Follow tested canning safety guidelines for high-acid and low-acid foods precisely, because processing time and temperature aren’t negotiable.
- acid pH testing before processing; add lemon juice if borderline
- jar sterilization by simmering in water just below boiling
- headspace sizing — usually ¼ inch for jams
- rolling boil throughout the full processing time, then perform seal inspection immediately after cooling
Pack Finished Preserves in Airtight, Labeled Jars
Once your preserves cool undisturbed for 12–24 hours, run a Lid Depressing Method check — press each center firmly. No flex means a solid vacuum seal.
Complete a Jar Compatibility Review before filling: inspect mason jars for chips or cracks that break seal integrity. Apply waterproof labels recording contents, processing date, and batch number.
Your Batch Traceability System and Cool-down Timing discipline are what separate reliable home canning from guesswork.
Rotate Stored Fruit Using FIFO to Reduce Waste
First in, first out FIFO rotation isn’t optional — it’s the backbone of food waste reduction across every fruit preservation method you use.
Apply Zone Rotation by placing oldest stock at the front of each shelf.
Use Visual Age Indicators like color-coded labels, and log removals through Digital Tracking.
Pair that with Staff Training and a weekly Audit Schedule to lock in shelf life extension strategies across all storage container selection decisions.
Frequently Asked Questions (FAQs)
What are the 7 preservation methods?
Think of preservation as buying time. The seven methods are Freezing, Rapid Freezing, Canning, Pressure Canning, Dehydration, Dehydration Drying, Pickling, Fermentation, Fermentation Process, and Controlled Atmosphere storage.
Can fruit help lower blood pressure?
Yes — potassium-rich fruits like bananas and citrus, whole fruit fiber, flavonoid benefits of berries, and watermelon citrulline all support healthy blood pressure through vascular relaxation, fluid balance, and reduced sodium impact.
How do I preserve my homegrown fruit harvest?
Pick right, store smart, preserve longer — your homegrown fruits deserve each step done with intention.
Fruit preservation methods like vacuum sealing, fermentation techniques, and cold storage turn a good harvest into a year‑round supply.
What are the best methods for preserving fruits?
Flash-freeze, dehydrate, or use fermentation techniques to extend shelf life. Vacuum-sealed bags, canning safety protocols, and modified atmosphere packaging round out your best fruit preservation methods options.
How do you preserve a jar of homegrown fruit?
Sterilize mason jars through a full sterilization cycle, then pack homegrown fruits using acidified syrup or sugar packing.
Vacuum sealing and following canning safety guidelines for high-acid foods ensure shelf-life testing confirms safe, long-lasting preservation.
How are fruits and Vegetables stored?
Fruits store best under cold, humid conditions, using cold storage techniques for homegrown vegetables — refrigeration, root cellar storage, or Modified Atmosphere Packaging.
Temperature and humidity management, vacuum sealing, and postharvest handling practices determine shelf stability.
How do you store a ripe fruit?
Ripe fruit needs cold, humidity, and airflow management, fast.
Refrigerate within 2 hours, use vacuum-sealed bags to limit freezer burn, and monitor temperature and humidity management closely to enhance fruit shelf stability.
How do you choose a vegetable storage method?
Match each vegetable to its needs — Root Crop Curing, Leafy Green Humidity, Tubers Light Sensitivity, Nightshade Temperature Range, and Legume Shelf Life all guide storage temperature, relative humidity, moisture control, storage containers, and root crop garden storage decisions.
What are the methods of storing fruit?
Cold Storage, Freezing, Canning, Drying, Vacuum Sealing, Modified Atmosphere Packaging, Ethylene Scrubbing, Cold Chain Logistics, and Biodegradable Containers are your core options — each matched to specific fruit types, shelf-life targets, and quality standards.
What’s the best way to store cut-up fruit?
Seal cut fruit in portion-sized containers lined with parchment lining, add a citrus juice dip to slow oxidation, and refrigerate at 32–40°F.
Use vacuum sealing bags to extend freshness up to five days.
Conclusion
harvest crate isn’t just a container—it’s a clock. Every hour after picking, biology works against you, and no technique can reclaim what careless handling already cost.
But when you apply disciplined fruit harvest storage methods—controlling temperature, humidity, ethylene, and handling from the first twist of the stem—you shift that clock in your favor.
The difference between rot and a three-week shelf life was never luck. It was always procedure, executed precisely from the start.
- https://extension.umn.edu/preserving-and-preparing/home-canning-basics
- https://www.health.harvard.edu/heart-health/eating-more-fruit-may-help-lower-blood-pressure
- https://www.persly.ai/disease-fact-check/hypertension-fruit
- https://www.healthpartners.com/blog/how-to-lower-high-blood-pressure-through-diet/
- https://www.cardiovasculardiseasehub.com/archives/2436