This site is supported by our readers. We may earn a commission, at no cost to you, if you purchase through links.

A plant that’s never been pruned tells on itself—leggy stems, sparse blooms, branches crossing like they’re arguing over space.
Most gardeners assume more growth means a healthier plant, but that thinking quietly works against you.
Left unchecked, plants pour energy into wood that’s going nowhere, while the parts that actually fruit, flower, and thrive get crowded out.
Knowing how to prune garden plants changes that.
A few clean cuts at the right time redirect that energy, opens up the canopy, and gives your garden the kind of structure that holds up season after season.
The difference is technique, timing, and the right tools.
Table Of Contents
- Key Takeaways
- Why Pruning Matters
- Best Time to Prune
- Essential Pruning Tools
- Step-by-Step Pruning Process
- Core Pruning Techniques
- Pruning by Plant Type
- Common Pruning Mistakes
- Top 9 Pruning Tools for Gardeners
- 1. Corona Comfort Gel Hand Pruner
- 2. Corona Garden Pruning Snips
- 3. Fiskars PowerGear Pruning Shears
- 4. Fiskars Extendable Bypass Lopper
- 5. Corona Razor Tooth Folding Saw
- 6. Troy Bilt Cordless Hedge Trimmer
- 7. Corona Forged Hedge Shears
- 8. Trimmer Plus Pole Saw Attachment
- 9. Fiskars Multipurpose Garden Snips
- Frequently Asked Questions (FAQs)
- Should you prune your plants?
- When should I prune my Garden?
- What is pruning a plant?
- Is pruning a gardening skill?
- How do you prune garden plants?
- Can you prune during wet or rainy weather?
- How do you sterilize tools between plants?
- What happens if you prune too much?
- Do different plant ages require different pruning?
- Should you fertilize immediately after pruning?
- Conclusion
Key Takeaways
- Pruning at the right time — late winter for most plants, right after bloom for spring shrubs — is just as important as how you cut, since bad timing can cost you a whole season of flowers.
- Every cut redirects your plant’s energy, so removing dead, crossing, or crowded branches pushes growth toward the parts that actually bloom, fruit, and thrive.
- Sharp, clean, sterilized tools aren’t optional — dull blades crush stems instead of cutting them, and dirty ones spread disease from plant to plant.
- Never remove more than 25% of a plant at once, always cut just outside the branch collar, and skip pruning when rain is in the forecast to keep your plants healthy and healing fast.
Why Pruning Matters

Pruning is one of the simplest things you can do to keep your garden thriving. A few good cuts at the right time can make a real difference in how your plants look and grow.
When timed well, pruning encourages fresh blooms—much like the burst of color you’ll see from these pollinator-friendly summer flowers after a good trim.
Here’s why it’s worth making pruning a regular habit.
Improve Plant Health and Growth
Think of pruning as a reset button for your garden. When you cut back strategically, you’re redirecting energy where it counts most — toward stronger roots, fuller growth, and healthier foliage.
Good plant health maintenance starts here.
Pair smart pruning techniques with solid water management, mulch application, and micronutrient balance, and you can boost overall growth by up to 30 percent.
Remove Dead, Damaged, and Diseased Wood
dead, damaged, and diseased wood is basically your garden’s dead weight — and leaving it around invites trouble fast.
Consider late winter pruning for best dead wood removal.
wood decay detection: tap suspect branches and listen for hollow sounds, or look for cankers and brittle, dull-textured wood. Then:
- Cut back to healthy tissue using proper branch collar cutting — never flush with the trunk.
- Follow strict sterilization protocols: wipe tools with alcohol between every plant.
- Practice post-prune monitoring to catch lingering infection early.
Hazardous limb removal protects everything around it.
Increase Air Circulation and Light
Once the dead wood is gone, your plant can finally breathe — literally. Thinning crowded branches opens canopy openings that create natural ventilation pathways, boosting air circulation and light penetration deep inside the plant.
Strategic plant placement and smart spacing guidelines work the same way. Better airflow means less fungal trouble, and more light means stronger, healthier growth overall.
Boost Flowering and Fruiting
Better airflow naturally sets the stage for better blooms. When you pair smart pruning with consistent watering, nutrient optimization, and good sunlight exposure, the results are hard to argue with.
Deadheading spent flowers signals your plant to keep producing, while pruning fruiting trees redirects energy straight to the fruit.
Pollinator attraction improves too — open canopies give bees easier access.
Control Size and Shape
Pruning is basically garden’s edit button. Through heading cuts, thinning cuts, and crown reduction, you can guide a plant into almost any form you want.
Branch Angle Management and Selective Limb Removal let you favor outward-growing limbs and eliminate crossing wood. Canopy Density Balancing keeps things open and proportional.
With consistent maintenance pruning and Seasonal Shape Adjustments, Growth Habit Modification happens gradually — never shockingly.
Best Time to Prune

Timing your pruning cuts makes a bigger difference than most gardeners expect. Prune at the wrong moment and you’ll lose a season of blooms or push your plant into unnecessary stress.
Here’s what you need to know about when to grab those shears.
Late Winter and Early Spring Pruning
Late winter is your best window for most deciduous trees and shrubs. Before buds swell, you can actually see the whole canopy — no leaves blocking your view. That’s when Canopy Architecture Planning really clicks.
Here’s what to focus on during winter pruning and early spring prep:
- Bud Swell Monitoring — Cut before buds open for cleaner healing
- Sap Flow Management — Early cuts minimize sap loss and stress
- Frost Damage Repair — Identify and remove winter-killed wood first
- Early Sprout Removal — Clear water sprouts before they waste energy
- Canopy Architecture Planning — Shape the framework while structure is fully visible
Prune Right After Spring Bloom
Once your spring bloomers finish flowering, that’s your green light to prune. Waiting too long risks cutting off next year’s bud sites, since shrubs start bud site preservation almost immediately after bloom.
Focus on energy redirection by removing spent flowers and weak wood. Good timing also aids pest removal from faded blooms.
| Task | Purpose | Follow-up |
|---|---|---|
| Remove spent blooms | Pest removal, energy redirection | Recovery feeding |
| Cut weak/crossing stems | Opens airflow | Water thoroughly |
| Mulch application | Retains moisture | Slow-release fertilizer |
Summer Pruning for Light Shaping
Summer is actually a great time for light touch-ups. A few passes with your pruning shears — thinning crowded shoots and removing excess growth — improve light penetration deep into the canopy.
This sunfleck creation triggers better fruit color and quality. It also helps with temperature regulation and humidity control by improving airflow.
Smart energy allocation means your plants grow stronger, not just bigger.
Limit Fall Pruning to Damage Removal
Fall pruning isn’t the time to get ambitious. Think of it as triage — your only job is Structural Hazard Removal: dead limbs, broken stems, anything likely to fail in a storm. Seasonal Energy Conservation matters here; cutting healthy wood stresses plants heading into dormancy.
Keep it focused:
- Remove only dead or damaged stems
- Use sharp pruning tools for Minimal Tissue Loss
- Follow Safe Ladder Practices on elevated branches
Post-Pruning Monitoring through winter tells you what needs attention come spring.
Match Timing to Plant Growth Cycles
Think of your plants like they’re running on an internal clock — and your job is to sync with it. Dormancy Break Timing and Sap Flow Peaks tell you when energy is moving and where.
Photoperiod Cues and Hormonal Growth Signals shift with day length, guiding new shoots.
Choose your Weather Window Selection wisely — dry, mild days let cuts heal fast and clean.
Essential Pruning Tools

Having the right tool makes every cut cleaner, faster, and safer for your plant. The good news is you don’t need a shed full of equipment — just a few key pieces that cover most jobs in the garden.
Here’s what you actually need and how each one earns its place.
Bypass Pruners for Small Stems
Bypass pruners are your go-to for anything under an inch thick. Heat treated blades slice cleanly without crushing stems, and the built-in spring mechanism opens the tool automatically after each cut.
That means less hand fatigue during long sessions.
- Sharp, beveled blade for precise cuts
- Ergonomic grip reduces strain
- Easy cutting capacity up to ¾ inch
Blade maintenance keeps them performing at their best.
Loppers for Thicker Branches
When stems get too thick for hand pruners, loppers take over.
These long-handled pruning tools handle branches up to 2 inches in diameter with ease.
Gear-Driven Loppers and a Ratchet Cutting Mechanism make hard pruning far less exhausting — especially with Hardened Steel Blades and a Telescoping Handle Reach of up to 41 inches.
Keep up your Blade Lubrication Routine so every cut stays clean.
Pruning Saws for Large Limbs
Once branches push past 2 inches, pruning saws become your go-to tools. These pruning tools use Cutting Stroke Mechanics — pull‑stroke design — to slice through large trees without binding.
Look for:
- Heat Treated Steel blades that stay sharp in dense hardwood
- Ergonomic Handle Design for less hand fatigue
- Swivel Head Adjustment for awkward angles
- Limb Size Limits guidance (12–14 inch blades handle most jobs)
Pruning safety tip: always clear your footing first.
Hedge Trimmers for Formal Shaping
After tackling those thick limbs, hedge trimmers are where precision really shines. For formal shapes — think sharp topiaries or clean hedgerows — nothing beats a quality hedge trimmer with Blade Angle Adjustment and Safety Guard Design built in.
| Feature | What It Means for You |
|---|---|
| Battery Runtime | 20–90 minutes cordless freedom |
| Ergonomic Reach | Up to 3.5m without ladders |
| Noise Reduction | Quieter electric models |
| Double-sided Blades | Faster, cleaner shaping |
| Safety Guard Design | Protects hands from kickback |
Match your pruning tools and pruning techniques to seasonal timing for plant pruning for best results.
Clean, Sharpen, and Disinfect Tools
Sharp, clean tools are the backbone of good pruning. Start with a stiff brush to scrub off soil, rinse well, then dry completely — rust loves moisture.
Follow a consistent sharpening angle on your whetstone to restore a clean edge.
For blade sterilization, soak in 70% isopropyl alcohol for 60 seconds.
Build maintenance scheduling into your gardening calendar, and practice smart tool storage practices — dry, ventilated, away from the sun.
Wear Gloves, Goggles, and Sturdy Shoes
Protective gear isn’t optional — it’s what keeps a good pruning session from turning into a trip to the ER. Suit up with the right kit before you make a single cut:
- Cut-resistant gloves (leather or nitrile gloves benefit both) shield your hands from thorns and sap, with padded hand support reducing fatigue on longer jobs.
- Fog-resistant goggles with UV shield lenses block flying chips and glare without clouding up mid-task.
- Non-slip footwear with ankle support keeps you steady on uneven ground.
Garden safety starts before the pruning safety practices even begin.
Step-by-Step Pruning Process
Pruning without a plan is like cooking without tasting — you might get lucky, but probably not. A simple, repeatable process takes the guesswork out and keeps your plants healthy cut after cut.
Here’s exactly how to work through it.
Inspect The Plant Before Cutting

Before you make a single cut, take a slow walk around your plant. Check leaves for spots or mildew — your Disease Spot Check — then do a quick Pest Presence Survey on stems and foliage.
A Bud Visibility Assessment tells you where new growth wants to go. Feel the soil for moisture, and evaluate stem thickness so you’re cutting with purpose, not guesswork.
Remove Dead, Diseased, and Damaged Growth

Once you’ve done your inspection, it’s time to act on what you found. Start with anything clearly dead, diseased, or broken — this is your biggest win for disease prevention and overall plant health.
- Cut dead limbs back to healthy wood, just above an outward-facing bud
- Practice Tool Sterilization between cuts — 70% alcohol keeps pathogens from hitching a ride
- Respect Branch Collar Preservation; never cut flush to the trunk
- Bag diseased trimmings for Infected Material Disposal — don’t compost them
Keep an eye on cuts afterward. Wound Healing Monitoring helps you catch trouble early when identifying dead or diseased branches you may have missed.
Thin Crowded Branches for Airflow

Think of your plant’s canopy like a crowded room — nobody thrives when packed in. Thinning branches removes entire limbs at their base, which improves canopy aeration and wind passage by up to 25 percent.
This moisture management step cuts fungal risk fast.
Use your loppers or pruning saw here, applying branch angle optimization and pest habitat reduction principles through smart, strategic seasonal timing.
Make Clean Cuts Above Buds or Collars

Where you cut is just as important as what you cut. Always cut above a bud or branch collar — aim for 1–3 mm above it.
Here’s how to make a clean cut every time:
- Angle downward and sloping away from the bud
- Keep a smooth edge finish — no jagged tears
- Maintain proper bud collar distance to speed callus formation rate
Good pruning cuts heal in weeks, not months.
Use The Three-cut Method on Thick Limbs

Once your pruning saw is ready, thick limbs need a smarter approach — that’s where the 3Cut Method saves you.
| Step | Action | Purpose |
|---|---|---|
| 1st Cut | Undercut Positioning — 12–18" from trunk | Prevents bark tearing |
| 2nd Cut | Top Cut Timing — just beyond undercut | Removes limb weight safely |
| 3rd Cut | Final Cut Healing — outside branch collar | Promotes clean callus growth |
Limb Weight Management is everything here. Skip the undercut, and the branch strips bark straight down the trunk.
Step Back and Check Plant Shape

Step away from the plant — seriously, just back up. Check the silhouette balance from a few feet out before making another cut.
Look for canopy symmetry, notice if one side feels heavier, and confirm the height proportion fits the space.
Branch radiance should flow outward, not inward. That visual taper from base to top? That’s what good maintenance pruning actually looks like.
Core Pruning Techniques

Once you’ve got the timing and tools sorted, the real fun begins — actually learning how to cut. There’s more than one way to prune, and each technique does something different for your plant.
Here are the core moves every gardener should know.
Deadheading Spent Flowers
Deadheading is one of those small habits that pays off big. When you snip spent blooms just above a healthy leaf node with sharp pruning shears, you trigger energy redirect — the plant stops chasing seed set inhibition and pushes toward new flowers instead.
For flowering shrubs, seasonal timing for plant pruning matters here too.
Regular deadheading delivers extended blooming, fungal risk reduction, and real visual appeal.
Thinning for Better Light Penetration
Thinning takes what deadheading starts and opens it up further. By removing entire branches at their origin, you create Crown Gap Optimization — real breathing room inside the canopy.
That Shade Reduction Technique lets sunlight reach Sunlit Interior Shoots that were basically starving before. With Layered Canopy Thinning, you’ll notice improved air circulation, a solid Photosynthetic Boost, and noticeably stronger growth throughout.
Heading Cuts for Bushier Growth
Want a fuller, bushier plant? Try heading back — it’s one of the most satisfying pruning techniques you can use.
Cut just above a lateral bud at a slight cut angle, and you’re triggering lateral bud activation almost immediately. That redirects energy allocation toward new side shoots, boosting shoot density fast.
Watch your bud placement, use sharp pruning shears, and match your seasonal timing for plant pruning to keep growth regulation on track.
Crown Reduction for Height Control
Crown reduction lets you bring an overgrown tree down to a manageable height without wrecking its natural shape. Pick the right growth point selection — cut back to strong lateral branches, never stub the limbs.
Stick to a height reduction ratio of no more than one-quarter to one-third per season. Trunk flare maintenance and leader preservation keep structure solid.
Post-reduction care means watching for wild regrowth.
Pinching for Quick Shaping
Pinching is one of the fastest pruning techniques you’ll use. No tools needed — just your fingers. The pinch technique works by removing soft stem tips before they harden, which signals growth hormone to redirect energy into side shoots, boosting leaf density naturally.
- Pinch just above a leaf node
- Match pinch pressure to stem thickness — gentle on thin stems
- Repeat every few weeks during active growth
Selective Cuts to Redirect Energy
Every cut you make is a vote for where the plant spends its energy. Selective removal of weak, crowded, or non-fruiting shoots drives carbohydrate redistribution toward productive wood — that’s fruit set enhancement in action.
Vascular flow targeting through well-placed cuts balances shoot competition reduction with energy budget balancing, so your plant stops wasting resources and starts delivering stronger blooms and bigger harvests.
Pruning by Plant Type

Not every plant plays by the same rules, and pruning is no different. A rose bush, a fruit tree, and a hedge each need their own approach — same tools, different game plan.
Here’s how to handle the most common plants in your garden.
Deciduous Trees in Late Winter
Late winter is the sweet spot for deciduous tree pruning.
With leaves gone, you can actually read the tree — bark identification becomes easier, and branch architecture is fully exposed.
Look for bud scale variations along twigs to confirm the tree is still dormant.
That dormant pruning window, just before bud break, minimizes tree structural stress and redirects winter sap flow toward strong new growth.
Evergreen Trees With Light Tip Trimming
Evergreen trees don’t need aggressive cutting — they thrive on restraint. Light tip trimming triggers hormone redistribution, pushing fresh growth toward branch ends and creating that soft canopy brightness gardeners love.
- Use sharp bypass pruners for clean tip renewal cuts
- Time pruning in early spring before new growth expands
- Target Japanese yew, juniper, and Leyland cypress for best glow effect
- Keep minimalist shaping natural, never square
Fruit Trees for Stronger Yields
Fruit trees are a different beast from evergreens — they reward careful management with actual food on your table.
Prune in late winter before buds break. Focus on scaffold management: keep three to five strong, outward-facing branches. Thin crowded wood so sunlight reaches every spur. Cut last year’s growth back by about a third.
| Task | Why It Matters |
|---|---|
| Scaffold Management | Directs energy to fruiting wood |
| Soil pH Optimization | Improves nutrient uptake for bigger fruit |
| Drip Irrigation Scheduling | Prevents stress during fruit set |
| Pollinator Compatibility | Boosts fruit set up to 20% |
| Resistant Varieties | Reduces disease pressure naturally |
Good pruning fruiting trees for better yields also means planting resistant varieties and pairing compatible pollinators nearby. Combine that with drip irrigation scheduling and soil pH optimization, and you’re setting up a system — not just trimming branches.
Spring-blooming Shrubs After Flowering
Spring bloomers like lilac, forsythia, and mock orange set next year’s buds almost immediately after flowering. Prune within two to four weeks of peak bloom — that’s your window.
- Remove old wood to encourage fresh flowering shoots
- Practice Disease Prevention Cleanup by clearing spent blooms
- Apply Post-Bloom Mulching to lock in moisture
- Use Bud Development Monitoring to time future cuts
Sharp, clean tools make every cut count.
Summer-blooming Shrubs in Late Winter
Unlike spring bloomers, summer-flowering shrubs like buddleia and hydrangea grow and bloom on new wood — so pruning them during the dormant season actually sets them up for success.
Cut them back in late winter before frost‑resistant buds break.
This is also the time for Pre‑Bloom Soil Prep and Winter Mulch Strategies, giving roots a strong foundation before the growing season kicks in.
Hedges for Dense, Even Growth
Hedges reward patience and consistency. Start with smart species selection — tight-branching evergreens fill gaps fast. Good soil preparation and a solid mulching strategy at planting give roots the foundation they need.
From there, it’s about seasonal timing for plant pruning: shape in late spring or summer using hedge shears.
Stick to a rejuvenation schedule every five to seven years, and your hedge stays dense for the long haul.
Perennials, Herbs, and Vegetables
Pruning perennials, vegetables, and herbs is honestly simpler than most gardeners think. Good soil preparation and mulching strategies set the stage, but regular cutting keeps plants producing. Companion planting helps too — rosemary and thyme thrive alongside vegetables and deter pests naturally.
Here’s your seasonal timing for plant pruning cheat sheet:
- Cut chives and perennial herbs back after each harvest to encourage regrowth
- Pinch rosemary tips in spring using bypass pruners to maintain compact shape
- Divide spreading clumps like oregano every three to five years
- Deadhead flowering herbs before seed set to extend your harvest timing
Common Pruning Mistakes

Even seasoned gardeners slip up with pruning from time to time. A few common mistakes can quietly set your plants back, no matter how good your intentions are.
Here’s what to watch out for.
Avoid Over-pruning Plants
Think of your plant like a solar panel — cut too much, and it simply can’t generate enough energy to thrive.
Overpruning is one of the most common pruning mistakes, and it quietly wrecks plants through photosynthesis loss and carbohydrate depletion.
Remove more than 25% of foliage at once, and you’re inviting structural weakness, poor regrowth timing, and open disease entry points.
| Warning Sign | Cause | What It Means |
|---|---|---|
| Stunted new growth | Carbohydrate depletion | Plant is energy-starved |
| Brittle branches | Structural weakness | Breakage risk increases |
| Disease spots near cuts | Disease entry | Pathogens exploiting wounds |
Don’t Cut Flush to The Trunk
A flush cut might look neat, but it’s one of the most damaging mistakes you can make. When you slice too close to the trunk, you destroy the branch collar — the tree’s built-in repair crew.
Here’s what improper cuts lead to:
- Destroyed branch collar tissue that facilitates wound sealing
- Slower healing callus formation around the wound
- Larger exposed areas that invite decay
- Weakened wood that splits in storms
- Failed decay prevention where rot spreads inward
Proper cut placement — just outside the collar — keeps that protective zone intact and promotes faster, cleaner recovery.
Avoid Dull or Dirty Blades
Your blades are either working for your plants — or against them. Dull tools crush tissue instead of cutting it, leaving ragged wounds that invite disease. Dirty blades spread pathogens from plant to plant like a handshake spreading a cold.
Dull, dirty blades don’t just cut plants — they wound and infect them
| Issue | What Happens | Fix |
|---|---|---|
| Blunt secateurs | Crushed stems, slow healing | Sharpen after every few sessions |
| Skipping cleaning between cuts | Disease transfer between plants | Wipe with 70% isopropyl alcohol |
| Poor storage hygiene | Rust dulls edges fast | Store dry, use blade guards |
Build a simple blade sharpening routine, stay consistent with tool sanitation, and practice edge inspection after heavy sessions. Tool rotation keeps your sharpest blade in action. Good pruning sanitation and tool maintenance aren’t optional — they’re what separates a thriving garden from a struggling one.
Never Prune at The Wrong Season
Timing is everything. Cut at the wrong moment and you’re inviting frost injury prevention failures, weak healing, and lost blooms.
Seasonal stress risks spike when you prune during peak summer heat or late fall. Wrong timing disrupts bud development timing and strips plants of dormant healing benefits.
Stick to seasonal pruning guidelines — the best time to prune is always what your plant’s growth cycle demands.
Don’t Remove Too Much New Growth
New growth isn’t just pretty — it’s where your plant stores energy reserves and builds flowering potential.
Hard pruning that strips too much at once throws off canopy balance and forces poor energy allocation after pruning. That disrupts growth timing and raises disease risk.
Keep 20 to 40 percent of new growth intact so your plant stress stays low and blooms stay strong.
Watch for Signs of Plant Stress
Your plant talks — you just have to listen. Yellowing leaves, wilting patterns after pruning, or unexpected leaf discoloration all point to poor energy allocation in plants struggling to recover.
root rot signs like soggy soil with drooping stems.
Pest damage and environmental stress compound pruning shock fast.
Catching these signals early keeps plant health strong and avoids the anxiety of wondering what went wrong.
Top 9 Pruning Tools for Gardeners
Having the right tool in your hand makes every cut cleaner, faster, and safer. Your garden doesn’t care how experienced you are — it just reacts to how well you work with what you’ve got.
Here are nine pruning tools worth keeping in your shed.
1. Corona Comfort Gel Hand Pruner
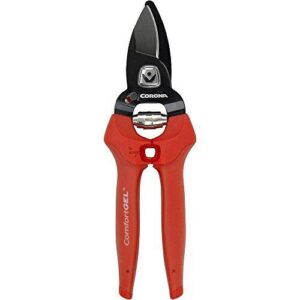
The Corona Comfort Gel Hand Pruner is a go-to for everyday garden work. It’s light — just 0.3 lb — so your hand won’t give out halfway through a session. The soft, ergonomic ComfortGEL grip keeps things steady even when your hands are sweaty, and the non-stick, high-carbon steel blade stays clean between cuts.
Branches up to half an inch? No problem. There’s even a built-in thorn stripper, which is genuinely handy when you’re working through roses.
| Best For | Gardeners with hand sensitivity or anyone who wants a lightweight, easy-to-use pruner for everyday trimming and rose care. |
|---|---|
| Primary Use | Small branch pruning |
| Blade Material | High-carbon steel |
| Ergonomic Grip | ComfortGEL soft grip |
| Weight | 0.3 lb |
| Power Source | Manual |
| Warranty | Not specified |
| Additional Features |
|
- The ComfortGEL grip is a genuine relief for hands that fatigue quickly or deal with neuropathy
- Built-in thorn stripper is a small feature that saves a surprising amount of time when working with roses
- At 0.3 lb, it’s light enough to use all morning without wearing you out
- The blade can dull or bend sooner than you’d hope, especially with regular use
- Half-inch max cutting capacity means it’s out of its depth on anything woody or thick
- Only comes in red, so if you’re matching a tool set, you’re stuck with it
2. Corona Garden Pruning Snips
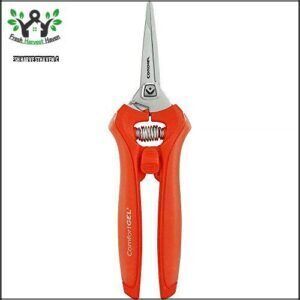
For detail work — think herbs, buds, or seedlings — you need something smaller. That’s where the Corona Garden Pruning Snips come in.
At just 0.1 lb, they’re barely there in your hand.
The bypass blades cut cleanly without crushing delicate stems, and the ComfortGEL grip keeps fatigue away during long sessions.
They’re easy to sterilize too, which matters when you’re moving between plants. tight spots, tiny stems, precise cuts — these snips handle it all without breaking a sweat.
| Best For | Gardeners, growers, and hobbyists who do a lot of detail work — trimming herbs, snipping buds, or propagating soft cuttings where precision matters more than power. |
|---|---|
| Primary Use | Soft stem snipping |
| Blade Material | Steel (implied) |
| Ergonomic Grip | ComfortGEL soft grip |
| Weight | 0.1 lb |
| Power Source | Manual |
| Warranty | Not specified |
| Additional Features |
|
- ComfortGEL grip keeps hand fatigue at bay, even during long trimming sessions
- Easy to fully sterilize, so you can move between plants without worrying about cross-contamination
- Lightweight and compact — great for tight spots and delicate stems that bigger pruners can’t handle
- The slide-lock can be stiff and annoying to release, sometimes needing real effort to undo
- Not built for anything woody or thick — strictly a small-stem tool
- Blade sharpness fades over a season, so you’ll need to resharpen or replace eventually
3. Fiskars PowerGear Pruning Shears
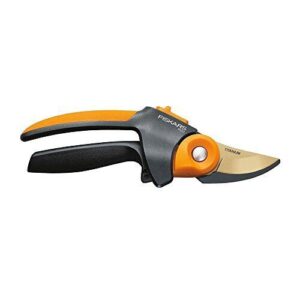
When you’re ready to step up to something with a little more muscle, the Fiskars PowerGear Pruning Shears are worth a look. The built-in gear mechanism multiplies your cutting force up to three times, which is a major improvement if your hands tire easily.
It manages branches up to ¾ inch without strain, and the rotating grip keeps your wrist comfortable through long sessions.
Just note — it’s designed for right-handed users only.
| Best For | Gardeners with arthritis, weak grip, or wrist issues who need extra cutting power without the strain. |
|---|---|
| Primary Use | Small branch pruning |
| Blade Material | Steel/titanium coat |
| Ergonomic Grip | Soft-grid rubber grip |
| Weight | Not specified |
| Power Source | Manual |
| Warranty | Not specified |
| Additional Features |
|
- Gear mechanism multiplies cutting force, making tough branches feel effortless
- Rotating handle reduces wrist fatigue during long pruning sessions
- Soft rubber grip stays comfortable and secure in your hand
- Only works for right-handed users — lefties are out of luck
- The plastic gear mechanism can break with heavy use
- Bulky size may feel awkward for people with smaller hands
4. Fiskars Extendable Bypass Lopper
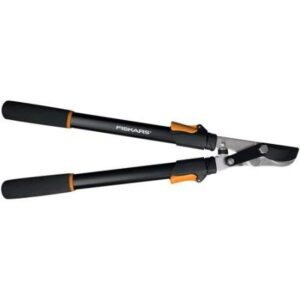
If your shrubs and lower tree branches are just out of reach, the Fiskars Extendable Bypass Lopper closes that gap nicely. It telescopes from 25 to 36 inches, so you’re not straining your toes or dragging out a ladder for every cut.
The power-lever mechanism does the heavy lifting on branches up to an inch thick, and the cushioned grips absorb the shock.
It’s a solid choice for orchard work, tall hedges, or anywhere overhead reaching gets old fast.
| Best For | Gardeners, orchard owners, or older adults who need extra reach and a comfortable grip for trimming branches up to an inch thick without climbing a ladder. |
|---|---|
| Primary Use | Medium branch lopping |
| Blade Material | Hardened steel |
| Ergonomic Grip | Cushioned rubber grip |
| Weight | 0.01 oz (listed) |
| Power Source | Manual |
| Warranty | Not specified |
| Additional Features |
|
- Telescoping handles (25–36 in) give you real flexibility without needing a ladder
- Power-lever mechanism makes cutting thicker branches feel noticeably easier on your hands
- Cushioned grips and shock-absorbing bumper reduce fatigue during longer sessions
- Pricey compared to similar tools made overseas, despite also being manufactured in China
- Struggles with anything over 1–2 inches thick, so larger limbs still need a saw
- The extended length can feel awkward and hard to maneuver in tight or crowded garden spots
5. Corona Razor Tooth Folding Saw
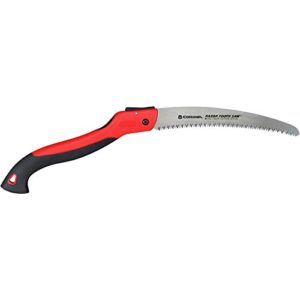
When thick branches stand between you and a clean garden, the Corona RazorTOOTH Folding Saw earns its place in your kit. The 10-inch curved blade with triple-ground, three-sided teeth tears through limbs up to 6 inches across — hardwoods included.
At under 13 ounces, it won’t wear your arm out. The locking blade stays put during cuts and folds safely for your pocket or pack.
It’s a compact powerhouse built for real pruning work.
| Best For | Gardeners, landscapers, and outdoor workers — especially seniors or anyone who wants a lightweight, sharp folding saw that handles real pruning without the bulk. |
|---|---|
| Primary Use | Branch sawing |
| Blade Material | Impulse-hardened steel |
| Ergonomic Grip | Co-molded plastic handle |
| Weight | 12.8 oz |
| Power Source | Manual |
| Warranty | Not specified |
| Additional Features |
|
- Three-sided razor teeth cut fast through hardwoods and green wood alike, even on branches up to 6 inches thick.
- Weighs just under 13 oz, so it’s easy to toss in a bag, backpack, or truck for fieldwork on the go.
- The locking blade keeps things safe — locked open while you work, locked closed when you’re done.
- Replacement blades can cost nearly as much as buying a new saw, and you can’t sharpen them yourself.
- Plastic handle might not hold up as well as metal in rough conditions or if it takes a hard drop.
- Bigger limbs over 6 inches will push it past its limits — you’d need a longer or powered saw for that.
6. Troy Bilt Cordless Hedge Trimmer
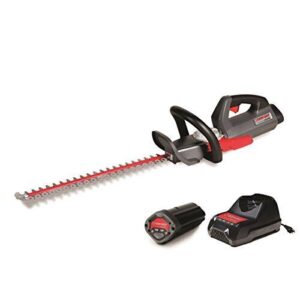
If your hedges have been fighting back, the Troy-Bilt Cordless Hedge Trimmer levels the playing field. Its 40V lithium-ion battery powers 22-inch chrome-plated blades at 3,300 strokes per minute — enough muscle to cut through dense boxwoods, junipers, and arborvitae without breaking a sweat.
No gas, no fumes, and a full recharge in just 25 minutes.
It weighs about 13 pounds, so you’ll feel it after a long session, but the runtime easily covers most yard jobs on one charge.
| Best For | Homeowners and landscapers who want gas-level power without the hassle of fuel, especially those tackling thick shrubs and dense hedges regularly. |
|---|---|
| Primary Use | Hedge trimming |
| Blade Material | Alloy steel, chrome-plated |
| Ergonomic Grip | Variable-speed trigger |
| Weight | 13.4 lb |
| Power Source | 40V lithium-ion battery |
| Warranty | Lifetime motor, 5-yr tool |
| Additional Features |
|
- Cuts through tough growth like boxwoods and junipers at 3,300 strokes per minute — no gas required
- Charges in about 25 minutes and runs for over an hour, so most yard jobs get done on one charge
- The CORE battery works across other Troy-Bilt tools, so you get more mileage out of your investment
- At 13 pounds, it gets heavy fast — especially overhead or on a ladder
- Power fades as the battery drains, so performance isn’t perfectly consistent start to finish
- It’s more tool than you need for light, occasional trimming — a smaller, lighter model might make more sense
7. Corona Forged Hedge Shears
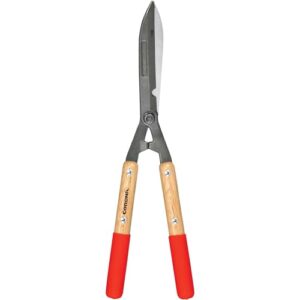
Sometimes the best tool is the simplest one.
Corona Forged Hedge Shears give you full control with no cords, no batteries, and no noise — just sharp, forged steel doing exactly what you need.
8.25-inch blades handle stems up to half an inch thick, and the built‑in limb notch keeps branches from slipping.
At just over two pounds and $38, they’re ideal for detail work on boxwood, privet, or any formal hedge that needs a steady, precise hand.
| Best For | Gardeners who want precise, quiet control for shaping hedges, shrubs, and ornamental grasses — no power needed. |
|---|---|
| Primary Use | Hedge shearing |
| Blade Material | Forged steel alloy |
| Ergonomic Grip | Round hardwood handles |
| Weight | 2.3 lb |
| Power Source | Manual |
| Warranty | Lifetime |
| Additional Features |
|
- Forged steel blades stay sharp longer and can be resharpened without taking anything apart
- The limb notch keeps branches from sliding around while you cut
- Lightweight at 2.3 lbs and completely cord-free — easy to maneuver in tight spots
- Short handles mean less leverage, so dense or thick growth puts up a fight
- Not built for branches over ½ inch — you’ll need loppers for anything beefier
- Some units arrive a little dull out of the box and need a quick sharpen before first use
8. Trimmer Plus Pole Saw Attachment
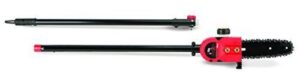
Got branches that are just out of reach? TrimmerPlus PS720 Pole Saw Attachment solves that without making you drag out a ladder.
most major gas trimmer brands — Troy-Bilt, Husqvarna, Ryobi — and extends up to 11 feet. The 8-inch bar manages branches around 4 inches thick, and the built-in auto oiler keeps things running smoothly.
7 pounds, it’s light enough to manage overhead. Clean the chain after each use and check tension before you start.
| Best For | Homeowners who want to trim high branches without a ladder and already own a compatible gas trimmer. |
|---|---|
| Primary Use | High branch cutting |
| Blade Material | Steel bar/chain |
| Ergonomic Grip | High-impact plastic housing |
| Weight | 7.05 lb |
| Power Source | Trimmer-powered |
| Warranty | 2-year limited |
| Additional Features |
|
- Extends up to 11 feet, so you can reach most branches without climbing anything
- Connects to major trimmer brands you probably already own, saving you money on a separate tool
- At just 7 pounds, it’s light enough to handle overhead without wearing you out fast
- Plastic housing won’t hold up well to heavy or commercial use over time
- Chain tension needs frequent checking, and the oil adjustment screw gets tricky to reach when dirty
- Running it too long can overheat lower-powered trimmer motors, so you’ll want to take breaks
9. Fiskars Multipurpose Garden Snips

The Fiskars Multipurpose Garden Snips ($19.98) are the little tool that punches well above its weight.
Three blade edges — straight, serrated, and a built-in wire cutter — mean you can clip herbs, slice open soil bags, and snip trellis wire without swapping tools.
Micro-tip blades reach into tight spots cleanly, and the SoftGrip handle keeps your hand comfortable through repetitive cuts.
They’re not for thick branches, but for everyday garden tasks, these snips genuinely earn their spot in your pocket.
| Best For | Gardeners who want one handy tool for snipping herbs, cutting twine, opening bags, and dealing with light wire without reaching for a whole toolbox. |
|---|---|
| Primary Use | Precision snipping |
| Blade Material | Stainless steel |
| Ergonomic Grip | SoftGrip ergonomic handle |
| Weight | Not specified |
| Power Source | Manual |
| Warranty | Lifetime |
| Additional Features |
|
- Three cutting edges in one — straight, serrated, and a wire cutter — so you’re not constantly switching tools mid-task.
- Micro-tip blades get into tight spots without crushing delicate stems, great for herbs and roses.
- SoftGrip handle makes repetitive cuts way less tiring on your hand.
- Not built for thick branches or heavy rope — you’ll still need a lopper or pruning saw for bigger jobs.
- The wire cutter is for thin gauge only; push it too hard and you risk damaging the blades.
- The non-stick coating wears down over time, so the anti-jamming benefit fades with heavy use.
Frequently Asked Questions (FAQs)
Should you prune your plants?
Yes, and it’s worth it.
Pruning keeps your plants healthy, helps them grow stronger, and makes your garden look great. Think of it as a regular tune-up your plants actually need.
When should I prune my Garden?
Think of garden like a calendar — every plant has its moment.
Most pruning happens in late winter, right after the worst cold passes, when plants are dormant and ready to surge back to life.
What is pruning a plant?
Pruning is simply cutting away parts of a plant — branches, buds, or roots — to keep it healthy and looking its best.
It’s how you guide growth, remove what’s dead, and help your garden thrive.
Is pruning a gardening skill?
Surprisingly, it’s not rocket science — but it’s not mindless either.
Pruning is a real, learnable gardening skill that sharpens with practice, patience, and paying close attention to how your plants grow and respond.
How do you prune garden plants?
Start by removing dead, damaged, or crossing branches. Make clean cuts just above a bud or branch collar.
Then thin crowded areas, shape for size, and step back to check your work.
Can you prune during wet or rainy weather?
Rain is basically the worst time to prune. Wet cuts heal slowly, fungal diseases spread fast on damp wood, and slippery tools are a recipe for accidents.
Wait for dry weather.
How do you sterilize tools between plants?
Wipe your blades with 70% isopropyl alcohol between each plant. It kills pathogens fast and keeps disease from spreading. Quick, easy, and your plants will thank you.
What happens if you prune too much?
Too much pruning stresses your plant fast. Removing more than 25% of foliage at once limits photosynthesis, weakens branches, and opens wounds to pests and disease — slowing recovery for months.
Do different plant ages require different pruning?
Yes, plant age matters a lot. Young plants heal fast and handle more frequent cuts. Older plants need gentler, less frequent pruning focused on removing dead wood rather than reshaping.
Should you fertilize immediately after pruning?
Hold off — fertilizing right after pruning can actually do more harm than good. Wait two to six weeks first. Let the wounds seal, then feed lightly once new growth appears.
Conclusion
Funny how plants are expected to flourish while being completely ignored—like a houseplant that thrives on neglect and good vibes alone. Spoiler: they don’t.
Learning how to prune garden plants is what actually separates a struggling tangle of stems from something worth photographing.
You’ve got the tools, the timing, and the techniques.
Now the only thing standing between you and a thriving garden is picking up those pruners and making the first cut.
- https://joegardener.com/podcast/138-why-pruning-matters-principles-recommendations-and-tips-from-the-pruners-bible/
- https://dennis7dees.com/pruning-101/
- https://growitbuildit.com/complete-guide-to-pruning-tools/
- https://www.gardenary.com/blog/pruning-101-how-to-prune-plants-in-the-vegetable-garden
- https://libguides.nybg.org/pruningintro