This site is supported by our readers. We may earn a commission, at no cost to you, if you purchase through links.

Most herb kits fail the same way: not from neglect, but from a chain of small, invisible problems that stack against germination before a single seed cracks open. Seeds older than two or three years, soil that stays too cold, light that barely reaches the tray—any one of these stalls growth. Together, they make seedlings nearly impossible.
If your herb kit seedlings aren’t growing, the cause almost certainly sits in one of four areas: seed viability, light intensity, soil temperature, or moisture balance. Each has a precise fix.
Table Of Contents
- Key Takeaways
- Why Herb Kit Seeds Stall
- Fix Light, Heat, and Water
- Revive Stunted Herb Seedlings
- Top 5 Herb Seedling Helpers
- Frequently Asked Questions (FAQs)
- Why are my seeds not germinating?
- Why is my seed not sprouting?
- Why are my seedlings not growing properly?
- What happens if you use the wrong soil when germinating seeds?
- Why aren’t my seedlings getting any bigger?
- How long does it take for seedlings to recover from transplant shock?
- Can I reuse last years seed-starting trays?
- Which herbs grow best together in one pot?
- How do I harden off herb seedlings outdoors?
- When should I start pruning young herb plants?
- Conclusion
Key Takeaways
- Seed viability is usually the first thing to check — herb seeds older than two to three years, especially basil and cilantro, may simply lack the energy to germinate, so verify the packet date before troubleshooting anything else.
- Soil temperature matters more than room temperature, and most herb seeds won’t sprout below 65–70°F, so a heat mat paired with a probe thermometer gives you real control where it counts.
- Light loss through window glass can quietly stall seedlings before they get going — placing grow lights 6–12 inches above the tray keeps intensity in the right range and removes that variable entirely.
- Waterlogged soil cuts off the oxygen young roots need, so blending perlite into your seed-starting mix and switching to bottom watering keeps moisture consistent without smothering germination.
Why Herb Kit Seeds Stall

Before you blame the soil or the season, the problem usually starts with the seed itself. Several overlooked factors can stop germination before it ever has a chance to begin. Here’s what to check first.
Understanding common vegetable garden problems and their solutions can help you pinpoint exactly which factor is working against your seeds.
Old or Expired Seeds
The seeds in your herb kit might be older than they look. Herb seed viability declines greatly after two to three years, and some varieties — basil and cilantro especially — drop off faster than others. Before assuming something else is wrong, check the expiration date on the packet.
If it’s passed, that’s likely your culprit. Remember that temperature and humidity affect seed longevity, so store your herb seeds in a cool, dry place.
Poor Seed Storage
Even if your seeds are fresh, bad storage can silently kill them. Moisture fluctuations above 8% break down seed membranes, while temperatures above 60°F accelerate deterioration.
Keep seeds in airtight containers with desiccants, away from light and humid appliances. A stable, cool, dark environment protects seed viability until you’re ready to plant.
Failed Towel Germination Test
Once you’ve ruled out storage as the culprit, the next step is running a seed viability test before committing to soil. Place 10 seeds between moist paper towels, keep them at 68–77°F, and check daily. Towel over-saturation rots seeds fast — the towel should feel damp, never dripping.
Seeds Planted Too Deeply
Depth matters more than most gardeners expect.
Ideal planting depth for herb seeds is generally two to three times the seed’s diameter — nothing more. Bury them deeper, and they’ll exhaust their stored energy before ever reaching light.
That’s oxygen deprivation at work: compacted soil cuts off the air supply, and germination simply stalls underground.
Hard Seed Coats
Some herb seeds come armored. The seed coat — a tough, layered shell built from macrosclereid cells reinforced with suberin and lignin — acts as a natural hydration barrier, slowing water uptake and delaying germination on purpose.
Some herb seeds come armored with a natural hydration barrier designed to delay germination on purpose
- Check coat hardness — press a fingernail gently against the seed; resistance signals physical dormancy
- Nick the coat — seed coat scarification with a nail file breaks the outer barrier fast
- Soak in warm water — 30 minutes softens coat permeability factors without damaging the embryo
- Test viability first — a damp-towel test confirms seed viability before you invest time
- Match germination conditions — warmth accelerates coat permeability and cuts seed germination time considerably
That’s dormancy breaking techniques in practice: simple, targeted, effective.
Fix Light, Heat, and Water
Seeds that sprout need the right conditions to keep going, and that’s where most herb kits quietly fall apart. Light, heat, and water work together like a three-legged stool — weaken one, and the whole thing wobbles. Here’s what to check and fix first.
Weak Window Light

Window glass doesn’t just frame your view — it quietly steals light. Intensity drops 20–40% the moment sunlight passes through the pane, and that’s before factoring in seasonal changes, overcast skies, or a dusty surface cutting transmission by another 15%.
For herbs on a windowsill, that light loss adds up fast — poor light is one of the top reasons herbs bolt early.
For herb seedlings with high light requirements, that cumulative loss is often enough to stall growth entirely.
Grow Light Placement

A grow light only works as hard as its placement allows.
For herb seedlings, ideal height sits 6–12 inches above the canopy — close enough to deliver useful light intensity, far enough to avoid bleaching or leaf curl.
- Keep PPFD between 100–200 µmol/m²/s for seedlings
- Use full-spectrum or cool-white LEDs for sturdy stem development
- Achieve uniform coverage by mounting lights evenly overhead
- Apply rotation techniques — turn trays 90° every few days
- Try staggered layouts for multiple rows to eliminate shaded pockets
Cold Soil Temperatures

Cold soil is one of the quietest germination killers. Most culinary herbs need soil above 65–70°F to sprout reliably — drop below that, and metabolic processes in the seed simply stall.
Place trays on a heat mat to hit the ideal temperature range fast, and always use a probe thermometer. Don’t trust room air — soil temperature control is what matters.
Soggy Seed-starting Mix

Soggy seed-starting mix is just as damaging as drought — and often harder to spot. When peat moss or coco coir dominates your mix without enough drainage amendments, waterlogged soil suffocates emerging roots by cutting off oxygen.
Watch for these warning signs:
- Slow, uneven germination across tray cells
- Dense, clumping texture that resists root penetration
- A sour smell signaling damping-off disease
Fix it by blending in perlite or pumice to restore aeration. Overwatering collapses the tiny pore spaces young radicles depend on. Adjust watering practices immediately — let the surface dry slightly before watering again, and make sure your tray has proper soil drainage.
Gentle Bottom Watering

Bottom watering is one of the simplest shifts you can make — and one of the most effective. Instead of pouring water from above, you set your seed tray in a shallow bath and let capillary action draw moisture upward through the root zone evenly.
Revive Stunted Herb Seedlings

Stunted seedlings aren’t a lost cause — they just need the right nudge at the right time. Once you identify what’s holding them back, the fixes are straightforward and fast-acting. Here’s what to check and correct to get your herbs growing again.
First True Leaves
When your seedling pushes out its first true leaves, something shifts — this is the Photosynthesis Shift Phase, where the plant stops relying on seed energy and starts feeding itself.
- True leaves look different from the rounded starter leaves (cotyledons)
- They show your herb’s actual Leaf Shape Variations — serrated edges, fine hairs, or waxy surfaces
- Use a Leaf Identification Guide to confirm healthy development
- Growth Timeline Expectations: true leaves usually emerge one to two weeks after germination
- Environmental Trigger Factors like insufficient light or cold delay their appearance
Watch for pale, stretched leaves — that signals trouble.
Quarter-strength Fertilizer
Once your seedlings show their first true leaves, they’re ready for a little nutritional support.
Quarter-strength fertilizer means diluting a balanced liquid fertilizer to just 25% of the label rate — roughly one part fertilizer to three parts water. Applied every 7–10 days, this light feeding delivers enough nitrogen for steady leaf development without the osmotic stress that causes nutrient burn.
| Feeding Stage | Fertilizer Strength |
|---|---|
| Before true leaves | None |
| First true leaves | Quarter-strength |
| Established growth | Half to full strength |
If your seedlings are turning yellow, brown, or showing faded leaves, don’t immediately reach for full-strength fertilizer — that often makes things worse. Dilution ratios matter because tender roots absorb nutrients slowly. Too much, too fast, and you’ll see weak, leggy seedlings rather than the growth boost you’re after. Always water thoroughly after feeding to move nutrients evenly through the mix.
Crowded Seed Tray Cells
Fertilizer gets seedlings started, but crowded cells quietly stall them. When too many plants compete in a small space, root development suffers — roots circle and tangle into a crowded mass of roots with nowhere to go.
Cull the seedlings down to one per cell using scissors, not pulling, to avoid disturbing neighbors. Seedling spacing matters more than it looks.
Damping-off Prevention
Crowding sets the stage for another quiet killer: damping-off disease. This fungal collapse — caused by Rhizoctonia, Fusarium, or Pythium — strikes at the soil line, rotting stems overnight.
Start clean. Use a sterile seed-starting mix, disinfect trays with a 10% bleach solution, and run a small fan to keep air moving. Good airflow dries foliage fast, and pathogens hate that.
Root-bound Seedlings
When roots outgrow their space, everything above soil suffers. Root-bound seedlings stop pushing new leaves, wilt after watering, and pale from nutrient starvation — all because a restrictive container size chokes the root zone.
- Lift the plant for root inspection
- Check for circling, dense roots
- Follow a repotting guide for timing
- Use proper pot size selection
- Apply recovery methods post-transplant
Top 5 Herb Seedling Helpers
Sometimes the right tools make all the difference between seedlings that struggle and ones that thrive. Whether you need a reliable growing medium or a solid reference to guide your decisions, a few well‑chosen resources can save you a lot of frustration.
Here are five products worth keeping in your herb‑growing toolkit.
1. Rosemary Gladstar Medicinal Herbs Guide
If you’re serious about growing herbs for more than just cooking, Rosemary Gladstar’s Medicinal Herbs belongs on your shelf. At just $11.49 for 224 pages, it covers 33 healing plants with clear growing, harvesting, and preparation guidance.
Gladstar walks you through tinctures, salves, and teas using basic kitchen equipment — no specialist setup needed. It’s a practical companion for anyone building a small medicinal garden and learning to use what they grow.
| Best For | Beginners who want to grow and use medicinal herbs at home without a big budget or complicated setup. |
|---|---|
| Format | Print Book |
| Price | $11.49 |
| Beginner Friendly | Yes |
| Herb Focused | Yes |
| Organic Approach | Natural remedies |
| Coverage Scope | 33 herbs |
| Additional Features |
|
- Covers everything from seed to remedy — growing, harvesting, and making your own tinctures, salves, and teas all in one book.
- Uses basic kitchen tools, so there’s no need to buy special equipment to get started.
- At $11.49, it’s an easy, low-risk way to dive into herbal medicine.
- Only 33 herbs are covered, so you’ll outgrow it quickly if you want a deeper reference.
- Safety and dosage info is pretty light — not the right resource if you’re looking for clinical guidance.
- Some plants may be hard to find or grow depending on where you live.
2. Herbal Apothecary Medicinal Herb Handbook
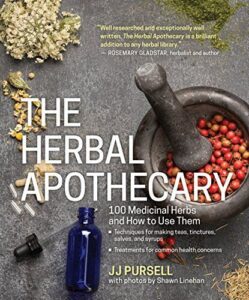
Where Gladstar’s guide focuses on 33 plants, the Herbal Apothecary Medicinal Herb Handbook goes wider — covering 100 medicinal herbs with full-color photographs, cultivation tips, and step-by-step preparation methods for teas, tinctures, salves, and syrups.
At $15.05 for 292 pages, it’s a solid desk reference.
You’ll find treatment sections by demographic — men, women, and children — making it easy to match a herb to a specific need rather than searching blindly.
| Best For | Anyone who wants a wide-ranging herb reference at home — beginners especially, but experienced herbalists will find it handy too. |
|---|---|
| Format | Print Book |
| Price | $15.05 |
| Beginner Friendly | Yes |
| Herb Focused | Yes |
| Organic Approach | Natural remedies |
| Coverage Scope | 100 herbs |
| Additional Features |
|
- Covers 100 herbs with full-color photos, so identifying and using them is straightforward
- Treatment sections broken down by men, women, and children make it easy to find what you actually need
- At $15.05, it’s a cheap alternative to pricey herbal workshops
- The index can be frustrating — some conditions are buried under vague broader terms
- Published in 2015, so some of the science or guidelines may be a bit behind
- Only 100 herbs, which sounds like a lot until you realize how many medicinal plants are out there
3. Best Little Culinary Herb Book
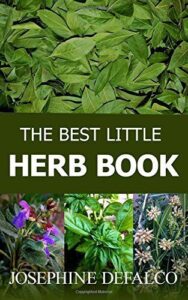
If you cook at home and grow your own herbs, this slim guide earns its shelf space fast. The Best Little Culinary Herb Book covers planting from seed, harvest timing, drying, freezing, and kitchen use — all in 140 pages.
It includes dietitian-tested recipes like herb butters and infused oils, plus seed‑saving instructions so your garden keeps giving.
At $8.24, it’s a practical, no‑fluff starting point built specifically for beginners who want results, not theory.
| Best For | Home cooks and beginner gardeners who want a simple, no-nonsense guide to growing, harvesting, and cooking with their own herbs. |
|---|---|
| Format | Print Book |
| Price | $8.24 |
| Beginner Friendly | Yes |
| Herb Focused | Yes |
| Organic Approach | Organic growing |
| Coverage Scope | Select culinary herbs |
| Additional Features |
|
- Covers the full cycle — from seed to kitchen — in one compact, easy-to-follow guide.
- Recipes were developed with a registered dietitian and tested at home, so they actually work.
- Seed-saving instructions mean your garden pays for itself over and over.
- Only covers a handful of herbs, so you’ll hit its limits pretty quickly as you branch out.
- Not much depth on individual herb care — experienced gardeners may find it too surface-level.
- At 140 pages, there’s no room for troubleshooting or tackling trickier growing situations.
4. Espoma Organic Seed Starter Soil
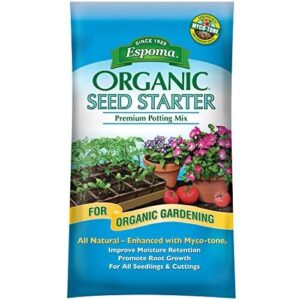
The foundation of your whole seed-starting setup is the mix you use — and Espoma Organic Seed Starter Soil gets it right. It combines sphagnum peat moss and perlite for a light, airy texture that drains well without drying out too fast.
What sets it apart is Myco-Tone mycorrhizal inoculant, which encourages stronger, wider root development from the start. At $19.86 for a 16-quart bag, it’s purpose-built for herbs and ready to use straight from the bag.
| Best For | Home gardeners and hobbyists who want an organic, ready-to-use mix for starting seeds or rooting cuttings without needing to blend their own media. |
|---|---|
| Format | Physical Bag |
| Price | $19.86 |
| Beginner Friendly | Yes |
| Herb Focused | Yes |
| Organic Approach | No synthetics |
| Coverage Scope | All seed types |
| Additional Features |
|
- The Myco-Tone inoculant gives roots a real head start — better nutrient uptake means stronger seedlings early on.
- Light, airy texture works great for bottom-watering setups and heat domes, keeping moisture consistent without waterlogging.
- No synthetic fertilizers or chemicals, so it fits right into an organic growing routine.
- The bag can dry out fast once opened, and you’ll need to re-hydrate the mix before using it again.
- Some bags contain coarse wood bits or clumps, which cuts down on the usable fine media you actually want for seed starting.
- At $19.86 for 16 quarts, it’s pricier than basic starters — not ideal if you’re starting seeds in bulk on a tight budget.
5. Root Naturally Seed Starting Pellets
If you’ve ever wished you could skip the mess of loose seed-starting mix, Root Naturally Seed Starting Pellets are worth a look. Each 42 mm peat pellet expands to nearly seven times its dry size after soaking — just add water and you have a ready-made planting pocket.
The fine mesh netting encourages air-pruning, which stimulates fibrous root growth and can cut your crop cycle by up to 25%.
Fifty pellets per resealable bag make storage simple.
| Best For | Home gardeners and small-scale growers who want a clean, low-fuss way to start seeds without dealing with loose soil mixes. |
|---|---|
| Format | Physical Pellets |
| Price | Not listed |
| Beginner Friendly | Yes |
| Herb Focused | Yes |
| Organic Approach | Sustainable peat |
| Coverage Scope | All seed types |
| Additional Features |
|
- Expand to 7x their dry size after soaking — no mixing, no mess, just add water
- Air-pruning mesh promotes stronger root systems and can shave up to 25% off your crop cycle
- Plant the whole pellet directly into soil, so there’s no transplant shock to worry about
- Full expansion takes at least an hour of soaking, so you can’t exactly be spontaneous about planting day
- The 42 mm size might not line up with your existing trays, which means some fiddling around
- Peat sourcing may be a dealbreaker if you’re following strict organic certification standards
Frequently Asked Questions (FAQs)
Why are my seeds not germinating?
Most seeds fail for one simple reason: something broke the chain between viable seed, moisture, warmth, and light. Pinpointing which link snapped is how you fix it fast.
Why is my seed not sprouting?
A seed won’t sprout when it’s too old, too wet, or too cold. Most herb seeds need soil at 70–75 °F and consistent moisture — not soggy — to trigger germination.
Why are my seedlings not growing properly?
Seedlings stall when light, heat, or moisture fall out of balance. Even one wrong variable can lock growth in place and leave you wondering what went wrong.
What happens if you use the wrong soil when germinating seeds?
The wrong soil can shut down germination before it starts. Poor drainage traps moisture, starving seeds of oxygen, while compacted or high-salt mixes create osmotic stress that blocks water uptake entirely.
Why aren’t my seedlings getting any bigger?
Sometimes your seedlings aren’t struggling — they’re simply waiting for a signal. Without enough light, warmth, or nutrients, growth quietly stalls, leaving you with tiny plants frozen at the same size day after day.
How long does it take for seedlings to recover from transplant shock?
Most herb seedlings bounce back from transplant shock within one to three weeks. You’ll usually notice wilting ease up after a few days, then fresh green growth returning steadily.
Can I reuse last years seed-starting trays?
Yes, you can — but clean them first. Sanitize with 10% bleach, rinse well, inspect for cracks, and always use fresh sterile mix. Reused trays are safe for two to five seasons when properly maintained.
Which herbs grow best together in one pot?
Mediterranean herbs — rosemary, thyme, and oregano — thrive together in one sunny, well-draining pot. Group moisture-lovers like basil, parsley, and cilantro separately. Always keep mint isolated; it’ll crowd everything else out fast.
How do I harden off herb seedlings outdoors?
Ironically, your seedlings survived the indoors only to face a riskier shift. Start with 2–3 hours of sheltered, partial sun, then increase daily. Return them inside if temperatures drop below 50°F.
When should I start pruning young herb plants?
Start pruning once your herb has at least two true leaves. Any earlier risks stunting growth. Light, frequent trims beat heavy cuts every time.
Conclusion
A gardener once said that seeds don’t fail—conditions do. That stuck because it’s exactly right.
When you’re asking, why are my herb kit seedlings not growing, the answer is almost always environmental, not inevitable. Fix the temperature, adjust the light, balance the moisture, and use fresh seed—those four variables control everything.
Seeds carry the blueprint; your job is simply to stop standing in the way. Growth follows naturally.