This site is supported by our readers. We may earn a commission, at no cost to you, if you purchase through links.

A late frost doesn’t knock politely. It arrives overnight, settles into your beds like a thief, and by morning your pepper seedlings look boiled instead of grown. That’s the gamble every gardener takes planting early, chasing a longer season before the calendar technically allows it.
Cold weather cloches solve this problem by trapping radiant heat and blocking wind, turning a single seedling’s microclimate into something closer to a Mediterranean spring. Glass, plastic, fabric — each material bends the rules of thermal mass differently, and choosing wrong costs you plants.
Get the setup right, though, and you’ll harden off transplants weeks ahead of your neighbors, with roots intact and stems unscathed.
Table Of Contents
- Key Takeaways
- Choose Your Seedling Cloche Type
- Prepare Beds Before Cold Weather
- Install Cloches Before Frost
- Manage Heat, Moisture, Airflow
- Top 9 Cold Weather Cloche Options
- 1. Vumdua Clear Plastic Garden Cloches
- 2. Mini Greenhouse Tunnel Poly Shade Cloth
- 3. Clear Glass Decorative Bell Jar
- 4. Pure Garden 4 Tier Mini Greenhouse
- 5. Breville Commercial Glass Smoking Cloche
- 6. Small Bell Shaped Glass Cloche
- 7. BPA Free Plastic Food Storage Set
- 8. Clear UV Resistant Greenhouse Plastic
- 9. Amagabeli Galvanized Wire Mesh Fence Roll
- Frequently Asked Questions (FAQs)
- Will cloches protect from frost?
- How cold is too cold for seedlings to be outside?
- How cold can seedlings get before cloches fail?
- Can cloches stay on during daytime sun exposure?
- How long should cloches remain on seedlings?
- Do cloches work for all vegetable types?
- Can cloches be reused across multiple growing seasons?
- Conclusion
Key Takeaways
- Cloche type should match your goal—glass and water-filled cloches suit single seedlings, while low tunnels and fabric row covers protect whole rows, so match material to your budget, crop, and climate before buying.
- Bed prep determines cloche success: south-facing orientation, raised beds with drainage, and pre-warmed soil (once daytime highs hit 40–50°F) all set the stage for trapping usable heat.
- Timing and sealing make or break protection—install cloches before sunset to lock in the day’s warmth, then seal edges tightly to stop drafts from undoing that gain overnight.
- Daily management matters as much as installation, since venting above 60°F, watering at soil level, and spacing seedlings 12–18 inches apart prevent overheating, fungal disease, and condensation buildup.
Choose Your Seedling Cloche Type

Not every seedling needs the same armor against the cold. Your garden’s layout, budget, and the crops you’re protecting all point toward a different choice. Here are five cloche types worth knowing before you commit to one.
If you’re just starting out, this guide to cold weather cloches for beginner gardeners breaks down which option fits your climate and skill level.
Glass Bell Cloches
Glass bell cloches bring old-world elegance to frost protection, with light transmission of 80–92% that keeps seedlings photosynthesizing even under cover. Their thermal mass traps daytime warmth, buffering nighttime drops.
Press the base firmly into soil to seal out wind. Inspect for chips each season, and clean gently—durability depends on careful handling, not just glass thickness.
Plastic Bottle Cloches
Not everyone has a Victorian bell jar lying around, but most kitchens produce a steady supply of PET bottles. Upcycling PET bottles into garden cloches costs nothing and transmits 90% of available light.
Cut off the base, smooth the edges to protect tender seedlings, then loosen the cap for a quick DIY ventilation hack. The dome also doubles as a pest barrier against slugs. Using these containers can help you achieve a glass-like visual impact in your garden displays.
Low Tunnel Cloches
Low tunnel cloches cover whole rows, not single seedlings—hoops spaced roughly 60 cm apart hold UV-stabilized polyethylene or shade cloth, raising soil temps 2–6°C.
Anchor ends firmly against wind; removable end-walls boost ventilation on mild days.
Store clean and dry between seasons, and quality film lasts 1–3 years, making low tunnels a durable choice for season extension across brassicas, greens, and root crops.
Fabric Row Covers
Where hoops and film demand structure, spun-bonded polyester or polypropylene simply drapes over your seedlings—breathable, lightweight, forgiving.
Fabric weight dictates the job: light (0.5–1.0 oz) works for pest deterrence; heavy (2.0 oz+) delivers real frost protection.
- Light transmission drops as weight increases
- Rainfall passes through untouched
- Material durability spans multiple seasons
Result? Season extension of 1–4 weeks, no hoops mandatory.
Water-filled Cloches
Fill clear bottles or cups with water, seal them around your seedlings, and you’ve built a thermal mass reservoir—absorbing daytime solar gain, releasing it after sunset to buffer soil temperature swings.
Expect 7–14 extra growing days. Keep 1–3 liters per cloche, use clean water to prevent algae, and refill as evaporation lowers levels. Vent on warm afternoons; overheating undoes your thermal retention gains.
Prepare Beds Before Cold Weather

A cloche only works as well as the ground beneath it, so don’t skip this part. Good bed prep sets the stage for every degree of warmth you’re trying to trap. Here’s what to sort out before the cold rolls in.
Choose South-facing Beds
Sun position dictates cloche success before you even set one down. Placing beds along a south-facing orientation captures maximum solar radiation throughout the day, priming passive solar heating inside your covers.
This site orientation matters most in winter, when the sun angle sits low and consistent exposure drives thermal gain. That steady light builds the microclimate your seedlings depend on for survival.
Improve Drainage With Raised Beds
Water pools where drainage fails, and cold, saturated soil is deadlier to seedlings than frost alone. Build beds at least 12 inches high, sloped 1–2% toward the edges.
- Gravel base, 2–4 inches thick
- Geotextile fabric barrier
- Perforated pipe drainage
- Perlite for soil porosity
- Root rot prevention
Bury perforated pipes beneath the gravel layer — your cloches stay effective only when roots stay dry.
Add Compost Before Covering
Think of compost as insurance for your seedlings, not just nutrition. Work 2–4 cm of mature, crumbly compost into the top 5–10 cm of soil, then rest the bed 3–7 days before covering — this prevents nitrogen burn and odor buildup.
You’ll gain microbial activity, faster nutrient mineralization, better soil structure, and improved moisture retention — all working quietly beneath your cloches.
Pre-warm Soil Early
Give the soil a head start, not just the seedlings. Once daytime highs hit 40–50°F in late winter, lay cloches down for roughly four weeks before sowing.
This traps solar warmth, builds thermal mass, and boosts microbial activity underground. Clay soils warm slowest, so they benefit most. Moist soil conducts heat better than dry, and raised beds accelerate the whole process, priming conditions for faster seed germination.
Check Soil Temperature
Guesswork won’t tell you when to sow—a thermometer will. Skip the surface; insert your probe to 10 cm, the best depth for seedling root zones, avoiding stones for solid contact.
Take readings mid-morning for consistent diurnal temperature variation control. A digital probe delivers accuracy within 1°C, confirming you’ve hit germination thresholds of 50–65°F before trusting soil warmth under cloches.
Install Cloches Before Frost
Timing turns a cloche from decoration into insurance, and frost doesn’t wait for you to catch up. Once your beds are ready, installation becomes a race against the setting sun and dropping mercury. Here’s exactly how to get your covers on right, sealed tight, and working before that first cold snap hits.
Cover Seedlings Before Sunset

Timing is everything here: set your cold weather cloches over seedlings before sunset, while soil still holds the day’s warmth. This traps solar heat, establishing a thermal reservoir that radiates gently through the night.
Skip this window and you invite overnight shock as temperatures plummet. Evening installation locks in that stored warmth, giving your seedlings steady temperature regulation and real frost protection until morning.
Seal Edges Firmly

Once your cloche sits over that warm soil, the edges need work, too. Gaps invite drafts, and drafts undo everything sunset timing accomplished.
- Preventing air leaks protects tender roots from sudden chills
- Weak seals waste your evening’s stored warmth
- Consistent contact keeps frost protection reliable all night
Apply weather stripping along the rim, then test seal integrity with the paper-pull method — easy slide means poor edge tension management.
Anchor Lightweight Covers

Weight is a variable you can’t ignore once wind enters the picture. Fabric row covers, built from breathable 17–30 gsm fleece, offer real wind permeability but need firm anchoring — stainless steel straps, landscape staples, or 5–10 kg weighted anchors along the perimeter.
| Anchor Type | Best For | Hold Strength |
|---|---|---|
| Landscape staples | Low tunnels | Moderate |
| Weighted anchors | Open beds | High |
| Steel straps | Fabric edges | High |
UV-stabilized materials resist fading through seasonal storage.
Space Seedlings for Airflow

Once anchored, turn your attention to spacing — pack seedlings too tight and you’re brewing humidity pockets under every dome. Give plants 12–18 inches of breathing room to help with gas exchange and mitigate mold growth.
Tight clusters trap moisture against foliage, inviting fungal trouble. Proper spacing also curbs microclimate buildup, keeping ventilation consistent and condensation from fogging your cloche walls.
Protect Direct-sown Rows

Direct-sown rows need coverage that runs the full length, not just isolated pockets. Extend your low tunnel or fabric row cover the entire row length, sealing every gap where wind uplift could sneak in.
Only keep covers on as long as necessary — pull them once seedlings establish, since prolonged shelter invites desiccation and overheating that undoes your frost protection efforts during seasonal extension.
Manage Heat, Moisture, Airflow

A cloche traps heat fast, but that same trapped air turns against you if you let it. Success now hinges on daily management, not just the initial cover. Here’s how to keep the balance right, from venting to watering to that final hardening-off stretch.
Vent Above 60°F
Sixty degrees is your tipping point — cross it, and your garden cloche turns from protector to pressure cooker. Vent gradually, starting with a quarter-inch gap, aiming for 60–70°F inside.
Ideal venting rates run 0.5–1 air changes hourly. Check with an infrared thermometer, keeping a 5–15°F differential from ambient air. This prevents leaf scorch while your seedlings keep growing steadily.
Prevent Condensation Buildup
Fog on the interior walls signals trouble brewing for tender leaves. Fight it with anti-condensation coatings, cutting dew point by 2–3°C, or hydrophobic liners that shed droplets fast.
Place a shallow tray of dry silica gel inside for backup absorption. Position vents on opposite sides for cross-flow, and track readings with a hygrometer near the crown — your early warning system against rot.
Water at Soil Level
Where you water matters as much as how much. Aim a drip line or spout directly at the soil, letting capillary rise pull moisture upward to the root zone instead of soaking foliage.
Coarser soils drain fast and need more frequent watering; finer textures hold plant-available water longer. This keeps humidity down, limits condensation, and steadies root zone hydration through cold nights.
Reduce Fungal Disease Risk
Cloches trap warmth beautifully, but that same snugness invites fungal trouble if you’re careless.
Airflow optimization and strict humidity control keep pathogens from settling in:
- Vent daily to curb condensation buildup
- Space seedlings for real airflow
- Sanitize tools and remove dead tissue fast
- Rotate cloche placement seasonally
Pathogen prevention isn’t glamorous work, but it’s what separates thriving seedlings from moldy disappointments.
Harden Seedlings Gradually
Pulling seedlings straight from their cozy cloche into open air is a bit like tossing someone into a cold lake without warning—shock sets in fast.
Yanking seedlings straight from their cloche into open air is like tossing them into a cold lake without warning
Hardening off takes 7–14 days: add 1–2 hours outdoors daily, shifting from shade to full sun. Watch for wilting or scorch—your cue to slow down. Gradual transpiration shock prevention builds sturdy stems ready for transplant.
Top 9 Cold Weather Cloche Options
Not every seedling needs the same shield from the cold, and your budget, bed size, and crop type all shape which cloche makes sense.
Some gardeners want quick, disposable coverage; others need something sturdy enough to survive years of frosty mornings. Here are nine options worth considering, ranging from glass classics to modern greenhouse film.
1. Vumdua Clear Plastic Garden Cloches
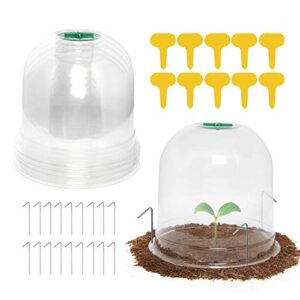
Six domes arrive per pack, each a shallow PVC bell built for individual seedlings rather than whole beds. The spiral vent design lets you fine-tune airflow across four holes, curbing condensation without lifting the dome. PVC holds its shape under light pressure and resists cracking through repeated frost cycles.
Setup requires no tools — press the flared rim into soil, done. Just know the plastic feels thin to some gardeners, and the vent piece can loosen in gusty weather, so weigh down exposed beds accordingly.
| Best For | Home gardeners protecting individual seedlings, small plants, and flowers from frost, pests, and unpredictable weather. |
|---|---|
| Material | PVC plastic |
| Transparency | Transparent |
| Weather Protection | Frost & pests |
| Assembly | Stackable domes |
| Portability | Lightweight domes |
| Primary Setting | Garden beds |
| Additional Features |
|
- Adjustable spiral vents let you control airflow across four holes, reducing condensation without removing the dome
- Durable PVC construction holds its shape under pressure and stays clear for maximum light penetration
- Vertical stacking design makes storage between growing seasons simple and space-efficient
- The plastic can feel thin or flimsy compared to glass or heavier cloches
- The top vent piece can be tricky to install and may come loose over time
- Not ideal for high-wind areas unless securely staked, as the domes can shift or blow away
2. Mini Greenhouse Tunnel Poly Shade Cloth
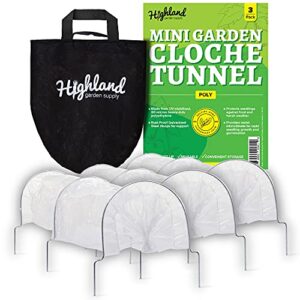
Where those PVC domes suit single seedlings, this option scales up to whole rows. The knitted polyethylene fabric cuts light by 40 to 60 percent, stretching over hoops to buffer harsh sun rather than trap heat.
Grommets along the edges secure it with clips or bungee cords, and the porous weave keeps air moving, curbing condensation on cool mornings. Expect 5 to 12°F of daytime cooling underneath — useful once seedlings graduate from frost protection to sun management.
| Best For | Gardeners who need to shade and protect entire rows of growing seedlings from intense sun once frost season has passed. |
|---|---|
| Material | Polyethylene & steel |
| Transparency | Transparent |
| Weather Protection | Frost, snow, hail |
| Assembly | Fully assembled |
| Portability | Lightweight 3-pack |
| Primary Setting | Seedling trays |
| Additional Features |
|
- Shade cloth blocks 40 to 60 percent of sunlight, lowering underneath temperatures by 5 to 12°F
- Porous knitted weave promotes airflow and reduces morning condensation buildup
- Grommeted edges allow secure attachment with clips or bungee cords over hoops
- Covers whole rows rather than individual seedlings, so it’s less precise than smaller domes
- Designed for sun management, not frost or cold protection
- Requires hoops and separate fasteners (clips or bungee cords) not included with the fabric
3. Clear Glass Decorative Bell Jar
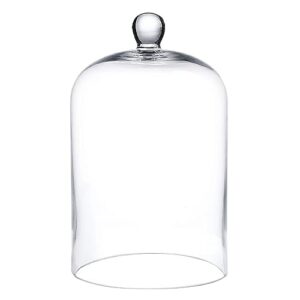
Trade the fabric’s diffuse cooling for something with old-world charm. A hand-blown glass bell jar — 6 inches wide, 10 inches tall — delivers 80–92% light transmission while trapping radiant heat around single specimens.
Sodalime glass edges finish smooth, resist chipping, and the top knob makes lifting simple for ventilation checks. Perfect for tomato seedlings or prized transplants sitting on a windowsill or patio table.
Interior space runs smaller than exterior measurements, so measure your seedling’s mature spread before committing.
| Best For | Gardeners and plant lovers who want a stylish way to protect seedlings or display collectibles while keeping everything visible. |
|---|---|
| Material | Glass |
| Transparency | Clear |
| Weather Protection | N/A |
| Assembly | Ready to use |
| Portability | Lightweight glass |
| Primary Setting | Tabletop display |
| Additional Features |
|
- Hand-blown glass construction offers a durable, high-quality feel for everyday use
- Clean, contemporary bell shape adds old-world charm to any windowsill, table, or event setting
- Clear finish provides excellent visibility of whatever is placed underneath
- Interior space is smaller than the exterior measurements, so careful sizing is needed
- Base may not be included, depending on the packaging
- Requires precise measurement of enclosed items to ensure a proper fit
4. Pure Garden 4 Tier Mini Greenhouse
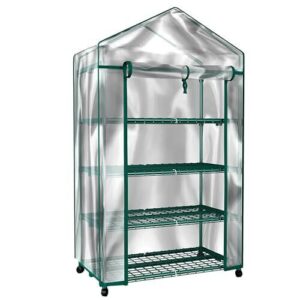
A single bell jar accommodates one prized transplant; this vertical unit controls your whole seed-starting operation. Four steel shelves, each rated for roughly 40 pounds, stack inside a 27.5" x 19" x 63" powder-coated frame wrapped in clear PVC.
Zippered front access lets you water and vent without disassembly. Locking wheels ease relocation, though wind stability suffers without secure anchoring. Expect overheating risk in direct sun if you skip regular venting checks.
| Best For | This mini greenhouse is best for home gardeners who want to extend their growing season and protect seedlings from frost, pests, and cold weather in a small indoor or outdoor space. |
|---|---|
| Material | Steel & PVC cover |
| Transparency | Clear cover |
| Weather Protection | Frost & pests |
| Assembly | Tool-free assembly |
| Portability | Locking wheels |
| Primary Setting | Patio or sunroom |
| Additional Features |
|
- Four-tier shelving keeps plants organized while making efficient use of vertical space
- Zippered roll-up doors and locking wheels make watering, venting, and repositioning easy
- Clear PVC cover creates a controlled microclimate ideal for seed germination
- Lightweight frame can become unstable in high winds without extra anchoring
- Thin PVC cover is prone to punctures and general wear
- Risk of overheating in direct sunlight if not vented and monitored regularly
5. Breville Commercial Glass Smoking Cloche
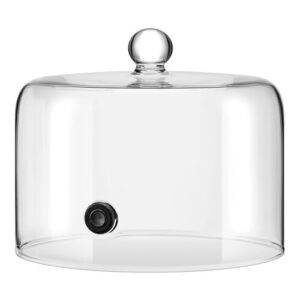
Here’s an option worth borrowing from the bar cart rather than the greenhouse: the Breville Commercial Glass Smoking Cloche. Hand-blown borosilicate glass in Spain gives it real thermal stability, resisting the shocks of sudden cold that shatter lesser jars.
At 7 inches wide, it’s sized for a single prized seedling, not a whole flat. The BPA-free silicone valve seals tight and survives dishwasher cycles, though it’s built for smoke infusion, not frost defense.
| Best For | professional chefs, bartenders, and home cooking enthusiasts who want to add smoky flavor and dramatic presentation to meats, cheeses, butter, and cocktails. |
|---|---|
| Material | Borosilicate glass |
| Transparency | Clear glass |
| Weather Protection | N/A |
| Assembly | Ready to use |
| Portability | Portable unit |
| Primary Setting | Home bar/kitchen |
| Additional Features |
|
- Hand-blown borosilicate glass offers excellent resistance to physical and temperature shocks
- BPA-free silicone valve creates a reliable one-way seal for smoke infusion
- Adds an eye-catching visual element when serving smoked dishes and drinks
- Only works when paired with the Breville Commercial Smoking Gun Pro CSM700, so it’s not a standalone tool
- Small amounts of smoke can escape from the bottom rim while filling
- At 1.7 pounds and 7 inches wide, it takes up dedicated storage space
6. Small Bell Shaped Glass Cloche
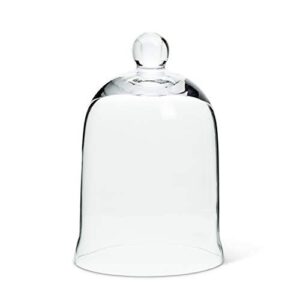
Six inches tall, knob included, this classic dome trades commercial heft for tabletop charm. Straight side walls make it easy to nestle over a single seedling or votive without fumbling for clearance.
Clear glass delivers full visibility, so you can monitor a succulent cutting or pepper start without lifting the lid. Weighing barely a few pounds, it’s built for miniature displays, not garden beds, and demands precise measuring before purchase, since that top knob eats into your usable interior height.
| Best For | Anyone looking to add a charming, decorative touch to small spaces, whether that’s covering a single succulent, protecting a keepsake, or dressing up a votive candle on a shelf or coffee table. |
|---|---|
| Material | Clear glass |
| Transparency | Clear |
| Weather Protection | N/A |
| Assembly | Ready to use |
| Portability | Lightweight glass |
| Primary Setting | Tabletop display |
| Additional Features |
|
- Clear glass construction offers full visibility of whatever’s underneath, no lifting required
- Straight side walls make it simple to place items without awkward maneuvering
- Sturdy, heavy-duty glass gives it a durable, quality feel
- Small scale means it only works for miniature items, not larger displays or garden use
- The top knob eats into interior height, so precise measuring is a must before buying
- Not suited for anything beyond tabletop-sized plants, candles, or collectibles
7. BPA Free Plastic Food Storage Set
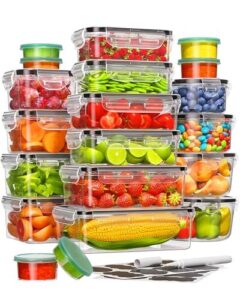
Forty pieces, one improvised cold frame — this BPA-free set repurposes kitchen containers into makeshift seedling shelters when you’re short on true cloches.
The silicone-sealed lids trap humidity like a mini greenhouse, though airtight closure works against you here unless you crack a corner for airflow.
Clear (if slightly white) Tritan plastic lets you check germination without lifting lids constantly.
Skip the largest rectangular sizes for single seedlings; reserve small sauce boxes for individual starts, saving bigger tubs for soil pre-warming trials instead.
| Best For | gardeners looking to repurpose a food storage set for starting seedlings or protecting young plants without buying separate cloches. |
|---|---|
| Material | Food grade plastic |
| Transparency | Transparent |
| Weather Protection | N/A |
| Assembly | Snap-lock lids |
| Portability | Stackable design |
| Primary Setting | Kitchen/pantry |
| Additional Features |
|
- Silicone-sealed, airtight lids trap humidity for a mini-greenhouse effect around seedlings
- Transparent (if slightly white) design lets you monitor germination without constantly lifting lids
- Wide range of container sizes, including small sauce boxes, suits individual starts as well as larger soil pre-warming trials
- Airtight seal can trap too much moisture, so you’ll need to crack a corner for airflow
- Lids can’t be microwaved or run through the dishwasher, limiting cleaning and reheating options
- Largest rectangular containers are better suited to soil trials than single seedlings, so sizing needs some planning
8. Clear UV Resistant Greenhouse Plastic
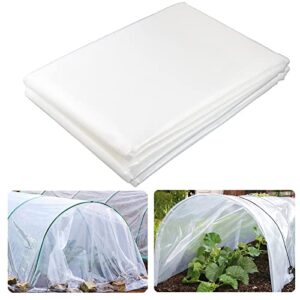
Skip the pre-shaped cloche entirely and build your own tunnel from bulk sheeting — 6 to 10 mil polyethylene with UV stabilizers outlasts flimsy row cover by seasons, not weeks.
Look for diffusion additives, roughly 20% in quality 8 mil film, which scatter light onto lower leaves instead of scorching the canopy’s top layer.
Anti-fog formulations cut condensation drip, though venting on warm afternoons still matters. Avoid draping film directly over PVC hoops; contact accelerates breakdown.
| Best For | Home gardeners and hobby farmers who want to build or cover grow tunnels, hoop houses, or mini greenhouses to protect plants from harsh weather and extend the growing season. |
|---|---|
| Material | Polyethylene plastic |
| Transparency | Clear with white tint |
| Weather Protection | Rain, frost, wind, heat |
| Assembly | Requires anchoring |
| Portability | Lightweight roll |
| Primary Setting | Garden tunnels |
| Additional Features |
|
- Durable 6 mil UV-resistant polyethylene holds up to sun, wind, rain, and frost
- Anti-drip treatment reduces condensation while high light transmission keeps growth even
- Versatile enough for garden covers, attic insulation, or construction use
- May stretch at staple or attachment points without extra reinforcement
- Needs secure anchoring with clamps or weights to prevent wind lift
- Some units arrive with a cloudy film or wrinkles that take time to smooth out
9. Amagabeli Galvanized Wire Mesh Fence Roll
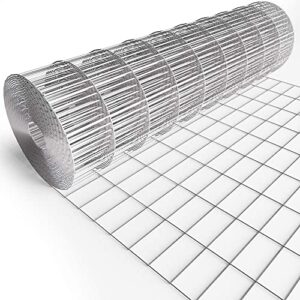
Not every cloche needs to be transparent — sometimes the job is exclusion, not insulation. Amagabeli’s galvanized mesh, with 2"x4" openings and 14-15 gauge wire, guards seedlings from rabbits and rodents rather than frost.
Double zinc coating resists corrosion for years outdoors, and galvanizing before welding protects every joint. Bend it into tree guards, border fencing, or compost bins.
Wear gloves — cut edges bite. Pair it with row covers for cold and critter protection combined.
| Best For | Gardeners who need a tough, weatherproof barrier to keep rabbits, rodents, and deer away from vegetable patches, flower beds, and young trees. |
|---|---|
| Material | PVC coated steel |
| Transparency | N/A |
| Weather Protection | Weather-resistant coating |
| Assembly | Roll-out installation |
| Portability | Flexible roll |
| Primary Setting | Garden perimeter |
| Additional Features |
|
- Double zinc coating and pre-weld galvanizing hold up against rust and outdoor wear for years
- Flexible enough to bend into tree guards, garden borders, or compost bin walls
- Sturdy 14-15 gauge wire construction stands up to regular outdoor use
- 2"x4" openings are large enough that small critters can still squeeze through
- Cut edges are sharp, so gloves are a must during installation
- Can warp under heavy downward pressure unless supported from above
Frequently Asked Questions (FAQs)
Will cloches protect from frost?
Yes, though not by magic. Glass and plastic covers trap solar-stored heat, buffering seedlings against radiative cooling. Effectiveness hinges on sealing edges tight and covering before sunset — gaps let cold air creep in like an uninvited guest.
How cold is too cold for seedlings to be outside?
Below 36°F (2°C), tender seedlings start suffering tissue damage; hardened-off plants tolerate brief dips to 32°F (0°C).
Keep overnight lows above 40°F (4°C) for cool-season crops, and watch root zones — soil under 45°F (7°C) stalls growth regardless of air temperature.
How cold can seedlings get before cloches fail?
Most cloches fail once nights dip below 28°F (-2°C) for hours. Poor seals let cold drafts in, undoing daytime gains entirely.
Frost-tolerant crops handle brief dips; tender seedlings suffer tissue damage once temperatures stay subfreezing through the majority of the night.
Can cloches stay on during daytime sun exposure?
Left on, trapped heat; left vented, steady growth. Sunny days can push interior temps 10–20°F above ambient, so lift or tilt covers once temperatures hit 60°F to prevent scorch and fungal buildup.
How long should cloches remain on seedlings?
Duration depends on growth stage: keep covers on 3 to 5 days after germination, remove once true leaves appear, and never exceed 10 days without hardening off, regardless of species or weather conditions outside.
Do cloches work for all vegetable types?
Not quite — leafy greens and brassicas thrive under cover, while cucumbers and zucchini need frequent venting. Tomatoes tolerate cloches early on but demand airflow. Match your cloche choice to each crop’s tolerance for warmth and humidity.
Can cloches be reused across multiple growing seasons?
Yes — glass and low tunnel cloches last for several seasons with proper care, while plastic and fabric versions degrade faster from UV exposure. Rinse, dry fully, and check for cracks or leaks before each reinstallation to get the most out of them.
Conclusion
Jack Frost only wins when you leave the gate open. Mastering cold weather cloches for protecting seedlings means reading your microclimate, matching material to risk, and venting before trapped heat turns friend into foe. Glass offers elegance, plastic forgives mistakes, and fabric keeps things simple.
Whichever you pick, consistency beats being perfect. Check soil temperature, seal every edge, harden off gradually, and your seedlings won’t just survive the chill. They’ll outgrow it, rooted and ready, weeks ahead of every other garden still waking up.
- https://www.gardenary.com/blog/frost-protection-for-plants-easy-garden-tips-for-cold-nights
- https://vinesgardens.org/plant-protection-in-cold-spring-weather
- https://www.countryliving.com/uk/homes-interiors/gardens/a63575370/how-use-cold-frames-cloches-garden
- https://www.rhs.org.uk/prevention-protection/cloches
- https://bioadvanced.com/cold-snap-care