This site is supported by our readers. We may earn a commission, at no cost to you, if you purchase through links.

Rosemary sprigs bought at the store lose flavor within weeks. Grow your own, dry them right, and that same rosemary holds its punch for a year or more. The difference comes down to timing, technique, and a little patience.
Air drying herbs indoors protects the essential oils that give basil its brightness and sage its depth. Skip a step, like rushing the harvest or skipping proper airflow, and you’ll end up with dull, musty leaves instead of pantry gold.
Grab your scissors and clear a shelf. You’re about to learn exactly how to turn garden clippings into herbs that taste like they were picked yesterday.
Table Of Contents
- Key Takeaways
- Best Herbs for Indoor Air Drying
- Harvest Herbs for Maximum Flavor
- Prepare Herbs Before Drying
- Air Dry Herbs Indoors
- Store Dried Herbs Properly
- Frequently Asked Questions (FAQs)
- What herbs should you not dry?
- Why hang herbs upside down to dry?
- What herbs can you air dry?
- How long do herbs need to air dry?
- How long does it take herbs to fully dry?
- Can a food dehydrator speed up herb drying?
- Is oven drying herbs at low heat effective?
- Can herbs be preserved by freezing in oil?
- How long do dried herbs stay flavorful?
- Conclusion
Key Takeaways
- Woody herbs like rosemary, thyme, sage, and marjoram air dry best hung upside down, while tender herbs like basil and mint should be laid flat, and moisture-heavy herbs like chives and cilantro dry better when frozen instead.
- Harvest herbs mid to late morning after dew dries but before flowers open, cutting just above leaf nodes with clean, sharp, sanitized scissors.
- Prep matters: rinse only when needed, dry herbs completely before bundling, strip lower leaves for airflow, and keep humidity below 40 percent to prevent mold.
- Once herbs pass the snap test for dryness, store them in airtight, opaque jars in a cool, dark spot between 50 and 60°F, labeled with harvest dates, to keep flavor intact for 12 to 24 months.
Best Herbs for Indoor Air Drying
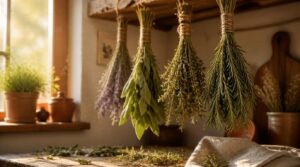
Not every herb behaves the same way once it’s hanging in your kitchen. Some hold up beautifully to air drying, while others need a gentler touch or a different method altogether. Here’s what you need to know before you start bundling.
Woody herbs like rosemary and thyme dry well hanging upside down, while tender, high-moisture ones such as basil and mint do better with this step-by-step herb garden setup guide to grow varieties suited for easier drying.
Woody Herbs That Dry Well
Some herbs practically ask to be dried. Rosemary, thyme, sage, and marjoram hold their shape and oils thanks to sturdy, woody stems and tightly packed leaves.
Air drying fresh herbs this way takes about 1 to 2 weeks, preserving 70-85% essential oils.
Three reasons woody herbs excel:
- Sturdy stems support easy bundling
- Tight leaves lock in fragrance
- Slower moisture loss protects flavor compounds
For long-term freshness, store your harvest in airtight containers to protect the flavor.
Tender Herbs Needing Care
Basil, mint, and tarragon are leafy and moisture-rich, so they need extra attention before drying begins. Lay them flat on a cloth or rack instead of hanging bundles, since thin leaves burn or wilt under too much heat.
Good soil drainage and regular pruning during growth keeps stems from turning limp, which makes drying faster and protects flavor once harvested.
Herbs Better Frozen
Chives and cilantro hold too much water for air drying to work well, and they turn brittle and flavorless when you try. Freezing beats drying for these herbs, preserving their vitamins and bright taste far better.
Chop them into an ice cube tray with water or oil for easy, freezer-burn-free portions you can drop straight into soups and stews later.
Flavor and Oil Retention
Fat and oil in an herb’s tissue act like a sponge, trapping aromatic compounds through lipid matrix absorption. This hydrophobic flavor retention slows volatile aroma loss during the dehydration process.
Cooler rooms, gentle airflow, and low light all help protect essential oils, while natural antioxidants in the leaves keep those oil-soluble flavors from breaking down over time.
Harvest Herbs for Maximum Flavor
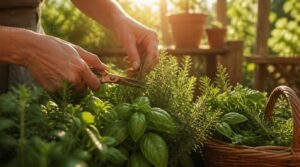
Great dried herbs start well before the drying rack, right at the moment you cut them. How and when you harvest shapes the flavor and oils you’ll be able to preserve later. Here’s what to keep in mind as you head out to gather your herbs.
Pick After Dew Dries
Timing is everything when you’re after flavor that lasts. Wait until morning dew evaporation is complete, mid to late morning on a cool, dry day, before you snip a single stem.
Once you’re set to harvest, reach for clean, sharp shears—these essential winter herb pruning techniques can help your plants stay healthy through the colder months.
This best time to harvest keeps surface moisture low, which curbs microbial spoilage and protects essential oil preservation. Skip the afternoon heat, too, since strong sun stresses leaves and drains their aromatic punch before drying even starts.
Cut Above Leaf Nodes
Grab your scissors and look closely at the stem before cutting. Find the nearest leaf node, the small bump where leaves meet stem, and snip just above it at a slight angle.
This encourages bud stimulation and helps prevent stem rot. Clean cuts above nodes also boost propagation success, so save longer trimmings if you plan to root new plants later.
Harvest Before Flowers Open
Snip herbs while buds stay tight and unopened, not after flowers bloom. At this stage, plant energy reserves stay concentrated in the stem, fueling continued opening once you bring them inside.
Hormonal balance shifts too: lower ethylene sensitivity means slower wilting and steadier water uptake. That’s why early harvesting helps boost vase life and gives your herbs the best shot at full flavor before hang drying begins.
Remove Damaged Leaves
Not every leaf deserves a spot in your bundle. Yellowed, brown, or necrotic tissue drains energy from healthy stems and invites disease, so pull it before drying begins.
Check for lesions or brown patches that spread when pressed—those signal active infection. Disinfect your scissors between cuts to avoid spreading pathogens.
Green, slightly marked leaves can stay if airflow isn’t blocked. It’s about balance, not being perfect.
Keep Stems Clean
Dirty stems carry more than soil, they carry the mold spores that ruin a whole batch. Sanitize your scissors before cutting, then brush off surface dust with a soft cloth.
Handle cut stems with clean hands to avoid transferring oils or bacteria.
Keep your workspace tidy and dry, since good postharvest handling now means better-tasting herbs later.
Prepare Herbs Before Drying
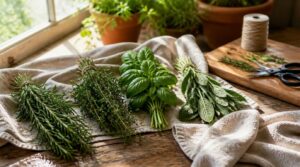
Once your herbs are harvested, a little prep work makes all the difference in how well they dry. Skipping this step can invite mold or dull flavor, so it pays to get it right. Here’s exactly what you need to do before hanging or laying out your herbs.
Rinse Only When Needed
Does that bundle of thyme really need a bath? Not always — rinse only when soil, pesticides, or sticky residue appear on leaves.
- Visible dust or grit
- Sap or pesticide residue
- Slippery, sticky surfaces
- Dirty root ends
- Outdoor-grown herbs
Minimalist rinsing protects volatile oils, prevents leaf damage, and speeds your herb dehydration method. When herbs look clean, skip it entirely.
Pat Completely Dry
Once herbs are rinsed, grab a clean towel or salad spinner and get them fully dry before moving on. Leftover droplets slow drying time by 20 to 40 percent and invite mold.
Pat gently from stem outward so leaves don’t bruise, then recheck for shine. Complete moisture removal protects essential oils and keeps that fresh herb texture intact.
Strip Lower Leaves
With dry stems in hand, pinch off any lower leaves before bundling. This step improves airflow around the base and lowers mold risk during the hang drying process.
Use clean shears for larger stems, sanitizing between plants to prevent disease spread. Stripped leaves also let you monitor plant health, since aging foliage often reveals stress first.
Sort by Herb Type
Once your stems are stripped, group them by texture, not species. Woody stem durability means rosemary, thyme, and sage handle bundled hang drying just fine.
Tender leaves like basil or tarragon bruise easily, so keep them separate for flat-drying or freezing. This sorting step protects oil retention and keeps delicate herbs from turning brittle before their time.
Prevent Surface Moisture
Once herbs are grouped by texture, excess moisture becomes the real enemy. A dehumidifier and steady airflow optimization keep drying spaces below 40 percent humidity.
- Run a dehumidifier nearby
- Check humidity with a hygrometer
- Add desiccant packs in enclosed spots
- Space herbs for good air circulation
Good moisture control protects flavor and prevents mold before your air drying techniques even begin.
Air Dry Herbs Indoors
With your herbs prepped and ready, it’s time to set up the drying space itself. Different herbs need different setups, and getting this part right protects both flavor and texture. Here’s how to bundle, hang, and arrange your herbs for the best results.
Bundle Sturdy Herb Stems
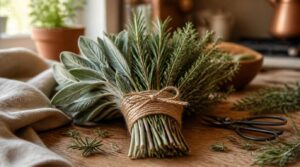
Rosemary, thyme, and sage hold their shape thanks to woody, rigid stems that resist bending under tension. Group thicker stems in the center for balanced weight, keep everything facing the same direction to avoid twisting, then wrap a tight knot at the midsection and secure it with extra twine.
This bundling method prevents kinking and keeps your culinary herbs drying evenly from the outside in.
Hang Upside Down
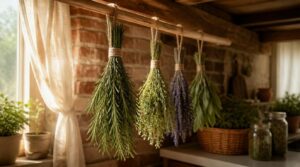
Turn your bundled stems upside down and hang them from a hook, nail, or drying rack. This position lets moisture drain downward and away from the leaves, speeding evaporation.
- Choose a warm, dry spot with steady airflow
- Space bundles apart so air moves freely
- Check weight distribution so bundles hang straight, not lopsided
Good airflow prevents mold and locks in flavor through natural preservation.
Use Paper Bag Covers
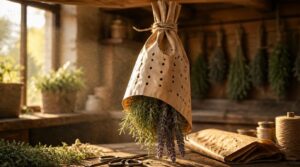
A plain kraft paper bag, punched with small ventilation holes, catches falling leaves and dust while your bundles dry. Slip it over each bundle before hanging, cinching the open end around the stems.
Kraft paper’s biodegradable and breathable, so moisture escapes instead of collecting. Punch holes evenly for airflow, and feel free to label or decorate the bag for easy identification.
Lay Delicate Herbs Flat
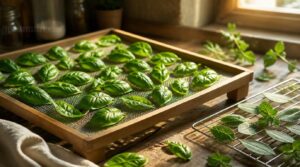
Basil and other tender leaves bruise easily when hung, so give them a flat surface instead. Choose a breathable mesh tray or cooling rack, never solid plastic that traps moisture. Spread leaves in a single, uncrowded layer to prevent mold pockets and dry evenly.
- Detach leaves from thick stems
- Use mesh or wood surfaces
- Lift trays for airflow
- Avoid overlapping leaves
- Rotate for even drying
Improve Airflow and Dryness
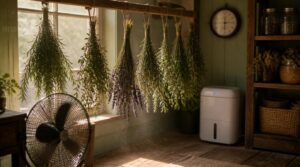
Good airflow makes or breaks your air drying techniques. Keep bundles spaced apart, lift racks off the floor, and run a small fan nearby.
| Factor | Target Range |
|---|---|
| Humidity | 40-50% |
| Temperature | 20-25°C |
A dehumidifier placed nearby pulls excess moisture from the air, keeping herbs in a dry cool place while you monitor moisture reduction daily.
Store Dried Herbs Properly
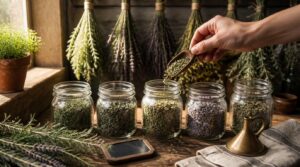
Once your herbs feel dry to the touch, the real work of protecting them begins. Good storage locks in flavor and keeps months of effort from going to waste. Here’s what you need to check and do before those herbs earn a permanent spot on your shelf.
Check Leaves for Crispness
How do you know your herbs are truly ready? Trust the snap resistance test over color alone: bend a single leaf, and it should crackle, not fold. Compare several leaves for uniform dryness, checking texture versus color. Properly dried leaves feel light for their size, with moisture content near 10 percent, showing minimal excess moisture remains.
Trust the snap test over color: a truly dry leaf should crackle, not fold
Remove Moldy Pieces
Passing the snap test isn’t the final check. Look closely for fuzzy patches or discolored spots before storage.
Use clean scissors to cut away any moldy pieces, preventing spore contamination and cross contamination with healthy herbs. Discard affected bits outdoors, then sanitize storage areas and tools thoroughly. This simple step protects your dehydration techniques and keeps your natural preservation methods safe from ruining an entire batch of dried herb storage.
Use Airtight Jars
Once your herbs pass the mold check, seal them in airtight glass mason jars for the best protection. Glass stays flavor-neutral and won’t taint your herbs over time. Before jarring, it helps to know which herbs you’re storing were grown well in the first place—this herb and vegetable companion planting guide shows how pairings like basil and tomatoes boost flavor and yield.
Check gaskets for cracks, leave minimal headspace, and press lids to test the seal. Vacuum sealing cuts oxygen exposure up to 90%, keeping dried herb storage fresh for months of reliable food preservation.
Label Harvest Dates
Once your jars are sealed, grab a marker and write the harvest date right on the lid. Use a consistent date format like YYYY-MM-DD, since this avoids mixing up batches later.
This small habit builds real batch traceability, letting you track flavor and potency back to the exact picking day for smarter dried herb storage.
Store Cool and Dark
Store dried herbs somewhere cool and dark, ideally between 50 and 60°F, to slow flavor loss. Direct sunlight breaks down oils fast, so use opaque jars to prevent photodegradation.
- Airtight container with tight lid
- Low humidity, ventilated spot
- Away from stove heat
- Minimal temperature swings
Steady conditions protect potency far longer than a sunny shelf ever could.
Frequently Asked Questions (FAQs)
What herbs should you not dry?
Basil, cilantro, and other tender, high-moisture herbs turn brown fast and lose their punch.
Cilantro oxidation dulls flavor quickly, while basil freezing in oil or ice cubes better preserves aroma and nutritional value than slow air drying ever could.
Why hang herbs upside down to dry?
Gravity pulls moisture from leaves toward stems, letting essential oils migrate back into the leaves while bundles hang. This creates vertical airflow around every surface, preventing leaf bruising and preserving structural integrity, flavor, and aroma better than flat-drying methods.
What herbs can you air dry?
Woody herbs like rosemary, thyme, sage, and oregano dry best thanks to their sturdy stems and low moisture. Lavender and bay leaves also hold fragrance well, while tender herbs need gentler handling to preserve their essential oils.
How long do herbs need to air dry?
Patience speeds up flavor, oddly enough. Drying time varies by herb moisture: rosemary and thyme need 5-14 days, while lavender finishes in 3- Trust the stem snap test—leaves crumble and stems break cleanly when truly ready.
How long does it take herbs to fully dry?
Most herbs reach full dryness in 1 to 2 weeks, though leaf thickness, humidity, and airflow all play a role. Thin leaves like mint finish in days, while woody stems and flowers take longer to crumble properly.
Can a food dehydrator speed up herb drying?
Yes — a dehydrator cuts drying time to 1–4 hours using controlled airflow and low heat (95–135°F), preventing scorching while preserving essential oils. It’s faster and more predictable than air drying, though woody herbs tolerate higher heat better than tender ones.
Is oven drying herbs at low heat effective?
Turning up the heat won’t speed things along without cost. Kept between 95 and 115°F, oven drying preserves essential oils while removing moisture, though delicate leaves like basil still risk faster flavor loss than sturdier, woody herbs.
Can herbs be preserved by freezing in oil?
Absolutely — freezing in oil locks in aroma compounds like carvacrol, especially for basil, oregano, thyme, and rosemary. Olive oil works well, preventing freezer burn while creating ready-to-use herb cubes for quick, flavorful seasoning straight from the freezer.
How long do dried herbs stay flavorful?
Whole leaves stay flavorful 12 to 24 months, while ground herbs fade within 6 to Airtight, opaque jars in cool, dark spots protect aroma longest—check by smell, replacing anything dull, powdery, or faded to keep dishes tasting vibrant.
Conclusion
Like a well-tended garden, patience rewards you with something worth savoring. Air drying herbs indoors isn’t complicated, but it demands attention at every stage, from harvest to storage. Cut at the right time, hang with care, and store away from light and moisture. Your reward is a jar of flavor that outlasts anything from a store shelf. Trust the process, check your jars often, and you’ll have bold, garden-fresh taste ready whenever you need it.