This site is supported by our readers. We may earn a commission, at no cost to you, if you purchase through links.

Succulents have a reputation for being unkillable—yet somehow, overwatering kills millions of them every year. The irony isn’t lost on anyone who’s watched a perfectly healthy Echeveria turn to mush within weeks of bringing it home. These plants evolved to survive droughts, not drowning, and that single misunderstanding accounts for most succulent casualties.
The good news: once you understand how succulents actually work—their dormancy cycles, their preference for neglect over attention, their sensitivity to soil and light—caring for them becomes almost easy. The right pot, the right mix, the right watering rhythm. That’s the whole game.
Table Of Contents
- Key Takeaways
- Choose The Right Succulent
- Pick Pots and Soil
- Plant and Repot Correctly
- Set Light and Temperature
- Water Without Overwatering
- Maintain and Troubleshoot Growth
- Top 5 Succulent Care Products
- Frequently Asked Questions (FAQs)
- How do I propagate succulents from leaves or cuttings?
- When should I repot my succulent plant?
- Can succulents survive outdoors during winter months?
- Why are my succulent leaves turning brown?
- Do succulents need different care when flowering?
- How do I revive a dying succulent?
- Can succulents survive winter outdoors?
- Why are my succulent leaves falling off?
- How often should I repot my succulents?
- Do succulents need humidity trays or misting?
- Conclusion
Key Takeaways
- Overwatering is the leading cause of succulent death, so master the soak-and-dry method — water deeply, then wait until the soil is completely dry before doing it again.
- Your pot and soil matter more than most people realize: always use containers with drainage holes and a gritty, well-draining mix to keep roots healthy and rot-free.
- Match your succulent to its environment first — the right species for your light, climate zone, and household pets makes everything else dramatically easier.
- Succulents thrive on neglect more than attention — ease up on watering in winter, skip misting entirely, and fertilize only during active spring and summer growth.
Choose The Right Succulent

Not every succulent thrives in every spot — and that’s the first thing worth knowing. The right match between plant and environment makes everything easier down the line.
Pairing plants with the right light conditions is especially helpful in trickier spots, like the ones covered in this guide to shade-loving plants for summer gardens.
Here’s what to look at before you bring one home.
Indoor Vs. Outdoor Succulent Types
Not all succulents play by the same rules — indoor and outdoor types differ more than most people expect. Indoor succulents like Haworthia stay compact, with softer leaf form suited to filtered light. Outdoor cold-hardy succulents like Sempervivum show stronger color display and wider size potential in open gardens.
- Climate Adaptation: Indoor types need stable temperatures; outdoor succulents handle frost and heat swings.
- Growth Patterns: Outdoor varieties spread wider; indoor ones stay tidy in containers.
- Care Demands: Indoor vs. outdoor succulent care differs primarily in light intensity and watering pace.
Low-light Varieties for Indoor Spaces
Not every room gets great light — and that’s fine. Some of the best indoor succulents actually prefer it that way.
| Plant | Light Tolerance | Best Placement |
|---|---|---|
| Snake Plant | Low to bright indirect | Any room, any corner |
| Haworthia | Partial shade | East or west window |
| Gasteria | Filtered/low light | North-facing rooms |
| ZZ Plant | Low to indirect | Desks, floor spots |
| Sansevieria | Adaptable | Shelves, dim offices |
Snake Plant benefits include near-zero fuss and serious shade tolerance. Haworthia light needs stay modest — a few morning hours work perfectly. Gasteria placement tips point toward filtered spots away from harsh sun. ZZ Plant care is almost embarrassingly simple. These low-light succulents cover the full range of low-light plant adaptation without sacrificing shade-tolerant aesthetics.
Cold-hardy Options for Outdoor Gardens
Cold doesn’t have to mean bare ground. Sempervivum withstands USDA zones 3–8 without blinking — perfect for rock garden integration between stepping stones or along dry walls. Opuntia humifusa survives down to 10°F. Sedum acre spreads fast and shrugs off frost.
The real key to cold-hardy succulents and smart winter drainage design is simple: keep roots dry. Soggy soil kills faster than cold ever will.
Matching Succulents to Your Climate
USDA Zone Matching is critical for succulent success. In the hot, dry Southwest, Agaves, aloes, and Euphorbias thrive, ideally suited for Arid Climate Picks and Elevated Sun Exposure. Coastal gardens demand High-Humidity Species like Echeveria or jade, paired with sharp drainage for salt tolerance. For colder regions (zones 3–5), cold-hardy succulents withstand harsh winters effortlessly.
By aligning outdoor succulents with local climate zones first, temperature and humidity management becomes significantly easier. This foundational step ensures plants receive the conditions they naturally require, reducing maintenance and boosting resilience.
Pet-safe and Toxic Succulent Choices
Not all succulents play nicely with curious pets — and the wrong choice can mean a panicked call to the vet.
Pet Friendly Options to keep on your shelf:
- Haworthia — safe for cats and dogs, looks like aloe but isn’t
- Echeveria — rosette beauty, low risk
- Portululacaria afra (elephant bush) — solid jade plant alternative
- Sedum — generally safe, but check the species label
- Lithops — non-toxic, though large amounts may upset stomachs
Your Toxic Species List includes aloe vera, jade plant, kalanchoe, string of pearls, and pencil cactus — all flagged in the plant toxicity database maintained by the ASPCA. Succulent toxicity awareness matters especially in mixed arrangements, where one toxic plant hides among safe ones.
Always read Safety Labeling Tips on plant tags — common names can mislead. Identifying Toxic Plants by scientific name is more reliable. If your pet chews something unknown, skip the guessing: follow Emergency Response Steps and call your vet immediately.
Toxicity to pets escalates fast in small animals, so petsafe plants aren’t optional — they’re just smart planning.
Pick Pots and Soil

The pot and soil you pick matter more than most people think — get it wrong, and even the toughest succulent will struggle. A few simple choices up front can save you a lot of headaches down the road.
Here’s what you need to know before you pot your first plant.
Why Drainage Holes Are Essential
Drainage holes aren’t optional — they’re the whole system. Without them, water pools at the bottom, displacing the oxygen roots need to breathe. This trapped moisture triggers root rot fast.
Drainage holes aren’t optional — without them, trapped moisture triggers root rot fast
Proper container drainage solutions promote the soak and dry method by maintaining moisture regulation cycles. Salt leaching also occurs naturally as water flushes through, preventing mineral buildup.
| Drainage Benefit | What It Does | Why It Matters |
|---|---|---|
| Root Aeration | Keeps air in soil | Promotes healthy root growth |
| Moisture Regulation | Prevents water pooling | Reduces rot risk |
| Salt Leaching | Flushes mineral buildup | Protects roots from burn |
Terra Cotta Vs. Plastic Containers
Terracotta pots are the classic pick for succulents — and honestly, they earn it. Their porous walls improve moisture retention by actively pulling excess water away from roots.
The thermal buffering keeps soil cooler in summer heat.
Plastic holds moisture longer, which risks rot.
Terracotta’s weight stability also prevents tip-overs.
For sustainability impact and container gardening longevity, clay wins.
Best Soil for Succulent Health
Soil is where most succulent’s problems start. Get the mix wrong, and nothing else you do will save them. Good succulent soil hits four marks:
- Texture Balance — gritty and loose, never dense
- Aeration Strategies — perlite and pumice keep roots breathing
- Organic Ratio — keep it modest; too much holds moisture
- pH Targeting — aim for 5.5–7.0 for healthy nutrient uptake
DIY Succulent Soil Mix Recipe
Making your own succulent soil is easier than you think. The go-to DIY succulent soil recipe combines essential components for optimal drainage and nutrient balance.
The ideal proportions are 3 parts potting soil, 2 parts coarse grit (such as coarse sand, decomposed granite, or chicken grit), and 1 part perlite or pumice. This mixture ensures mostly gritty, a little organic composition, achieving the right mineral ratio for succulent health.
Blend the dry ingredients thoroughly using a stirring technique until the mixture is evenly combined. Store leftovers sealed to maintain quality for future use.
Preventing Waterlogged Roots and Rot
Root rot is quieter than you’d think — by the time leaves yellowing, the damage is often done. Use well-draining soil, pots with drainage holes, and empty saucers after every watering.
Bottom watering and elevated pot stands improve root zone aeration. A moisture meter monitoring seasonal drying intervals keeps overwatering symptoms away. Master these succulent watering techniques, and your roots stay happy.
Plant and Repot Correctly
Getting your succulent into the ground — or a pot — seems simple, but a few small decisions here make a real difference later.
From how deep to set the roots to knowing when it’s time to size up the container, the basics are worth doing right.
Here’s what you need to know.
Step-by-step Planting Basics

Start with the pot halfway filled with well-draining soil—that’s your foundation for good succulent planting basics.
Set the plant in place, then focus on root spreading so nothing curls underneath. Add soil gradually, using gentle soil tamping to settle it without compacting.
Keep leaf orientation natural, crown elevation above the soil line. Initial settling happens on its own.
How Deep to Place Roots

Once your soil is settled, depth is everything. Place the root ball so its top sits level with the surface — not buried. This keeps the crown and lower leaves above the soil moisture zone, protecting against rot.
Shallow containers work better for most compact species, as their roots spread wide rather than deep. Prioritize good root airflow over extra depth, ensuring healthier growth.
When a Succulent Needs Repotting

Your succulent will tell you when it’s ready to move up. Watch for rootbound indicators like roots poking out of drainage holes or circling tightly inside the pot.
Soil condition cues matter too — if water pools on top or the mix dries out within a day, it’s compacted.
Growth stagnation cues like zero new leaves confirm the signal.
Aim for spring repotting. The best practice is spring and fall repotting to minimize shock.
How to Repot Without Stress

Once you’ve spotted those root-bound signs, timing is everything — repot in the morning when temps are mild. Lightly use the Pre-watering Technique the day before to loosen roots safely.
- Use Tool Sanitization — sterilized scissors only — to trim dead or mushy roots
- Apply Root Massage to gently uncoil any tightly circling sections
- Prep your pot with drainage holes and fresh succulent soil preparation mix
- Let trimmed roots callous 2–3 days for solid root rot prevention
- Place in Acclimation Lighting — bright but indirect — for the first week
Stress-Reducing Timing makes the whole repotting succulents process smoother than you’d expect.
Choosing The Right Pot Size

Most people grab whatever pot looks right — then wonder why their plant rots. For repotting succulents, match the container to the root ball: about one inch wider, no more. Shallow Pot Depth helps well-draining soil dry faster, which matters indoors.
Root Type Matching guides depth — fibrous roots stay shallow, taproots need more room. Get that Growth Space Balance right, and your succulent repotting guide practically writes itself.
Set Light and Temperature

Light and temperature are the two things succulents are pickiest about — get them wrong, and even a healthy plant starts to struggle.
The good news is that once you know what your specific succulent needs, placing it correctly is pretty straightforward.
Here’s what to pay attention to.
How Much Light Succulents Need
Most succulents are sun-chasers — they need at least 6 hours of bright light daily to stay compact and healthy. Lux level guidelines put typical indoor rooms at 1,000–5,000 lux, while outdoor summer sun hits 120,000. That gap matters.
- Direct sunlight suits Echeveria, Agave, and cacti
- Bright indirect sunlight keeps Haworthia happy without scorching
- Low light succulents manage on 3–4 hours
- Seasonal light adjustment keeps growth steady year-round
- Acclimation period prevents sunburn when moving plants outdoors
Seasonal light adjustment keeps growth steady year-round. An acclimation period prevents sunburn when moving plants outdoors.
Best Window Placement Indoors
Where you place your pot matters more than most people think. South windows win for South Window Benefits — strongest light, all day.
East Window Softness suits shade-tolerant types beautifully, offering gentle morning illumination ideal for delicate species.
West Window Heat demands caution in summer; intense afternoon sun may scorch leaves, so a sheer curtain provides essential diffusion.
North Window Limits create challenging conditions with minimal light, making most plants struggle without supplemental grow lights.
| Window | Light Quality | Best For |
|---|---|---|
| South | Bright direct | Echeveria, cacti |
| East | Soft morning | Haworthia, Gasteria |
| North | Low indirect | Struggling — add grow lights |
Placement Distance significantly impacts light intensity — positioning plants closer to the glass maximizes usable light exposure.
Direct Sun Vs. Partial Shade
Full sun means at least six hours of direct sunlight daily — and for most succulents, that’s the sweet spot. Direct sunlight builds Growth Compactness, Leaf Thickness, and Moisture Loss.
Partial shade slows all of that down and can trigger Color Variation as pigment balance shifts.
Low light succulents like Haworthia handle reduced bright light fine, but Heat Stress hits sun-lovers hard without enough direct exposure.
Preventing Stretching and Sunburn
Two problems kill indoor succulents fast — etiolation and sunburn. Leggy succulents stretch toward light when they’re not getting enough; supplemental grow lights running 12–14 hours daily fix that.
For gradual sun acclimation outdoors, increase exposure by 30 minutes of direct sunlight each day over two weeks. Use shade cloth application during heat spikes, and maintain a careful water-light balance—weekly plant rotation takes care of the rest.
Ideal Temperature and Humidity Levels
Succulents have specific climate preferences — not fussy, just precise. Maintain temperatures between 60°F and 80°F for most varieties, while cold-hardy succulents tolerate nighttime dips without issue.
For humidity, aim low — well under 60%. Most homes at 40–50% are suitable, but high humidity stresses plants quickly.
Seasonal shifts matter too. As winter arrives, ease up on watering and fertilizing to align with their natural growth patterns.
Water Without Overwatering

Watering succulents is honestly where most people go wrong — and it’s usually too much, not too little.
The good news is, once you nail the rhythm, it becomes second nature.
Here’s what you need to know to get it right.
How The Soak and Dry Method Works
The soak and dry method is simpler than it sounds. Pour water slowly until it drains from the bottom — that’s your complete soil soak, pushing moisture through the full root zone. Then leave it alone.
Here’s what makes it work:
- A full dry period between waterings prevents overwatering
- Deep root hydration beats surface watering every time
- Well-draining soil ensures uniform distribution of moisture without pooling
Indoor Watering Schedules by Season
Once you’ve mastered the soak-and-dry rhythm, seasonal adjustments become essential. Spring requires watering every 10–14 days, while summer demands checks every 7–10 days due to faster drying. In fall, reduce frequency to every 3–4 weeks, and in winter, water monthly at most.
Humidity also plays a critical role—plants in humid environments need less frequent watering. These seasonal succulent care adjustments ensure healthy indoor gardening without overwatering.
Outdoor Watering in Hot Climates
Outdoor succulents in hot climates need a Morning Soak — water deeply, early, before the heat kicks in. The soak-and-dry method still applies, but you’ll check more often.
Drip Irrigation beats overhead sprinklers by cutting evaporation. Use Wind-Adjusted Watering on breezy days, and add Shade Mulch around the base to conserve moisture.
A Smart Controller eliminates guesswork, preventing overwatering for these drought-tolerant plants.
Using The Finger Test Correctly
Once your soil dries out from that last deep drink, the finger test tells you exactly when to water again. Push your finger about 1–2 inches into the well-draining soil near the plant’s base — not the edge.
Dry and crumbly? Time to soak. Still cool or slightly sticky? Wait.
Clean, dry hands improve moisture texture reads every time.
Signs of Overwatering and Underwatering
Your succulent is always talking — you just have to learn the language. Soft, mushy leaves and stem droop? Classic overwatering. Leaves become swollen before root rot sets in. Check for root odor too — that sour smell is a dead giveaway.
Underwatering shows differently: leaf curling, wrinkled leaves, and brown, crispy leaves. The color shifts to a dull gray, and bone-dry soil confirms it.
Winter Dormancy Watering Adjustments
Winter flips everything — your succulent is basically napping, and it needs far less from you. Overwatering now is riskier than underwatering ever was.
- Use a daytime watering window when temps stay above freezing
- Try subsurface moisture testing a few inches down before watering
- Adjust watering volume down and prevent crown wetness by watering at the base
Every 2–4 weeks is plenty.
Maintain and Troubleshoot Growth

Once your succulent is planted and watered correctly, the real work is staying consistent. A little pruning here, a pest check there — these efforts add up to a plant that thrives.
Here’s what to keep an eye on: regular maintenance ensures long-term health.
When and How to Prune Succulents
The best pruning season is early spring—when cuts heal fastest and new growth fills in quickly. Use sharp, sterilized shears (a quick alcohol wipe suffices) and make a clean cut at 45 degrees, just below a node.
For managing leggy growth, cut back up to one-third of the plant. Allow cuttings to callus over before planting.
One overgrown plant can easily become three healthy ones with proper care.
Removing Dead Leaves and Spent Blooms
Think of dead leaf removal as your plant’s hygiene protocol — small habit, big impact. Gently pull dry, loose leaves from the base; use clean scissors for stubborn ones. That’s tool sanitization done right.
Timing matters: Remove spent blooms and brown, shriveled leaves during routine succulent pruning. Post-cleanup inspection reveals hidden pests or rot. Enhanced airflow follows naturally.
Your succulent pruning techniques improve with every pass.
Fertilizing During Active Growth
Fertilizing succulents isn’t complicated — but timing and dilution ratio make all the difference. Spring through summer is your window. That’s when plants are actively pushing new growth and can actually use the nutrients. Nail your succulent fertilization schedules with these basics:
- Fertilizer Types: Use a balanced diluted fertilizer like 10-10-10, mixed to half-strength
- Feeding Frequency: Once monthly during active growth keeps roots happy without overloading them
- Seasonal Timing: Feed March through September; skip winter entirely
- Nutrient Signs: Firmer leaves and steady new growth mean your plant nutrition plan is working
- Application: Water first, then fertilize — dry roots burn easily
Propagating From Leaves, Stems, and Pups
Succulent propagation is easier than it sounds — and one plant can quickly become ten.
Leaf propagation works with fleshy types like Echeveria; pull cleanly at the base. Allow Callus Formation before planting.
For stem cuttings, use pieces 3–6 inches long. Let cuttings dry for 1–7 days before placing in a gritty Rooting Medium.
Succulent Pups are best separated when they reach 2–3 inches tall. Follow Pup Size Guidelines to ensure readiness.
After planting, provide Bright, indirect light until roots hold firm.
| Method | Key Detail |
|---|---|
| Leaf Propagation | Clean snap at base; Callus Formation before planting |
| Stem Cuttings | 3–6 inches; callus first |
| Succulent Pups | Follow Pup Size Guidelines — 2–3 inches ready |
| Aftercare Light | Bright, indirect until roots hold firm |
Preventing Root Rot and Weak Growth
Root rot usually starts silently—long before leaves go soft or yellow. Once propagation’s done and your plants are settled, root zone inspection becomes your best early-warning habit.
Four practices protect succulent root health:
- Use well-draining soil or a gritty mix soil with perlite or pumice.
- Ensure pot elevation keeps drainage holes clear.
- Try moisture sensor monitoring instead of guessing.
- Apply antifungal treatments early if rot appears.
Soil aeration matters just as much as avoiding overwatering.
Treating Mealybugs, Aphids, and Disease
Even healthy roots won’t save a plant overrun with pests. For mealybugs, alcohol swab treatment works fast — dab 70% isopropyl directly on each bug. Follow up with a neem spray cycle every 7–10 days. Isolation quarantine stops spread immediately.
Catch sooty mold cleanup early, since that black film signals an active infestation.
Early disease detection is everything in succulent pest and disease control.
Top 5 Succulent Care Products
The right tools make succulent care a whole lot easier — and a few solid picks can save you from a lot of guesswork.
Whether you’re dealing with lighting, watering, or soil, there’s a product that genuinely pulls its weight.
Here are five worth keeping on your radar.
1. Jump Start T5 Fixture with Timer Reflector

If your succulents aren’t getting enough natural light, the Jump Start T5 Fixture is worth a serious look. It runs a 6400K full-spectrum lamp—ideal for seedlings, cuttings, and low-light varieties like Haworthia.
The snap-on Omni-Max reflector pushes light downward where your plants actually need it. Best part? The built-in timer manages 12/12 or 18/6 hour cycles with one button. Set it, forget it.
Its slim design, lightweight build, and easy hanging ensure it fits neatly into tight indoor spaces.
| Best For | Gardeners and hobbyists who need an affordable, space-saving grow light for seedlings, herbs, succulents, or small reptile and amphibian setups. |
|---|---|
| Primary Use | Grow lighting |
| Indoor Suitable | Yes |
| Outdoor Suitable | No |
| Succulent Friendly | Yes |
| Weight | 1 lb |
| Beginner Friendly | Yes |
| Additional Features |
|
- Built-in timer with 12/12 or 18/6 cycles means zero daily fuss—just set it once and let it run.
- The snap-on Omni-Max reflector focuses light right where your plants need it, no wasted output.
- Super slim and lightweight, so it fits on shelves, tables, or inside enclosures without taking over the space.
- It’s discontinued, so finding replacement bulbs or parts down the road could be a real headache.
- Some users reported the fixture failing unexpectedly after only a few months of use.
- The timer setup tripped people up at first—the single-button system isn’t as intuitive as it sounds.
2. Indoor Outdoor Moisture Sensor Meter
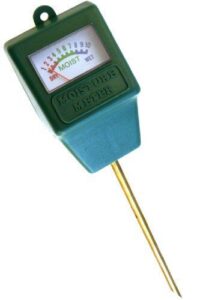
Light handled — now let’s talk water. Guessing when to water is how most succulents end up waterlogged. The New Resources Group moisture meter takes the guesswork out.
Slide the metal probe into the soil, and the color-coded needle tells you exactly where moisture sits — dry, moist, or wet. No batteries needed.
At around $13, it’s a low-cost tool that pays for itself the first time it saves a plant from root rot.
Just clean the probe regularly to keep readings accurate.
| Best For | Beginner gardeners and houseplant owners who want a simple, no-fuss way to know when to water. |
|---|---|
| Primary Use | Soil moisture sensing |
| Indoor Suitable | Yes |
| Outdoor Suitable | Yes |
| Succulent Friendly | Yes |
| Weight | 4.96 oz |
| Beginner Friendly | Yes |
| Additional Features |
|
- No batteries needed — just stick it in the soil and get an instant reading
- Color-coded scale makes it easy to understand at a glance
- At around $13, it’s an easy, low-cost addition to your plant care routine
- The probe is fragile and can break in dense or compacted soil
- Tip corrodes over time and needs regular cleaning to stay accurate
- Readings are coarse (dry/moist/wet only) — no precise moisture percentages
3. Espoma Organic Cactus and Succulent Potting Soil

Soil matters more than most people think—and Espoma’s Organic Cactus Mix gets it right. It blends sphagnum peat moss, perlite, and humus for fast drainage without leaving roots bone-dry.
The real standout is Myco-Tone, Espoma’s proprietary mycorrhizae blend, which helps roots grow deeper and handle drought stress better.
It’s 100% natural, safe for pets, and comes in 4- or 8-quart bags. At $11.74 for four quarts, it’s a solid investment for any repotting project.
| Best For | Anyone growing cacti, succulents, palms, or citrus in containers who wants an organic, well-draining mix that won’t suffocate sensitive roots. |
|---|---|
| Primary Use | Succulent potting mix |
| Indoor Suitable | Yes |
| Outdoor Suitable | Yes |
| Succulent Friendly | Yes |
| Weight | 2.5 lbs |
| Beginner Friendly | Yes |
| Additional Features |
|
- The sphagnum peat, humus, and perlite combo drains fast and keeps roots from sitting in soggy soil
- Myco-Tone mycorrhizae gives roots a real boost, helping plants grow stronger and handle dry spells better
- Fully organic and pet-safe — no synthetic chemicals to worry about
- At $11.74 for just four quarts, it’s pricier than most bagged potting soils
- Very sensitive plants or large pots might still need extra perlite or grit mixed in
- Fine particles can slip through drainage holes over time, so expect a little soil loss
4. Bonsai Jack Succulent and Cactus Soil Mix
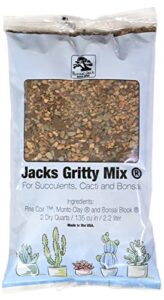
Bonsai Jack’s Gritty Mix 111 is the overachiever of succulent soils. It’s built from equal thirds of Monto Clay, pine bark, and calcined clay — no peat, no heavy filler.
Water runs straight through, roots dry fast, and fungus gnats don’t stand a chance. The pH sits at 5.5, dialed in for cacti and succulents.
At 2 quarts, the bag is small, so save it for your most prized plants or propagation trays where drainage really counts.
| Best For | Succulent, cactus, and bonsai growers who want serious drainage and don’t mind paying a bit more for their prized plants. |
|---|---|
| Primary Use | Succulent potting mix |
| Indoor Suitable | Yes |
| Outdoor Suitable | Yes |
| Succulent Friendly | Yes |
| Weight | 2.2 lbs |
| Beginner Friendly | No |
| Additional Features |
|
- Drains fast and dries out quickly, so root rot and fungus gnats basically don’t happen
- PH is dialed in at 5.5 — exactly what acid-loving plants like Echeveria and Aloe want
- Clean, uniform particles make it easy to work with, from tiny cuttings to larger container plants
- Only 2 quarts per bag, so it’ll run out fast if you have a lot of pots to fill
- Premium price makes it hard to justify using it for everything — more of a "special occasion" soil
- Fast drainage means you’ll need to water more often and keep a closer eye on moisture levels
5. Espoma Organic Perlite for Soil Aeration Growth
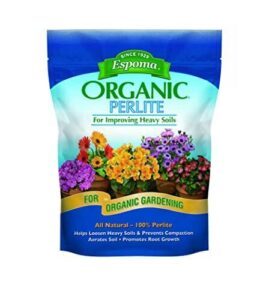
Think of perlite as the secret weapon hiding in plain sight. Espoma’s Organic Perlite is 100% pure volcanic material — no fillers, no additives, and OMRI listed for organic growing.
Mix it into your succulent soil, and water drains faster, roots breathe easier, and compaction becomes a problem for someone else.
The ratio is simple: one part perlite to one part soil does the job. At 8 quarts, the bag won’t last forever on big projects, but it’s a smart, affordable addition to any mix.
| Best For | Gardeners who want to improve drainage and aeration in potting mixes, especially those growing succulents, cacti, or starting cuttings. |
|---|---|
| Primary Use | Soil amendment |
| Indoor Suitable | Yes |
| Outdoor Suitable | Yes |
| Succulent Friendly | Yes |
| Weight | 1.55 lbs |
| Beginner Friendly | Yes |
| Additional Features |
|
- 100% natural and OMRI listed, so it plays nicely with organic growing practices
- Lightweight and pH-neutral — easy to work with and won’t mess with your soil chemistry
- Noticeably reduces compaction and helps roots breathe, which makes a real difference in plant health
- The 8-quart bag goes fast if you’re working on anything larger than a few pots
- Dust can kick up during handling, so you’ll want to be a little careful when pouring
- You need to mix it thoroughly — uneven distribution means some spots won’t get the drainage benefit
Frequently Asked Questions (FAQs)
How do I propagate succulents from leaves or cuttings?
Propagating succulents is easier than it sounds. Pull a healthy leaf cleanly from the base, let it callus for a day or two, then lay it on dry, well-draining soil.
When should I repot my succulent plant?
Repot when roots peek out of the drainage holes, soil dries out suspiciously fast, or growth just… stops. Every two years is a solid baseline for healthy plants.
Can succulents survive outdoors during winter months?
Some succulents handle winter just fine — Sempervivum and Sedum can tough out temperatures near -30°F when planted in dry ground.
Tender types like Echeveria won’t survive a hard freeze without shelter.
Why are my succulent leaves turning brown?
Brown leaves usually mean overwatering or sunburn.
Soft, mushy leaves point to too much water, while dry, wrinkled ones mean thirst.
Sudden sun exposure scorches leaves fast — and that damage won’t fade.
Do succulents need different care when flowering?
Surprisingly, not much changes. Keep the soak-and-dry method, let soil dry fully between waterings, and give them bright light.
Just deadhead spent blooms and skip heavy fertilizer — they’re working hard enough already.
How do I revive a dying succulent?
Slide it out of the pot and check the roots first.
White and firm means hope.
Brown and mushy means act fast — trim the rot, let it dry, and start fresh.
Can succulents survive winter outdoors?
Some can, some can’t — it all comes down to species and your zone. Sempervivum and hardy Sedums laugh at frost. Echeveria? Not so much.
Know what you’re growing before winter hits.
Why are my succulent leaves falling off?
Leaves falling off usually means overwatering. Soft, mushy leaves signal too much moisture; dry, wrinkled ones mean too little.
Check your soil — if it’s still damp, hold off watering until it’s completely dry.
How often should I repot my succulents?
Most succulents are fine staying put for 2–3 years. Repot when roots peek out of drainage holes or the plant starts tipping over — those are your clearest signals.
Do succulents need humidity trays or misting?
Skip the mist — your succulents don’t need it. Most thrive in average indoor humidity. Skip trays too.
Stick to deep, infrequent watering at soil level and let the roots dry fully between drinks.
Conclusion
What if the secret to caring for succulent plants was simply learning to hold back? These aren’t needy houseplants—they’re built for patience, and so is the process.
Get the drainage right, match the light, and let the soil dry completely before you water again. That rhythm becomes second nature fast.
Stick with it, and you won’t just keep your succulents alive—you’ll watch them genuinely thrive, season after season, with almost embarrassing ease.
- https://www.succulentsandpropagation.com/post/re-potting-how-to-know-when-it-s-time-to-re-pot-your-succulents
- https://heliconusa.com/signs-of-poor-soil-compaction/
- https://asucca4u.com/blogs/news/repotting-overgrown-succulents
- https://gardenswhisper.com/how-to-know-when-to-repot-succulents/
- https://www.joyusgarden.com/transplanting-succulents-in-pots/