This site is supported by our readers. We may earn a commission, at no cost to you, if you purchase through links.

Your garden’s basil shouldn’t end up wilted in the back of your fridge, and that overgrown rosemary doesn’t deserve the compost bin. Garden herb infused oil recipe techniques let you bottle summer’s harvest into liquid flavor bombs that transform every meal from forgettable to unforgettable.
The problem? Most home cooks skip the essential acidifying step, unknowingly creating the perfect breeding ground for botulism spores lurking in fresh herb oils.
Learning the safe infusion process means you’ll capture those bright, garden-fresh flavors without the dangerous guesswork, turning your abundant herb haul into shelf-stable culinary gold that rivals anything from specialty food shops. Once you master the balance between safety protocols and flavor extraction, you’ll wonder why you ever settled for store-bought oils.
Table Of Contents
- Key Takeaways
- What is Garden Herb Infused Oil?
- Best Herbs and Oils for Infusing
- Harvesting and Preparing Fresh Herbs
- Safe Methods for Herb Oil Infusion
- Step-by-Step Herb Infused Oil Recipe
- Straining, Bottling, and Storing Infused Oil
- Top 8 Tools for Making Herb Infused Oils
- Frequently Asked Questions (FAQs)
- Can you reuse herbs for multiple oil batches?
- Whats the ideal herb to oil ratio?
- How do you fix cloudy infused oil?
- Can frozen herbs work for oil infusion?
- Why does my herb oil taste bitter?
- Can you reuse herbs for multiple infusions?
- Do herb infused oils need to be filtered twice?
- What temperature kills botulism spores in oils?
- Can I mix different herbs in one infusion?
- How do you know when infusion is complete?
- Conclusion
Key Takeaways
- Fresh herbs must be acidified in a 3% citric acid solution for 24 hours before oil infusion to prevent botulism, or refrigerated and used within four days if you skip this critical safety step.
- The herb-to-oil ratio matters for both flavor and safety—use 1 part dried herbs to 5 parts oil, or 1 part fresh herbs to 3 parts oil to achieve concentrated taste without wasting your harvest.
- Cold infusion preserves delicate volatile compounds over 4-6 weeks at room temperature, while heat infusion speeds extraction to 30 minutes using temperatures below 110°F without destroying essential oils.
- Double-straining through cheesecloth followed by coffee filters removes sediment that harbors spoilage organisms, extending shelf life to six months when properly acidified and stored in dark glass bottles.
What is Garden Herb Infused Oil?
Garden herb infused oil transforms ordinary cooking oil into something exceptional by capturing the essence of fresh herb infused oil in every drop. You’re not just making flavored oil—you’re creating a kitchen staple that bridges the gap between everyday cooking and artisanal craft.
Growing your own basil, rosemary, and thyme means you can experiment with homemade herb garden infused oil recipes that highlight each plant’s unique flavor profile.
Let’s break down exactly what herb infused oil is, why it deserves a spot in your culinary arsenal, and how making it at home puts you in control of both flavor and quality.
Once you’ve mastered the basics, you can explore creative ways to preserve fresh herbs in olive oil that extend their shelf life while locking in peak flavor.
Definition and Key Benefits
Herb infused oil is your rebellion against bland cooking—steeping fresh or dried herbs like basil, rosemary, or thyme into oils like olive or sunflower to capture fat-soluble flavor compounds and aromatic properties.
You can enhance these oils even more by harvesting fresh herbs daily from your own garden to capture their peak aromatic potency.
Herb infused oil is your rebellion against bland cooking—steeping fresh herbs into oil to capture fat-soluble flavor compounds and aromatic properties
This infusion technique transforms ordinary oils into powerhouse ingredients packed with culinary uses, from marinades to finishing drizzles, while delivering antioxidant health benefits and intense flavor enhancement that store-bought versions can’t match.
You can explore sustainable cooking techniques with garden herbs to maximize flavor while reducing waste in your kitchen.
By incorporating infused olive oil into your recipes, you can experience the antioxidant health benefits that enhance your cooking.
Culinary and Wellness Uses
Once you’ve crafted your flavor-packed infused oil, you’ll discover it’s not just a one-trick kitchen staple—it’s a multifaceted ally for both your cooking adventures and your natural wellness routine. By incorporating infused oils into your daily life, you can explore the benefits of anti inflammatory effects and improve your overall health.
Herb infused oil uses span far beyond simple flavor enhancement in your kitchen:
- Healthy cooking: Drizzle rosemary-infused oil over roasted vegetables or use basil oil in salad dressings for nutritional value and aromatic therapy that transforms ordinary meals into sensory experiences.
- Skincare benefits: Apply calendula or lavender herbal infused oil topically to soothe irritated skin, treat bug bites, or create homemade balms and soaps.
- Cooking with herbs: Marinate proteins, finish pasta dishes, or brighten morning eggs with herb infused oil recipes that deliver concentrated botanical properties.
- Natural remedies: Massage thyme or oregano oil onto sore muscles for relief, harnessing centuries-old herbalism practices.
Why Make Herb Infused Oils at Home
Creating your own herb infused oil at home gives you total flavor control and cost efficiency—turning surplus garden rosemary or basil into value-added oils for pennies per batch. You’ll skip preservatives, customize blends for specific infused oil uses, and enjoy health benefits from fresh botanicals.
Plus, homemade infused oils make thoughtful homemade gifts while supporting sustainable cooking practices that reduce packaging waste.
Best Herbs and Oils for Infusing

The secret to exceptional infused oil starts with your ingredient choices—you can’t fake quality when you’re working with just two components. Your herb selection shapes the entire flavor profile, while the carrier oil determines shelf life, cooking performance, and how well those botanical notes come through.
Let’s break down which herbs pack the most punch, what oils work best as your base, and how to pair them for maximum impact in your kitchen.
Getting your tips for harvesting delicate herbs down will help you capture those essential oils at their absolute best.
Top Garden Herbs for Infused Oil
Your herb garden is a treasure trove waiting to transform everyday oils into bold, aromatic infusions. Fresh herbs bring diverse flavor profiles and botanical benefits to your infused oils, but choosing wisely matters for both taste and safety.
Here are the standout choices for powerful herbal infusions:
- Rosemary – Pine-like, resinous flavor that withstands heat and delivers intense Mediterranean notes perfect for roasted vegetables and grilled meats.
- Thyme – Concentrated earthy taste with potent antimicrobial aromatic properties, ideal for savory applications.
- Basil – Sweet, peppery profile creating vibrant green oil that brightens pasta dishes and salad dressings instantly.
Choosing The Right Carrier Oil
Your oil selection determines both safety and flavor impact in every batch of herb infused oil. Olive oil, rich in monounsaturated fatty acids at roughly 70-80 percent, delivers fruity depth and solid shelf life—perfect when you want the carrier oils themselves to shine alongside bold rosemary or oregano.
Neutral oil options like grapeseed or canola let delicate herb notes dominate, though their higher polyunsaturated content means faster oxidation. Consider smoke points and flavor profiles together for culinary success.
Flavor Pairings for Culinary Use
Pairing the right herb with the right dish transforms ordinary meals into restaurant-worthy creations, and knowing which combinations work best will reveal bold new flavors in your everyday cooking.
Rosemary-olive oil elevates roasted potatoes and grilled lamb, while basil blends shine on caprese salads and pasta. Thyme pairs beautifully with chicken and root vegetables, creating vibrant flavor profiles that showcase your culinary techniques and turn simple recipe ideas into gourmet recipes worth sharing.
Harvesting and Preparing Fresh Herbs

The moment you step into your garden to gather herbs, you’re setting the stage for oils that burst with flavor and color. How you harvest, blanch, and dry those herbs will make or break the final result—fresh isn’t always safe, and a few simple techniques protect both taste and health.
Here’s what you need to know before you start snipping stems.
When and How to Harvest Herbs
Timing transforms everything when you’re harvesting herbs. Pick your herbs mid-morning after dew has dried but before noon’s heat saps those precious essential oils. Choose foliage before flowers open for maximum flavor intensity, and wait for dry, sunny weather conditions to minimize moisture.
Use clean, sharp tools to make precise cuts that protect your herb garden while capturing fresh herbs at their aromatic peak for infused oils.
Blanching and Drying Techniques
Ever tried locking in spring’s bold green with a pot of boiling water? Blanching Methods protect fresh herbs from fading and bitterness, plus amp up your Herb Infused Oil’s shelf life. Rapid cooling and careful surface drying are your best allies for:
- Vibrant color and flavor enhancement
- Oil safety and food safety guidelines
- Complete botulism prevention through proper herb preservation
Tips for Maximum Flavor and Color
Want show-stopping green that actually tastes alive? Chop tender Fresh Herbs like basil or chives into fine pieces—smaller bits release more chlorophyll for Color Preservation and faster Flavor Enhancement.
Keep your gentle heat between 60 and 80 °C during Infusion Techniques to pull maximum pigment without frying delicate oils.
Smart Herb Selection from your Herb Garden plus controlled warming yields Infused Oils bursting with both hue and personality.
Safe Methods for Herb Oil Infusion

Making herb-infused oil isn’t just about blending flavors—it’s about doing it safely so you can enjoy your creation without worry. Fresh herbs carry natural bacteria that thrive in oil, which means you need to take a few smart precautions before you start infusing.
Let’s break down the safest methods to protect your oil from spoilage and keep botulism off your countertop.
Acidifying Fresh Herbs for Safety
Fresh herbs can harbor botulism bacteria when submerged in oil, making acidification a non-negotiable step for food safety.
Mix one tablespoon of food-grade citric acid with two cups of water, then soak your basil, oregano, or rosemary for 24 hours.
This acidification method drops the herb’s pH below 4.2, preventing botulism and giving you safe, shelf-stable herb-infused oil.
Using Dried Versus Fresh Herbs
Choosing between fresh and dried herbs transforms your herb-infused oil’s shelf life and botulism risk. Dried herbs deliver concentrated flavor profiles with virtually zero moisture, letting you store your infused oils at room temperature for up to three months without bacterial worries.
Fresh herbs bring brighter aromatic notes but demand refrigeration and use within four days—or acidification first—to guarantee herb safety.
Preventing Spoilage and Botulism
Botulism prevention hinges on one non-negotiable rule: acidify fresh herbs in a 3% citric acid solution for 24 hours before infusing, or refrigerate non-acidified oils and use within four days maximum. Oil storage tips matter because Clostridium botulinum thrives in that airless, low-acid environment your beautiful infused oils create.
Watch for these spoilage signs that scream “discard immediately”:
- Cloudiness or visible mold growth throughout the oil
- Rancid or off odors when you open the bottle
- Any herb-infused oil left at room temperature beyond two hours
Proper acidification methods extend shelf life to six months at room temperature, transforming your food preservation game while keeping food safety front and center in your herbal rebellion.
Step-by-Step Herb Infused Oil Recipe
Now that you’ve mastered the safety steps, it’s time to bring your herb-infused oil to life. The process itself is refreshingly simple, but getting the proportions and timing right makes all the difference between bland oil and liquid flavor gold.
Let’s walk through the essential ingredients, your two infusion methods, and the exact steps that’ll transform your fresh herbs into a pantry staple you’ll reach for again and again.
Essential Ingredients and Quantities

You’ll need a simple formula to nail your first batch: combine 1 ounce of dried herbs with 10 fluid ounces of olive oil, or try 2 cups of fresh herbs with 16 ounces for bold flavor profiles.
Herb ratios matter—too little creates weak taste, too much wastes your garden bounty. These quantities follow safety guidelines while delivering homemade infused oils worth bragging about.
Cold Infusion Vs. Heat Infusion

Once you’ve gathered your ingredients, you’ll pick between two infusion methods that define your herb infused oil’s character.
Cold infusion takes 4–6 weeks at room temperature, preserving delicate flavor profiles and volatile compounds in making infused oils from basil or mint.
Heat infusion speeds extraction times to 30 minutes–12 hours using gentle warmth, ideal for hearty roots while maintaining oil stability and safety measures through controlled temperatures below 110°F.
Detailed Infusion Process

Your infusion process starts with proper herb extraction: fill sanitized jars two-thirds with dried herbs, then pour oil until it covers the plant material by 2–3 inches.
For cold maceration methods, seal containers and store them in darkness for 2–6 weeks, checking weekly.
Heat-based oil infusions require 110°F or lower for 30 minutes–4 hours, ensuring flavor enhancement without damaging delicate compounds in your herb infused oil.
Straining, Bottling, and Storing Infused Oil

You’ve made your infused oil, and now it’s time to bottle it up so it stays fresh, flavorful, and safe to use. The way you strain, store, and seal your creation makes all the difference between a vibrant herb oil that lasts for months and one that spoils in days.
Let’s walk through the essential techniques for keeping your garden-fresh flavors locked in and ready whenever you need them.
Straining Techniques for Clear Oil
Getting crystal-clear herb infused oil isn’t just aesthetic—it’s about removing sediment that can harbor spoilage organisms and compromise your infusion’s shelf life. Here’s how to master oil clarification through strategic filter selection and sediment removal:
- Start with coarse straining using a stainless steel mesh strainer lined with cheesecloth to catch bulk plant matter while allowing rapid flow.
- Purify through fine filtration with unbleached coffee filters that trap microscopic particles cheesecloth misses.
- Let gravity do the work by allowing strained oil to settle overnight, then decant the clear top layer away from bottom sediment.
- Repeat until immaculate by cycling between filtering and resting until no visible particles remain in your herb oil.
Best Containers and Bottling Tips
Your choice of container shapes everything about infusion safety and oil preservation. Glass bottles with tight-fitting lids prevent contamination, while dark storage protects herb-infused oil from light-induced rancidity.
Sterilize containers by boiling for ten minutes, then air-dry completely before filling.
Prioritize amber or opaque vessels for herbal infused oil—they block damaging UV rays that degrade delicate botanical compounds and accelerate spoilage in oil infusions.
Storage, Shelf Life, and Refrigeration
Storage transforms your herb-infused oil from a fleeting experiment to a reliable kitchen staple. Non-acidified fresh herb oil demands refrigeration within two hours and must be discarded after four days—botulism thrives in oxygen-free, low-acid environments. Here’s how refrigeration safety protects your infusion methods:
- Store acidified herb oil at room temperature for up to six months in cool, dark cabinets
- Keep dried herb infusions refrigerated for three months maximum shelf life
- Label every bottle with preparation date and discard deadline for oil preservation
- Freeze portions in ice cube trays for two to three months of extended storage
Even shelf-stable infusions benefit from refrigeration—cold storage tips slow rancidity and preserve vibrant flavor compounds longer than room temperature ever could.
Top 8 Tools for Making Herb Infused Oils
You don’t need fancy equipment to make outstanding herb-infused oils, but the right tools make the process smoother and safer. From bottles that protect your oils from light damage to strainers that give you crystal-clear results, each piece of equipment fulfills a real purpose.
Here are eight essential tools that’ll help you create professional-quality infused oils in your own kitchen.
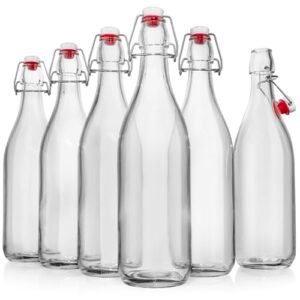
1. Mockins Glass Swing Top Bottles

You can’t transform your herb infused oil recipe without the right vessel. Mockins Glass Swing Top Bottles offer professional-grade infusion storage in 4 oz to 33 oz capacities, with lead-free glass material that won’t leach chemicals into your oil infusions.
The swing top mechanism creates airtight sealing through a metal bail and thick rubber gasket, keeping herb oil fresh while preventing oxidation.
Each set includes funnels and extra gaskets for long-term bottle durability, so you’ll master your herb infused oil creations with confidence.
| Best For | Home brewers, culinary enthusiasts, and anyone making herb-infused oils, kombucha, or homemade beverages who needs reliable airtight storage that won’t affect flavor. |
|---|---|
| Material | Glass |
| Dishwasher Safe | Not specified |
| Reusable | Yes |
| Quantity | 6 bottles |
| Food Grade | Yes |
| Primary Use | Beverage storage |
| Additional Features |
|
- Airtight swing top seal with thick rubber gaskets keeps oils and liquids fresh while preventing oxidation, with extra gaskets included for long-term use
- Lead-free, BPA-free glass won’t leach chemicals into your infusions, and the nonporous material resists staining and odor retention between uses
- Sets come with practical accessories like funnels and cleaning brushes, plus multiple capacity options from 4 oz to 33 oz to match different batch sizes
- Glass construction makes bottles prone to breakage during shipping or rough handling
- Swing top assembly can be tricky to put together correctly, especially for first-time users
- Bottles may arrive with dust, fogginess, or scratches that require extensive cleaning before first use
2. Willdan Glass Swing Top Bottles
You won’t compromise on quality when Willdan Glass Swing Top Bottles enter your herb-infused oil arsenal. These 33-ounce vessels feature heavy-duty glass durability designed to resist temperature swings and daily handling, while the swing top mechanism with silicone gasket delivers a leakproof design that locks out oxygen and preserves your herbal infused oil batches.
The transparent bottle materials let you monitor your oil infusions visually, tracking color development as rosemary or basil releases its essence.
With generous storage capacity and refrigerator compatibility, you’ll protect perishable herb oil creations while maintaining their potency and flavor intensity.
| Best For | Home cooks and DIY enthusiasts who want durable, airtight glass containers for storing herb-infused oils, homemade beverages, and other liquids while keeping an eye on clarity and color. |
|---|---|
| Material | Glass |
| Dishwasher Safe | Yes |
| Reusable | Yes |
| Quantity | 6 bottles |
| Food Grade | BPA free |
| Primary Use | Liquid storage |
| Additional Features |
|
- Heavy-duty glass construction handles temperature changes and repeated use without breaking easily
- Swing top closure with silicone gasket creates an airtight seal that keeps oxygen out and helps preserve flavors
- Clear glass lets you watch your infusions develop and check the quality of stored liquids at a glance
- Some users report seal issues, though adjusting the wire cap mechanism usually fixes the problem
- Not ideal for high-pressure storage situations
- Glass requires careful handling to avoid breakage despite the sturdy build
3. Organic Cotton Cheesecloth
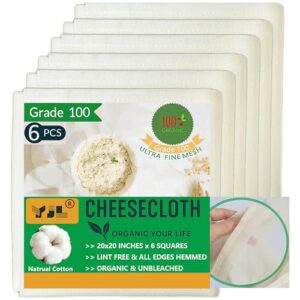
After bottling comes the delicate art of straining, where Organic Materials like grade 90 cotton weave cheesecloth become your secret weapon.
This reusable filter removes herb particles from oil infusions without imparting lint or chemical residues into your herbal infused oil. Higher cheesecloth grades deliver tighter food straining performance—fold your cloth multiple times to catch even the finest sediment from basil or rosemary herb oil.
You’ll achieve crystal-clear infused oils while the unbleached organic cotton remains biodegradable, letting you strain responsibly batch after batch.
| Best For | Home cooks and DIY enthusiasts who want to strain herb-infused oils, nut milks, or broths with a reusable, chemical-free filter that won’t leave lint or off-flavors in their final product. |
|---|---|
| Material | 100% Combed Cotton |
| Dishwasher Safe | Not specified |
| Reusable | Yes |
| Quantity | 6 cloths |
| Food Grade | 100% Organic |
| Primary Use | Straining/filtering |
| Additional Features |
|
- Grade 90 or higher weaves catch fine sediment and particles while staying breathable, and you can fold the cloth multiple times to get even clearer results
- Made from unbleached organic cotton with no toxic dyes or chemicals, so it’s safe for direct food contact and won’t add weird tastes to delicate infusions
- Reusable and compostable at end of life, which cuts down on waste compared to disposable paper filters
- Smaller cuts like 20×20 inches may not work well for straining large batches of liquid all at once
- Needs a few rinses before first use to clear out manufacturing residue, and proper care between uses (immediate rinsing, no fabric softener) to keep it lasting
- Will eventually wear out after many wash cycles, even with good care, so it’s not a forever solution
4. Stainless Steel Fine Mesh Strainers Set
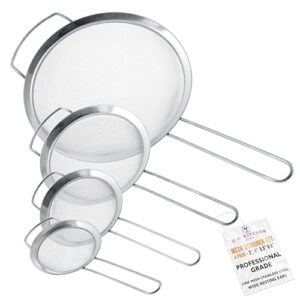
While cheesecloth manages initial filtering, a food-grade stainless steel fine mesh strainer set takes your herb-infused oil to professional clarity. Mesh size importance shows in oil clarification—tighter weave captures stubborn rosemary fragments and thyme leaves that escape looser materials.
These durable stainless steel benefits include rust-proof performance during fine filtration of hot or cold oil infusions, plus dishwasher-safe convenience for repeated batches. You’ll strain herb oil with confidence knowing the strainer material won’t leach chemicals, and nested sizes let you match container openings for splatter-free pouring every time.
| Best For | Home cooks who regularly make herb-infused oils or need to strain cooking oils multiple times without the waste and mess of disposable filters. |
|---|---|
| Material | Stainless Steel |
| Dishwasher Safe | Yes |
| Reusable | Yes |
| Quantity | 4 strainers |
| Food Grade | Yes |
| Primary Use | Sifting/straining |
| Additional Features |
|
- Food-grade stainless steel won’t rust, leach chemicals, or absorb oil like paper filters, so you get back every drop of your infusion
- Multiple nested sizes mean you can strain directly into different containers without spills, and they stack neatly in a drawer when you’re done
- Dishwasher-safe and built to last through hundreds of uses, making them way more economical than buying disposable cheesecloth or paper towels
- Some users have reported handles coming loose or breaking off at the welds, especially with heavier loads
- The mesh holes might be too fine for quick draining or too coarse for ultra-fine sediment, depending on what you’re filtering
- Shallow basket depth means you’ll need to work in smaller batches if you’re straining large quantities of oil
5. Homemade With Love Canning Labels
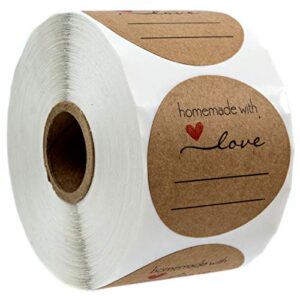
Once you’ve strained your beautifully clear herb oil, you’ll want labels that tell the story of what’s inside—batch date, herb blend, and that personal touch reminding everyone this came from your kitchen, not a store shelf.
SBLABELS’ 2″ kraft rounds bring product branding to your homemade food products with “homemade with love” printed above two lines for ingredients and dates. Their permanent adhesive transforms gift packaging for infused oils into something truly special, turning kitchen recipes into homemade gifts worthy of any artisan market.
Canning supplies that enhance herb oil recipes from practical to unforgettable.
| Best For | Home canners, small food businesses, and anyone who makes infused oils, jams, or baked goods and wants to add a warm, handmade touch to their packaging. |
|---|---|
| Material | Brown Kraft Paper |
| Dishwasher Safe | N/A |
| Reusable | No |
| Quantity | 500 labels |
| Food Grade | Yes |
| Primary Use | Product labeling |
| Additional Features |
|
- Pre-printed “homemade with love” design saves time while still looking personal and charming on jars and gift packaging
- Two blank lines give you space to jot down important details like batch dates, ingredients, or herb blends
- Permanent adhesive means your labels stay put on glass jars, boxes, and bottles without peeling off
- Once you stick them on, they’re staying—the permanent adhesive makes them tough to remove without leaving residue or damage
- You’re locked into one design and color scheme with no way to customize the text or swap the heart graphic
- No details on whether these labels hold up to moisture, heat, or refrigeration, which matters for oils and canned goods
6. Stainless Steel Funnel Set
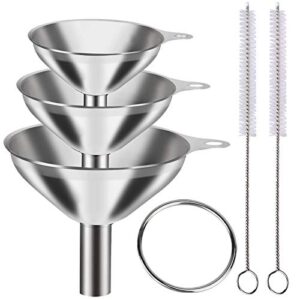
Transferring your precious herb infused oil into bottles without spilling a drop requires the right kitchen tools. A stainless steel funnel set with multiple sizes accommodates every container, from narrow-neck cruets to wide-mouth jars, turning oil transfer from a messy gamble into controlled precision.
Look for food-grade 304 stainless steel with built-in strainers that catch herb bits during bottling—this funnel material won’t corrode, absorb flavors, or leach chemicals into your infused oils. The smallest funnels excel at filling those elegant bottles that make herb oil infusions feel truly artisan.
| Best For | Home cooks who make herb-infused oils and want mess-free bottling with different sized funnels for various container types. |
|---|---|
| Material | 304 Stainless Steel |
| Dishwasher Safe | Yes |
| Reusable | Yes |
| Quantity | 3 funnels + 2 brushes |
| Food Grade | Food-grade 304 |
| Primary Use | Filling containers |
| Additional Features |
|
- Food-grade stainless steel won’t rust, absorb flavors, or leach chemicals into your oils like plastic alternatives
- Built-in strainers catch herb bits during transfer so you get clearer finished oils without extra filtering steps
- Multiple sizes handle everything from tiny oil cruets to wide-mouth jars, plus they’re dishwasher safe with cleaning brushes included
- Funnels run smaller than expected and don’t stack together, so storage requires the included key ring
- The narrow spouts can slow down pouring with thicker oils and may clog if herb particles are too large
- A small welding ridge inside the spout can sometimes trap fine powders or sediment during transfer
7. Digital Kitchen Food Scale
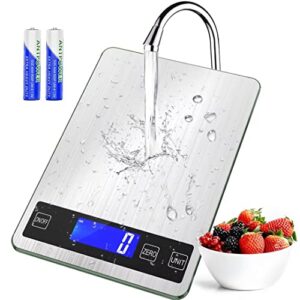
Precision transforms your herb-infused oil from guesswork into kitchen science. A digital kitchen food scale measuring in 1-gram increments gives you measurement accuracy that volume cups can’t match—weigh your herbs and carrier oils exactly, then replicate winning batches flawlessly.
Look for food scales with tare functions that zero out your bottle’s weight, plus easy-to-clean stainless steel platforms that handle oil spills without fuss. Regular scale calibration maintains digital weighing precision, turning this kitchen essential into your most trusted ally for safe food preparation and repeatable cooking techniques.
| Best For | Home cooks and serious bakers who want precise measurements for recipes, portion control, and creating consistent herb-infused oils every time. |
|---|---|
| Material | Glass & Stainless Steel |
| Dishwasher Safe | Not specified |
| Reusable | Yes |
| Quantity | 1 scale |
| Food Grade | Food safe |
| Primary Use | Weight measurement |
| Additional Features |
|
- Measures up to 22 lbs with 1-gram precision and includes a tare function that zeros out container weight, making it easy to weigh ingredients directly in your mixing bowl
- Converts between 6 different units (kg, g, lb, oz, fl.oz, ml) so you can follow any recipe without doing math in your head
- Tempered glass and stainless steel construction cleans up easily after oil spills and looks sleek enough to leave on your counter
- The 22 lb maximum capacity might be limiting if you regularly weigh very large batches or heavy pots
- Battery life varies with use, and you’ll need to replace them periodically unlike plug-in models
- May need occasional calibration to maintain accuracy, especially if you’re weighing very small amounts of expensive ingredients like saffron or truffles
8. Stainless Steel Measuring Cups Set
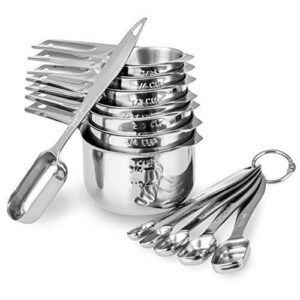
Volumetric consistency makes or breaks your herb-infused oil ratios—that’s where stainless steel measuring cups deliver superior kitchen tool durability and accurate measurements every time. Unlike plastic alternatives that warp or glass that shatters, these measuring cup materials resist corrosion from olive oil and cooking oils while maintaining their shape through thousands of uses.
Choose sets with engraved markings that won’t fade, nested storage solutions that save counter space, and food-grade stainless steel benefits, including BPA-free construction. Your herb gardening efforts deserve tools that measure herb oil ingredients with professional precision.
| Best For | Home cooks and herbalists who want durable, non-reactive tools for measuring oils and dried herbs with precision that lasts through years of daily use. |
|---|---|
| Material | 18/8 Stainless Steel |
| Dishwasher Safe | Yes |
| Reusable | Yes |
| Quantity | 7 cups + 6 spoons |
| Food Grade | 18/8 grade |
| Primary Use | Recipe measurement |
| Additional Features |
|
- 18/8 stainless steel won’t rust, warp, or leach chemicals into your oils—unlike plastic that degrades or glass that breaks
- Engraved measurements stay readable forever, so you’ll get accurate ratios even after thousands of dishwasher cycles
- Nested design with ring storage keeps 13 pieces organized in one compact spot on your counter or in a drawer
- Missing a 1/2 tablespoon spoon, which might force you to eyeball or double-measure for some recipes
- Etched markings can be tough to read in low light or for anyone with vision challenges
- Satin finish shows water spots easily if you don’t dry them right after washing
Frequently Asked Questions (FAQs)
Can you reuse herbs for multiple oil batches?
No, you should never reuse herbs for multiple oil batches. Spent material loses flavor compounds, increases botulism prevention risks, and invites oil spoilage factors through microbial growth in the anaerobic environment.
Whats the ideal herb to oil ratio?
For dried herbs, use 1 part herb to 5 parts oil by weight to capture bold flavor profiles.
Fresh herbs need 1 part herb to 3 parts oil, compensating for moisture while maximizing herb extraction and infusion times.
How do you fix cloudy infused oil?
When your batch looks less than crystal-clear, first check for spoilage signs—off smells or visible mold mean it’s time to let go.
If safe, restrain through coffee filters, let particles settle overnight, then gently decant the clarified top layer.
Can frozen herbs work for oil infusion?
Yes, frozen herbs can infuse oil for cooking, but they carry the same botulism risk as fresh herbs.
Keep frozen herb oil refrigerated short-term or use immediately in hot dishes for safety.
Why does my herb oil taste bitter?
If your herb oil tastes bitter, you’ve likely pulled harsh compounds from the herbs themselves or your base oil—especially extra virgin olive oil—through extended infusion time, excessive heat, or rough handling during oil extraction.
Can you reuse herbs for multiple infusions?
Reusing herbs for multiple oil infusions isn’t recommended due to flavor degradation, botulism risk, and extraction limits. Fresh herbs lose most beneficial compounds in the first infusion, making subsequent batches weaker and potentially unsafe for culinary use.
Do herb infused oils need to be filtered twice?
One pass through cheesecloth removes large herb particles, but a second filtration using a coffee filter achieves crystal-clear oil clarity, smoother filtered texture, and reduced sediment—though double straining remains optional for casual home infusions.
What temperature kills botulism spores in oils?
Unfortunately, home kitchens can’t reach the 240°F to 250°F (115°C to 121°C) required for spore inactivation in oils.
That’s why acidification and refrigeration are your real botulism prevention allies for herb-infused oil safety.
Can I mix different herbs in one infusion?
You can combine basil, oregano, and rosemary in infused oil after acidifying them together for twenty-four hours in a citric acid solution.
However, mixing garlic requires different ratios, so keep it separate for safety.
How do you know when infusion is complete?
Your herb oil is ready when the aroma strength noticeably intensifies and the flavor profile stabilizes—usually after 2 to 6 weeks for cold infusion or 30 minutes to 12 hours using heat.
Conclusion
Picture Sarah’s kitchen last August: three pounds of basil wilting fast, panic setting in. She made her first garden herb infused oil recipe using the acidifying method, bottling twelve jars that lasted through winter. Each drizzle brought back summer’s peak flavor without fear.
You’ve got the same power now—safe techniques, quality tools, proper storage knowledge. Your abundant harvest won’t go to waste; it’ll transform into liquid gold that elevates every dish you touch.