This site is supported by our readers. We may earn a commission, at no cost to you, if you purchase through links.

Most gardeners wait until they see bare soil and empty beds before they think about spring flowers. By then, the window for fall bulbs has already closed.
Tulips, daffodils, and hyacinths need to go in the ground weeks before winter arrives—not after it knocks on the door. The timing hinges on one thing: soil temperature.
When it drops to 50–60 °F at a 4–6 inch depth, roots can establish without triggering early top growth. Get that window right, and your bulbs spend all winter quietly building strength. Miss it, and spring tells the story.
Table Of Contents
- Key Takeaways
- Best Time to Plant Fall Bulbs
- Check Soil Temperature First
- Match Timing to Your Zone
- Count Back From First Frost
- Buy and Store Bulbs Early
- Prepare Soil Before Planting
- Plant Bulbs The Right Way
- Adjust for Warm Climate Planting
- Care for Bulbs After Planting
- Top 5 Bulb Planting Essentials
- Frequently Asked Questions (FAQs)
- Can you plant fall bulbs too early?
- Can I still plant bulbs in October?
- What should you not plant in the fall?
- When should fall bulbs be planted?
- Can I put bulbs in the ground now?
- What month do you plant fall bulbs?
- What is the rule for planting bulbs?
- Can I still plant bulbs in November?
- What bulbs should you plant in the fall?
- How to plant winter flower bulbs in the ground?
- Conclusion
Key Takeaways
- soil temperature at 4–6 inches deep is your real planting signal — wait for 50–60°F, not a date on the calendar.
- Bulbs need 6–8 weeks before the ground freezes to build the root system that powers spring blooms.
- Your USDA hardiness zone sets the range, but your local first frost date sets the deadline — count back six weeks from there.
- In warm climates (zones 8–11), refrigerate tulips and hyacinths 10–14 weeks before planting to replace the cold they won’t get naturally.
Best Time to Plant Fall Bulbs

Getting the timing right is the single biggest factor in whether your bulbs bloom or bust come spring. Plant too early, and warm soil can rot them; wait too long, and the ground freezes before roots can form.
For a full breakdown of soil temps and frost windows by region, this autumn bulb planting guide makes the timing decision a lot easier.
Here’s what you need to know to nail the planting window.
Why Fall Planting Supports Spring Blooms
Fall is when the real work happens underground. Planting before the first fall frost gives bulbs time to do four essential things:
- Root Development — roots anchor and absorb nutrients before dormancy
- Cold Stratification — 12–16 cold weeks trigger flowering hormones
- Moisture Retention — cool soil holds consistent moisture for root hairs
- Nutrient Accumulation — phosphorus and potassium fuel Early Shoot Initiation in spring
Ideal Planting Window for Most Bulbs
roots are forming, your planting calendar becomes your best tool. Most bulbs go in two to four weeks before your first fall frost, when soil temperature sits between 50 and 60°F.
regional weather trends and hardiness zones shift those frost dates, so check local forecasts.
soil moisture stays consistent in that cool window, giving bulbs the stable environment they need to settle into dormancy.
Why Bulbs Need 6–8 Weeks to Root
Think of a bulb like a battery — it stores energy, but it still needs to build a system to use it.
A bulb stores energy like a battery, but still needs roots to put that power to work
That 6–8 week window before the ground freezes drives root anchoring, moisture uptake, and soil microbial activity underground. Ensuring proper pre‑plant storage(https://antlercountry.com/fall-bulb-guide-planting-for-spring-and-digging-up-and-storing/) helps prevent mold and keeps bulbs healthy.
- Roots regulate energy allocation before spring growth begins
- Soil temperature at planting depth triggers hormonal regulation
- Root development follows planting depth guidelines for stability
- Cool soil — around 50–60°F — hits the right temperature thresholds for planting
Signs It is Too Early or Too Late
Roots need cool, moist soil — not a sauna or a swamp.
If daytime heat stays above 50°F or the ground feels soggy after rain, hold off.
An early warm spell tricks bulbs into skipping root development.
Prolonged drought is just as problematic.
Watch for late frost signs and check soil temperature at 4–6 inches deep.
First hard frost dates are your real deadline.
Check Soil Temperature First

Before you grab your trowel, check one thing: the soil temperature. Planting into warm soil is one of the most common mistakes gardeners make, and it quietly ruins your spring display before it even begins.
Here’s what you need to know to get it right.
Target Soil Temperature of 50–60 °F
Your target window is 50–60°F, measured 4–6 inches deep with a soil thermometer or digital soil probe. Once soil temperatures drop below 60°F consistently, roots can establish without stress.
Check several spots to account for microclimate variability — a sunny corner reads differently than a shaded bed. Early morning readings, around 6–8 a.m., give you the most reliable baseline for timing your planting.
Why Bulbs Struggle in Warm Soil
Warm soil is basically working against you. When temperatures stay above 60°F, root inhibition kicks in fast — fine root growth can slow by up to 60 percent.
Fungal proliferation follows close behind, with Botrytis and Fusarium thriving in that heat. Moisture volatility makes watering harder to manage, and nutrient imbalance can burn tender roots.
Worst of all, premature dormancy break tricks bulbs into sprouting too soon.
How to Measure Soil at Planting Depth
A good soil thermometer takes the guesswork out of timing. Push a stainless steel probe — ideally 5 inches for Stainless Steel Durability and proper Probe Length Selection — to your bulb’s base for accurate planting depth guidelines.
- Early Morning Readings between 6–8 a.m. for consistency
- Bi‑Metal Dial Accuracy for instant, battery‑free results
- Multi‑Location Sampling across sun and shade spots
- soil texture and soil drainage while you’re measuring
When Tulips Should Wait for Cooler Soil
Tulips are picky about temperature — and they’re worth listening to. If your soil hasn’t dropped below 60°F, hold off.
Nighttime Cooling Trends are your best Delayed Planting Signals. Watch for Temperature Threshold Alerts across Early Autumn Weather patterns in your hardiness zones.
Once soil temperatures drop below 60°F consistently, your bulb chilling period can begin on solid footing.
Match Timing to Your Zone

Not every garden follows the same calendar — your zip code matters more than the month. USDA hardiness zones give you a reliable starting point for timing your bulb planting.
Here’s how to match your schedule to your zone.
Earlier Planting in Zones 4–5
In zones 4–5, fall planting can’t wait. Your first hard frost often hits by mid-October, so September is your real deadline. Think of it as a race against frozen ground — bulbs need 6–8 weeks for early root development before winter locks the soil.
- Start microclimate mapping your yard now
- Apply soil pH adjustment before bulbs go in
- Use a planting depth guide for each bulb variety timing
- Choose elevated bed placement for better drainage in cold zones
Hardiness zones 4–5 demand early soil preparation — don’t delay.
Mid-season Planting in Zones 6–8
If you garden in zones 6–8, fall bulb planting is more forgiving — but timing still matters.
Zone 6 soil cooling happens faster, so late October planting works well.
Zone 7 and 8 gardeners often push into November.
Microclimate variability means two yards in the same zone can differ by weeks.
Track your soil temperature, not just the calendar, and rotate bulb locations annually for healthier blooms.
Late Planting in Zones 9–10
Warmer winters in zones 9–10 shift your window to November through early January. Your goal is soil between 50–60°F — use soil moisture sensors and nighttime temperature monitoring to track conditions accurately.
Pre-chill tulips and hyacinths 10–14 weeks beforehand. Microclimate site selection matters here; a north-facing bed stays cooler longer. Row cover utilization and light mulching protect bulbs during surprise cold snaps.
Using USDA Zones With Local Weather
Your USDA Plant Hardiness Zone is a starting point, not the final word. Frost Date Variability means two gardens in the same zone can need different planting dates. Urban Heat Islands delay soil cooling, while Elevation Effects speed it up. Zone Boundary Shifts from recent climate data add another wrinkle. Always cross‑check with a Frost Dates Calculator for your exact area.
- Your first frost date beats any zone map for real timing
- Microclimate Adjustments can shift your window by weeks
- Regional planting guidelines based on hardiness zones give useful ranges, not exact dates
- Hardiness zone and frost date considerations work best together
Count Back From First Frost

Your first frost date is the most reliable clock you have for fall bulb planting. Count back six weeks from that date, and you’ve found your sweet spot.
Here’s exactly how to use that window — and what to do when timing doesn’t go as planned.
Planting Six Weeks Before Hard Frost
Count back six weeks from your area’s average hard frost date — that’s your planting target. Frost prediction tools like the Old Farmer’s Almanac or Weather.com make finding those frost dates easy.
This window gives bulbs enough time for solid root development before the ground hardens. Microclimate adjustments matter too; a sheltered south-facing bed might give you an extra week of wiggle room.
Difference Between Frost and Ground Freeze
Frost and a ground freeze aren’t the same thing.
Frost forms when air temperature influences drops surface temps to 32°F — it harms leaves and tender shoots. Frost damage symptoms appear overnight; ground freezes take days.
Ground ice penetration goes deeper, freezing the soil itself. soil temperatures drop below 60°F steadily, roots get to work. A ground freeze stops that entirely.
Using Local Frost Calendars Correctly
Local frost calendars are useful tools — but only if you read them right. Most are built from Historical Climate Normals spanning 1981–2010, so they reflect averages, not guarantees.
Use them this way:
- Find your 50% Frost Probability Level date, not just one cutoff.
- Apply Microclimate Adjustments for low spots, slopes, or water nearby.
- Combine Local Weather Integration with Hardiness Zone data for a precise seasonal bulb planting schedule.
Soil temperatures drop below 60°F at different times across the same county.
What to Do After The First Frost
Once the first frost hits, your job isn’t done — it’s just shifting gears. Roots keep forming in cool soil, so act quickly to protect what’s underground.
| Task | Timing | Details |
|---|---|---|
| Ice Crust Removal | After each freeze | Rinse gently to restore airflow |
| Snow Cover Management | All winter | 2–3 inches insulate root zone temperature |
| Rodent Netting | Before ground freezes | Lay flat over bed |
| Mulching benefits | Immediately post-frost | Apply 2–4 inches organic mulch |
| Watering schedule | Warm spells only | Stop once ground freezes solid |
Buy and Store Bulbs Early

Getting bulbs early gives you the best pick before shelves empty out.
How store them between purchase and planting day matters more than most gardeners expect.
Here’s what you need to know about buying and storing bulbs the right way.
When to Order Bulbs for Fall
Don’t wait until fall to start thinking about bulbs. Catalog release timing usually kicks off in late spring, and the best varieties disappear fast.
Ordering early unlocks early supplier discounts, better bulk order benefits, and a fuller variety availability forecast.
Many suppliers follow a pre-order shipping schedule by zone, delivering bulbs right when your soil is ready to receive them.
How to Choose Firm, Healthy Bulbs
A bad bulb wastes a whole season. Before you store your bulbs or drop them in the ground, run through these five quick checks:
- Bulb Weight Check — Healthy bulbs feel heavy for their size. Light means dried out.
- Texture Evaluation — Firm is good. Soft or spongy means rot.
- Skin Integrity — Look for dry, intact outer layers. Cuts and broken scales invite disease.
- Odor Assessment — A sour or rotten smell signals internal decay. Discard it immediately.
- Mold Detection — Surface mold beyond a small patch is a red flag.
Choosing the right fall bulbs for your climate starts here — buy at the right time, pick only plump, firm ones, and your spring display practically takes care of itself.
Short-term Storage Before Planting
Store your bulbs in a paper lunch bag inside a cool, dark spot — ideally between 40–60°F.
Good air circulation keeps mold from sneaking in.
Use labeling tags on your packaging materials so you’re not guessing on planting day.
Humidity monitoring matters too; if condensation builds up, air them out.
Don’t wait longer than six weeks, or viability drops fast.
Keeping Bulbs Away From Fruit
Apples, bananas, and tomatoes are silent saboteurs in your storage space. These common ethylene sources release a gas that damages tulip bulbs — causing poor rooting, shorter stems, and flower abortion.
Keep bulbs in a fruit-free zone with good ventilation strategies to prevent buildup.
Storage separation is your simplest defense. For serious setups, ethylene scrubbers using potassium permanganate sachets neutralize the threat completely.
Prepare Soil Before Planting

Good soil is the real secret behind a strong bloom season.
Before you drop a single bulb in the ground, a little prep work makes all the difference.
Here’s what to focus on first.
Choosing a Sunny, Well-drained Site
Your site choice sets the tone for everything that follows. Most fall bulbs need at least 6 hours of sunlight daily, and a gentle site slope helps water move away from bulbs naturally.
Here’s what makes a location work:
- Sunlight Hours – Aim for full sunlight exposure, especially morning sun
- Soil Porosity – Loose, sandy loam drains within 24 hours
- Site Slope – Even a slight grade prevents pooling
- Wind Shelter – Reduces moisture loss from the root zone aeration layer
- Soil Drainage Improvement – Avoid low spots where water collects after rain
Loosening Soil 12–18 Inches Deep
Once your site is set, it’s time to loosen the soil 12–18 inches deep.
Use the Broadfork Technique — work in 6‑inch increments for Incremental Soil Loosening without breaking beneficial structure.
Compaction Prevention starts here.
Sandy loam responds well; clay needs Soil Texture Adjustment.
| Soil Type | Loosening Ease | Key Fix |
|---|---|---|
| Sandy Loam | Easy | Light amendment |
| Clay | Hard | Add coarse grit |
| Rocky | Moderate | Remove large stones |
Good soil aeration enhances Moisture Retention Strategies naturally.
Adding Compost for Better Root Growth
Now that soil is loose, it’s time to feed it.
Mix compost through the full 12–18 inches you just loosened — that’s your Compost Placement Strategy. This organic matter drives Microbial Activity Boost and Soil Structure Enhancement, giving roots room to breathe and spread.
Aim for a balanced blend; too much nitrogen pushes leaves over roots. Good Moisture Retention follows naturally.
Improving Drainage to Prevent Rot
Good drainage is the difference between blooms and rot. Even rich compost won’t save bulbs sitting in soggy ground.
- Mix in coarse sand or fine grit to open up heavy clay.
- Add gypsum at roughly 50–100 grams per square meter for better structure without shifting pH.
- Layer gravel substrate beneath beds for steady water movement.
- Use raised bed design or perforated drainage pipes in problem spots.
Biochar water infiltration improves with even one to two pounds per 100 square feet. Well-drained soil simply keeps bulbs alive.
Plant Bulbs The Right Way
Getting the basics right at planting time makes all the difference between a great spring show and a disappointing one. How deep you go, which end faces up, and what you do right after planting all matter more than most people realize.
Here’s exactly what to do, step by step.
Planting Pointy End Up

Most bulbs tell you exactly where to plant them — just look for the pointy part. That pointed tip is where the shoot emerges first, so it always faces up.
The flat, rough side is the root plate, where roots develop downward.
Identifying bulb top orientation takes seconds, but matters.
Upside-down planting effects are minor — bulbs usually self-correct — but correct placement gives shoots a faster, straighter path up.
Depth Rule: Three Times Bulb Height

One simple rule covers most bulbs: plant three times as deep as the bulb is tall. Measurement techniques matter here — measure from base to tip, then multiply by three. Height variability across species means depth ranges from 3 to 9 inches.
Follow these bulb planting depth and spacing guidelines:
- Measure each bulb individually with a ruler
- Apply soil adjustments in clay or sandy beds — go slightly shallower in heavy clay
- Use correct bulb planting depth for frost heave resistance in cold zones
- Deeper placement helps root zone cooling in warm climates
- Press soil firmly after planting to secure position
Planting depth rule keeps every bulb protected.
Spacing Bulbs for Airflow and Bloom

Spacing matters just as much as depth. Give each bulb enough room for air to move freely — this is your first line of disease prevention.
Tight clusters trap moisture and invite fungal problems quickly.
| Bulb Type | Spacing Guidelines |
|---|---|
| Tulips | 4–6 inches apart |
| Daffodils | 6 inches apart |
| Hyacinths | 4–6 inches apart |
| Crocuses | 4 inches apart |
| Alliums | 12 inches apart |
Follow these bulb planting depth and spacing guidelines for both strong airflow spacing and peak bloom density.
Watering Deeply After Planting

After planting, give everything a deep soak right away. Water slowly — a hose, watering can, or drip system all work — until moisture reaches the full planting depth. A bulb set 6 inches down needs water at 6 inches.
This soil compaction relief removes air pockets and locks roots into firm contact with the soil. One thorough session beats daily sprinkling every time.
Mulching to Reduce Frost Heave

Think of mulch as your bulbs’ winter blanket. After watering, spread 2–3 inches of pine needles, shredded bark, or straw over the bed.
These mulch material types all offer solid mulch insulation benefits — stabilizing soil temperature and reducing frost heave from freeze-thaw cycles.
Apply it before the first hard frost. Avoid piling it against stems, which invites rot.
Adjust for Warm Climate Planting

Gardening in a warm climate doesn’t mean giving up on tulips or hyacinths — it just means playing by different rules. Your winters aren’t cold enough to do the work naturally, so you have to step in.
Here’s exactly what warm-climate gardeners need to know.
When Southern Gardeners Should Plant
Southern regions — zones 8 to 11 — run on a different clock. Coastal frost lag means soil temperatures drop below 60°F weeks later than the calendar suggests. Use a soil cooling check and regional frost calendar to know when you’re actually ready.
Watch for these timing cues:
- Nighttime temperature cue: wait for consistent 40–50°F nights
- Soil at planting depth reads below 60°F
- Late-season pre-chill window opens in November or December
- Timing the planting of bulbs before the first frost means acting fast once soil cools
Pre-chilling Tulips and Hyacinths
Once the soil cools, tulips and hyacinths need a push. In warm zones, your refrigerator becomes the winter they never get.
This cold stratification — a pre-chill in Ventilated Storage Bags at 34–48°F — mimics natural dormancy. Watch Refrigeration Humidity (keep it 60–70%), monitor bulb storage temperature daily, and maintain an Ethylene-Free Environment away from fruit.
| Factor | Tulips | Hyacinths |
|---|---|---|
| Temperature Chilling Period | 9–12 weeks | 12–14 weeks |
| Bulb Storage Temperature | 35–45°F | 34–45°F |
| Acclimation Period Before Planting | 2 hours | 2 hours |
How Long Bulbs Need in Cold Storage
Each species has its own chilling needs — and getting the hours right matters. Daffodils do well with 8–12 weeks in the refrigerator, while tulips need a full 12–14 weeks of cold stratification.
Keep your storage temperature range between 34–40°F. Ideal humidity sits around 65–75%.
Do your bulb viability monitoring weekly. Before planting, let bulbs warm up gradually — that pre-planting warm-up prevents thermal shock.
Best Planting Timing for Very Mild Winters
Once your bulbs have finished their cold storage, timing the planting of bulbs before the first frost becomes your next puzzle — especially in very mild winters.
Watch for nighttime air cooling into the low 50s°F for two straight weeks.
That’s your early frost indicator.
In very warm climates, soil temperatures drop below 60°F later, sometimes not until December.
Microclimate monitoring matters here — a south-facing wall delays safe planting by weeks.
Care for Bulbs After Planting

Getting your bulbs in the ground is only half the job. What happens next — through winter, early spring, and beyond — shapes how well they actually bloom.
Here’s what to stay on top of after planting.
Monitoring Moisture Without Overwatering
Think of your bulbs like a wrung-out sponge — damp, not dripping. Slide a moisture meter into the root zone; you’re aiming for 40–60% moisture.
For smart drip irrigation timing, water deeply every 7–10 days rather than daily.
A 2–3 inch mulch layer maintains mulch moisture balance naturally.
Skip watering entirely when rainfall hits 0.5 inch in 24 hours.
Protecting Bulbs From Squirrels and Deer
Wildlife can undo a season’s work overnight. Protect your beds with layered defenses:
- Physical Barriers — Use squirrel-proof cages or hardware cloth buried 8 inches deep.
- Repellent Sprays — Rotate Deer Off and Critter Ridder, Deer and Rabbit Repellent monthly; reapply after rain.
- Mulch Deterrents — Pea gravel edging disrupts digging.
- Companion Planting — Daffodils and alliums naturally repel browsers.
Winter Mulch and Cold-weather Protection
Once the ground starts to cool, timing your mulch application matters more than most gardeners realize. Wait until after the first hard frost — early mulching traps warmth and delays winter dormancy.
Then lay 2–3 inches of pine straw or shredded bark over the bed. This organic mulch buffers soil temperature, prevents frost heave, and keeps freeze-thaw cycles from pushing bulbs upward.
Spring Feeding After Shoots Emerge
Once shoots push through the soil, it’s time to fertilize. Apply a balanced NPK ratio fertilizer — something like 10-10-10 — right after emergence.
Light feeding timing matters here: a second application 6–8 weeks later promotes steady growth if foliage looks pale. Always water deeply afterward for proper root zone fertilization, and never apply to dry soil — salt burn prevention depends on it.
Letting Foliage Die Back Naturally
After blooms fade, resist the urge to cut back the foliage. Those green leaves are doing critical work — nutrient reallocation from leaves to the bulb fuels next year’s flowers.
Let them yellow fully, which takes 6–12 weeks. Premature removal weakens bulbs noticeably.
For disease prevention and moisture management, keep mulch in place and avoid overwatering.
Seasonal aesthetics improve when you simply let nature finish the job.
Top 5 Bulb Planting Essentials
Getting the right tools in hand before you start makes everything easier. A few well-chosen products can handle the trickiest parts — from checking soil temperature to keeping deer out of your garden.
Here are five essentials worth having before you plant your first bulb.
1. AcuRite Stainless Steel Soil Thermometer
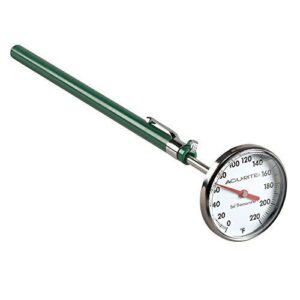
Soil temperature is the single most important signal before you plant. The AcuRite Stainless Steel Soil Thermometer gives you that reading in under 30 seconds.
Push its 7-inch stainless steel probe about 4–6 inches deep and check the dial — you’re aiming for 50–60 °F. No batteries, no apps, no guesswork.
It reads from 0 to 220 °F, so it works across every task in your garden.
At around $11, it’s one of the smartest small investments you’ll make this fall.
| Best For | Home gardeners and hobbyist growers who want a simple, no-fuss way to know exactly when their soil is ready to plant. |
|---|---|
| Price | $15.49 |
| Primary Use | Soil temperature measurement |
| Form Factor | Physical tool |
| Coverage | Single probe use |
| Origin | USA brand |
| Warranty/Support | 1-year limited |
| Additional Features |
|
- Reads in under 30 seconds with no batteries or setup — just push it in and check the dial
- Stainless steel probe is durable and easy to wipe clean between uses
- Calibration nut lets you fine-tune accuracy if the readings ever drift
- The calibration adjustment has a limited range, so fixing it at one temperature can throw off readings at another
- A few users have reported loose adjustment nuts or units that arrived non-functional
- Not built for continuous immersion — leaving the probe submerged for long periods can let moisture in
2. Espoma Organic Bulb Tone Fertilizer
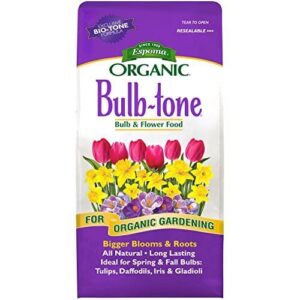
Your bulbs are only as strong as the soil feeding them. Espoma Organic Bulb-Tone gives you a 3-5-3 NPK formula with 6% calcium and a Bio-Tone microbial blend — everything a bulb needs to build deep roots before winter sets in.
Mix about 1½ teaspoons per bulb right into the planting hole. It’s certified organic, slow-release, and works for tulips, daffodils, hyacinths, lilies, and more.
No synthetic fillers, no complicated mixing — just pour and plant.
| Best For | Home gardeners who want an easy, organic way to feed bulbs and get bigger, healthier blooms without dealing with synthetic chemicals. |
|---|---|
| Price | $12.99 |
| Primary Use | Bulb fertilization |
| Form Factor | Granular product |
| Coverage | 4 lb per 60 sq ft |
| Origin | Made in USA |
| Warranty/Support | Manufacturer backed |
| Additional Features |
|
- Certified organic with a Bio-Tone microbial blend that helps bulbs build stronger roots
- Simple to use — just 1½ tsp per bulb, no mixing needed
- Works for a wide range of bulbs: tulips, daffodils, lilies, dahlias, and more
- Costs more than most conventional bulb fertilizers
- Can have a strong odor, especially if the bag leaks during shipping
- Only comes in granular form, so it won’t work if you need a liquid fertilizer
3. Plantskydd Deer Repellent Spray
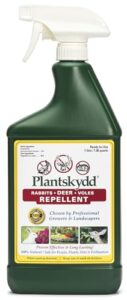
Good fertilizer gets bulbs rooted.
A hungry deer undoes all that work in one night.
Plantskydd Deer Repellent Spray uses dried bloodmeal to trigger a predator-threat response in deer, rabbits, voles, and squirrels.
One 32 oz bottle covers up to 100 plants.
Spray it on foliage, or dip bulbs before planting for early protection.
It’s rain-fast within 24 hours and holds for weeks.
At $27.95, it’s cheap insurance for a whole season’s worth of bulbs.
| Best For | Gardeners and homeowners dealing with deer, rabbits, or other plant-munching wildlife who want reliable, season-long protection for flowers, shrubs, trees, and bulbs. |
|---|---|
| Price | $27.95 |
| Primary Use | Animal repellent spray |
| Form Factor | Liquid spray |
| Coverage | Up to 100 plants |
| Origin | Made in USA |
| Warranty/Support | 90-day shelf life |
| Additional Features |
|
- Covers up to 100 plants per bottle — solid value at $27.95 for a full growing season
- Works on a wide range of herbivores, from deer and elk down to voles and squirrels
- Can be used as a pre-plant bulb dip, so protection starts before anything even breaks the soil
- The smell is genuinely strong and can linger for days — keep windows closed after spraying
- The sprayer is prone to clogging and leaking, which gets messy fast
- Once opened, you’ve got 90 days to use it or lose it
4. Safer Garden Deer Rabbit Repellent Spray
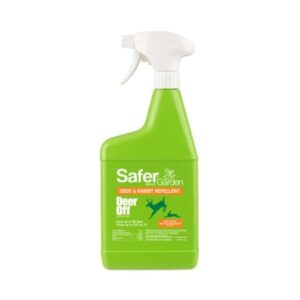
Plantskydd works hard, but here’s a budget-friendly backup worth keeping on hand. Safer Garden Deer & Rabbit Repellent Spray hits animals with a one-two punch — putrescent egg smell triggers alarm, while spicy pepper and garlic taste finish the job.
One 32 oz bottle covers 500 square feet and stays effective for up to 90 days. At $8.57, that’s real value.
It dries odorless to you, so neighbors won’t notice. Apply it on calm days — wind reduces coverage fast.
| Best For | Gardeners on a budget who want an easy, spray-and-go solution to protect ornamental plants from deer, rabbits, and squirrels without any lingering smell. |
|---|---|
| Price | $8.57 |
| Primary Use | Animal repellent spray |
| Form Factor | Liquid spray |
| Coverage | Up to 500 sq ft |
| Origin | USA brand |
| Warranty/Support | Seasonal protection |
| Additional Features |
|
- Dual-action formula hits animals with both scent and taste, making it harder to ignore
- Dries odorless to humans, so you can use it in your yard without bothering neighbors
- At $8.57 for 500 sq ft of coverage, it’s one of the more affordable options out there
- Results with rabbits can be hit or miss — some users see little difference
- May need reapplication more often than the 90-day claim suggests, especially after heavy rain
- Not safe for edible plants, and the packaging has been known to leak during shipping
5. Organic Vegetable Gardening Guide

Protecting your bulbs is one piece of the puzzle. Growing everything around them is another.
Joe Lamp’l’s Organic Vegetable Gardening Guide brings that bigger picture into focus. At $14.21 for 256 pages, it covers soil health, crop rotation, raised beds, and pest control without chemicals.
You’ll find profiles for 40 crops plus layout strategies for small spaces.
If you’re already gardening intentionally, this book fits naturally into that mindset.
| Best For | Home gardeners of any level who want to grow organic vegetables — especially those working with small spaces like raised beds, containers, or a compact backyard. |
|---|---|
| Price | $14.21 |
| Primary Use | Gardening reference guide |
| Form Factor | Printed book |
| Coverage | 256 pages of content |
| Origin | USA publisher |
| Warranty/Support | Award-winning content |
| Additional Features |
|
- Covers 40 crop profiles plus layout and rotation strategies, so you’re not piecing advice together from five different sources.
- Written by Joe Lamp’l, who’s spent years talking to expert growers — the advice feels tested, not theoretical.
- Works whether you’re gardening in the ground, a raised bed, or grow bags on a balcony.
- No digital version, so you can’t search it or pull it up on your phone mid-garden.
- Strictly organic and chemical-free — if you’re open to conventional methods, some sections won’t apply to you.
- At 256 pages, it’s a real read; casual beginners looking for a quick-start cheat sheet might feel a little overwhelmed at first.
Frequently Asked Questions (FAQs)
Can you plant fall bulbs too early?
Yes, and it’s a trap many enthusiastic gardeners fall into. Planting while soil stays above 60 °F delays rooting, invites rot, and can trigger premature sprouting before winter even arrives.
Can I still plant bulbs in October?
October is one of the best months for planting most spring-blooming bulbs.
Tulips and daffodils root well this time of year, and soil temperatures are usually right in the sweet spot.
What should you not plant in the fall?
Skip warm-weather annuals like marigolds and zinnias — they won’t survive frost. Don’t plant tropical shrubs, summer perennials, or spring bulbs in soil still above 65°F.
Heat delays rooting and kills bloom quality.
When should fall bulbs be planted?
Plant fall bulbs when soil temperatures drop to 50–60°F, usually late September through November. Roots need 6–8 weeks before the ground freezes to support strong spring blooms.
Can I put bulbs in the ground now?
It depends on your soil temperature. Stick a thermometer 4–6 inches deep. If it reads below 60°F, you’re good to go. Above that, wait a week and check again.
What month do you plant fall bulbs?
For most gardeners, September through November is your sweet spot. Northern zones aim for September to October, while warmer zones shift toward October and November.
Soil temperature matters more than the calendar.
What is the rule for planting bulbs?
The core rule is simple: plant bulbs about six weeks before your first hard frost, when soil hits 50–60 °F.
That window gives roots enough time to establish before winter sets in.
Can I still plant bulbs in November?
November might feel late, but it’s often right on time. Yes, you can still plant bulbs if the ground isn’t frozen and soil temperature sits between 50–60 °F.
What bulbs should you plant in the fall?
Tulips, daffodils, hyacinths, crocuses, and alliums are all excellent fall choices. Each one roots through winter and bursts into color come spring.
How to plant winter flower bulbs in the ground?
Place each bulb pointy end up. Dig a hole three times the bulb’s height. Water deeply after planting, then add 2–3 inches of mulch to protect roots from frost heave.
Conclusion
Planting fall bulbs is a masterclass in patience and timing, where a single misstep can make all the difference between a breathtaking display and a lackluster show. By nailing the perfect window for planting, you’ll access a world of vibrant blooms come spring.
When to plant fall bulbs is more than just a question – it’s a carefully calculated dance with nature. Get it right, and your garden will thank you with stunning beauty.