This site is supported by our readers. We may earn a commission, at no cost to you, if you purchase through links.

Most gardeners lose plants in winter not because of the cold itself, but because of what they didn’t do in October. A hard freeze doesn’t discriminate—it finds every unprotected root, every unamended patch of clay, every young tree trunk left bare.
The 2023 USDA hardiness map update confirmed what many gardeners had already noticed: zones are shifting, and plants that survived last decade’s winters may now face different conditions.
Soil prep, smart mulching, and knowing your microclimate aren’t optional extras—they’re the difference between a garden that recovers in spring and one that doesn’t.
These winter garden preparation tips walk you through exactly what to do, in the right order, before the ground freezes.
Table Of Contents
- Key Takeaways
- Assess Your Winter Garden Needs
- Prepare Soil and Garden Beds
- Protect Plants Through Cold Weather
- Top 5 Winter Garden Preparation Items
- Frequently Asked Questions (FAQs)
- What should I do to prep my garden for winter?
- What are the four common mistakes landscapers make when planting?
- Is October too early to cut back perennials?
- How do I prepare my garden for winter?
- How can I Keep my Garden in a good shape during winter?
- How do I prepare my garden soil for winter?
- Can You winterize your garden?
- What are winter gardening guidelines?
- How to prepare garden soil for winter?
- How do I succeed in winter gardening?
- Conclusion
Key Takeaways
- Most winter plant loss isn’t caused by cold itself—it happens because gardeners skip soil prep and protection steps in October, before the first freeze arrives.
- Your hardiness zone is just the starting point; map your garden’s microclimates too, since a sheltered corner or a frost pocket can behave like an entirely different zone.
- Amending beds with 2–3 inches of compost, mulching to a depth of 2–3 inches, and sowing cover crops like winter rye are the three soil steps that pay off most in spring.
- Protecting plants through winter means layering your approach—row covers for beds, burlap wraps for young trunks, and deep watering two days before a hard freeze to build a moisture buffer at the roots.
Assess Your Winter Garden Needs

Before you move a single shovel of soil, it helps to take a good look at what your garden actually needs this winter. Every yard is different — your hardiness zone, soil condition, and plant mix all shape what steps matter most. Here’s where to start.
A winter vegetable garden preparation guide can help you map out exactly which steps apply to your zone before the cold sets in.
Check Hardiness Zone
Your hardiness zone is the starting point for every winter garden decision you make. The USDA divides North America into zones based on average minimum winter temperatures, from zone 1a to 13b. Each zone splits into a and b subzones, representing a 5°F difference — so a plant hardy to zone 7a may struggle in 7b without extra protection.
Mapping microclimates in your own garden matters just as much as your official zone. A sheltered south-facing corner can behave like a warmer subzone, while a frost pocket near a fence might perform colder. In Falkenstein, Germany, factor in regional frost patterns and local elevation when interpreting subzones on any map.
Climate change impacts mean your historical zone data may already be outdated. Reassess regularly, cross-check with regional extension resources, and select hardy varieties rated for slightly colder zones than your current designation as a practical buffer. The recent 2023 USDA map update shows many regions shifted half a zone warmer.
Test Soil PH
Once you know your zone, it’s time to look at what’s happening underground. Soil pH sits on a scale from 0 to 14, with 7 being neutral. Most garden plants thrive between 6.0 and 7.0, where nutrients like phosphorus dissolve and reach roots most effectively. Outside that range, even well-fed soil can leave plants struggling.
Identify Drainage Problems
Drainage often gets overlooked until winter turns small problems into serious damage. Walk your yard after rain and look for standing water that lingers for several days — that’s your first warning. Check whether gutter downspouts discharge directly onto the soil, creating soggy patches near your foundation. Damp basement walls or musty odors nearby also signal seepage risk.
Clay-heavy or compacted soil drains slowly, while frozen ground turns winter rainfall into runoff almost immediately. Here are four signs your drainage needs attention before the cold sets in:
- Water pools in low spots after rain and stays for days
- Soil stays saturated near foundations, increasing seepage risk
- Gutter discharge creates soft, eroded patches along the house
- Tree roots near pipes cause misalignment and hidden leaks underground
Installing a French drain or building a raised bed in problem areas gives water somewhere to go. Loosening compacted soil also helps restore infiltration and reduces erosion before the ground freezes hard.
Note Frost-prone Plants
Once you’ve sorted drainage, turn your attention to the plants themselves. Not everything in your garden tolerates cold the same way.
Frost-tender plants like basil, tomatoes, and citrus suffer cell damage when temperatures drop below freezing — ice crystals form inside their tissues, causing collapse.
Walk your beds and honestly note which plants need extra protection before the first frost arrives.
Plan Harvest Timing
Once your frost-prone plants are flagged, shift your focus to timing your harvests. Each crop has a peak maturity window — miss it, and flavor and nutrition drop fast.
Track your planting dates and expected maturities so you can forecast picks before cold arrives. Dry, stable weather is your best harvest window; heat waves compress it quickly.
Prepare Soil and Garden Beds

Good soil is the foundation everything else depends on. Before winter sets in, a little prep work now saves you a lot of headaches come spring. Here’s what to do with your beds before the ground freezes.
A spiked aerator tool makes this especially easy—walking your beds with one before the freeze opens up channels so moisture and nutrients actually reach the roots, and these autumn garden prep tips walk you through the full process.
Add Compost or Manure
Think of compost as a slow-burning furnace for your soil — it releases warmth and nutrients steadily all winter long.
Compost is your soil’s slow-burning furnace, quietly releasing warmth and nutrients all winter long
Work 2–3 inches of compost or aged manure into the top 6 inches of your beds before the ground freezes. This boosts soil cation exchange capacity, locks in nutrients, and feeds the microbial habitat that keeps roots healthy through dormancy.
Mulch Roots and Beds
Once compost is worked in, apply a layer of mulch to lock that work in place. Spread organic mulch — straw, shredded leaves, or bark chips — at a 2–3 inch winter mulch depth across your garden beds.
Always leave a 2-inch gap around stems to prevent crown rot. This soil insulation shields roots and retains moisture through hard freezes.
Sow Winter Cover Crops
Bare soil through winter is a wasted chance. Sow winter rye or oats by early fall, drilling seeds 1–2 cm deep for fast germination.
Hairy vetch adds nitrogen, while daikon radish breaks up compacted ground. This cover cropping builds soil health, blocks erosion, and feeds spring beds.
Plan termination two to six weeks before planting, matching timing to your region.
Improve Heavy-clay Drainage
Clay soil holds water like a stubborn sponge, slowing drainage all winter. Apply gypsum as a soil amendment, using 2–4 tons per acre to loosen packed particles.
Mix in biochar to boost soil aeration and pore space. Install a perforated drain pipe with a gravel layer to channel water away. Compost adds organic matter, supporting clay compaction prevention long term.
Clear Weeds and Debris
A messy bed is basically a winter hotel for pests. Pull annual weeds from the base, breaking them at the soil line so they won’t regrow come spring.
Bag invasive weeds separately to stop reseeding through mulch. Rake leaves and twigs off pathways too, since piles make perfect slug habitat.
- Pull weeds by the root
- Bag invasive species for disposal
- Rake leftover debris after first cleanup
Protect Plants Through Cold Weather
Your soil’s ready, but the real test for your plants is still ahead. Cold air, biting wind, and sudden freezes can undo months of careful work in just one bad night. Here are five ways to keep your garden safe and steady when temperatures drop.
Use Breathable Row Covers

When frost creeps in overnight, a floating row cover can save your whole bed.
Pick polypropylene or polyester fabric weighing 0.5 to 2.0 ounces per square yard for the right balance of warmth and airflow.
Support it with hoops, anchoring edges with soil, and trust UV stabilizers to keep it strong for years.
Wrap Young Tree Trunks

Row covers handle your beds, but young trunks need their own shield. Wrapping tree trunks for winter is core to winterizing trees and shrubs, guarding bark with breathable burlap for sunscald prevention and frost crack mitigation each fall season.
- Use light-colored, breathable materials
- Spiral upward with overlap
- Secure with soft ties
- Add tree guards against rodents
- Remove wraps in spring
Shield Herbs and Perennials

After trunks, turn toward tender herbs and perennials needing frost protection too.
| Plant | Action | Zone |
|---|---|---|
| Rosemary | Mulch or bring indoors | 6–7 |
| Persian Shield | Cover or overwinter inside | Below 8 |
| Sedum | Light mulch only | Hardy |
Add perennial winter mulch over crowns, and watch frost-sensitive foliage closely after cold nights.
Water Before Deep Freezes

Mulching herbs helps, but soil moisture levels matter just as much before deep freezes hit your winter beds.
- Water deeply two days ahead, building a moisture reservoir for root zone hydration.
- Water early in the day, letting excess drain to prevent frost heaving overnight.
- Skip soggy, compacted soil; deep saturation timing protects against root rot while boosting long-term moisture retention.
Monitor Pests and Disease

Don’t let cold weather fool you into skipping pest scouting techniques. Check leaf undersides weekly with a hand lens for aphids, scale, and mites.
Watch for powdery mildew and yellowing leaves, both signs of disease and root rot in soggy beds. Sticky traps and digital photos make pest monitoring easier. Invite beneficial insects like lady beetles for natural garden pest management and lasting winter pathogen prevention.
Top 5 Winter Garden Preparation Items
You’ve got the know-how now, but a few good tools make all the difference. The right gear saves you time, protects your plants better, and keeps the work from feeling like a chore. Here are five items worth adding to your winter garden kit.
1. Garden Floating Row Cover
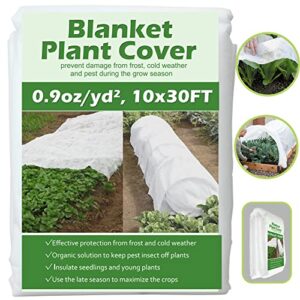
Think of a floating row cover as a cozy blanket for your whole garden bed. This breathable polypropylene fabric comes in sizes up to 10 ft × 30 ft, so you can cut it to fit any space.
Drape it directly over plants, or support it with hoops, then secure the edges with stones or soil. It blocks frost, wind, and pests while still letting light and rain through, giving tender vegetables real protection against light freezes.
| Best For | Home gardeners who want an easy, budget-friendly way to protect veggies, shrubs, and fruit plants from frost, pests, and sun stress all season long. |
|---|---|
| Material | Non-woven polypropylene |
| Primary Use | Frost and pest protection |
| Weather Resistance | UV-resistant coating |
| Weight | Lightweight fabric roll |
| Reusability | Reusable after drying |
| Setup Method | Drape and secure |
| Additional Features |
|
- Covers up to 300 sq ft and can be cut to fit any garden bed shape
- Lightweight and breathable, so light and air still reach your plants
- Doubles as frost guard, shade cloth, and pest barrier all in one
- Won’t hold up well against heavy snow, hail, or sharp debris
- Doesn’t block rain, so it’s not great if you need moisture control
- Needs indoor storage when not in use, or the UV coating breaks down fast
2. Natural Jute Burlap Fabric Roll
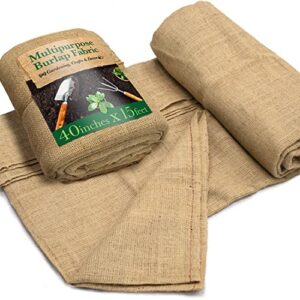
When the wind picks up and frost hits hard, jute burlap acts like a windbreaker for your garden. It comes in a 40-inch-wide roll, cut by the yard, and made from 100% natural jute fibers.
Wrap it around young trunks, drape it over beds, or use it as a breathable mulch barrier. It’s biodegradable and chemical-free, though some rolls carry a faint odor at first that fades with airing out.
| Best For | Gardeners, beekeepers, and DIY decorators who want a tough, natural fabric for everything from frost protection to event styling. |
|---|---|
| Material | 100% jute fiber |
| Primary Use | Garden lining and wrapping |
| Weather Resistance | Naturally weather-tolerant |
| Weight | Heavy-duty burlap roll |
| Reusability | Biodegradable, single-use |
| Setup Method | Cut to length |
| Additional Features |
|
- Made from 100% natural jute, so it’s strong, biodegradable, and chemical-free
- Wide 40-inch roll with 15 ft or 30 ft length options gives you plenty to work with
- Handy for tons of projects, from lining raised beds to wrapping beehives to dressing up event décor
- Some rolls have a strong odor that can stick around for weeks
- The weave can be loose in spots, which sometimes means uneven texture or fraying
- Cut edges can come out a bit rough, so you may need to trim them up yourself
3. Walensee Manual Lawn Aerator
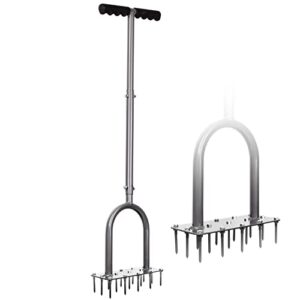
Compacted soil chokes off air and water right when roots need both most. The Walensee Manual Lawn Aerator uses fifteen hardened iron spikes across three rows, punching down about 2.3 inches per pass.
Its 34.6-inch cushioned handle and foot pedal let you add pressure without bending over. No straps, no electricity, just steady footwork on pre-watered ground. It’s best for small patches, edges, and bare spots, not heavily compacted clay.
| Best For | Homeowners who want a quick, no-fuss way to aerate small lawns, edges, and bare patches without lugging out heavy equipment. |
|---|---|
| Material | Hardened iron and steel |
| Primary Use | Lawn spot aeration |
| Weather Resistance | Powder-coated steel handle |
| Weight | 4.91 lb |
| Reusability | Fully reusable |
| Setup Method | Tool-free assembly |
| Additional Features |
|
- Fifteen spikes across three rows cover more ground per step, so you’re not stuck making endless passes.
- The cushioned T-handle and foot pedal let you lean into the work instead of bending your back.
- Tool-free assembly means it breaks down fast for storage and won’t take up much space in the garage.
- It’s manual labor, so bigger lawns can turn into a real workout pretty quick.
- Dry or heavily compacted clay soil needs a good watering first, or the spikes just won’t sink in.
- The holes it leaves are on the small side and can close up fast, so the aeration boost doesn’t always stick around.
4. PeoMev Heavy Duty Metal Hose Holder
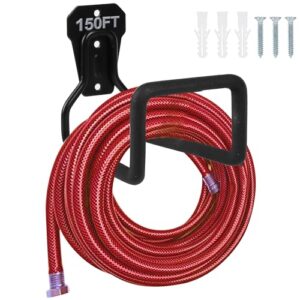
A tangled hose left on frozen ground is a problem waiting to happen.
The PeoMev Heavy Duty Metal Hose Holder mounts to wood, fence, or masonry using the included stainless-steel screws and anchors. Its foam-rubber coating protects your hose from scratches and slippage. The iron build resists rust through wet winters, and at 45 lb capacity, it accommodates most garden hoses easily.
Install it before you drain and store your lines for the season.
| Best For | Homeowners who want a simple, sturdy way to keep garden hoses, extension cords, or garage gear off the ground and organized year-round. |
|---|---|
| Material | Iron with foam rubber |
| Primary Use | Hose and cord storage |
| Weather Resistance | Rust-proof iron finish |
| Weight | 12.8 oz |
| Reusability | Fully reusable |
| Setup Method | Wall-mount with screws |
| Additional Features |
|
- Iron build with a rust-proof finish holds up through rain, snow, and everything in between
- Foam-rubber coating keeps hoses from slipping or getting scratched while they hang
- Comes with all the hardware you need — screws and anchors work on wood, fence, or masonry
- The included screws can feel a little undersized for heavier walls, so you might need to grab your own
- The hanger space runs tight if your hose is extra thick or unusually long
- Hard 45 lb cap means you can’t hang a water-filled hose or stack multiple items at once
5. Vivosun Twin Chamber Tumbling Compost Bin
Good compost doesn’t wait for spring — and neither should you.
The Vivosun Twin Chamber Tumbling Compost Bin keeps decomposition active all winter long. Its dual-chamber design lets one side finish while you fill the other, so you’re never starting from scratch. The 360° tumbling mechanism aerates the pile without digging. The black exterior absorbs heat, which helps microbes stay active even in cold snaps. Set it up in a sheltered spot before the ground freezes.
| Best For | Home gardeners and backyard growers who want a steady supply of compost year-round without the hassle of manual turning. |
|---|---|
| Material | Galvanized steel and PP plastic |
| Primary Use | Backyard composting |
| Weather Resistance | Galvanized steel frame |
| Weight | 21.7 lb |
| Reusability | Fully reusable |
| Setup Method | Multi-step assembly |
| Additional Features |
|
- The dual-chamber setup means one side is always finishing while the other fills — no waiting around for a full batch to break down.
- Tumbling instead of digging makes aeration quick and easy, which speeds up decomposition compared to a static bin.
- The galvanized steel frame holds up through rain, wind, and cold without rusting out on you.
- Assembly can take a while and honestly goes smoother with two people — the center divider especially can be a bit of a puzzle.
- If you fill it close to the top, it can leak a little, so leaving some headroom is a good idea.
- The plastic body is lightweight, which is nice for moving it around, but long stretches of intense sun could wear it down over time.
Frequently Asked Questions (FAQs)
What should I do to prep my garden for winter?
Start by checking your hardiness zone and testing soil pH. Add compost, mulch beds, and harvest tender crops before frost hits. Protect vulnerable plants with row covers or burlap wraps.
What are the four common mistakes landscapers make when planting?
Landscapers commonly make four planting mistakes: wrong plant selection, improper planting depth, poor soil preparation, and inadequate irrigation planning. Each one quietly undermines a plant’s health before it ever gets a real chance to grow.
Is October too early to cut back perennials?
Not necessarily. October works well for most perennials once flowering ends and foliage dies back. However, leave coneflowers and black-eyed Susans standing — birds rely on their seed heads all winter long.
How do I prepare my garden for winter?
Getting your garden ready for winter means evaluating, protecting, and feeding your soil before cold sets in. A little prep now saves your plants — and your spring workload.
How can I Keep my Garden in a good shape during winter?
Keeping your garden healthy through winter is about staying one step ahead. Check your soil, protect vulnerable plants, and manage moisture. Small, consistent actions now prevent bigger problems when spring arrives.
How do I prepare my garden soil for winter?
Prepare your soil before the cold sets in. Add 2–3 inches of compost, mulch your beds, and clear weeds now. Healthy soil in autumn means a stronger garden come spring.
Can You winterize your garden?
Yes, you can absolutely winterize your garden. With the right timing and a few targeted steps, your plants, soil, and tools can rest safely through the cold months and bounce back strong in spring.
What are winter gardening guidelines?
Winter gardening guidelines help you protect plants, soil, and tools through cold months while setting up a stronger spring. They cover everything from soil prep and frost protection to watering, pruning, and pest control.
How to prepare garden soil for winter?
Getting your soil ready before winter hits is simpler than it sounds. Add 2–4 inches of compost, mulch beds with straw, fix drainage issues, and sow a cover crop like rye.
How do I succeed in winter gardening?
Success in winter gardening comes down to reading your garden’s needs early. Know your hardiness zone, test your soil pH, and protect frost-sensitive plants before temperatures drop.
Conclusion
Think of your garden as a house you’re carefully closing up before a long trip away.
You wouldn’t leave windows open or pipes uninsulated.
These winter garden preparation tips work the same way—each step seals a gap before the cold finds it.
Amended soil, mulched beds, and wrapped trunks aren’t last‑minute tasks; they’re the locks on the door.
Do this work now, and spring won’t greet you with damage—it’ll greet you with growth.
- https://burnettscg.com/essential-fall-cleanup-tasks-to-prepare-your-garden-for-winter
- https://mortonarb.org/blog/10-tips-from-the-pros-to-prepare-your-garden-for-winter
- https://www.almanac.com/fall-vegetable-garden-cleanup-11-things-do-now
- https://www.oriolelandscapes.com/preparing-your-landscape-for-fall-and-winter-tips-from-the-pros
- https://townandcountryhaddam.com/2025/10/08/putting-the-garden-to-bed-fall-cleanup-checklist