
This site is supported by our readers. We may earn a commission, at no cost to you, if you purchase through links.

The first warm weekend of spring has a way of making last autumn’s "I’ll deal with it later" feel very present. Suddenly you’re standing in your garden staring at a tangle of dead stems, frost‑heaved edging, and soil that’s gone gray and crusted over the winter.
It’s a lot—but it’s also the exact right moment, because a garden that looks rough in March responds fast to good attention.
A systematic spring gardening renovation guide beats guessing every time: assess before you touch anything, repair what winter broke, rebuild your soil, prune with purpose, and plant on a schedule that works with your local frost dates rather than against them.
Table Of Contents
- Key Takeaways
- Assess Winter Garden Damage
- Clear Beds and Repair Structures
- Rebuild Healthy Spring Soil
- Prune and Divide Plants Properly
- Plant for a Fresh Harvest
- Frequently Asked Questions (FAQs)
- How do I protect spring plants from late frosts?
- When should I prune spring-blooming shrubs and trees?
- What pests emerge in spring and how to control them?
- How often should I water newly planted spring gardens?
- Can I transplant perennials during early spring months?
- How do I attract pollinators to my garden?
- Which companion plants help deter common pests?
- When should I start a compost pile from scratch?
- How do I deal with waterlogged or flooded beds?
- What cover crops work best between growing seasons?
- Conclusion
Key Takeaways
- Walk your beds before touching anything—spotting frost damage, animal activity, and drainage issues up front saves you from fixing mistakes you didn’t have to make.
- Healthy soil is built, not found: test pH, add compost, and mulch after amending so weeds don’t undo your work before the first seedling goes in.
- Prune to the plant’s rhythm, not your schedule—spring bloomers like lilac need post‑flower cuts, while summer bloomers get trimmed in late winter, and anything dead comes out first, regardless.
- Time your planting to your last frost date and hardening seedlings off gradually; skipping either step risks weeks of indoor work going to waste in a single cold night.
Assess Winter Garden Damage

Before you pull a single weed or reach for your pruners, take a slow walk through your garden.
Notice what’s thriving, what’s struggling, and what needs attention before diving into your spring flower garden maintenance routine.
Winter leaves clues — some obvious, some easy to miss — and spotting them now saves real headaches later. Here’s what to look for on that first pass.
Walk Beds Before Cleanup
Before you pull a single weed, walk every bed first. This isn’t stalling — it’s smart. Check for soft spots, uneven surfaces, and any structural issues like loose edging or shifted stones that winter may have exposed.
You’re doing a quick risk assessment: spotting debris accumulation, drainage problems, and tripping hazards. A five-minute walkthrough now shapes your entire cleanup path and saves real headaches later.
Check Frost-Damaged Plants
Once you’ve scoped the layout, shift your eyes to the plants themselves. Frost damage signs aren’t always obvious — leaves may look water-soaked and limp, or show brown necrotic patches by midmorning.
green tissue inside means recovery potential is real. Your root system assessment matters most here.
Post-frost watering helps restore turgor, and protecting new growth from late cold snaps keeps your postwinter preparation on track. Early morning checks can reveal water‑soaked translucent patches that indicate frost injury.
Inspect Animal Activity
While you’re checking plants for frost damage, make your assessment walk do double duty — look for animal tracks, nibbled stems, or disturbed mulch. Nocturnal visitors like voles and rabbits leave clues: chewed shoots near the soil line, bark scratches, or tunneling beneath beds.
Tighten pest barriers now, note any wildlife habitats forming in corners, and manage attractant control before garden pests get a head start.
Mark Uncertain Perennials
Some perennials play it coy in spring. After your animal assessment walk, flag any plants showing no signs of life — these uncertain perennials are worth watching, not yanking. Bloom variability, microclimate impact, and growth habit shifts all affect timing. Give them a few more weeks before deciding.
For effective plant health monitoring, follow these steps:
- Insert a labeled stake at each dormant clump for survival tracking across weeks
- Note sun exposure and drainage to understand microclimate impact on reemergence
- Log last year’s bloom variability in your garden journal to spot patterns
- Plan propagation strategies — division or backup seedlings — in case clumps don’t recover
- Watch for subtle growth habit shifts, like spreading instead of upright regrowth, as early perennial care signals
Note Repairs in Journal
Before you wrap up your walkabout, open your garden journal and log everything — damage, repairs, odd plant behavior.
Use it like a maintenance schedule, you’ll actually thank yourself for later.
Note which structures need hinge reinforcement or page reattachment if it’s a well‑loved binder.
Record task scheduling priorities, plant inspection findings, and any archival adhesives or spine stitching supplies needed for journal cleaning.
Future, you’ll appreciate the detail.
Clear Beds and Repair Structures
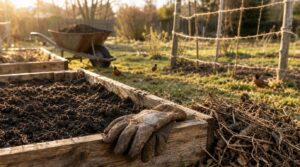
Once the damage is assessed, it’s time to roll up your sleeves and get the garden actually ready to grow.
That means clearing out the mess winter left behind and making sure your structures are solid before planting starts.
Here’s where to begin.
Remove Debris and Mulch
Start at the edges and work inward — that’s the move that keeps cleared ground clean. Rake leaf litter into a wheelbarrow, then do a mulch contamination check: pull any moldy or pest-riddled sections and discard them.
Keep your mulch layer maintenance goal at two to three inches. Reuse clean mulch, and use efficient cleanup tools like a low-set leaf blower for clearing beds fast.
Smart debris recycling methods and soil surface preservation keep spring momentum going.
Cut Dead Plant Material
Spotting dead growth is half the battle. Look for stems that are brown or mushy at the base — those go first.
Cut just above a healthy bud using sharp pruners, making clean diagonal cuts to speed recovery.
Disinfect your blades between plants; that single Tool Sanitization Practice stops disease from hitchhiking across your beds.
Bag diseased material rather than composting it.
Clean Containers and Saucers
Containers and saucers carry more grime than you’d think — old mineral deposits and mold spores are a real pest and plant disease prevention issue. Saucer Sanitization belongs in every garden cleanup routine.
- Rinse with warm water, scrub with mild detergent, then disinfect with diluted bleach
- Match saucer size using a basic Size Guide: 1–2 inches beyond your pot rim
- Choose Material Choices wisely — plastic resists cold cracking; ceramic adds stability
Check Drainage Tips and dry completely for Mold Prevention.
Fix Paths and Raised Beds
Winter doesn’t play nice with hardscape. Walk every path and raised bed now, before planting day sneaks up on you.
Look for shifted stones, bowed bed walls, and drainage issues where water pools at edges.
Tighten loose joints — a quick Joint Reinforcement Methods check saves bigger repairs later. Path Edging Repair keeps soil where it belongs.
Bed Drainage Fixes, like adding coarse base material, prevent root rot before it starts.
Tune Tools and Irrigation
Dull blades and leaky lines are silent season-wreckers. Sharpen and oil every hand tool now — clean cuts mean healthier plants.
For your irrigation system maintenance, run each zone and watch for uneven spray or pooling. A Pressure Regulator Test confirms steady flow. Check drip lines for clogs, and if you have Smart Controller Setup, verify seasonal schedules before the first dry week hits.
Rebuild Healthy Spring Soil

Good soil isn’t luck — it’s something you build.
Before you plant a single seed, it’s worth spending an hour or two getting the ground actually ready to do its job.
Here’s where to start.
Test Soil PH First
Before you plant a single seed, check your soil pH — it controls everything from nutrient availability to root health. Most vegetables want a pH between 6.0 and 7.0. Seasonal shifts from rain or irrigation quietly push it off target.
- Collect samples from multiple spots and depths
- Use test strips, a meter, or a lab kit
- Compare results against recommended ranges for your crops
- Add garden lime to raise pH, sulfur to lower it
- Retest in 4–8 weeks to confirm your soil amendment worked
Add Compost or Manure
Once your pH is dialed in, it’s time for a soil structure boost.
Spread 1–2 inches of finished compost or aged manure across your beds — that’s your spring amendment timing sweet spot, right before planting kicks off.
Both improve organic matter and soil preparation immediately.
For a manure nutrient boost, stick to composted sources only.
Safe manure use means fully aged material from reputable suppliers when sourcing organic matter.
Amend Without Deep Digging
You don’t need to dig deep to feed your soil well. No-till methods protect the microbial life already working beneath the surface. Top-dressing does the job without the disruption.
Try these surface amendments that actually work:
- Spread ½–1 inch of compost application across beds
- Apply ¼–½ inch aged manure for organic matter
- Layer shredded leaves for mulch layering and structure
- Water lightly to help soil preparation along
Fertilize New Growth Carefully
Once your compost application settles in, new growth is hungry — but not as hungry as you might think. A balanced slow-release organic fertiliser at bud break feeds roots gradually over six to eight weeks without overwhelming tender shoots. Foliar feeding works well for quick micronutrient balance when root uptake lags.
| Plant Type | Feed Type | Timing |
|---|---|---|
| Seedlings | Dilute liquid | After first true leaves |
| Perennials | Slow-release granules | At crown emergence |
| Leafy greens | Low-nitrogen liquid | During rapid leaf flush |
Seedling nutrition calls for light, frequent doses — heavy feeding beds do more harm than good early on. These eco-fertilization tips keep your spring gardening checklist on track and your soil health intact.
Mulch for Weed Control
Few steps pay off faster than spreading mulch after you’ve cleared and amended your beds. Organic mulching blocks light, locks in moisture, and slowly feeds your soil.
Spread mulch after amending your beds — it blocks weeds, locks moisture, and feeds your soil as it breaks down
- Ideal Layer Depth: 2–3 inches of wood chips or shredded bark for weed control
- Fabric Underlay Benefits: cardboard or landscape fabric doubles suppression in problem spots
- Eco-Mulch Options: compost-based mulches improve soil biology as they break down
Keep mulch away from stems.
Prune and Divide Plants Properly
Spring pruning isn’t complicated, but timing and technique make all the difference.
Get it wrong and you’ll either lose this year’s blooms or stress a plant that’s just waking up.
Here’s what to focus on to get it right.
Prune by Bloom Time

Pruning shrubs at the wrong time is the fastest way to lose a whole season of blooms. Bloom Timing Basics come down to one rule: know whether your shrub flowers on old or new wood. Lilac and forsythia need post‑flowering cuts — Old Wood Management at its simplest.
Shrub Pruning Schedules, prune summer bloomers like spirea in late winter. Rose Bloom Cycles respond best when you prune roses right as buds swell.
Remove Dead Branches First

Dead wood is your starting point — always. Before anything else, grab your Pruning Safety Gear: gloves, eye protection, and sharp pruning shears.
Whether you’re pruning shrubs or tackling tree pruning, clear dead branches first for a Structural Integrity Boost.
Use Branch Collar Cuts to speed healing.
Precise pruning techniques and Tool Sanitization Methods after each cut keep Disease Spread Prevention on your side.
Limit Heavy Cutting

Once you’ve cleared dead wood, resist the urge to keep cutting. Your plant needs what’s left.
Smart Dormant Pruning Timing follows these Species Pruning Rules:
- Never remove more than one-third per session
- Use Wound Healing Techniques — cut just above a healthy bud
- Follow Tool Sanitization Steps between every plant
- Track recovery with Plant Recovery Tracking notes
- Prune for structure and shape, not habit
Trim Roses at Bud Swell

Roses tell you when they’re ready — watch for Bud Swell Timing, that moment when buds fatten and blush with color. That’s your green light for pruning roses.
Use Angled Cut Techniques, slicing just above an outward-facing bud. Apply Cane Selection Tips: remove crossing or weak wood first.
Follow Disease Prevention Steps by cleaning tools between plants.
Finish with Post-Trim Rose Care — mulch and a deep watering.
Divide Crowded Perennials
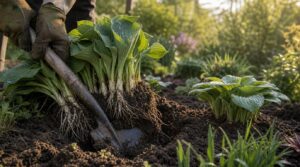
A clump that stops blooming is telling you something. Overcrowding signs, like dead centers, weak stems, or zero flowers, mean it’s time to divide perennials. Spring gardening is the perfect window — act after new shoots appear but before peak bloom.
Tool Essentials and Plant Selection matter:
- Use a sharp spade or fork
- Target hostas, daylilies, and ornamental grasses first
- Each division needs 3–5 healthy shoots
- Division Timing: early morning reduces stress
- Aftercare Steps: water deeply for two weeks post-transplanting
Plant for a Fresh Harvest

Now comes the part that makes all that prep work worth it — actually getting things in the ground. Timing matters more than most people realize, and a few smart choices early on can mean the difference between a sluggish start and a garden that hits its stride fast.
Here’s how to plant with purpose this spring.
Start Seeds by Frost Date
Everything hinges on your last frost date — get that wrong, and you’re gambling with weeks of work.
Use Frost Date Calculators to find yours, then count backward.
Seed Timing Basics are simple: most warm-season crops need 6–8 weeks indoors before transplanting.
cool-season types like broccoli need just 4–6 weeks.
| Crop | Sow Indoors | Germination Temperatures |
|---|---|---|
| Tomatoes | 6–8 weeks before frost | 75–85°F |
| Peppers | 6–8 weeks before frost | 80–90°F |
| Broccoli | 4–6 weeks before frost | 45–65°F |
| Spinach | Direct sowing after soil is workable | 45–65°F |
| Basil | 4–6 weeks before frost | 70–80°F |
Seedling Light Needs matter too — 12–16 hours daily keeps stems sturdy.
Skimp on light and you’ll get leggy, weak transplants before Late Frost Protection even becomes a concern.
Harden Off Seedlings Gradually
Those seedlings aren’t ready for the real world yet — not straight from a cozy grow light. Hardening off bridges that gap.
Start with 1–2 hours outdoors in a sheltered spot, then add an hour daily. Wind Acclimation, Sun Exposure Timing, Temperature Acclimation, Watering Adjustments, and Humidity Control all matter here.
Watch for wilting, use protective covers if temps dip, and you’ll sidestep transplant shock entirely.
Direct-Sow Cool Crops
While seedlings finish hardening off, you can already be sowing directly outside.
Cool-season crops — spinach, lettuce, peas, radishes — go in as soon as soil temperature hits 45–55°F, usually 2–4 weeks before your last frost date.
Nail your seed spacing tips, keep moisture retention methods consistent, and fast-growing varieties like radishes are up in 3–7 days.
Row cover benefits any tender row on cold nights.
Plant Bulbs and Tubers
Now’s the time to think bulb vs tuber — they’re not the same thing.
Spring-planted summer flowering bulbs like dahlias and gladioli go in after frost risk passes, three times their height deep, with bone meal mixed in.
For tubers, use the tuber hill technique as foliage grows.
Allow post-bloom care: skip bulb deadheading and let leaves die back naturally.
Set Bare-Root Plants Early
Bare root plants reward you most when you act fast. early planting window — roughly 2 to 4 weeks before your last frost — keeps soil temperatures cool enough to support root development without stressing new growth. what to do from the moment they arrive:
- Root Rehydration by soaking roots 4–6 hours in cool water.
- Trim damaged tips with clean pruners for healthy root system care.
- Dig wide holes, spread roots flat — no bending.
- Water deeply and mulch immediately for transplant shock reduction.
Got wind? A simple windbreak buys early season establishment time.
Frequently Asked Questions (FAQs)
How do I protect spring plants from late frosts?
Cover plants before sunset, water deeply the night before, and tuck tender seedlings under frost blankets or cloches.
Cold frames, floating row covers, and smart microclimate creation are your best frost risk management tools.
When should I prune spring-blooming shrubs and trees?
spring-blooming shrubs — lilac, forsythia, azalea — right after flowering ends. That’s your window.
Post-Bloom Pruning protects next year’s buds, which form on old wood. Wait too long, and you’re cutting off next spring’s show.
What pests emerge in spring and how to control them?
As nights stay above 50°F, mosquitoes, ants, termites, and wasps wake up fast. Remove standing water for mosquito management, seal entry points for ant prevention, and set wasp traps early.
How often should I water newly planted spring gardens?
Think of new roots like a first-week employee — keen but fragile.
Check soil moisture 2–3 inches down every other day.
Water deeply, mulch well, and adjust your watering schedule as weather shifts.
Can I transplant perennials during early spring months?
Yes — early spring is ideal.
Move perennials before new shoots emerge, water deeply the day before, and handle the root ball carefully.
Transplant shock prevention starts with cool mornings, good soil, and immediate post-transplant mulching.
How do I attract pollinators to my garden?
You don’t need a fancy garden to attract pollinators — you need the right plants at the right times. Focus on Native Plants, Bloom Succession, and Bee Habitats, and they’ll come.
Which companion plants help deter common pests?
Basil beside tomatoes cuts aphid and whitefly pressure.
Marigolds suppress nematodes.
Nasturtiums work as trap crop plants, pulling aphids away.
These herb companions and pest-repellent flowers form a simple, integrated approach to pest management in vegetables.
When should I start a compost pile from scratch?
Start your compost pile when daytime temps hold steady between 50–70°F and the soil feels like a wrung-out sponge — that’s when microbial activity kicks in fast and the composting process actually gains momentum.
How do I deal with waterlogged or flooded beds?
Waterlogged beds suffocate roots fast.
Improve drainage by cutting shallow trenches, building raised beds, or installing a perforated pipe system. Aerate compacted soil gently, then replant with flood‑resistant species once things dry out.
What cover crops work best between growing seasons?
Think of cover crops as your soil’s off-season crew.
Legume Nitrogen Fixation through hairy vetch or crimson clover rebuilds fertility naturally, while winter rye manages erosion control crops and weed suppression between seasons.
Conclusion
Bare beds become blooming borders one deliberate step at a time. That’s the quiet truth behind every spring gardening renovation guide worth following—it’s not about doing everything at once, but right things in the right order.
Assess, clear, feed, prune, plant.
Your garden doesn’t need a miracle; it needs a method. Start this weekend with a single walk-through, notebook in hand, and let the season build from there.
- https://gatheredinthekitchen.com/prepare-garden-soil-for-spring
- https://willowridgegardencenter.com/preparation-for-spring-planting
- https://phsonline.org/for-gardeners/gardeners-blog/prepare-garden-soil-fall-for-spring-planting
- https://powerplanter.com/blogs/news/when-to-start-spring-garden-cleaning
- https://primexgardencenter.com/spring-pruning-basics-for-ornamental-trees-and-shrubs