This site is supported by our readers. We may earn a commission, at no cost to you, if you purchase through links.
Look for skin that’s developed its mature hue – deep red apples, golden pears, or vibrant orange citrus. Ripe fruit smells sweet and fragrant at the stem end, while unripe fruit has little to no aroma.
Gently press near the stem – perfectly ripe fruit yields slightly but springs back. Listen for hollow sounds when tapping melons and watermelons. Weight matters too – ripe fruit feels heavier due to increased juice content.
Trust your senses: if it looks right, smells sweet, and feels just soft enough, it’s time to harvest. The secret lies in reading these signals together rather than relying on just one indicator. It’s about finding the right mix of characteristics that signify ripeness, and understanding that ripe fruit has distinct qualities.
Table Of Contents
- Key Takeaways
- Visual Ripeness Indicators
- Aroma and Smell Indicators
- Weight and Texture Indicators
- Fruit Specific Ripeness Signs
- Harvesting and Handling Ripe Fruit
- Frequently Asked Questions (FAQs)
- How to determine the ripeness of fruit?
- How to tell when fruit is ready to harvest?
- How long before harvest should ripening begin?
- Can you speed up fruit ripening naturally?
- What temperature affects ripening most significantly?
- Does sunlight exposure change ripening patterns?
- When should you stop watering before harvest?
- Conclusion
Key Takeaways
- Trust your senses together – You’ll get the best results when you combine visual cues (color changes, skin texture), aromatic signals (sweet fragrances), and tactile feedback (gentle yielding to pressure) rather than relying on just one indicator.
- Each fruit tells its own story – You’ll need to learn specific ripeness signs for different fruits since bananas show brown spots when they are ready, while mangoes develop golden-orange hues and kiwifruit requires gentle pressure testing.
- Weight and sound reveal juice content – You’ll know citrus and melons are at peak ripeness when they feel surprisingly heavy for their size and produce hollow sounds when tapped, indicating maximum water content and sweetness.
- Timing matters for quality and storage – You’ll maximize flavor and extend shelf life by harvesting during narrow windows when fruits detach easily, emit strong aromas, and show proper color development, then handling them gently to prevent damage.
Visual Ripeness Indicators
You’ll know fruit is ready to pick by watching for key visual changes that signal peak ripeness.
Color shifts, skin texture, and stem condition work together to tell you when it’s harvest time.
Fruit Skin Texture Changes
When examining fruit for harvesting fruit maturity, focus on skin texture changes as key fruit ripeness indicators.
Feel your fruit’s skin transformation—texture tells the ripeness story better than color ever could.
Smoothness variations reveal ripeness—some fruits maintain smooth epidermis elasticity while others develop beneficial wrinkled textures.
Passion fruit’s naturally wrinkled skin indicates ideal turgor pressure and fruit firmness.
Skin imperfections like slight wrinkling often signal perfect fruit texture for harvest, while excessive smoothness may indicate underripeness in certain varieties.
Spotting Patterns and Color
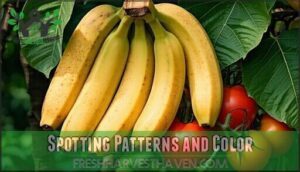
Color development reveals when fruit has reached peak ripeness.
You’ll notice these visual maturity changes as harvesting fruit maturity approaches:
- Bananas transform from green to bright yellow with light brown spotting significance
- Mangoes develop golden-orange hues with reddish undertones showing uniformity assessment
- Tomatoes shift from pale to deep red, indicating complete color development
Watch for hue variations across the fruit’s surface. Uniform color distribution typically signals prime fruit ripeness detection timing.
However, some varieties like certain plums don’t follow standard fruit color analysis patterns, so understanding your specific fruit type matters for accurate fruit ripeness indicators assessment.
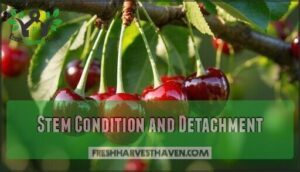
Stem Condition and Detachment
When someone’s ripe, they’re ready to go—and so is fruit when its stem shows the right signs.
Check how easily the stem detaches from the fruit; ripe produce literally lets go with gentle pressure.
The stem’s firmness and color also tell the story of harvest readiness signs.
A dried, brown stem often indicates proper fruit maturity, while green stems suggest more waiting time needed, indicating the fruit is not yet ripe.
Shape Changes and Softening
Beyond the stem’s readiness, you’ll notice significant shape changes and softening as fruits reach peak ripeness.
Fruit expansion becomes evident as cellular breakdown creates gentle yielding to touch. This softening process follows distinct ripening gradients throughout the fruit. Fruits also undergo ethylene gas production to trigger ripening.
Watch for these key indicators:
- Gentle swelling – Fruits like peaches and plums expand slightly as internal pressure builds
- Surface give – Light pressure testing reveals increased pressure sensitivity without mushiness
- Rounded contours – Angular fruits develop softer, more curved edges during softening stages
- Uniform texture – Fruit texture changes become consistent across the entire surface when ready
Aroma and Smell Indicators
Your nose becomes your best friend when hunting for perfectly ripe fruit—a strong, sweet perfume signals peak harvest time.
Trust those aromatic cues, but watch out for sour or fermented smells that mean you’ve waited too long.
Sweet Fruit Perfume and Scent
Take a deep breath near ripe fruit and you’ll notice nature’s sweet invitation.
Trust your nose—nature’s sweetest perfumes signal perfect harvest time.
A strong, sweet fruit perfume signals peak ripeness as fruit aroma compounds intensify.
Hold the fruit close to your nose—rich sweetness intensity means it’s ready.
No scent usually indicates underripe fruit, while fermentation odors suggest spoilage has begun.
Scent volatility increases as the fruit ripens, but you can also use fruit ripeness products to assist, and notice the strong, sweet fruit perfume, which is a key indicator of peak ripeness, and also consider the fruit aroma compounds.
Scent Volatility and Aroma Intensity
Aroma compounds dramatically increase as ripeness peaks, making scent a reliable harvest indicator.
Electronic noses now detect these volatile organic compounds with 88-96% accuracy, matching sensory panels that correlate aroma intensity with ideal eating quality.
Ethylene production triggers this aroma burst within 24-48 hours of commercial ripeness, creating the signature fruit scent that signals perfect timing.
Fruit Specific Aromas and Smells
Different fruits emit unique scent signatures when perfectly ripe.
Each variety develops specific aroma compounds that signal ideal harvest timing. Understanding these distinctive fruit aromas helps you identify peak ripeness through scent detection alone.
- Bananas: Sweet, fruity fragrance intensifies as starches convert to sugars
- Mangoes: Strong floral scent with tropical notes indicates full ripeness
- Pineapples: Sweet, fragrant aroma develops at the base when ready
- Citrus: Fresh, zesty oils peak with ripeness, creating bright aromatic intensity
Spoilage and Fermentation Signs
While sweet aromas signal perfect ripeness, you’ll want to avoid fruits showing spoilage and fermentation signs.
Sour smells, mold growth, and soft spots indicate fruit decay has begun.
Watch for fermentation signs like alcoholic odors or fizzing sounds, and check for pest damage, fruit bruising, and visible rot before harvesting.
These warning signs mean the fruit has passed its prime picking window, indicating a need to avoid it due to potential spoilage.
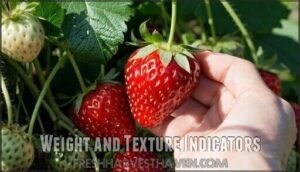
Weight and Texture Indicators
Weight and texture give you reliable clues about when fruit reaches peak ripeness.
You can feel the difference between underripe and perfectly ready fruit by checking how heavy it feels for its size and testing its firmness with gentle pressure.
Heavier Fruits and Juiciness
Most ripe fruits feel surprisingly heavy for their size, indicating they’re packed with water content and natural sugars.
When you pick up a melon or citrus fruit, that satisfying weight signals peak juiciness and maximum fruit freshness.
- Juice Yield: Heavier citrus fruits produce more juice, while lighter ones work better for zesting lighter fruits
- Water Content: Dense, weighty fruits contain maximum moisture, ensuring better fruit texture and eating quality
- Melon Thumping: Combine weight assessment with the hollow sound test—heavy melons that thump properly offer the sweetest experience
Weight Density Relationship
A fruit’s density tells the whole story—heavier fruits pack more water content and sweetness correlation than their lightweight counterparts.
This weight and density relationship serves as your best juiciness indicator. Melons and citrus should feel surprisingly heavy for their size, signaling ideal fruit ripeness weight.
Light citrus fruits offer better zesting quality despite less juice.
Thumping and Hollow Sounds
Beyond weight considerations, you can rely on the classic thumping technique for melons.
Watermelon Thumping Guide principles reveal that ripe melons produce distinct hollow sounds when tapped.
The Melon Sound Science involves Fruit Cavity Resonance – as fruit firmness testing shows, ripe interiors create more echo.
Rind Density Impact affects this too, with thinner rinds allowing better sound transmission.
These Hollow Sound Factors serve as reliable fruit ripening indicators:
- Tap with knuckles, not fingertips
- Listen for deep, hollow resonance
- Compare sounds across multiple fruits
- Avoid dull thuds indicating underripeness
- Practice on known ripe melons first
This sensory cue works best for harvesting fruit like watermelons and cantaloupes, utilizing the hollow sounds and Fruit Cavity Resonance for optimal results, and considering Rind Density Impact for accurate assessments.
Gentle Pressure and Yielding
Testing fruit firmness tells you when to pick.
Apply gentle pressure with your fingertips to check if fruit yields slightly without becoming mushy.
Avocado softening begins at the stem end, while kiwifruit pressure readings between 1.5-2.0 kgf indicate ripeness.
Peach penetrometer measurements help commercial growers determine harvest timing.
When melon detachment occurs naturally, firmness testing confirms readiness for harvesting fruit.
Fruit Specific Ripeness Signs
Each fruit tells its own ripeness story through unique signs that you’ll learn to recognize with practice.
Understanding these specific indicators helps you harvest at peak flavor and quality rather than guessing when fruit is ready.
Avocado Ripeness and Handling
Unlike other fruits that announce their readiness, avocados demand a more nuanced approach to ripeness assessment.
Proper handling techniques and storage methods guarantee the best fruit quality assessment for both commercial and home use.
One key factor in ripening is ethylene gas exposure, which helps trigger the softening process.
- Avocado firmness: Gently press the shoulders—ripe fruit yields slightly without mushiness
- Stem color: Remove the small cap; green underneath indicates perfect ripeness stages
- Nondestructive ripeness testing: Check skin texture for slight give and darkened pebbly surface
Mango and Pineapple Ripeness
Mangoes and pineapples require different approaches for ideal harvest timing.
Mango varieties like Tommy Atkins show color changes from green to red-orange, while pineapple cultivars develop golden-yellow skin from base upward.
Both fruits emit stronger aromas during ripening stages, with mangoes producing fruity scents and pineapples releasing sweet fragrances when ready.
| Indicator | Mango | Pineapple |
|---|---|---|
| Color | Green to yellow/red/orange depending on variety | Golden-yellow covering 2/3 of skin from base |
| Aroma | Deep fruity scent near stem end | Sweet fragrance from base area |
| Texture | Slight yielding when gently pressed | Mild softness near base, flattened "eyes" |
Citrus Fruits and Berries Ripeness
Citrus fruits like oranges and grapefruits show ripeness through uniform peel coloration and minimal green patches.
You’ll notice ripe citrus feels heavy for its size, indicating ideal juice content.
Berries reach peak ripeness when they display deep, uniform colors without white tips.
Here are key ripeness indicators for citrus and berries:
- Citrus sweetness develops when skin turns glossy yellow or orange with smooth texture
- Berry firmness should feel plump yet yield slightly without mushiness
- Acidity levels balance perfectly when citrus emits fragrant, sweet aromas
- Shelf life extends when fruit shows proper color development and dense weight
Stone Fruits and Kiwifruit Ripeness
Stone fruit color changes from green to vibrant hues signal peak ripeness. Peaches develop creamy backgrounds while plums show rich, uniform coloration. Kiwifruit firmness drops dramatically—from rock-hard to yielding gently. You’ll detect sweet, floral aromas near stems when ideal picking time arrives.
| Fruit Type | Color Indicator | Firmness Test |
|---|---|---|
| Peaches | Yellow/creamy background, no green | Yields to gentle pressure |
| Plums | Rich, uniform color throughout | Soft near stem, stays juicy |
| Kiwifruit | Olive-brown hue, slight wrinkling | 1-2 kgf pressure reading |
Storage effects determine final fruit quality after harvest, which is crucial for maintaining the vibrant hues and overall condition of the fruit.
Harvesting and Handling Ripe Fruit
Once you’ve mastered identifying ripe fruit, the next step is harvesting it at the perfect moment and handling it properly to maintain quality.
Proper timing and gentle techniques guarantee your fruit stays fresh longer and tastes its absolute best.
Optimal Harvest Timing and Methods
Perfect timing transforms your fruit from good to extraordinary.
You’ll maximize flavor and extend storage life when you hit those narrow harvest windows precisely.
- Monitor maturity indices: Check starch levels (3-4 for apples), sugar content (16-24°Brix for grapes), and firmness readings
- Use precision harvesting techniques: Hand-pick delicate fruits during cooler morning hours with proper tools to minimize damage
- Apply ripeness stage identification: Look for detachment ease, color changes, and optimal texture before picking
To guarantee the best harvests, consider using specialized measurement devices.
Post Harvest Handling and Storage
Once you’ve picked ripe fruit, proper handling and storing becomes your next priority.
Store most fruits at appropriate storage temperature with humidity control to extend shelf life.
Use refrigeration for delicate fruits like berries, while bananas and avocados prefer room temperature.
Implement ethylene mitigation by separating ethylene producers from sensitive fruits.
Following proper procedures for fruit ripening process can also help extend shelf life.
Follow fruit grading standards and cold chain protocols to maintain postharvest fruit quality throughout the handling and storing process, ensuring proper procedures are in place.
Monitoring Ripeness and Quality
Once you’ve stored your harvested fruit properly, ongoing monitoring becomes your next priority.
Check ripeness indicators daily using sensory cues like color, aroma, and gentle pressure testing. Quality assurance systems with data logging help track changes over time.
Ripeness technology and predictive modeling can forecast ideal consumption windows. Consider using a fruit ripeness monitor for accurate assessments.
Remember, consumer perception varies, so monitor fruit quality based on intended use and personal preferences for peak enjoyment. This approach ensures that you get the most out of your harvested fruit, taking into account the ideal consumption windows.
Reducing Spoilage and Waste
When proper Storage Techniques aren’t applied, you’ll watch perfectly ripe fruit turn into expensive compost.
Monitor harvest time carefully, as one overripe fruit can trigger spoilage in others through ethylene gas. Train your team on fruit quality indicators and shelf life expectations.
Consider Processing Options for borderline fruit rather than discarding it. Understanding optimal humidity levels can substantially extend fruit preservation.
Smart Transportation Impact planning and Consumer Education about fruit storage can extend usability and reduce Supply Chain waste considerably.
Frequently Asked Questions (FAQs)
How to determine the ripeness of fruit?
Check color changes, sniff for sweet aromas, and gently squeeze for slight give. Heavy fruits often taste juicier, while firm-but-yielding texture signals readiness without mushiness.
How to tell when fruit is ready to harvest?
Like a compass guiding you home, ripe fruit reveals its readiness through color changes, sweet aromas, and gentle yield to pressure.
You’ll know it’s time when fruits feel heavy, develop their characteristic colors, and emit fragrant scents, which are key indicators of ripeness, including the development of fragrant scents.
How long before harvest should ripening begin?
Ripening should start 7-14 days before harvest, depending on the fruit type.
You’ll notice color changes, softening textures, and developing aromas during this pivotal window when sugars concentrate and flavors peak.
Can you speed up fruit ripening naturally?
Yes, you can speed up fruit ripening naturally.
Place fruits in a paper bag with a banana or apple—these release ethylene gas that triggers ripening.
Keep at room temperature away from direct sunlight for faster results.
What temperature affects ripening most significantly?
Temperature affects fruit ripening dramatically. You’ll find that warmer temps between 68-77°F accelerate ripening by boosting ethylene production, while cooler storage below 55°F slows the process considerably.
Does sunlight exposure change ripening patterns?
Notably, sunlight exposure dramatically alters ripening patterns by accelerating sugar development and color changes. You’ll notice fruits on sunny sides ripen faster and develop deeper colors than shaded areas.
When should you stop watering before harvest?
Stop watering 7-14 days before harvest to concentrate sugars and flavors. This stress signals the plant to focus energy on fruit development rather than growth, creating sweeter, more flavorful produce.
Conclusion
Mastering identifying ripeness for harvesting fruit will revolutionize your garden-to-table experience forever.
You’ll save money, reduce waste, and enjoy peak flavors when you apply these techniques consistently.
Remember that each fruit type has unique indicators, so you’ll need to adjust your approach accordingly.
Practice these methods regularly, and you’ll develop an intuitive sense for perfect timing.
Trust your senses, be patient with the learning process, and soon you’ll harvest fruit at its absolute prime every single time.


