This site is supported by our readers. We may earn a commission, at no cost to you, if you purchase through links.
 You’ll find success with seed starting containers for small spaces by choosing compact, space-efficient options that maximize your growing potential.
Biodegradable peat pots work brilliantly since they transplant directly into the ground without root disturbance. Self-watering seed trays eliminate daily maintenance while conserving counter space.
Vertical seed starting racks multiply your capacity without expanding your footprint. Recycled materials like egg cartons and yogurt containers offer budget-friendly alternatives that perform surprisingly well.
Hydroponic seed starter systems provide professional results in minimal space. The key lies in selecting containers with proper drainage and choosing the right growing medium for ideal germination rates.
Smart container selection can transform even the tiniest apartment into a productive seed-starting operation with compact and space-efficient options.
Table Of Contents
- Key Takeaways
- Seed Starting Basics
- Small Space Seed Starting
- Top 6 Seed Starting Containers
- Optimizing Seed Starting Conditions
- Efficient Seed Starting Techniques
- Frequently Asked Questions (FAQs)
- What is the best container for starting seeds?
- How to start seeds indoors with little space?
- Is it better to start seeds in small pots?
- What to use instead of a seed tray?
- Can recycled containers affect seed germination rates?
- How often should self-watering trays be refilled?
- What seeds work best in soil blocks?
- Do LED lights increase electricity bills significantly?
- When should humidity domes be completely removed?
- Conclusion
Key Takeaways
- Choose biodegradable containers like peat pots or soil blocks – they’ll eliminate transplant shock and let you plant directly in the ground without disturbing roots
- Maximize vertical space with seed starting racks that can triple your growing capacity in the same footprint, fitting 240+ seedlings in under 4 square feet
- Invest in self-watering systems to maintain consistent moisture for days without daily attention, achieving 90%+ germination rates while reducing maintenance
- Ensure proper drainage in all containers to prevent root rot and damping-off disease – waterlogged seedlings fail faster than you can replace them
Seed Starting Basics
Starting seeds successfully requires understanding three fundamental principles that determine germination rates and seedling health.
You’ll need biodegradable containers for transplant-shock prevention, proper drainage systems to avoid root rot, and specialized seed starting mixes that provide ideal aeration and moisture retention, all of which contribute to successful seedling health.
Benefits of Biodegradable Containers

Biodegradable containers revolutionize small-space seed starting by eliminating transplant shock.
Transform your tiny space into a seedling powerhouse with containers that work smarter, not harder.
These eco-friendly solutions break down naturally in soil, creating seamless shifts from seed to garden.
- Peat pots: Compressed organic materials promote healthy root development through natural air circulation
- Paper containers: Recycled, food-grade materials offer sustainable alternatives to plastic options
- Cardboard tubes: Toilet paper rolls become instant compostable containers for direct transplanting
Sustainable materials like biodegradable pots reduce plastic waste while supporting stronger seedling establishment.
Importance of Proper Drainage

Without proper drainage, you’re setting yourself up for seedling disaster.
Waterlogged roots can’t breathe, leading to damping-off disease and root rot.
Your biodegradable containers need adequate drainage holes for moisture control and soil aeration.
One major concern is insufficient watering, which can halt germination.
Smart drainage systems prevent these costly mistakes while maintaining healthy root development.
| Poor Drainage | Proper Drainage |
|---|---|
| Soggy, anaerobic soil conditions | Well-aerated growing medium |
| Root rot and fungal diseases | Healthy, white root systems |
| Stunted, yellowing seedlings | Vigorous, green growth |
| Complete seedling failure | Strong transplant success |
Choosing The Right Seed Starting Mix

Creating the right seed starting mix determines whether your seeds thrive or struggle in containers.
Garden soil’s density creates waterlogged conditions that kill seedlings faster than you can say "damping off."
Your ideal seed starting mix needs these components:
- Coco coir or peat moss – provides water retention without becoming soggy
- Vermiculite – improves nutrient balance and aeration for healthy roots
- Perlite – guarantees proper drainage in small space gardening setups
- Sterilization methods – prevents disease in your seed starting containers
- pH testing strips – maintains ideal soil pH between 6.0-7.0
Mix ingredients in equal parts for foolproof germination success.
Small Space Seed Starting
Small spaces don’t have to limit your seed starting success when you choose the right containers and systems.
Vertical racks, hydroponic setups, and self-watering trays maximize your growing capacity while minimizing your footprint, which is a key factor in small spaces.
Utilizing Vertical Seed Starting Racks

When you’re juggling seedlings in tight quarters, vertical seed starting racks become your space-saving superheroes.
These multi-tiered systems multiply your growing capacity by 2-3 times per square foot through smart space optimization.
Most racks feature adjustable shelving for plant support and integrated lighting systems.
To guarantee adequate light, consider a system with fluorescent shop lights.
Choose powder-coated steel rack materials for durability, and consider models with built-in watering systems for automated care.
Compact Hydroponic Seed Starters

Hydroponic seed starters eliminate soil mess while accelerating germination rates up to five times faster than traditional methods.
These compact hydroponics systems require 80% less water through recirculating nutrient solutions and superior root aeration. Small space planters featuring rockwool or oasis cubes prevent disease while maintaining ideal moisture.
System maintenance involves monitoring pH levels and ensuring proper lighting needs are met for healthy seedling transplant readiness. Many growers use Deep Water Culture for its simplicity.
Self-Watering Seed Starter Trays

Self-watering seed starting trays transform urban gardening by providing consistent moisture through built-in water reservoirs.
These innovative seedling trays eliminate guesswork for busy gardeners, reducing watering frequency while maintaining ideal growing conditions in small spaces.
These are available at self watering trays.
Key benefits of selfwatering trays:
- Automated hydration system – Water reservoir delivers steady moisture to small seed containers without oversaturation
- Space-efficient design – Compact seed starting trays maximize seedling production in limited areas
- Reduced maintenance – Perfect for busy gardeners who can’t monitor daily watering schedules
- Enhanced germination rates – Consistent moisture levels promote healthier seedling development
Top 6 Seed Starting Containers
You’ll find the perfect container for your space constraints among these six carefully selected options. Each container type offers unique advantages for maximizing seedling production while minimizing your growing footprint.
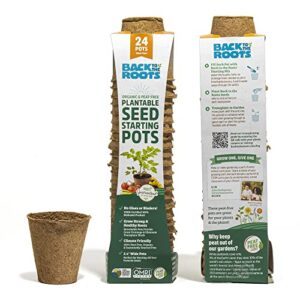
1. Organic Plantable Seed Starting Pots
 View On Amazon
Why settle for plastic when biodegradable pots offer superior root health? These organic, plantable containers eliminate transplant shock by allowing direct soil planting.
Made from sustainable wood fibers, they’re USDA-certified biobased and completely peat-free. The 2.4-inch size fits perfectly in compact spaces while providing excellent drainage.
You’ll watch roots penetrate naturally through breathable walls, promoting 25% faster establishment. They decompose within months, enriching your soil with organic matter.
To avoid burning tender seedlings, remember to wait until the first true leaves appear before fertilizing, ensuring the best start for your plants with superior root health and a completely peat-free environment.
Best For: Eco-conscious gardeners who want to eliminate transplant shock while supporting sustainable growing practices and improving root health.
- Requires frequent watering monitoring as organic materials dry out faster than plastic containers
- May need additional drainage hole modifications to prevent seed mix loss through large openings
- Not suitable for long-term plant growth, designed specifically for seed starting and early transplanting phases
- Eliminates transplant shock by allowing roots to grow through biodegradable walls, resulting in 25% faster plant establishment
- Made from USDA-certified sustainable wood fibers that decompose within 6-12 months, enriching soil with organic matter
- Superior water management with natural moisture regulation that reduces overwatering and root rot by up to 70%
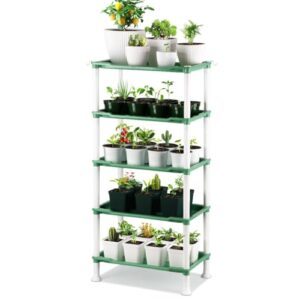
2. Seed Starting Rack Kit
 View On Amazon
Vertical rack kits transform cramped spaces into seedling powerhouses, supporting up to 240 plants in just 27.5" x 12.5" footprints.
You’ll get adjustable LED lights with programmable timers, heating mat compatibility, and collapsible storage that fits under beds.
Wire metal construction handles heavy soil trays without wobbling, while adjustable shelf heights accommodate everything from tiny herbs to tall tomato seedlings.
Perfect for apartments or basements lacking natural light.
Best For: Space-constrained gardeners who need to start multiple seedlings indoors without access to adequate natural light or outdoor space.
- Assembly issues with shelf alignment and pole connections frequently reported by users
- Structural durability concerns, with units prone to tipping when loaded or moved
- Additional heating mats and accessories often required for optimal germination, increasing total cost
- Maximizes growing capacity in minimal space, supporting up to 240 seedlings in under 3.5 square feet
- Integrated LED lighting with timers eliminates dependence on natural light and automates daily cycles
- Collapsible design stores easily under beds or in closets during off-season
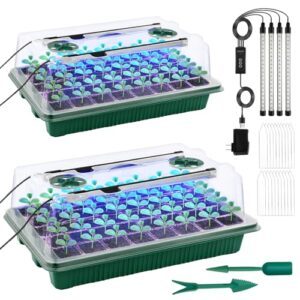
3. indoor seed starter grow kit
 View On Amazon
Complete indoor seed starter grow kits offer everything you’ll need to transform your countertop into a mini greenhouse.
These 60-80 cell systems pack LED grow lights, humidity domes, and water reservoirs into compact footprints that fit standard shelving.
With 18-hour light cycles and bottom-watering systems, you’ll see germination in 3-7 days while maintaining 90% seedling survival rates.
The adjustable brightness and modular components make these kits perfect for apartment dwellers wanting reliable results without the guesswork.
Best For: Apartment dwellers and small-space gardeners who want a reliable, compact system to start seedlings indoors with professional-level germination rates.
- Complete all-in-one system with LED grow lights, humidity domes, and bottom-watering reservoirs that delivers 90% seedling survival rates
- Compact design fits on standard shelving while supporting 60-80 seedlings, maximizing growing capacity in minimal space
- Low-maintenance operation with 10 days between watering and adjustable lighting that eliminates guesswork for beginners
- Outer cells may become waterlogged from humidity dome condensation, requiring monitoring and adjustment
- LED lights operate in fixed pairs and may be insufficient brightness for larger, more mature plants
- Heat mats must be purchased separately, adding to the initial investment cost for optimal germination performance
4. Burpee Self Watering Seed Trays
 View On Amazon
Efficiency meets innovation in these 72-cell trays that eliminate guesswork from watering schedules.
You’ll appreciate the specialized wicking mat that draws moisture from a bottom reservoir, maintaining consistent hydration for several days without attention.
The expandable coir pellets create ideal growing conditions while the soft silicone bottoms make transplanting effortless—just push seedlings out as healthy plugs.
With numbered cells for organization and reusable construction, these trays deliver professional results in compact spaces.
Best For: Busy gardeners and beginners who want consistent germination results without the hassle of daily watering schedules.
- Labor-intensive initial setup requires expanding pellets and careful assembly of multiple components
- Heavy and difficult to move when water reservoir is full, limiting portability around growing areas
- Some users report missing components like coconut coir pods upon delivery
- Self-watering system maintains optimal moisture for days, eliminating guesswork and reducing seedling loss
- Soft silicone bottoms make transplanting effortless by allowing you to push out healthy seedling plugs
- Durable, reusable construction with numbered cells for organization provides excellent long-term value
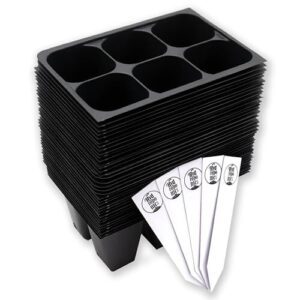
5. Hydroponic Seed Starter Cell Trays
 View On Amazon
With hydroponic seed starter cell trays, you’re maximizing your space like a chess grandmaster—every square inch counts.
These trays accommodate 128-242 seedlings per unit, achieving 90-100% germination rates through nutrient-infused plugs and controlled moisture.
Their pyramid-shaped cells prevent root tangling while floating designs maintain even hydration via capillary action.
Built from durable polystyrene, they’re reusable across multiple seasons, and the modular format streamlines transplanting with minimal root disturbance.
The modular format makes them perfect for apartment dwellers seeking serious seed-starting efficiency.
Best For: Apartment dwellers and small-space gardeners seeking maximum seedling production with professional-grade germination rates and efficient transplanting workflow.
- Exceptional space efficiency with 128-242 seedlings per tray and 90-100% germination rates through nutrient-infused plugs
- Pyramid-shaped cells prevent root tangling while floating designs maintain consistent moisture via capillary action
- Durable polystyrene construction enables multi-season reuse with modular format for streamlined batch transplanting
- Higher upfront investment compared to traditional soil-based starter trays and pots
- Requires understanding of hydroponic nutrient management and pH monitoring for optimal results
- Limited to smaller seedlings as compact cell size may restrict root development for larger plant varieties
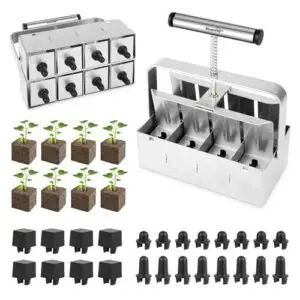
6. Soil Block Maker for Seeds
 View On Amazon
Revolutionary gardeners, meet your container-free solution.
Soil block makers eliminate plastic waste while creating self-contained growing cubes that air-prune roots naturally.
You’ll craft 240 seedlings in a standard tray using compressed soil blocks that prevent root binding and transplant shock.
The 8-cell stainless steel maker produces 2-inch blocks perfect for most seeds.
Though mastering soil consistency requires practice, you’ll achieve 95% germination rates and stronger root systems that outperform traditional containers, with self-contained growing cubes and air-prune roots naturally.
Best For: Eco-conscious gardeners who want to eliminate plastic waste while achieving superior germination rates and healthier seedlings for small-space growing.
- Requires practice and experimentation to master optimal soil consistency and moisture ratios
- Learning curve can be frustrating initially, with some users reporting broken parts in packaging
- Heavier construction (1530g) and squeaky spring operation may feel cumbersome compared to lightweight plastic alternatives
- Achieves 95% germination rates with air-pruned roots that prevent transplant shock and root binding
- Eliminates plastic waste while fitting 240 seedlings in a standard 12"x26" tray for maximum space efficiency
- Durable stainless steel construction provides long-term value with no recurring container costs
Optimizing Seed Starting Conditions

You’ve got your containers sorted, but creating ideal growing conditions determines whether your seeds thrive or merely survive.
The right combination of location, lighting, and humidity control transforms any cramped corner into a productive seedling nursery.
Selecting The Best Location for Seed Starting
Your indoor setup needs warm, well-lit spaces to maximize germination success.
Space assessment determines whether you’ll use compact planters or larger seed starting kits.
Consider these key location factors:
- Temperature control: Maintain 65-75°F for ideal germination rates
- Indoor seed starters: Choose heated rooms or basements with supplemental lighting
- Small garden planters: Position near south-facing windows for maximum natural light
- Outdoor options: Wait until soil temperature reaches 50°F consistently.
Small spaces require strategic planning for your seed starting containers.
Essential Lighting for Seed Starting
Your seedlings need proper light exposure to thrive. LED grow lights offer superior LED efficiency and ideal light distribution with reflective backing.
Position lights 2-4 inches above seedlings for the best distance during the seedling stage. Full-spectrum LEDs provide the right light spectrum your plants crave.
Consider LED grow light options for efficient plant development. Maintain 14-18 hours of light duration daily using timers for consistent growth.
Managing Humidity and Preventing Pests
Once you’ve got your lighting sorted, humidity management becomes your next priority for healthy seedling development.
Proper airflow and humidity control prevent common seedling diseases that can wipe out entire trays overnight.
- Monitor humidity levels: Keep relative humidity between 70-80% during germination, then reduce to 50-60% after sprouting
- Remove humidity domes promptly: Take off covers once seeds germinate to prevent mold prevention issues and improve air circulation
- Ensure adequate airflow: Use small fans or open vents to maintain gentle air movement around seedlings
- Apply organic solutions: Use diluted hydrogen peroxide or cinnamon for natural pest prevention and fungal disease control
Efficient Seed Starting Techniques

You’ll maximize your seedling success by mastering two key areas: resourceful container alternatives and proven germination methods.
Smart recycling techniques and evidence-based growing practices can turn even the smallest spaces into productive seed-starting operations, utilizing proven germination methods.
Using Recycled Materials for Seed Starting
You can transform everyday household waste into effective seed starting containers without spending a dime.
Toilet paper rolls cut into sections create plantable pots that decompose in soil. Egg carton planters offer individual cells perfect for small seeds, while milk jug greenhouses provide humidity control.
Yogurt container starts need drainage holes but work excellently for larger seedlings. Takeout container trays organize multiple plantings efficiently, and soda bottle cloches protect delicate sprouts from temperature fluctuations.
Remember to use a sterile seed starting mix for best results to ensure your seeds grow into healthy plants, and consider the humidity control and temperature fluctuations when choosing your container.
Tips for Successful Seed Germination and Growth
Beyond recycled materials, you’ll achieve better germination by mastering three key factors. Consistent Moisture prevents seeds from drying out, while Adequate Airflow reduces fungal diseases in your seed trays. Root Development thrives when you maintain ideal conditions for Seedling Hardening.
Here’s your success formula for small spaces:
- Monitor soil moisture daily using the finger test
- Position fans nearby for gentle air circulation
- Gradually reduce watering frequency before transplanting
Nutrient Management becomes critical once cotyledons appear. These seed starting tips guarantee healthy seedling growth in compact setups.
Frequently Asked Questions (FAQs)
What is the best container for starting seeds?
For starting seeds, you’ll want 72-cell plug trays or 2-inch soil blocks as your go-to choice.
They’re the "goldilocks" standard – not too big, not too small, just right for healthy root development.
How to start seeds indoors with little space?
Use vertical seed starting racks to maximize growing space upward.
Choose 72-cell plug trays or compact hydroponic systems. Self-watering trays reduce maintenance.
DIY options include toilet paper rolls and recycled containers with drainage holes.
Is it better to start seeds in small pots?
Like planting seeds in nature’s own starter cups, small pots aren’t always ideal.
Cell trays or 2-inch soil blocks provide better space efficiency and root development.
Small containers can become rootbound quickly, stunting growth before transplanting.
What to use instead of a seed tray?
You can repurpose household items like yogurt cups, egg cartons, toilet paper rolls, or milk cartons with drainage holes. These recycled containers work perfectly for starting seeds affordably.
Can recycled containers affect seed germination rates?
Recycled containers can act like Goldilocks’ porridge bowls – some work perfectly, others don’t.
Poor drainage, chemical residues, or inadequate ventilation can reduce germination rates by 15-30%, so you’ll need proper preparation and drainage holes.
How often should self-watering trays be refilled?
You’ll typically refill self-watering trays every 7-10 days, depending on environmental conditions and seedling size.
Check the reservoir regularly—when water levels drop to about 25% capacity, it’s time to top off for ideal moisture maintenance.
What seeds work best in soil blocks?
Good things come to those who sow! You’ll find success with smaller seeds like lettuce, herbs, spinach, and radishes in soil blocks. Their compact root systems thrive without containers.
Do LED lights increase electricity bills significantly?
LED lights consume 20-50% less electricity than fluorescent lights.
For seed starting, you’ll typically use 24-50 watts per shelf.
This adds roughly $5-15 monthly to your bill, making LEDs cost-effective for indoor gardening.
When should humidity domes be completely removed?
Absolutely remove humidity domes once those precious seedlings sprout their first true leaves. You’ll prevent damping-off disease and encourage stronger stem development by eliminating excess moisture at this critical stage.
Conclusion
Transforming cramped quarters into flourishing nurseries seems impossible—until you discover proper seed starting containers for small spaces.
These six compact solutions maximize germination potential while minimizing footprint requirements. From biodegradable pots eliminating transplant shock to vertical racks tripling capacity, each option delivers professional results.
Whether you’re utilizing hydroponic systems or repurposing household materials, success depends on drainage excellence and growing medium selection.
Your apartment’s seed-starting operation awaits strategic container choices that prove space limitations never limit gardening ambitions.
- https://lovelygreens.com/seed-starting-with-recycled-materials/
- https://www.reddit.com/r/vegetablegardening/comments/zw3i6j/seed_starting_on_a_budget/
- https://www.gardenary.com/blog/the-best-seed-starting-trays-to-start-seeds-indoors
- https://twosistersflowerfarm.com/favorite-seed-starting-trays/
- https://www.botanicalinterests.com/products/epic-tray-gardener-start-kit