This site is supported by our readers. We may earn a commission, at no cost to you, if you purchase through links.

A single night below 50°F can wipe out a basil plant you’ve been nursing for weeks. Tender seedlings and warm-season crops have no tolerance for cold snaps—and by the time the damage shows, it’s already done.
Cloches solve this quietly. These simple covers trap solar heat in the soil, push internal temperatures up by 5 to 10 degrees, and create a stable microclimate that keeps vulnerable plants growing when the weather turns against you. Gardeners have relied on them for centuries, long before plastic fleece or poly tunnels existed.
Knowing how to keep vegetables warm with cloches is less about having the right equipment and more about using it correctly—when to install, how to vent, and when to pull them off without shocking the plant. Each of those steps matters more than most gardeners realize.
Table Of Contents
- Key Takeaways
- Choose Vegetables That Need Cloches
- Pick The Right Cloche Type
- Pre-Warm Soil Before Planting
- Set Cloches Over Vegetables Correctly
- Trap Heat for Cold Nights
- Vent Cloches During Warm Days
- Manage Moisture Under Cloches
- Anchor Cloches Against Wind
- Top 4 Cloche Support Items
- Remove Cloches Without Shocking Plants
- Frequently Asked Questions (FAQs)
- Do cloches keep food warm?
- How to keep vegetables warm?
- Can cloches protect vegetables from pests and insects?
- How do cloches affect pollination of flowering crops?
- Which cloche materials work best in heavy rainfall?
- Can cloches be reused across multiple growing seasons?
- Do cloches work effectively in raised garden beds?
- Conclusion
Key Takeaways
- Pre-warming bare soil for 7–10 days before transplanting, then sealing cloche edges 2–3 inches into the ground, gives roots a stable thermal buffer that prevents cold shock and accelerates early establishment.
- Timing matters as much as equipment: install cloches by mid-afternoon to trap peak solar heat, vent by 10:30–11:00 AM to prevent overheating, and reseal before sunset to lock in the day’s warmth overnight.
- Double-layering cloches cuts convective heat loss by 30–40%, keeping soil up to 6°C warmer on the coldest nights—making it the single most effective upgrade for protecting tender crops like tomatoes, peppers, and basil.
- Hardening off is non-negotiable: start with just 1–2 hours of uncovered time on overcast mornings and only remove cloches permanently once three consecutive frost-free nights are confirmed and soil holds above 2°C for 48 hours.
Choose Vegetables That Need Cloches

Not every vegetable experiences cold snaps the same way, and knowing which ones actually need protection saves you from over-covering hardy plants or leaving vulnerable ones exposed.
Leaning toward cold-resistant vegetable varieties for fall harvests means less scrambling when temperatures suddenly drop.
Some crops are far more sensitive to temperature swings than others, making cloches a real lifesaver for their survival and productivity. Here are the vegetables that benefit most from cloche protection.
Tender Seedlings
Freshly germinated seedlings are the most vulnerable plants in your garden. Their thin stems and high moisture content make them easy targets for cold snaps and damping off.
Cloches or mini greenhouses raise nighttime temperatures by 3 to 5 degrees, keeping that critical warmth locked in. Maintain humidity around 60 to 70 percent to support strong root ball development without encouraging mold. Providing consistent warm-weather germination helps make sure your crops thrive from the very beginning.
Leafy Greens
Leafy greens like lettuce, spinach, and arugula don’t need blazing heat — they need steady microclimate control. A simple glass jar or repurposed plastic bottle placed over young plants holds just enough warmth to keep frost from biting tender leaves while locking in moisture.
Spinach and arugula also pack iron, magnesium, and antioxidant carotenoids, so protecting them early pays off at the table too.
Tomatoes and Peppers
Where leafy greens forgive a chill, tomatoes and peppers won’t. As nightshade family crops, both need sustained warmth — peppers especially require 75–86°F for steady fruiting. Cloches deliver that early:
- Faster fruit ripening and color shift from green to red
- Higher lycopene production in tomatoes
- Better capsaicin development in hot peppers
- Protection from cold rain and disease
- A longer growing season
Basil and Cilantro
Herbs are almost more delicate than any fruiting crop when temperatures swing. Basil wilts and blackens below 50°F, and cilantro bolts fast under sudden heat.
A simple glass jar or DIY bottle cloche gives both herbs the stable microclimate they need — steady warmth, reduced wind exposure — so leaves stay tender, aromatic, and ready to harvest right when your cooking calls for them.
Fall Season Crops
Fall is actually when cloches earn their keep most. Frost-sweetened carrots and winterizing Brussels sprouts develop richer flavor after a light freeze, so you want them in the ground and protected through November.
Cold-tolerant kale, autumn beets, and fall radishes all respond well to fleece covers, extending your growing season by weeks without much extra effort.
Pick The Right Cloche Type

Not every cloche works for every situation, so picking the right type from the start saves you a lot of backtracking later. Your choice depends on the crop size, your budget, and how much temperature control you actually need. Here are the main options worth knowing.
Glass Bell Cloches
Glass bell cloches are the classic choice — their dome shape raises internal temperatures by 5–10°F while delivering excellent light transmission to individual plants. Three reasons gardeners reach for them first:
- Full-spectrum light reaches foliage without filtering
- Their vintage garden decor aesthetic suits cottage-style beds
- Clear glass is simple to maintain with routine wiping
Rinse and dry between uses to preserve clarity.
Plastic Bottle Cloches
Repurpose a 2-liter bottle and you have a DIY cloche ready in seconds. Invert it over tender seedlings — clear PET plastic transmits 85–92% of visible light while locking warmth around the stem and soil surface.
| Feature | Detail |
|---|---|
| Bottle Sizing Guide | 2-liter for taller crops; 1-liter for compact seedlings |
| PET Plastic Durability | Impact-resistant; reusable across multiple growing seasons |
| DIY Bottle Modification | Cut the base or neck to match plant height |
| Recycling Garden Waste | Repurposed objects cost virtually nothing |
| Light Transmission Efficiency | 85–92% visible light reaches foliage |
Loosen the cap on warm days when protecting plants from overheating matters most. Wash with soapy water between uses, store dry, and replace any bottle that cracks or clouds over.
Fleece Row Covers
Fleece row covers work more like a blanket than a cloche — soft, breathable, and draped directly over entire beds. Spunbond polypropylene fleece transmits 70–90% of sunlight while raising temperatures 4–6°F, and heavier weights push frost protection down to around -8°C.
The fabric also acts as a physical pest barrier, deterring thrips and flea beetles without chemicals. Anchor edges firmly and vent on warm days to keep microclimate humidity in check.
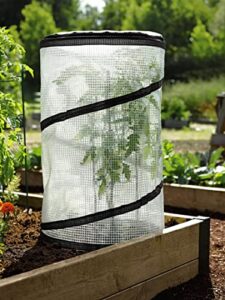
Poly Tunnel Cloches
Poly tunnel cloches scale up protection without sacrificing control. UV-stabilized polyethylene stretched over galvanized steel frames creates a semi-greenhouse corridor that raises temperatures 2–8°C above outside conditions, smoothing out those punishing overnight dips that stall seedling establishment.
The modular assembly lets you extend coverage across entire rows, while double-layer versions cut heat loss by 30–40%, giving you genuine microclimate temperature stability through unpredictable spring weather.
Mason Jar Covers
You probably already have a few of these in the kitchen. Large glass mason jars flipped over individual seedlings act as compact garden cloches, trapping warmth and moisture around tender seedlings with no assembly required.
They’re easy to clean, endlessly reusable, and deliver a genuine mini greenhouse effect — enough to protect basil or lettuce from a surprise cold snap without spending anything.
Pre-Warm Soil Before Planting

Putting a cloche over cold ground without warming it first is like tucking a seedling into a cold bed — it slows establishment and stresses roots before they even get started.
A few days of pre-warming makes a real difference, and the steps are straightforward once you know what to look for. Here’s how to get your soil ready before a single plant goes in.
Cover Bare Soil Early
Bare soil left exposed in early spring loses moisture up to 40 percent faster than covered ground, draining the very resources your seedlings need most.
A simple layer of compost or mulch holds that moisture in, shields fine topsoil from erosion, and keeps soil surface temperatures 5 to 10 degrees warmer — giving germination a genuine head start before your cloches even go on.
Trap Afternoon Sunlight
Once your soil is covered and holding moisture, timing your cloche placement around the sun does most of the warming work for you.
Position your glass cloches or DIY cloches to face west or southwest, where afternoon sun intensity hits longest. Heat absorbed by dark soil under clear covers lingers well into evening, giving roots a warmer overnight start.
Check Soil Temperature
Knowing your soil is actually warm enough matters more than guessing. Push a digital soil thermometer 2 to 4 inches deep — that’s where most vegetable roots are active — and take your reading in the morning, after overnight temperatures have settled.
Moist soil reads warmer than dry soil, so water before you measure for an accurate baseline under your cloches.
Warm Upper Root Zones
Once you know your soil temperature, you can act on it. The upper 4 inches of soil are where root metabolism and nutrient uptake happen first — and where a garden cloche makes the biggest difference.
- Moist soil improves moisture heat transfer, warming roots faster
- Phosphorus availability drops when soil exceeds 25°C
- Dark soil boosts soil heat capacity under cloches
- Warm roots accelerate early leafy green establishment by up to 35 percent
Reduce Cold Shock
Transplants moved directly from warm indoors to cold soil often stall — roots simply shut down. Pre-warming the soil for 7–10 days beforehand cushions that change, giving roots a stable thermal buffer instead of a sudden drop.
| Technique | Benefit | Timing |
|---|---|---|
| Cloche pre-warming | Raises soil 5–10°F | 7–10 days before transplant |
| Buried cloche edges | Blocks cold drafts | At installation |
| Double-layer covers | Reduces heat loss 30–40% | Cold nights |
Gradual acclimation matters just as much as the cover itself.
Set Cloches Over Vegetables Correctly
Placing a cloche correctly makes the difference between a thriving plant and a stressed one. It’s not just about dropping a cover on top — position, clearance, and edge sealing all matter more than most gardeners expect. Here’s how to get each one right.
Center Over Each Plant

Top alignment is everything when placing a cloche. Position the center of the cover directly over the main stem so heat radiates evenly through the stem zone warmth pocket.
This creates vertical air channels that vent excess heat naturally and helps uniform light interception across surrounding leaves, keeping your plant growing straight and steady rather than leaning toward one warmer side.
Leave Foliage Clearance

Foliage touching the inside of a cloche traps moisture against leaves, creating exactly the warm, humid conditions that fungal disease and pest overwintering thrive in.
Keep at least an inch of clearance between the cover walls and any surrounding leaves — enough room for air to circulate without letting cold drafts settle directly onto the plant.
Seal Lower Edges

A loose edge is where warmth escapes fastest. Elastomer or foam seals compress gently against soil, stopping convective exchange between the garden cloche and cold outside air.
- Retain soil moisture near plant roots
- Block ground-level cold drafts
- Maintain frost protection through the night
Bury the lower rim 2 to 3 inches into soil to preserve seal integrity.
Avoid Crushing Seedlings

Even the gentlest placement can snap a tender stem if you press straight down. Tilt and slide each cloche in from the side instead, keeping a 1–2 cm gap between the rim and leaf tips.
Before covering, check that true leaves haven’t grown past a quarter of the cloche height — if they’ve, re-center or choose a taller cover.
Space for Growth

A cloche that fits today can choke growth by next week:
- Leave 1–2 cm clearance above current leaf tips
- Use hoops 18–24 inches tall for larger crops like kale
- Upgrade DIY cloches as seedlings expand
- Track growth weekly to schedule cover changes
- Match cover size to each crop’s full height at maturity
Plant protection only works when the space scales with your plants.
Trap Heat for Cold Nights

Cold nights can undo a week’s worth of careful growing if your cloches aren’t working hard enough once the sun goes down. The good news is that a few simple techniques make a real difference in how much heat your covers actually hold through the night. Here’s what to do before temperatures drop.
Install Before Sunset
Late afternoon preparation is your best opportunity. Set the garden cloche while the soil still holds peak solar heat retention, trapping warmth before temperatures slide after sunset.
| Timing | Soil State | Outcome |
|---|---|---|
| 2–4 PM | Dark, warm | Strong heat absorption |
| At sunset | Cooling | Warmth sealed inside |
| After dark | Cold | Little benefit gained |
Evening installation timing locks in residual warmth, making overnight frost prevention far more effective.
Use Dark, Moist Soil
Soil color matters more than most gardeners expect. Dark, moist soil absorbs 80 to 90 percent of solar radiation during the day, then slowly releases that stored warmth through the night — giving roots a stable buffer against cold air above.
Organic matter and humus keep moisture locked in, which also raises near-root humidity and keeps microbial activity ticking, supporting nutrient availability even when temperatures dip.
Bury Edges Lightly
Warm soil only stays warm if cold air can’t sneak in underneath. Push cloche edges 2 to 3 inches into the soil to seal out ground-level drafts — that shallow burial makes a surprisingly big difference overnight.
No need to go deep; just enough to eliminate the gap where cold air creeps in and undoes everything the dark soil worked to hold.
Block Cold Drafts
Even with edges buried, exposed garden surroundings still funnel cold air toward your plants.
A windbreak fence with staggered slats can cut wind speed by 15 to 25 percent, and dense evergreen hedges along north and east borders reduce cross drafts by up to 40 percent — giving your cloches a much calmer environment to do their job.
Add Double Layers
Think of double layering as wrapping your garden in a coat and then a jacket. The outer layer reflects radiant heat while the inner one traps a warm air pocket between them, cutting convective heat loss by 30 to 40 percent.
Double layering your cloches works like a coat over a jacket, trapping a warm air pocket that cuts heat loss by up to 40 percent
On the coldest nights, that gap can keep soil temperatures up to 6°C warmer — enough to protect tender seedlings from a fatal dip.
Vent Cloches During Warm Days

On warm days, a cloche can quickly flip from protector to problem if you don’t manage the heat inside. Temperatures can climb fast once the sun gets going, and your plants won’t thank you for leaving them to swelter. Here’s how to stay ahead of that with a few simple venting habits.
Open by Midmorning
By 10:30 to 11:00 am, lift your cloches to let fresh air circulate beneath. This window clears overnight condensation before it settles on leaves, cutting fungal risk without chilling tender vegetables.
Dew accumulation under an enclosed cover creates the kind of leaf wetness that invites disease, so timing your ventilation to midmorning gives plants a drier, steadier microclimate through the warmest part of the day.
Prevent Overheating
Once internal temperatures climb past 75 to 80°F, plants shift from thriving to struggling fast. Don’t wait for wilting — heat stress sets in quietly.
Lift or tilt your cloche, or drape a 40–50% shade cloth overhead to cut radiant heat by up to 40 percent. A white or reflective cover also helps deflect solar radiation before it builds.
Clear Condensation
A fog-covered cloche isn’t just annoying — humidity above 70 percent inside your glass or plastic cloche creates the damp conditions that fungal diseases thrive on.
When warm air meets the cooler inner surface and drops to the dew point, droplets form fast. Opening your cloche by midmorning lets that moisture escape before it lingers.
Improve Airflow
Strategic clustering of cloches promotes cross-ventilation between adjacent plants, so spacing them evenly along a bed keeps air moving instead of stagnating. A gap of just 1–2 centimeters at the cloche edge allows slow, continuous exchange without inviting cold drafts.
Fleece covers handle this naturally — their breathable weave encourages micro air movement while still holding warmth close to the foliage.
Close Before Evening
As afternoon light fades, replace cloches before sunset to trap the day’s accumulated soil warmth overnight. Dark, moist soil beneath your covers reradiates heat for hours — but only if covers are sealed early enough to catch it.
- Check edges are tucked
- Bury sides 2–3 inches
- Close poly tunnels fully
- Set a reminder at dusk
Think of it as your garden’s evening shutdown routine.
Manage Moisture Under Cloches

Keeping moisture balanced under cloches is just as important as managing heat. Too much humidity trapped inside encourages fungal problems, while dry soil stresses roots that can’t pull water from the air alone. Here’s how to stay on top of moisture so your plants thrive, not just survive.
Check Soil Daily
Slip a moisture meter probe 4 to 6 inches into the soil each morning before checking your cloches.
| Moisture Reading | Soil Condition | Action |
|---|---|---|
| Below 10% | Critically dry | Irrigate immediately |
| 15%–25% | Ideal for most crops | Maintain routine |
| Above 30% | Oversaturated | Improve ventilation |
Consistently tracking volumetric water content keeps root oxygen levels balanced and nutrient uptake running smoothly under your cloches.
Water at Roots
Once you know the soil moisture level, aim water directly at the base of each plant. Root uptake efficiency depends on soil water potential staying consistently favorable — roots can’t pull moisture they can’t reach.
- Target the root zone, not the leaves
- Use a narrow-spouted watering can for precision
- Water slowly to improve hydraulic conductivity
- Let moisture reach 4–6 inches deep
- Avoid wetting foliage inside the cloche
Hydropatterning mechanics means roots naturally branch toward moisture, so consistent root-zone delivery encourages healthy lateral growth.
Avoid Soggy Soil
Even precise root-zone watering can tip into oversaturation inside a cloche, where reduced evaporation means moisture lingers far longer than in open beds. That closed environment raises humidity 10–20% above outside air, so the soil stays wet much longer than you’d expect.
Test drainage with a quick dig. If water pools after 30 minutes, improve soil porosity by working in compost annually — it builds crumb structure and keeps roots breathing.
Reduce Fungal Risk
Wet soil invites more than root rot — it creates the perfect breeding ground for fungal spores. That extra humidity trapped inside a garden cloche needs active management, not just awareness.
Work these three habits into your routine:
- Lift covers at midmorning for condensation management and improved air circulation.
- Sanitize tools between plants to prevent cross-contamination.
- Remove moldy foliage immediately to cut spore spread at the source.
Monitor Humidity Buildup
A hygrometer near the plant canopy tells you exactly what’s happening inside your garden cloche before problems start.
| Moisture Cue | What It Signals | Your Response |
|---|---|---|
| Condensation drips | Excess humidity buildup | Vent cloches midmorning |
| Damp foliage surface | Poor air circulation | Lift glass cloches briefly |
| Soggy root zone | Evaporation rate rising | Reduce watering frequency |
Color-changing humidity indicator strips near air gaps give at-a-glance alerts without guesswork.
Anchor Cloches Against Wind

Wind is one of the fastest ways to undo all the warmth you’ve built up under a cloche. A cover that shifts even a few inches can let in cold air and undo hours of heat retention. Here are the most reliable ways to keep yours locked in place.
Use Garden Stakes
Garden stakes are your first line of defense when wind threatens to send cloches tumbling. Drive stakes one-third to half their length into firm soil beside each cloche, then use soft fabric ties to secure the cover without cinching stems. Place them close, but never tight enough to girdle developing stems.
Powder-coated steel holds up best in wet conditions, while bamboo works well in sheltered beds.
Add Rocks Carefully
Rocks pull double duty as ballast — anchoring cloches against wind while absorbing solar heat and releasing it back toward seedlings after dark.
- Use rocks over 20 cm at each cluster for reliable anchoring
- Mix flat and round stones to prevent uneven soil compaction
- Keep rocks away from plant stems to avoid moisture rot
Space clusters evenly around the perimeter.
Secure Plastic Edges
Loose plastic edges are a silent saboteur — cold air sneaks under them even when everything else looks secure.
Fold the sheeting back on itself and bury 2–3 inches into soil along the perimeter to seal out ground-level drafts. For harder surfaces, weight the folded edge with a soil berm. This simple ground seal keeps your seedlings’ microclimate stable through wind gusts up to 25 mph.
Clamp Loose Covers
When a cover starts to flutter, heat escapes fast. Spring clamps — plastic, rubberized, or stainless steel — bite along the rim and distribute pressure evenly, preventing edge separation across fabric, plastic, and glass cloches alike.
- Grip multiple corners simultaneously
- Choose rubberized clamps for delicate rims
- Keep clamps clear of seedling crowns
- Re-check placement after watering
- Use stainless steel in wet conditions
Inspect After Storms
Storms test every anchor you’ve set. Walk your beds promptly after any strong wind event, treating it like a structural damage check for your garden insulation system.
| What to Check | What to Look For | Action Required |
|---|---|---|
| Cloche position | Shifted or overturned covers | Re-center and re-anchor immediately |
| Edge seals | Lifted or exposed soil gaps | Press edges down, bury 2–3 inches |
| Seedling condition | Crushed or bent transplants | Prop upright, add temporary support |
| Drainage paths | Pooling water near foundations | Clear debris, redirect flow away |
| Cover integrity | Tears, cracks, or broken rims | Repair or replace before next frost |
Temperature fluctuations after displacement can shock seedlings fast — don’t wait until morning.
Top 4 Cloche Support Items
Having the right support items makes a real difference in how well your cloches perform. These four products are worth keeping on hand whether you’re protecting early seedlings or extending the season into fall. Here’s what’s worth adding to your setup.
1. Park Seed Solar Insulating Jackets
Park Seed Solar Insulating Jackets come six per set, each measuring 18 by 17 inches — enough to wrap individual tomatoes, peppers, or young transplants during unpredictable spring weather.
Water-filled chambers absorb daytime heat and release it slowly overnight, keeping frost from settling in. The reflective outer surface redirects radiant heat back toward the plant canopy rather than letting it escape. They’re reusable, lightweight when drained, and fold flat for storage between seasons.
| Best For | Home gardeners who want to extend their growing season and protect young plants like tomatoes and peppers from late frosts, wind, and small animals. |
|---|---|
| Primary Material | Water-filled polyethylene chambers |
| Weather Resistance | Wind and frost barrier |
| Outdoor Suitability | Garden rows and beds |
| Storage Design | Foldable when drained |
| Durability Concerns | Water spillage and weight risk |
| Included Quantity | 6 jackets per set |
| Additional Features |
|
- Water-filled chambers absorb solar heat during the day and release it slowly at night, creating a naturally frost-free environment around your plants
- Folds flat when drained, making off-season storage simple and space-efficient
- Doubles as a wind and animal barrier, giving seedlings all-around protection during vulnerable early growth
- Filling the chambers without spilling or accidentally damaging young plants can be tricky
- Once full, the weight may cause instability — you’ll likely need a plant cage to keep them upright
- Removing them takes some planning since you have to drain the water in sections to manage the weight safely
2. Pop Up Tomato Accelerator Protector
When keeping individual transplants cozy is the priority, the Pop Up Tomato Accelerator Protector earns its spot. It unfolds in seconds, stands 18 inches wide and 28 inches tall, and creates a snug microclimate around each plant.
The zippered mesh top lets you water directly inside and crack ventilation open on warmer days without lifting the whole cover. Made from polyethylene greenhouse fabric, it’s reusable across multiple seasons and folds flat when the weather cooperates.
| Best For | Gardeners who want to give individual transplants a warm, protected start — especially those growing tomatoes, peppers, or other cold-sensitive plants in raised beds or container gardens. |
|---|---|
| Primary Material | Polyethylene fabric and mesh |
| Weather Resistance | Weather-resistant outdoor fabric |
| Outdoor Suitability | Raised beds and large planters |
| Storage Design | Flat pop-up storage |
| Durability Concerns | Fabric wear with extended use |
| Included Quantity | Single unit |
| Additional Features |
|
- Pops open in seconds and folds flat for easy storage, making setup and takedown completely hassle-free
- The zippered mesh top lets you water and adjust airflow without removing the cover entirely
- Reusable polyethylene fabric extends its value across multiple growing seasons
- Earth staples for anchoring aren’t included, so you’ll need to budget for those separately
- May not hold up well in high winds without extra staking
- Plants will eventually outgrow it, requiring a larger cover or the removal of the protector altogether
3. 40% Shade Cloth Garden Mesh Sun Shade Net
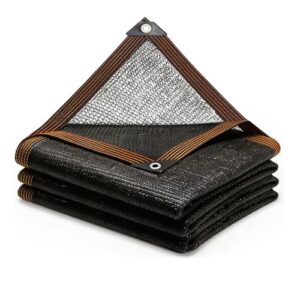
When tomatoes are thriving under their individual protectors, summer heat can actually become the next obstacle. That’s where the 40% Shade Cloth Garden Mesh Sun Shade Net earns a place in your setup.
The knitted HDPE construction blocks roughly 40% of sunlight while keeping airflow moving through the canopy, so plants photosynthesize without scorching. Aluminum grommets spaced every 3.28 feet make mounting straightforward on any frame or fence line.
| Best For | Gardeners, homesteaders, and backyard growers who need reliable sun protection for heat-sensitive plants like seedlings, succulents, and vegetables during peak summer months. |
|---|---|
| Primary Material | High-density polyethylene and aluminum |
| Weather Resistance | UV and weather-resistant HDPE |
| Outdoor Suitability | Gardens, patios, and enclosures |
| Storage Design | Rollable flat storage |
| Durability Concerns | Seam and grommet failure risk |
| Included Quantity | Single 10ft x 20ft sheet |
| Additional Features |
|
- The 40% shade rate strikes a solid balance — enough to shield plants from scorching UV without blocking the light they need to actually grow.
- Knitted HDPE construction lets air flow freely through the mesh, helping keep temperatures down in greenhouses, coops, and covered garden beds.
- Aluminum grommets spaced every 3.28 feet make it easy to secure across frames, fences, or custom structures without a lot of extra hardware.
- Durability can be hit or miss — some users have reported seam and grommet failures within a year, especially in windy conditions.
- The grommet spacing works fine for standard setups, but if you have a non-standard frame or need more attachment points, you may find yourself improvising.
- It sits at a higher price point than basic plastic netting, so if you’re covering a large area on a tight budget, the cost adds up quickly.
4. Relbro Assorted Plastic Spring Clamps
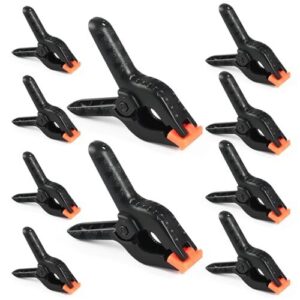
Once you’ve got your shade cloth secured, you need something reliable to hold it there — and the Relbro Assorted Plastic Spring Clamps handle exactly that.
The set includes 10 clamps across three sizes (3.5, 4.5, and 6 inch), gripping between 8 to 30 lbs of force. Pivoting jaw pads won’t scratch frames or tear fabric. One-handed operation means quick adjustments when venting on warm mornings without fumbling.
| Best For | Anyone who needs a reliable, lightweight clamping solution for outdoor setups, home décor projects, or casual DIY work where versatility across different sizes matters. |
|---|---|
| Primary Material | Reinforced nylon plastic and wire spring |
| Weather Resistance | Waterproof and wear-resistant build |
| Outdoor Suitability | Garden covers and outdoor tasks |
| Storage Design | Compact multi-size set |
| Durability Concerns | Jaw pad peeling over time |
| Included Quantity | 10-piece assorted set |
| Additional Features |
|
- Three size options in one set means you’re covered for everything from delicate quilting projects to heavier outdoor tasks like securing shade cloths or tarps
- Pivoting jaw pads protect surfaces from scratches and hold firmly on uneven edges without slipping
- Ergonomic handles make one-handed use easy, so quick adjustments don’t require putting everything down
- Orange jaw pads can stick out visually, which may be an issue if the clamps are visible in decorative setups
- The coating on the orange tips has been known to peel over time with regular use
- Best suited for temporary or light-duty tasks — not a substitute for heavy-duty clamps on demanding projects
Remove Cloches Without Shocking Plants

Pulling cloches too soon is one of the easiest ways to undo weeks of careful work. Plants that have been sheltered need time to adjust to wind, temperature swings, and direct sun before they’re on their own. Follow these steps to move your vegetables out from under cover without setbacks.
Harden Off Gradually
Think of hardening off as teaching your seedlings to trust the outdoors. Start by lifting cloches for just 1 to 2 hours daily, choosing overcast mornings to limit sun stress.
Keep direct light minimal for the first few days to prevent leaf burn. Watch for curling leaves or drooping — those are your plants asking for more time.
Increase Uncovered Time
Once your seedlings have developed true leaves, start stretching uncovered windows to 2–4 hours during mild afternoons, ideally when temperatures hold between 15 and 22°C with low wind. Favor sunny, stable days — direct light speeds acclimation.
Check soil moisture beforehand, since exposed plants transpire faster. If leaves show scorch or curl, pull back the schedule and try again tomorrow.
Watch Night Temperatures
Keep a close eye on overnight forecasts during hardening off — nights below 10°C can stall progress or damage plants you’ve spent weeks protecting. Tomatoes and peppers need particular attention when temperatures dip under 12°C.
Soil thermal mass helps buffer short cold snaps, but clear, still nights drain that heat fast. If a cold stretch is forecast, replace the cloches until conditions stabilize.
Remove After Frost Risk
Pulling glass, plastic, or fabric cloches too soon undoes weeks of careful protection.
Only remove when all five conditions are met:
- No freezing nights forecast for 3 consecutive days
- Soil surface temperature holds above 2°C for 48 hours
- Overnight lows stay consistently above 0°C
- A 2°C safety margin accounts for local microclimates
- No frost alerts within two nights of removal
Store Covers Cleanly
Dirty covers breed mold — rinse glass cloches, plastic cloches, and fabric cloches before storing.
| Cover Type | Storage Tip |
|---|---|
| Glass cloches | Bag to block dust |
| Plastic cloches | Stack loosely in bins |
| Fabric cloches | Fold loosely; avoid creasing |
| Homemade cloches | Label bins by type |
Air dry covers fully, then fold fabric loosely. Keep bins labeled, away from sunlight to prevent material degradation.
Frequently Asked Questions (FAQs)
Do cloches keep food warm?
Yes, cloches keep food warm for 20 to 60 minutes longer than uncovered plates by trapping heat and humidity in a sealed microclimate above the dish.
How to keep vegetables warm?
Cloches trap solar heat around seedlings, raising soil temperatures by 2–4°C through microclimate stability and radiative warming. That small thermal buffer protects tender vegetables overnight, keeping roots warm and growth consistent through unpredictable spring weather.
Can cloches protect vegetables from pests and insects?
They work as a physical pest barrier, blocking slugs, snails, and birds from reaching tender seedlings. Tiny insects can still slip through ventilation gaps, so cloches complement — not replace — proper garden pest management.
How do cloches affect pollination of flowering crops?
Keeping covers on flowering crops means pollinators can’t get in. Remove cloches during peak blooming hours so bees can access blossoms — otherwise fruit set drops and yields suffer, especially in cucurbits.
Which cloche materials work best in heavy rainfall?
Like armor built for a storm, polycarbonate and UV-stabilized plastic outlast glass in heavy rain — resisting impact, maintaining light transmission, and avoiding the cracking risks that make glass a liability when downpours hit hard.
Can cloches be reused across multiple growing seasons?
Yes, most cloches — glass, rigid plastic, or fleece — last multiple growing seasons with basic care: rinse off soil after each use, dry fully, and store away from direct sun.
Do cloches work effectively in raised garden beds?
Cloches perform exceptionally well over raised beds. Raised bed insulation benefits from the enclosed microclimate, improving seedling survival rates in early spring while soil heat retention accelerates germination and protects roots from overnight temperature drops.
Conclusion
Cloches are your garden’s insurance policy against a season that doesn’t play by the rules. Knowing how to keep vegetables warm with cloches means more than draping plastic over a plant—it’s about reading conditions, responding early, and giving roots the stability they need to perform.
Vent on warm days. Seal before dark. Harden plants off slowly when the time comes. Do those things consistently, and cold snaps stop being threats. They become just weather.
- https://www.johnnyseeds.com/tools-supplies/row-covers-and-accessories/insect-barrier/duraspun-45/johnnys-duraspun-45-10-x-50-row-cover-6181.html?
- https://www.homedepot.com/pep/Oatey-1-1-2-in-Galvanized-2-Hole-Pipe-Hanger-Strap-33500/303434697?
- https://www.homesandgardens.com/gardens/how-to-cover-bare-soil-in-winter
- https://cvc.ca/countryside-stewardship-mail/cover-it-up/
- https://ucanr.edu/blog/napa-master-gardener-column/article/cover-your-soil