This site is supported by our readers. We may earn a commission, at no cost to you, if you purchase through links.

Most gardeners discover too late that carrots are less forgiving than they look. You tuck those tiny seeds into the ground, wait two months, and pull up a tangle of forked, stunted roots that belong in a horror movie—not on your dinner plate.
The culprit is almost never the seed. It’s the setup: wrong soil depth, uneven watering, or a variety that never stood a chance in your conditions. Growing carrots successfully comes down to a handful of decisions made before the first seed hits the ground, and once you understand them, everything else falls into place.
Table Of Contents
- Key Takeaways
- Choose The Best Carrot Varieties
- Prepare Loose, Deep Carrot Soil
- Sow Carrots at The Right Time
- Water, Mulch, and Fertilize
- Thin, Weed, and Protect
- Harvest, Clean, and Store Carrots
- Top 6 Carrot Growing Tools
- Frequently Asked Questions (FAQs)
- What’s the trick to growing carrots?
- What month should I start planting carrots?
- How many carrots can grow from one carrot seed?
- What is the secret to growing good carrots?
- Do coffee grounds help carrots grow?
- How long does it take for carrots to grow?
- How to grow carrots?
- How long does it take to grow carrots?
- Can you grow carrots in shallow soil?
- Why do carrots grow so fast?
- Conclusion
Key Takeaways
- Soil is the make-or-break factor: carrots need at least 12 inches of loose, rock-free, well-drained ground with a pH between 6.0 and 6.8 before a single seed goes in.
- Your variety choice should match your conditions — Chantenay for heavy or clay-dense soil, Nantes for deep beds and containers, Imperator only where you have 12–18 inches of loose earth.
- Too much nitrogen pushes leafy tops at the cost of the roots, so stick to a low-nitrogen fertilizer like 5-10-10 and apply it sparingly starting at the first true leaf stage.
- Timing and thinning decide your final harvest — sow when soil hits 45–55°F, thin seedlings to 2–3 inches apart once they reach 2 inches tall, and don’t skip either step.
Choose The Best Carrot Varieties

Not all carrots are the same, and the variety you pick will shape everything from how you prep your soil to how sweet your harvest tastes. Your garden conditions — soil depth, drainage, and climate — matter more than most people realize when selecting the right type.
If you’re working with dense or clay-heavy ground, understanding harvesting carrots from heavy soil can save you a lot of frustration at the end of the season.
Here are the main varieties worth knowing before you plant a single seed.
Nantes, Danvers, Imperator, and Chantenay Types
Each carrot type has its own root shape, flavor profile, and growth duration — and knowing the difference helps you grow with confidence. Chantenay carrots thrive in heavy clay soils, offering heavy clay soil tolerance for late-season planting.
- Nantes carrots — cylindrical, coreless roots; sweet, crisp; matures in 65–75 days
- Danvers carrots — broad-shouldered, tapered; earthy-sweet; 70–85 days; tolerates heavier soil preference
- Imperator carrots — long, slender; high sugar content; 75–85 days; needs deep, loose soil
- Chantenay carrots — short, dense, cone-shaped; very sweet; 60–70 days
- Carrot variety selection and characteristics shape your entire growing season
Best Varieties for Heavy Soil, Short Roots, or Deep Beds
Your soil type drives variety choice more than anything else.
For Heavy Soil Varieties, Chantenay carrots are your best bet — their Short Root Types don’t fight compaction. Danvers carrots handle denser ground well too.
For Deep Bed Selections with 12–18 inches of loose soil, Nantes carrots thrive beautifully.
Container Suitability also favors Chantenay and Nantes, where soil preparation for carrot cultivation stays fully within your control.
Sweetness, Texture, and Storage Differences
Variety choice shapes what ends up on your plate.
Nantes scores high on Brix sweetness testing — generally 7–9% — and their crystalline texture analysis shows finer tissue, meaning a tender, almost juicy bite.
Imperators run denser at the core.
For cool storage preservation, Danvers hold up the longest.
Avoid light exposure effects by keeping harvested roots dark; even brief exposure dulls sweetness fast.
Heirloom and Colorful Carrots for Added Variety
Beyond orange, a whole spectrum opens up. Purple types like Dragon carry anthocyanin benefits — the same pigments linked to antioxidant activity — while red varieties often pack higher lycopene levels.
Solar Yellow carrot delivers mild sweetness; Red Cored Chantenay adds dramatic cross-sections on the plate.
Heirloom seed saving preserves these traits reliably across seasons, and colorful culinary uses range from vivid slaws to roasted medleys.
Container-friendly and Quick-maturing Options
Not everyone has a garden bed — and that’s where container gardening carrots shine. Compact pot varieties like Nantes, Little Fingers, and Thumbelina thrive in space‑saving containers just 8–12 inches deep.
With early harvest seeds maturing in 50–65 days, and rapid growth mixes staying at 68–75°F, you’ll see strong seed germination from early spring to midsummer. Container friendly growing, done right.
Prepare Loose, Deep Carrot Soil
Carrots are picky about where they grow — get the soil right, and everything else falls into place. Before you sow a single seed, there are a few soil factors worth getting familiar with.
Here’s what to look at.
Ideal Soil Texture, Depth, and Drainage

Think of your soil as the foundation of everything.
Carrots need loose, well-drained soil with a Soil Texture Balance between sandy loam and loam — not too heavy, not too light.
Aim for Ideal Root Depth of 12 inches minimum.
Test drainage by checking if water clears within 2–4 hours.
Compaction Prevention matters: dense, compacted ground forces roots to fork instead of grow straight.
Removing Rocks, Sticks, and Clumps

Before you sow a single seed, clear out rocks and clumps — they’re the main reason roots fork and twist. Work in sections, sifting the top 8–12 inches to pull out stones, sticks, and dense clumps.
Use a garden fork to dig deep and break it up thoroughly.
Loose, well-draining soil isn’t optional. It’s everything.
Adding Compost Without Making Soil Too Rich

Compost is fuel for your carrot bed — but too much kills the engine. Stick to these Compost Volume Control principles:
- Work organic compost into the top 6–8 inches as a soil amendment, never more than 10% of soil volume.
- Use finished, low-nitrogen compost to support roots without pushing excess foliage.
- Follow Seasonal Compost Scheduling — apply before planting, not within two weeks of sowing.
Layered Compost Application keeps nutrient balance right where carrots need it.
Adjusting Soil PH for Better Root Growth

Soil pH is the quiet control dial behind every carrot you grow. Keep yours between 6.0 and 6.8 — that’s the soil pH range for carrot cultivation where phosphorus, manganese, and iron stay accessible.
Start with pH testing before you plant anything. If readings fall low, a sulfur amendment brings it down gradually. Too high? Lime application corrects it.
Seasonal pH monitoring keeps everything on track.
Fixing Heavy Clay With Raised Beds or Amendments

Clay soil is a carrot’s worst enemy — it compacts, holds water, and twists roots sideways.
raised beds 12 to 18 inches deep using a Gravel Drainage Base beneath an Expanded Shale Mix blended with organic compost amendment. Add a Cardboard Lining to block clay intrusion, slope the Inward Bed Edge for stability, and apply Gypsum Soil Amendment to break up remaining compaction.
Sow Carrots at The Right Time

Timing is everything with carrots — sow too early in cold soil, and the seeds just sit there, or too late, and your roots run out of growing season. Getting the details right from the start saves you a lot of frustration later.
Here’s what you need to know to plant carrots at exactly the right moment.
Best Planting Window by Season and Temperature
Timing is everything with carrots. In spring, wait until your Spring Soil Temp hits 45–55°F before sowing — too cold, and germination stalls.
Summer Cool Days work well for succession sowing every 2–3 weeks. For fall, Fall Frost Timing matters: count back 10 weeks from your first frost.
Your seasonal planting calendar for carrots should always follow your Regional Temp Zones.
Direct Sowing Instead of Transplanting
Once your soil is warming up, direct sow right away — don’t transplant. Carrots hate root disturbance, and transplant shock will ruin your crop before it starts.
- Direct sow seeds ¼ inch deep; precise seed sowing depth and spacing recommendations matter
- Use seed tape preseeded strips or seed coating pellets for even germination timing
- Maintain seed germination moisture consistently until sprouts emerge
Broadcast sowing wastes seed. Sow in rows.
Seed Depth, Row Spacing, and Plant Spacing
Now that your seeds are ready to go in, placement matters more than most gardeners expect. Follow recommended depth guidelines: sow at ¼ inch in clay or fine soils, ½ inch in sandy ground.
Row width variations range from 12 to 18 inches apart.
In-row spacing strategies target 2 to 3 inches between seeds — seed placement precision here directly reduces soil compaction effects and prevents crowded, forked roots.
Using Seed Tape, Pelleted Seed, or Sand Mixes
Getting carrot seeds spaced evenly sounds simple until you’re staring at a pinch of tiny seeds. That’s where seed tape, pelleted seeds, and sand mixes earn their place.
Seed tape installation tips: lay the biodegradable strip directly in your furrow at the right sowing depth and spacing for carrots — no guesswork.
Pelleted seed coating benefits include easier handling and a built-in moisture buffer.
sand mix ratios, combine one part seed with three parts gritty sand, then use a seed dispenser for seed distribution accuracy across the row.
Succession Planting for a Longer Harvest Season
Want carrots all season instead of one overwhelming harvest? Staggered sowing intervals are your answer.
Every 2–3 weeks, drop another round of seeds using your successive planting calendar. For your spring planting window, start when soil hits 55°F. Shift your carrot planting schedule and timing toward fall by sowing 10 weeks before first frost.
Intercropping fast greens between rows fills gaps while roots develop underground.
Water, Mulch, and Fertilize

Getting water, mulch, and fertilizer right makes the difference between a patchy row and a reliable harvest.
Carrots aren’t demanding, but they do have a few specific needs you’ll want to get down early.
Here’s what to focus on.
Keeping Soil Evenly Moist During Germination
Germination is a waiting game — and can’t afford to get wrong. Pre-wet your seedbed before sowing, then use fine mist irrigation to keep the surface damp without washing seeds away. Soil moisture monitoring matters daily here.
- bottom watering method for trays to prevent surface crusting
- plastic dome humidity until sprouts emerge
- top inch before watering — not the clock
- soil consistently moist, not soggy
- early morning to slow evaporation
How Much Water Carrots Need Each Week
Most weeks, your carrots need about one inch of water — but your watering schedule for carrots should flex with conditions. Hot or windy weather calls for up to 1.5 inches. Climate adjusted watering means checking soil moisture, not just the calendar. Always account for rainfall compensation before irrigating again.
Container water management requires more frequent monitoring, since pots dry faster.
When to Apply Low-nitrogen Fertilizer
Time your first application at the first true leaf stage — usually 2 to 4 weeks after germination. A split low-nitrogen organic fertilizer approach, using something like 0-10-10 or 5-10-10, works well across two light doses spaced 2 to 3 weeks apart.
Coordinate each application with rainfall or irrigation. A soil test helps confirm whether you even need to fertilize before root thickening begins.
Why Too Much Nitrogen Causes Poor Roots
Too much nitrogen is a silent saboteur. When you oversupply it, carrots pour energy into lush tops — leaving roots thin, forked, and underdeveloped.
Here’s what’s actually happening underground:
- Root respiration stress increases, while lignin reduction weakens taproot structure.
- Mycorrhizal suppression cuts off natural nutrient partnerships.
- Osmotic imbalance and root hair deficiency slow water and nutrient uptake.
Stick to low nitrogen fertilizer with NPK ratios like 5-10-10.
Mulching to Retain Moisture and Reduce Crusting
Mulch is your soil’s best defense. Apply 2–4 inches of straw or composted leaves after seedlings reach a few inches tall.
This mulch depth keeps moisture in the root zone, reduces daily soil temperature swings by 1–3°C, and prevents surface crusting after heavy rain.
For mulching carrots specifically, straw works well — it’s loose enough to let water through while blocking weed germination entirely.
Thin, Weed, and Protect

Getting your seedlings to this stage is a win, but the real work of shaping healthy roots starts now. Crowded plants, stubborn weeds, and hidden pests can quietly undo everything you’ve built.
Here’s what to do at each step to keep your carrots on track.
When to Thin Carrot Seedlings
Start thinning carrot seedlings once they hit that two-inch height mark — waiting longer risks stunted roots and crowded beds.
Mid-Spring Timing works best when soil temperatures sit between 50–70°F.
Follow these thinning and spacing guidelines for carrots:
- Dry-Day Thinning reduces soil clumping
- Two-inch spacing suits standard varieties
- Spacing Adjustments to 3–4 inches benefit longer-rooted types
- Soil Moisture Level should be slightly damp beforehand
How to Thin Without Damaging Taproots
Once you’ve nailed the timing, technique matters just as much. Use the Scissor Cutting Method — snip unwanted seedlings at soil level rather than pulling. This protects taproot development in neighboring plants.
Root-Friendly Soil Loosening beforehand keeps things pliable.
Follow a Sequential Thinning Schedule if beds are crowded, and apply Post‑Thin Mulching immediately after.
Clean tools between cuts — Tool Sanitization prevents disease spread.
Weed Control Between Carrot Rows
Weeds don’t wait, and neither should you.
Between your carrot rows, Interrow Mechanical Weeding with a front bed weeder keeps pressure low without disturbing roots.
Stale Seedbed Preparation — letting weeds sprout, then flaming them before sowing — cuts competition early.
Apply a Mulch Row Barrier of straw 2–4 inches deep, and use Flame Weeding Timing when weeds hit their first true leaves.
Preventing Forked, Twisted, or Stunted Roots
Even after managing weeds, root deformities can still catch you off guard. Seedbed Leveling and removing stones larger than a pea prevent root splitting prevention failures before they start.
Maintain Moisture Consistency — about 1 inch weekly — since drought-flood cycles stress root cells. Nutrient Ratio matters too: high nitrogen pushes leaves, not roots.
Follow seed spacing guidelines of 2–4 inches, and planting depth for carrot seeds at ¼ inch keeps emergence straight.
Crop Rotation and Companion Planting Basics
Rotate carrots with legumes every three years — legume nitrogen fixation replenishes soil naturally while breaking pest cycles that target root crops.
Companion planting with carrots adds another layer of protection: marigolds suppress nematodes, and pest-deterrant herbs like rosemary deter carrot rust fly.
Mycorrhizal partnerships thrive under diverse rotations, and cover crop benefits extend beyond one season, building healthier soil for every harvest ahead.
Harvest, Clean, and Store Carrots

All that patient tending finally pays off when your carrots are ready to pull. Getting the harvest, cleaning, and storage steps right is what separates a crop that lasts from one that goes limp in a week.
Here’s what you need to know to finish strong.
Signs Carrots Are Ready to Harvest
Your carrots are ready when root diameter hits ½ to 1 inch at the shoulder peak. Check top greenness — vibrant, upright tops signal the root is still actively developing.
Give the base a gentle tug; firm pull resistance means the root is anchored and mature. Snap firmness confirms good moisture content.
For anthocyanin and beta-carotene varieties, harvest timing based on frost improves carrot sweetening naturally.
Loosening Soil Before Pulling Roots
Before you pull a single root, loosen the surrounding soil first — skipping this step is how good carrots snap in half.
Use the broadfork technique: insert tines 6–8 inches out from the shoulder, press down gently, and lift. This compaction reduction and root zone aeration method breaks up soil without severing roots.
- Work from the outer edge inward
- Keep the broadfork angled away from the taproot
- Finish with gentle soil raking to prevent loose well-drained soil from crusting back over
Trimming Tops and Cleaning Harvested Carrots
Once you’ve pulled your roots, the clock starts. Follow these trim height guidelines: cut foliage about ½ inch above the crown using a sharp knife — jagged cuts trap moisture and invite decay.
Apply the brush cleaning method next: scrub loose soil with a soft vegetable brush, then rinse under cool running water. Crack inspection matters too — trim any split shoulders before storing.
Refrigerating Carrots for Short-term Storage
Your fridge is a carrot’s best short-term friend — if you set it up right. For ideal crispness retention, store fresh carrots at 32–40°F with high humidity control using a perforated bag in the crisper drawer.
Skip washing until use. Keep them away from apples; ethylene management matters here. Proper packaging methods and stable carrot storage temperature keep whole carrots fresh for 3–4 weeks.
Storing Carrots in Sand or a Cool Bin
Sand storage outlasts your fridge by months.
Layer carrots in a wooden crate or ventilated bin — bin ventilation design matters to prevent rot. Use clean builder’s sand for sand humidity control, keeping it just damp. Maintain carrot storage temperature near 32–39°F.
Run monthly moisture level checks, remove any soft roots, and use a container labeling system to track storage dates. Expect 3–6 months under stable storage conditions for fresh carrots.
Using Light Frost to Improve Sweetness
Cold nights are nature’s secret ingredient. After harvest, a light frost — temperatures dipping to 0–5°C briefly — triggers beta‑amylase activation, converting stored starches into glucose and fructose. That’s carrot sweetening happening at the cellular level.
A brief frost triggers beta-amylase, converting starches to sugars and sweetening carrots at the cellular level
- Frost timing matters: short exposure beats prolonged freezing
- Sugar conversion peaks within hours of light frost
- Post‑harvest cooling at 32–40°F locks in flavor profiling gains
- beta‑carotene content remains stable through frost events
- Nantes and Imperator varieties respond fastest to carrot harvest timing based on frost dates
Top 6 Carrot Growing Tools
Having the right tools doesn’t just make carrot growing easier — it makes the difference between a patchy row and a genuine harvest you’re proud of. Each tool on this list targets a real challenge, from soil preparation to pest control to proper storage.
Here are six worth keeping in your garden kit.
1. Bully Tools Broad Fork Garden Tool
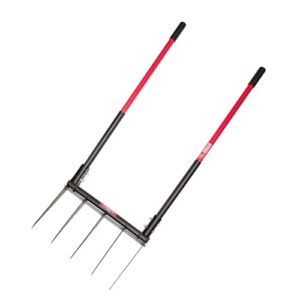
The Bully Tools Broad Fork is built for gardeners who want results without wrecking their soil structure. Its five 10-gauge steel tines cut through compacted ground cleanly, which is exactly what carrot beds need — deep, open channels where roots grow straight instead of forking.
At 11.8 pounds with triple-wall fiberglass grips, it’s sturdy without punishing your back. The reinforced steel U-bar holds everything tight during heavy work.
Made in the USA and backed by a lifetime warranty, it earns its place in your tool shed.
| Best For | Home gardeners and serious veggie growers who want to aerate and loosen soil the old-school way — no gas, no noise, just results. |
|---|---|
| Primary Material | 10-gauge steel & fiberglass |
| Primary Use | Soil aeration & tilling |
| Outdoor Suitability | Yes |
| Reusability | Long-term reusable |
| Chemical-Free | Yes |
| Assembly Required | No |
| Additional Features |
|
- Five thick 10-gauge steel tines dig deep and open up soil without destroying its structure, which is great for root crops and drainage.
- Triple-wall fiberglass handles keep it light enough to use for a while without your hands paying the price.
- Made in the USA with a lifetime warranty — this thing is built to last, and the company stands behind it.
- At nearly 12 pounds, it’s a workout. If you’re not used to heavy garden tools, this one will let you know.
- The handles can develop some wobble over time, so you may need to tighten bolts here and there to keep things solid.
- Tough clay or heavily compacted soil will slow you down — it’s not a rototiller, and forcing it on stubborn ground can cause damage.
2. Down To Earth Organic Fertilizer
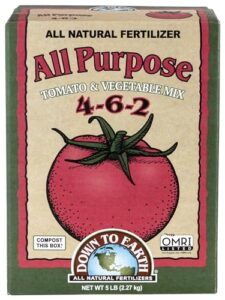
Once your soil is loose and ready, it needs to eat too.
Down To Earth’s All-Purpose Fertilizer has a 4-6-2 NPK ratio — lower nitrogen, higher phosphorus — which is exactly what carrots want. Too much nitrogen pushes leafy tops at the expense of the roots you’re actually growing.
This OMRI-certified granular blend feeds soil biology through ingredients like fish bone meal, kelp meal, and humates. Work it in at planting, and your roots will thank you.
| Best For | Organic gardeners growing root vegetables, herbs, or flowers who want a gentle, soil-friendly fertilizer that won’t push too much leafy growth. |
|---|---|
| Primary Material | Granular organic blend |
| Primary Use | Plant fertilization |
| Outdoor Suitability | Yes |
| Reusability | Single-season consumable |
| Chemical-Free | OMRI certified organic |
| Assembly Required | No |
| Additional Features |
|
- OMRI-certified, so it checks the box for organic growing without any synthetic shortcuts
- The 4-6-2 NPK ratio is great for root development — more phosphorus, less nitrogen
- Feeds soil biology over time through ingredients like kelp meal, humates, and fish bone meal
- The fishy smell is real — not ideal indoors, and it can draw in wildlife if you don’t water it in right away
- Doesn’t cover every micronutrient, so some growers end up reaching for extra amendments
- Over-applying it won’t burn plants, but it can leave surface buildup if it’s not worked into the soil properly
3. Agfabric Sun Shade Cloth
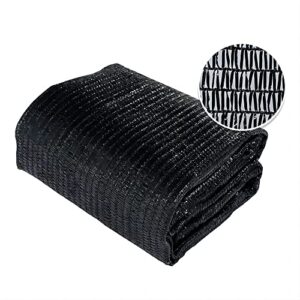
Heat can stress carrot tops during peak summer, slowing root development. The Agfabric Sun Shade Cloth blocks 30% of sunlight — just enough to cool the bed without starving your plants of the photosynthetically active radiation they need.
It’s made from knitted HDPE fabric, so air and water still move through freely.
Cut it to fit your rows, secure it with the included clips, and your carrots stay cooler without losing that steady sun exposure that roots depend on.
| Best For | Gardeners, small-scale farmers, and backyard growers who need affordable, easy-to-install shade protection for heat-sensitive plants or animals. |
|---|---|
| Primary Material | HDPE knitted fabric |
| Primary Use | Shade & UV reduction |
| Outdoor Suitability | Yes |
| Reusability | Multi-season reusable |
| Chemical-Free | Yes |
| Assembly Required | Minimal clipping |
| Additional Features |
|
- Knitted HDPE fabric lets air and water pass through freely, so your plants don’t suffocate under the cover.
- Easy to cut and customize — works great for oddly shaped beds, runs, or DIY frame setups.
- Lightweight and quick to install with included clips, making seasonal setup a breeze.
- Edges and corners can tear with repeated use, so you may need extra reinforcement over time.
- Included clips don’t always play nice with PVC frames — you might need to grab different fasteners.
- The black color can darken enclosed spaces quite a bit and may shrink slightly after long sun exposure.
4. Agfabric Plant Freeze Protection Cover
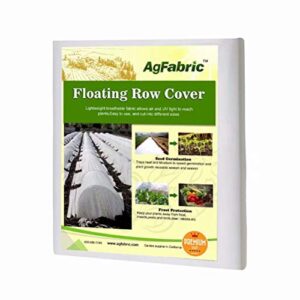
When a late frost threatens your carrot bed, the Agfabric Plant Freeze Protection Cover is worth having on hand.
The 0.95 oz spun polypropylene fabric provides roughly 3 to 8°F of frost protection by trapping radiant heat from the soil while still letting air and moisture move through.
That microclimate keeps seedlings stable without triggering fungal problems.
Drape it directly over your rows or suspend it on hoops, anchor the edges securely, and your carrots stay protected through unexpected cold snaps.
| Best For | Gardeners who want a simple, chemical-free way to protect crops from frost, pests, and rough weather through the shoulder seasons. |
|---|---|
| Primary Material | Non-woven polypropylene |
| Primary Use | Frost & pest protection |
| Outdoor Suitability | Yes |
| Reusability | Multi-season reusable |
| Chemical-Free | Yes |
| Assembly Required | Minimal anchoring |
| Additional Features |
|
- Lightweight and breathable — keeps plants warm without trapping moisture that leads to mold or rot
- Versatile setup — drape it flat over rows or prop it on hoops, whatever works for your garden
- Pulls double duty as pest protection, keeping insects, birds, and deer off your plants without any sprays
- Thin fabric snags easily on stakes or rough edges, so it won’t last forever with heavy use
- Needs solid anchoring — skip the stakes and a good gust will send it flying
- Blocks some sunlight, which can slow growth for plants that need full sun exposure
5. Agfabric Garden Insect Netting
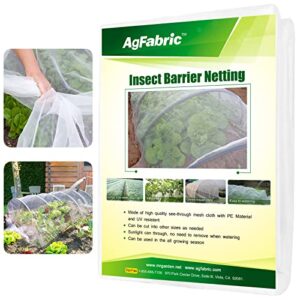
Carrot rust flies and flea beetles don’t announce themselves — they just show up and do damage. That’s where the Agfabric Garden Insect Netting earns its place.
The fine 0.03-inch polyethylene mesh blocks moths, flies, and aphids while letting water, air, and sunlight reach your plants.
It covers a generous 20 × 16 feet, works over hoops or raised beds, and stores flat between seasons.
One sheet can protect an entire bed without reaching for a single pesticide.
| Best For | Gardeners who want to protect vegetables, fruit trees, and berry patches from insects and birds without using pesticides. |
|---|---|
| Primary Material | Polyethylene mesh |
| Primary Use | Pest & bird barrier |
| Outdoor Suitability | Yes |
| Reusability | Multi-season reusable |
| Chemical-Free | Yes |
| Assembly Required | Minimal anchoring |
| Additional Features |
|
- The 0.03-inch mesh keeps out most common pests — moths, flies, aphids — while still letting water and sunlight through, so your plants don’t miss a beat.
- At 20 × 16 feet, one sheet covers a good-sized raised bed, and it’s reusable season after season, making the $40.99 price tag easy to justify.
- It holds up surprisingly well in rough weather — hail included — and installs easily with hoops, stakes, or bungee cords.
- The bonded center seam can separate over time, and some users have had to reinforce it themselves to keep it from failing mid-season.
- If you’re growing squash or other plants that need pollination, you’ll have to pull the netting off and put it back — which gets old fast.
- Very small insects can still squeeze through the 0.03-inch openings, so it’s not a complete solution if tiny pests like thrips are your main concern.
6. Garden Root Vegetable Storage Bin
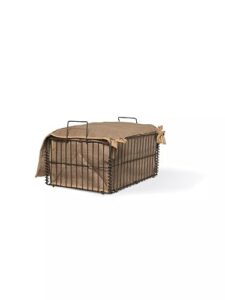
Once your carrots are harvested, you need smart place to put them. The Garden Root Vegetable Storage Bin manages that job well.
Its wire frame and breathable burlap liner keep air moving around your roots, which slows moisture buildup and extends freshness.
At 12.5 × 18 × 8.5 inches, it holds a solid harvest without crowding.
Line it with newspaper, layer in slightly damp sand, and store it somewhere cool and dark. Your carrots can stay crisp and sweet for months.
| Best For | Home gardeners and bulk buyers who want to store root vegetables like carrots, potatoes, and onions without using up fridge or counter space. |
|---|---|
| Primary Material | Metal wire & burlap |
| Primary Use | Root vegetable storage |
| Outdoor Suitability | Yes |
| Reusability | Long-term reusable |
| Chemical-Free | Yes |
| Assembly Required | Tool-free assembly |
| Additional Features |
|
- The breathable burlap liner keeps air circulating, which helps slow moisture buildup and extend freshness
- Tool-free assembly makes setup quick and hassle-free right out of the box
- At 12.5 × 18 × 8.5 inches, it holds a generous harvest in one tidy spot
- The corkscrew wire fasteners can loosen over time, causing the sides to shift or separate
- The burlap liner can be tricky to fit snugly inside the bin’s frame
- Vegetables may rot faster if the bin isn’t lined with newspaper or extra material, and the bin can’t be washed if it gets dirty
Frequently Asked Questions (FAQs)
What’s the trick to growing carrots?
Loose, deep soil is the real secret. Roots can’t grow straight through rocks or clumps. Get your soil right — 12 to 18 inches deep — and almost everything else falls into place.
What month should I start planting carrots?
Spring planting works best 2 to 4 weeks before your last frost date, once soil hits 50–65°F. For fall harvests, count back 10 to 12 weeks from your first expected frost.
How many carrots can grow from one carrot seed?
One seed grows one carrot. Each plant produces a single primary taproot, though some varieties occasionally develop one or two small side roots.
Proper spacing and soil prep keep that main root straight and full-sized.
What is the secret to growing good carrots?
The secret is soil. Give carrots deep, loose, rock-free earth — at least 12 inches — and they’ll practically grow themselves. Add consistent moisture, thin seedlings early, and skip excess nitrogen.
Do coffee grounds help carrots grow?
Yes, coffee grounds can help carrots grow. Mixed sparingly into the top 2 inches of soil, they improve texture, add potassium and phosphorus, and support beneficial microbes — but don’t overdo it.
How long does it take for carrots to grow?
Most carrots take 60 to 80 days from sowing to harvest. Baby types can be ready in 50 days, while full-size varieties like Imperator need closer to 75 to 85 days.
How to grow carrots?
Growing carrots well comes down to three things: loose soil, proper spacing, and patience. Sow seeds ¼ inch deep, water consistently, thin early, and you’ll harvest roots in 55–80 days.
How long does it take to grow carrots?
Most carrots reach harvest in 50 to 80 days from sowing. Baby types finish in as few as 50 days, while full-size roots like Imperator need closer to
Can you grow carrots in shallow soil?
Shallow soil works, but variety choice matters. Stick to Chantenay or Nantes types — their shorter roots stay within 8–12 inches. Amend with compost and keep moisture consistent to prevent crusting.
Why do carrots grow so fast?
Roots don’t actually grow "fast" — they grow efficiently when conditions align.
Loose soil, cool temperatures (60–75°F), steady moisture, and full sun let carrot roots expand steadily downward without interruption, hitting harvest size right on schedule.
Conclusion
Picture two gardeners planting side by side: one rushes, ignoring soil depth, spacing, and variety. The other pauses, gets ready, and chooses deliberately.
At harvest, one pulls twisted, forked failures—the other lifts clean, straight roots from loose earth. That difference isn’t luck.
Knowing how to grow carrots successfully means making the right call before seeds ever touch soil. Nail the fundamentals, and your harvest won’t just feed your table—it’ll prove what careful attention actually grows.
- https://click.linksynergy.com/deeplink?id=kXQk6%2AivFEQ&mid=36039&u1=gardeningknowhow-us-1070439092548076969&murl=https%3A%2F%2Fwww.burpee.com%2Fvegetables%2Fcarrots%2F%3Fbp_mode%3DSeed
- https://c.next2.io/?sid=11175396&said=gardeningknowhow.com&partnerId=gardeningknowhow-us-5896782277462282108&link=https%3A%2F%2Fwww.lowes.com%2Fpd%2FCRAFTSMAN-34-in-L-Wood-Steel-Spading-Fork%2F5015343883&merchantId=199898&fallback_url=https%3A%2F%2Flowes.sjv.io%2Fc%2F221109%2F897039%2F12374%3FsubId1%3Dgardeningknowhow-us-5896782277462282108%26sharedId%3Dgardeningknowhow-us%26u%3Dhttps%253A%252F%252Fwww.lowes.com%252Fpd%252FCRAFTSMAN-34-in-L-Wood-Steel-Spading-Fork%252F5015343883
- https://www.researchgate.net/publication/343671119_Effect_of_Different_Soil_Amendments_and_Variety_on_the_Growth_and_Yield_of_Carrot_Daucus_carota_L
- https://www.cropj.com/abouziena_5_11_2011_1380_1386.pdf
- https://link.springer.com/article/10.1007/s11104-023-05892-0