This site is supported by our readers. We may earn a commission, at no cost to you, if you purchase through links.

Your first tomato plant will probably die, and that’s perfectly normal. Most beginners lose a few plants to overwatering, underwatering, or mysterious leaf spots before they figure out what vegetables actually need.
The good news? Vegetable planting and care isn’t nearly as complicated as garden catalogs make it sound. Once you understand how sunlight, soil, and water work together, you can grow crisp lettuce, sweet carrots, and prolific beans without a horticulture degree.
Start with a sunny 4-by-4-foot patch, pick three easy crops, and focus on getting the basics right before you worry about heirloom varieties or companion planting charts.
Table Of Contents
- Key Takeaways
- Planning Your Vegetable Garden
- Preparing Soil and Planting Techniques
- Essential Vegetable Plant Care Tips
- Top 5 Tools and Products for Vegetable Care
- Frequently Asked Questions (FAQs)
- In what order should I plant my vegetable garden?
- How often should I rotate crops?
- When should I start composting?
- What tools do I need for gardening?
- How do I preserve seeds for planting?
- Can I grow vegetables in containers?
- When is the best time to harvest vegetables?
- How do you store harvested vegetables properly?
- What are signs of overwatering or underwatering?
- How often should you prune vegetable plants?
- Conclusion
Key Takeaways
- Start with a sunny 4-by-4-foot patch and three beginner crops like lettuce, radishes, or bush beans—mastering small spaces beats overwhelming yourself with ambitious layouts that fail.
- Water soil deeply to 6-12 inches using drip irrigation or soaker hoses in early morning, then mulch 2-3 inches to cut evaporation by 70 percent and build drought-tolerant roots.
- Test your soil every 1-3 years for pH and nutrients, then amend with 2-3 inches of compost before planting—feeding the soil correctly prevents most nutrition problems before they start.
- Scout for pests weekly, rotate crops yearly to disrupt pest cycles, and prune with clean tools after harvest to boost air circulation and stop disease before it spreads.
Planning Your Vegetable Garden
Planning your vegetable garden starts with getting the basics right before you plant a single seed. You need to think about where your garden will go, what you’ll grow, and how you’ll set it up for success.
If you’re planting during the warmer months, focus on summer vegetable gardening ideas that thrive in heat and need less fussing over.
Let’s walk through the four essential decisions that’ll help you build a thriving garden from day one.
Choosing The Right Location and Sunlight
Before you plant a single seed, scout your yard for the sunniest real estate—your vegetables need six to eight hours of full sun daily. Position your garden plan facing south to catch maximum bright light, and watch for tree shadows that can steal 40 percent of your sunlight.
Test soil temperature, check drainage, and note microclimate effects from nearby walls or fences. To boost your garden’s success, it’s vital to understand.
Selecting Beginner-Friendly Vegetables
Once your sunny spot is locked in, pick vegetables that won’t quit on you. These beginner plants practically grow themselves:
- Lettuce – Baby leaves ready in 30 days, perfect for seed selection practice
- Radishes – Harvest in 25 days and loosen compacted soil types
- Bush beans – Fix nitrogen while producing heavily in containers
- Cherry tomatoes – Thrive in five-gallon pots with consistent sun
Start with two or three easy vegetables, master those, then expand your garden planning skills next season.
Garden Size and Layout Considerations
Your first garden should measure 4 by 4 feet—small enough to manage without a full-time commitment. Raised garden beds make space optimization easy, while garden paths at least 18 inches wide give you wheelbarrow access.
Orient beds north-south so tall tomatoes won’t shade your lettuce. This garden design and layout creates distinct microclimates, and border design around each bed prevents grass creep.
Seeds Vs. Seedlings: What to Plant
Once you’ve mapped your layout, seed selection becomes your next decision. Starting a garden means choosing between direct sowing garden seeds and buying transplants—each works differently.
Here’s what beginners need to know:
- Seedlings cut harvest time by 2 to 6 weeks for tomatoes and peppers
- Direct sowing works best for carrots and radishes with deep taproots
- Germination rates drop after seeds age beyond 2 to 5 years
- Transplant shock decreases by 20 to 40 percent with established seedlings
- Soil preparation matters more for seeds than transplants in cool climates
NonGMO seeds and crop rotation planning start here.
Starting with crop rotation for healthy soil helps you build stronger plants while naturally enriching your garden over time.
Preparing Soil and Planting Techniques
Getting your soil ready is where the real magic happens—it’s the foundation for everything your plants will do. You’ll need to know how to feed that soil, space your plants so they actually thrive, and decide whether to start from seed or give yourself a head start with transplants.
Let’s break down the three key techniques that’ll set you up for a killer harvest.
Composting and Fertilization Methods

Think of soil as your vegetables’ pantry—stock it right and they’ll thrive.
Composting turns kitchen scraps into dark, crumbly organic matter in eight to twelve weeks when you balance carbon-rich browns with nitrogen-packed greens. Vermicomposting speeds things up using worms, while compost tea delivers quick nutrients.
For soil amendments, layer one to three inches of finished compost into beds before planting, or use organic fertilizer types matched to your crop’s needs.
For more on the distinct benefits and purposes of compost and fertilizer differences, refer to helpful gardening guides.
Proper Plant Spacing and Depth

Getting seed depth guidelines right makes the difference between a thriving crop and a frustrating fail. Most seeds should sit two to three times their width deep—lettuce barely under the surface, beans about an inch down.
Plant spacing rules matter just as much: tomatoes need eighteen to twenty-four inches, while spinach thrives at three to four inches apart for proper root growth patterns.
Direct Sowing Vs. Transplanting

Seed germination depends on soil temperature—warm season crops need at least 60F to sprout outdoors.
Direct sowing bush beans and carrots avoids transplant shock and root disturbance, while transplanting peppers and tomatoes gives you a head start in short growing seasons.
Transplants require hardening off for five to fourteen days, but they help with water conservation since established roots access deeper moisture for better vegetable plant care.
Essential Vegetable Plant Care Tips

Getting your plants in the ground is just the beginning—the real work starts once they’re growing. You’ll need to master a few key practices to keep your vegetables healthy, productive, and pest-free throughout the season.
Let’s walk through the essential care tasks that separate thriving gardens from struggling ones.
Watering Schedules and Techniques
Your vegetables thrive when you water soil deeply—6 to 12 inches—to encourage strong roots and drought tolerance. Use drip irrigation or soaker hoses for smart watering and water conservation, reducing evaporation by up to 70 percent.
Apply a 2 to 3 inch mulch layer to hold soil moisture steady. Check soil moisture 1 to 2 inches down, and water early morning for best vegetable plant care results.
Nutrient Management and Fertilizer Use
Healthy vegetable plant nutrition starts with soil testing every 1 to 3 years to match fertilizer types and rates to your crop needs. Smart nutrient cycling through crop rotation and organic amendments builds soil health while reducing chemical dependency.
- Test pH before planting to guarantee nutrients remain available
- Band granular fertilizers near roots for faster early uptake
- Split liquid applications across growth stages for steady supply
- Add 2 to 3 inches of compost to improve soil structure
- Record fertilizing dates and amounts to adjust future plans
Pruning, Weeding, and Mulching
Think of pruning, weeding, and mulching as your garden’s spring cleaning routine—essential maintenance that prevents problems before they start.
Prune with clean, sharp hand pruners after harvest to open plant centers and boost air circulation.
Hand-weed every 7 to 14 days using weeding tools like a hoe to stop competition early.
Layer 2 to 3 inches of organic mulches like straw around stems to lock in moisture and improve soil health.
Organic Pest and Disease Control
Even the tidiest beds face pests—aphids, caterpillars, flea beetles—so scout leaves weekly and remove diseased parts immediately. Rotate crops yearly to disrupt pest cycles, then use row covers on young transplants and insecticidal soap on soft-bodied invaders.
Introduce beneficial insects for biocontrol, apply neem oil sparingly, and keep records of what worked. Prevention beats cure every time.
Prevention beats cure every time—scout weekly, rotate crops, and introduce beneficial insects before pests take hold
Top 5 Tools and Products for Vegetable Care
You don’t need a shed full of equipment to grow great vegetables, but a few smart tools make the work easier and more enjoyable. The right gear helps you test soil, prune plants, feed roots, and control weeds without wearing yourself out.
Here are five reliable products that beginners and experienced gardeners reach for season after season.
1. Rapitest Soil Test Kit
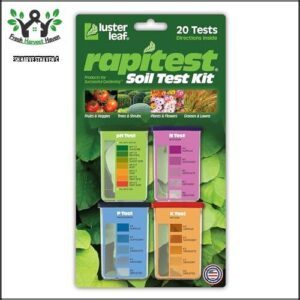
You can’t grow great vegetables if your soil’s off-balance, and that’s where the Luster Leaf Rapitest comes in. This affordable kit tests pH, nitrogen, phosphorus, and potassium—40 tests total—using a simple color-matching system that even beginners can nail.
Mix soil with water, add a capsule, and compare the color to the chart. You’ll get results in minutes, not days.
The kit includes plant preferences for over 450 species, so you’ll know exactly what amendments your tomatoes or peppers need before you plant.
| Best For | Home gardeners who want quick, affordable soil testing without sending samples to a lab. |
|---|---|
| Brand | Luster Leaf |
| Weight | 4 ounces |
| Primary Use | Soil testing |
| Skill Level | Beginner-friendly |
| Material Quality | Durable components |
| Application Type | Testing tool |
| Additional Features |
|
- Tests all four essentials (pH, nitrogen, phosphorus, potassium) with 40 total tests included
- Color-matching system is beginner-friendly and delivers results in minutes
- Comes with pH preferences for 450 plants so you know exactly what to adjust
- Not as precise as professional lab testing
- Only 40 tests with no easy refill options available
- Capsules can be tricky to open and results need dim lighting for accuracy
2. Corona ComfortGel Hand Pruner
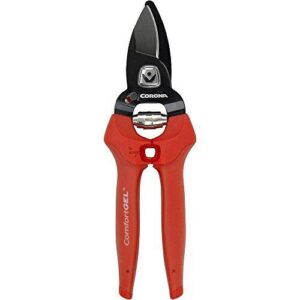
Once your soil’s in shape, you’ll need a solid pruner to keep plants productive. The Corona ComfortGel bypass model cuts stems up to 3/4 inch with ergonomic grips that won’t cramp your hands during long sessions.
Its high-carbon steel blades slice cleanly through live growth without crushing stems, and the non-stick coating sheds sap easily. The shock-guard bumpers reduce wrist strain, and the ambidextrous design works for lefties and righties alike—backed by a two-year warranty.
| Best For | Gardeners who need a reliable pruner for regular trimming and maintenance on small to medium stems, especially those who value comfortable grips during extended use. |
|---|---|
| Brand | Corona |
| Weight | 4.8 ounces |
| Primary Use | Pruning and cutting |
| Skill Level | All levels |
| Material Quality | High carbon steel |
| Application Type | Hand tool |
| Additional Features |
|
- Ergonomic ComfortGel grips reduce hand fatigue and work well for people with grip strength issues
- Non-stick coated blades make clean cuts through live growth and shed sap easily
- Ambidextrous design with shock-absorbing bumpers protects wrists during repetitive cutting
- Blades may dull faster than expected with regular use
- Blade edge can bend over time, preventing the tool from closing completely
- Not designed for heavy-duty work or cutting branches beyond its 1/2 to 3/4 inch capacity
3. Dr Earth Natural Compost Mix
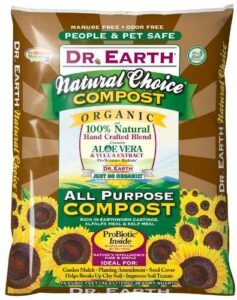
After you’ve trimmed back old growth, you’ll want to feed the soil that sustains those plants.
Dr Earth Natural Compost Mix breaks up heavy clay and boosts moisture retention in one pass. Toss 2 to 3 inches into your top foot of soil, and it’ll release nitrogen, phosphorus, and potassium slowly—no synthetic spikes.
The 1.5-cubic-foot bags cover small beds easily, and the OMRI-listed formula stays safe around kids and pets.
| Best For | Gardeners who need to amend clay-heavy soil or want a nutrient-rich organic compost for planting beds, shrubs, or vegetables. |
|---|---|
| Brand | Dr. Earth |
| Weight | 35.7 pounds |
| Primary Use | Soil amendment |
| Skill Level | All levels |
| Material Quality | 100% natural |
| Application Type | Soil additive |
| Additional Features |
|
- Breaks up dense clay and improves soil structure while slowly releasing NPK nutrients
- OMRI-listed and 100% natural, making it safe to use around children and pets
- Works as a multi-purpose amendment for trees, flowers, vegetables, lawns, and mulch applications
- Costs more than standard compost options on the market
- Bags sometimes contain small rocks, pebbles, or twigs that need to be sorted out
- Quality and consistency can vary between different bags
4. Dave Thompson Organic Fertilizer
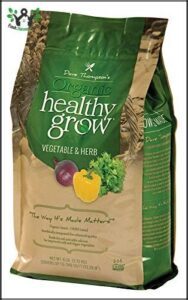
Once your beds are prepped, you’ll need regular nutrition to keep plants thriving all season.
Dave Thompson’s Organic Healthy Grow delivers composted manure in granule form—spread it around tomatoes, peppers, and greens every 4 to 6 weeks. The 6-pound bag covers modest beds, and you’ll see greener foliage within days if you water it in right after applying.
It’s OMRI listed, feeds beneficial microbes, and adds calcium for bigger yields without synthetic spikes.
| Best For | Organic gardeners who want a natural, slow-release fertilizer that feeds soil microbes and adds calcium for healthier vegetables, herbs, and flowers. |
|---|---|
| Brand | Dave Thompson’s Organic Healthy Grow |
| Weight | 6 pounds |
| Primary Use | Fertilizing |
| Skill Level | All levels |
| Material Quality | OMRI listed organic |
| Application Type | Granular fertilizer |
| Additional Features |
|
- Shows visible results within days when watered in properly
- OMRI-listed and safe for organic gardening with low odor
- Adds calcium and promotes beneficial microbial activity for better yields
- May attract gnats if not applied correctly
- 6-pound bag only covers smaller garden beds
- Requires consistent watering and proper application to avoid issues
5. Nisaku Japanese Weeding Knife Tool
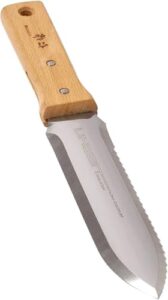
Weeds thrive where vegetables compete for water and nutrients—that’s when you’ll need a tool that digs, cuts, and measures in one move.
The Nisaku Japanese Weeding Knife brings a 7.25-inch stainless steel blade with serrated and straight edges, plus inch markings for consistent planting depth. Slice through stubborn roots, pry dandelions between lettuce rows, or trench seed lines to exact specifications.
The ergonomic wooden handle won’t slip when your gloves are muddy, and the blade stays sharp season after season.
| Best For | Gardeners who need a versatile tool for weeding, root cutting, and precise planting in tight spaces between vegetables. |
|---|---|
| Brand | Japanese Manufacturer |
| Weight | 6.4 ounces |
| Primary Use | Digging and weeding |
| Skill Level | All levels |
| Material Quality | High-quality stainless steel |
| Application Type | Multi-purpose tool |
| Additional Features |
|
- High-quality Japanese stainless steel blade with both serrated and straight edges stays sharp through multiple seasons
- Built-in inch markings let you measure planting depth without switching tools
- Ergonomic wooden handle provides secure grip even with muddy gloves
- Cheap vinyl sheath may wear out quickly and need replacement
- Blade is extremely sharp and requires careful handling to avoid accidents
- Heavier than expected at 10 oz, which might cause hand fatigue during extended use
Frequently Asked Questions (FAQs)
In what order should I plant my vegetable garden?
Start cool-season crops like lettuce, peas, and radishes first in early spring.
Follow with warm-season plants—tomatoes, peppers, cucumbers—after the last frost passes.
Sequence planting by temperature tolerance, not impulse.
How often should I rotate crops?
You’ll want to rotate crops every 3 to 4 years to let soil recover and pests move on. Switch plant families each season—legumes after heavy feeders work great.
When should I start composting?
Think of your compost pile as a slow cooker—you can start it anytime, but spring or fall works best. Begin when you’ve got kitchen scraps and yard waste ready to feed it.
What tools do I need for gardening?
You’ll need a hand trowel, pruners, a garden fork, a rake, and a hose or watering can. A soil test kit helps check pH, while gloves protect your hands.
How do I preserve seeds for planting?
Store seeds in airtight glass jars with silica gel packs, keep them in a cool spot between 32 and 50°F, and label each container with the plant name and collection date.
Can I grow vegetables in containers?
Yes, you can grow vegetables in containers—from 5-gallon pots to 15-gallon totes. Most crops need at least 6 to 8 hours of direct sunlight and containers with drainage holes.
When is the best time to harvest vegetables?
Most vegetables hit peak flavor in the morning after dew dries—think lettuce and snap beans. Tomatoes? They actually taste richer later when warmth develops sugars fully.
How do you store harvested vegetables properly?
Keep your harvest at 32 to 40°F with 85 to 95 percent humidity for leafy greens. Use a dedicated crisper drawer, and don’t mix ethylene-producing fruits with vegetables—they’ll speed up spoilage.
What are signs of overwatering or underwatering?
An ounce of prevention beats a pound of cure—watch for yellow, droopy leaves and brown edges.
Wet soil with wilting means overwatering; dry, crispy leaves signal underwatering. Check soil moisture first.
How often should you prune vegetable plants?
Prune tomatoes and cucumbers weekly during active growth, peppers monthly when fruiting, and herbs every two to three weeks.
Start after plants develop four to six true leaves to avoid stressing young seedlings.
Conclusion
Rome wasn’t built in a day, and neither is a thriving vegetable garden. Your first harvest might be modest—three misshapen tomatoes and a handful of bolted lettuce—but you’ll learn more from those imperfect crops than any book can teach.
Master vegetable planting and care through hands-on trial, not flawlessness. Water deeply, weed consistently, and give your plants the sunlight they crave.
Next season, you’ll wonder why you ever found this intimidating.