This site is supported by our readers. We may earn a commission, at no cost to you, if you purchase through links.

The difference between a thriving garden and a mediocre one often comes down to six weeks. That’s the window when experienced gardeners start spring seeds indoors while their neighbors are still browsing garden centers.
Timing your indoor seed starting correctly means you’ll transplant vigorous seedlings ready to produce, not scramble to catch up with the season. The challenge is knowing exactly when to begin—start too early and your seedlings become leggy and rootbound, too late and you’ve squandered the advantage entirely.
Your last spring frost date acts as the anchor point, but each crop demands its own countdown, from peppers that need 8 to 10 weeks of indoor growth to broccoli that’s ready in just 4 to 6.
Table Of Contents
- Key Takeaways
- Why Start Spring Seeds Indoors
- Determining The Right Seed Starting Time
- Which Seeds to Start Indoors for Spring
- Step-by-Step Indoor Seed Sowing Guide
- Caring for Indoor Seedlings
- Top 5 Products for Starting Seeds Indoors
- Frequently Asked Questions (FAQs)
- When to start seeds indoors for spring planting?
- What vegetable seeds should be started indoors?
- What seeds should not be started indoors?
- When can I plant seeds indoors?
- When should I start planting seeds?
- Should I start seeds indoors or outside?
- When should you plant seeds in the winter?
- How do I start seeds indoors?
- When is the best time to plant a garden?
- Is January too early to start seeds indoors?
- Conclusion
Key Takeaways
- Start seeds indoors 6 to 12 weeks before your last spring frost date, counting backward from that anchor point based on each crop’s specific timeline—tomatoes need 6 to 8 weeks, peppers require 8 to 10 weeks, and slow growers like onions demand 10 to 12 weeks of indoor growth.
- Indoor seed starting gives you control over variety selection, extends your harvest window by 2 to 4 weeks compared to direct sowing, and costs just $0.12 per plant versus $1.25 for nursery seedlings—an 85% savings that reaches break-even by year three.
- Success hinges on maintaining soil temperature between 65 and 75°F using heat mats, providing 12 to 16 hours of grow light positioned 2 to 4 inches above seedlings, and using sterile seed starting mix with proper drainage to prevent damping off disease.
- Root crops like carrots, beets, and radishes must be direct-sown outdoors because transplanting damages their taproots and causes deformed growth, while beans and peas establish stronger in cool garden soil without the stress of transplanting.
Why Start Spring Seeds Indoors
Starting seeds indoors gives you a serious edge in the garden, and once you try it, you won’t want to go back to relying solely on store-bought transplants.
Timing matters—knowing when to plant seeds for spring harvest helps you choose varieties that’ll thrive indoors and transition smoothly to your garden.
You’ll gain more control over your growing season, access varieties you’d never find at the local nursery, and save money in the process.
Plus, growing from vegetable seeds gives you the flexibility to experiment with heirlooms and rare cultivars that suit your climate perfectly.
Let’s look at the specific advantages that make indoor seed starting worth your time and effort.
One key factor is timing—understanding when to plant summer vegetables helps you get seeds started indoors at exactly the right moment for transplanting.
Benefits for Early Harvests
Starting seeds indoors gives you command over your harvest calendar, pushing your first pickings weeks ahead of neighbors who sow directly. You’ll extend the season and access yields that would otherwise wither before frost. Indoor seed starting builds transplanting seedlings that shrug off cold snaps, ensuring early ripening and frost protection.
Following a proven seed-starting schedule with proper hardening-off keeps your transplants vigorous and cuts losses from late-season surprises.
- Tomatoes and peppers started indoors produce 2 to 4 weeks earlier, delivering ripe fruit by early summer instead of late.
- Prolonged harvest windows let you tuck second successions into beds after early crops finish.
- Increased yields pile up when sturdy transplants spend more frost-free days actively fruiting. For more on the benefits of, explore these advantages of planting seedlings indoors.
Expanding Plant Variety Choices
Beyond timing, starting seeds indoors unlocks access to rare flowers and heirloom varieties that garden centers never stock. Seed catalogs list dozens of unusual options—Mexican sour gherkin, multicolored cleome, spurred Canterbury bells—preserving genetic diversity and plant diversity you won’t find on nursery benches.
Choosing indoor gardening and smart seed selection lets you grow regionally adapted lines, disease-resistant cultivars, and vegetable seeds bred for flavor, not shipping. For practical tips and guidance, check out these benefits of starting seeds indoors.
Cost Savings Compared to Buying Seedlings
Starting seeds indoors delivers substantial financial benefits over time. A $3 seed packet produces roughly 25 plants at $0.12 each, while garden center seedlings cost around $1.25 apiece—a savings of over 85 percent per plant.
Starting seeds indoors costs just twelve cents per plant versus a dollar twenty-five at the nursery—over 85 percent savings
Though upfront equipment like grow lights runs about $205, gardeners raising 60 to 70 starts yearly reach break-even by season three, turning every future planting into long-term garden budget relief.
Control Over Growing Conditions
Beyond the money you’ll save, seed starting puts you in the driver’s seat for temperature control, humidity management, and light optimization. You’ll keep soil temperature steady around 68 to 72 degrees, adjust air circulation with a small fan, and dial in soil quality using sterile mix—conditions outdoor sowing can’t match.
Indoor gardening with grow lights ensures strong seed germination every single time.
Determining The Right Seed Starting Time

Timing is everything regarding starting seeds indoors—plant too early and your seedlings become leggy and stressed, too late and you’ll miss the window for a productive growing season. The key to getting it right lies in understanding your local frost dates, matching them to each plant’s specific needs, and using the tools already at your fingertips.
Let’s break down exactly how to calculate your ideal seed starting schedule so you can confidently get those trays filled at the perfect moment.
Calculating Your Last Spring Frost Date
You can’t master seed scheduling without knowing your last frost date—the average final 32°F night that dictates when transplanting is safe. Online frost date tools like Garden.org’s calculator use your zip code and climate zones to show probabilities: Ashburn, Virginia hits a 50% last frost around April 23.
Check multiple thresholds—36°F, 32°F, 28°F—because tender seedlings demand different protection than hardy crops.
Recommended Timelines for Seed Starting
Once you’ve pinpointed your last frost date, count backward using seed starting schedules customized to each crop’s growth rate. Tomatoes need 5–7 weeks indoors, peppers demand 8–10, and slow growers like onions require 10–12 weeks.
Your planting calendar transforms frost date calculations into actionable sowing dates—broccoli transplants thrive outdoors 3–4 weeks before frost, while heat-loving eggplants wait until soil hits 70°F.
Adjusting for Local Climate and Zone
Your USDA Hardiness Zone offers a baseline, but microclimate effects and climate variability demand zone adjustments beyond generic schedules. Regional planning tools and recent last frost date records improve your gardening schedule far better than zone numbers alone.
Check soil temperature and frost patterns around your property—south-facing walls, raised beds, and sheltered corners warm faster, letting you transplant indoor-sown seedlings one to two weeks earlier.
Using Planting Calendars and Seed Packets
Seed synchronization begins when you pair your planting calendar with seed packet instructions, turning generic frost date management into a tailored gardening schedule. Here’s your sowing strategy for packet decoding:
- Locate the “weeks before last frost” guideline printed on each seed packet and match it to your calendar’s final frost date.
- Cross-reference packet depth and temperature requirements with calendar timing to verify proper seed starting conditions.
- Group packets by lead time—10–12 weeks, 8–10 weeks, 4–6 weeks—then assign calendar sowing dates for each batch.
- Transfer key details like spacing, sun exposure, and days to maturity into your planting calendar for quick reference all season.
Which Seeds to Start Indoors for Spring

Not all seeds thrive when started indoors, and choosing the right ones makes the difference between strong transplants and wasted effort. Some crops need that controlled indoor environment to develop properly before facing the garden, while others actually perform better when sown directly in the ground.
Let’s break down which vegetables, herbs, and flowers deserve a spot on your indoor seed-starting bench this spring.
Warm-Season Vegetables (Tomatoes, Peppers, Eggplants)
Tomatoes, peppers, and eggplants are your go-to warm-season vegetables for indoor seed starting, giving you control over garden layout and crop rotation from day one.
Start tomato seeds 6 to 8 weeks before your last frost date, while peppers and eggplants need 8 to 10 weeks indoors for strong seed germination.
These heat-loving plants thrive with bottom heat and bright light during transplanting preparation.
Cool-Weather Crops (Broccoli, Cabbage, Cauliflower)
Broccoli, cabbage, and cauliflower follow a different timeline than heat-lovers—you’ll start these cool-weather champions 4 to 8 weeks before your last frost for vigorous seed germination.
Sow seeds 0.25 to 0.5 inches deep in a quality mix, maintain soil temperature around 80°F initially, then transplant outdoors when seedlings show 4 to 5 true leaves and garden soil reaches 50°F for ideal harvest timing.
Herbs and Flowers Best Suited for Indoor Sowing
Beyond vegetables, several herbs and flowers thrive through indoor sowing—giving you even more control over your spring garden. Basil, cilantro, and parsley germinate quickly on sunny windowsills, with basil sprouting in 5 to 10 days at 70 to 75°F.
For flowers, start marigolds and zinnias indoors 4 to 6 weeks before frost for vibrant summer blooms and excellent pollinator support.
Crops Better Direct-Sown Outdoors
While many crops thrive from indoor seed starting, some perform far better when direct sown outdoors. Root vegetables like carrots, parsnips, and radishes develop straighter, more uniform shapes when their taproots grow undisturbed—transplanting often causes forked or twisted roots that are harder to harvest and use.
Other crops better suited for outdoor germination include:
- Peas and beans, which dislike root disturbance and establish stronger vines in cool garden soil
- Cucumbers and melons, whose sensitive roots often suffer transplant shock despite fast growth
- Squash and pumpkins, which develop sprawling root systems that outperform pot-bound transplants
Direct sowing eliminates transplant stress entirely while promoting deeper root development. Wait until soil temperature reaches ideal levels—cool-season crops like peas go in as soon as ground can be worked, while warm-season beans and cucumbers need consistently warm beds after your last frost date. Prepare a fine seedbed with crumbly, moisture-retentive soil several inches deep, ensuring small roots penetrate easily from day one.
This approach saves labor, skips specialized indoor equipment, and often produces more vigorous plants adapted to your outdoor conditions from germination forward.
Step-by-Step Indoor Seed Sowing Guide
Once you’ve figured out what to plant and when, it’s time to roll up your sleeves and get those seeds in the ground—or rather, in the trays. The success of your indoor sowing depends on a few critical steps that set your seedlings up for vigorous growth from day one.
Here’s how to handle containers, sowing depth, labeling, and environmental conditions to boost germination rates and produce healthy transplants.
Choosing Containers and Seed Starting Mix

Your choice of container and growing medium sets the foundation for success in indoor seed starting. Seed tray options range from reusable plastic trays with clear drainage holes to biodegradable materials like peat or paper pots that minimize root disturbance.
Pair these with a sterile seed starting mix—usually one part quality compost to one part perlite or vermiculite—to prevent damping off and guarantee proper aeration.
Sowing Seeds at Correct Depth and Spacing

Once your containers and soil mix are ready, precision in sowing depth and spacing determines your germination rates. As a general rule, plant seeds at a depth equal to twice their diameter—tiny lettuce seeds need barely 1/8 inch of coverage, while larger beans require 1/2 to 1 inch.
- Use a pencil or dibber to create uniform grooves at the correct depth
- Space seeds 1/2 to 2 inches apart to prevent crowding and damping off
- Press soil gently after sowing to maintain constant moisture contact
- Surface-sow root crops and very small seeds, as they need light to germinate
Labeling and Organizing Seed Trays

A jumble of unmarked trays leads to misidentified seedlings and wasted effort, so you’ll need a solid labeling strategy. Use waterproof markers on weatherproof stakes, include the plant name, sow date, and expected transplant date on every label. Assign each tray a unique alphanumeric code and maintain a central map for seed tracking.
Photograph each setup with dated close-ups, group trays by plant family to reduce mix-ups, and use labeled dividers within larger trays for clean tray organization.
| Label Element | Best Practice |
|---|---|
| Material | Weatherproof stakes or laminated tags |
| Font Size | 4 to 6 millimeters for readability |
| Placement | Front edge of each cell, facing outward |
| Color Coding | Two-color scheme for seed type and status |
| Record Keeping | Digital log with tray code and sow date |
Maintaining Optimal Temperature and Humidity

Beyond light and water, your seedlings need precise temperature control and humidity levels to trigger reliable seed germination. Keep soil temperature between 65 and 75 degrees Fahrenheit using a heat mat, then monitor with a dual-channel thermometer.
Maintain 70 to 90 percent humidity under a clear dome during germination, and add a gentle fan for air circulation to prevent damping off—essential indoor gardening tips for vigorous seedling care.
Caring for Indoor Seedlings

Once your seeds have sprouted, the real work begins—you’ll need to provide consistent care to raise strong, healthy seedlings ready for transplanting. Light, water, temperature, and proper spacing all play vital roles in preventing leggy growth, damping off, and other common setbacks.
Here’s how to manage each stage of seedling development, from germination through transplanting.
Providing Adequate Light and Water
Your seedlings won’t thrive without the right light intensity and water quality.
Position grow lights 2 to 4 inches above fresh sprouts, providing 12 to 16 hours of full spectrum LED or fluorescent light daily to prevent leggy growth.
Keep soil moisture evenly balanced using room temperature, filtered water, and maintain humidity control between 50 and 70 percent with a plastic dome for ideal indoor planting success.
Preventing Common Seedling Problems
Overwatering invites damping off disease within 7 to 14 days, causing stems to collapse at soil level when Pythium thrives in soggy conditions.
Prevent this by ensuring sterile seed starting mix, clean containers, and proper air circulation at 40 to 60 percent humidity using a small fan positioned 12 to 18 inches away. Bottom watering and morning irrigation reduce disease pressure dramatically.
Thinning and Transplanting to Larger Pots
Once true leaves appear and roots fill the current pot, it’s time for seedling thinning and pot upgrading. Remove the weakest plant at the soil line with clean scissors, giving survivors 2 to 3 inches of root room.
Transplanting into 4-inch or 6-inch pots with drainage holes minimizes transplant shock when you handle leaves rather than stems, tease out crowded roots gently, and use a well-draining mix with perlite for soil aeration.
Monitoring Growth and Adjusting Care
Track your seedlings weekly with seedling inspection that catches problems early—pale leaves signal you need light adjustment, while stretched stems mean intensity is too low.
Growth tracking through soil monitoring helps you spot watering issues before root rot sets in, and humidity control paired with gentle air circulation keeps damping off at bay.
Adjust your indoor gardening techniques as plants mature, increasing fertilizer strength once transplanting approaches, ensuring vigorous plant care throughout seed starting.
Top 5 Products for Starting Seeds Indoors
Having the right tools can make or break your seed-starting success, turning a frustrating experiment into a thriving nursery of healthy seedlings. You don’t need to spend a fortune, but investing in a few quality essentials will set you up for germination rates that rival any commercial greenhouse.
Here are five products that’ll give your seeds the best possible start, from the moment they hit the soil to their first true leaves.
1. Back to Roots Organic Seed Starting Mix

Back to Roots Organic Seed Starting Mix delivers a peat-free foundation that expands from a compressed block into 12 quarts of ready-to-use soil.
You’ll find coconut coir blended with perlite for excellent drainage, plus mycorrhizae to boost root development from day one. The mix includes gypsum for calcium, worm castings for nutrients, and yucca extract to maintain even moisture between waterings.
It’s lightweight, finely screened to protect delicate roots, and works equally well for seeds or cuttings—making it a flexible choice for indoor trays or early outdoor containers.
| Best For | Gardeners who want a peat-free, organic option for starting seeds, herbs, or young plants indoors or outdoors. |
|---|---|
| Primary Use | Seed starting & growing |
| Indoor/Outdoor | Both |
| Material | Organic peat-free |
| Reusable | No |
| Weight | 2.87 pounds |
| Skill Level | All levels |
| Additional Features |
|
- Expands to 12 quarts from a compact block, making it easy to store and use when you need it
- OMRI-listed organic formula with mycorrhizae and worm castings supports strong root growth
- Lightweight coconut coir blend drains well and keeps moisture consistent for seedlings
- Some bags arrive with dampness or an earthy smell that can be off-putting
- Occasional reports of small twigs, bark bits, or gnats mixed into the soil
- May need pest treatment if stored improperly or if gnats show up after opening
2. MIXC Seed Starter Kit Tray
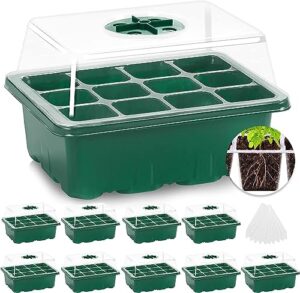
Once you’ve got quality soil, you’ll need reliable containers to hold it. The MIXC Seed Starter Kit Tray delivers 120 transparent cells across 10 reusable trays, each paired with a watertight base and adjustable-vent humidity dome.
Clear plastic walls let you monitor root development and moisture without lifting lids, while drainage holes in every cell prevent waterlogged soil. Labels help you track varieties, and the vents dial in the perfect balance of warmth and airflow to speed germination and sidestep damping-off.
| Best For | Beginner and experienced gardeners who want to monitor root development closely and need a complete, reusable system for starting multiple seed varieties at once. |
|---|---|
| Primary Use | Seed starting trays |
| Indoor/Outdoor | Both |
| Material | Plastic |
| Reusable | Yes |
| Weight | Not specified |
| Skill Level | Beginner to experienced |
| Additional Features |
|
- 120 transparent cells let you watch root growth and moisture levels without disturbing seedlings
- Adjustable vents and humidity domes give you precise control over warmth and airflow to prevent damping-off
- Reusable trays with drainage holes and labels offer great value and help you track different plant varieties
- Small drainage holes make it tricky to remove seedlings without damaging roots
- Plastic lids feel thin and might not hold up through many seasons of use
- No easy-release mechanism means you’ll need patience when transplanting
3. Heirloom Vegetable Seed Variety Pack
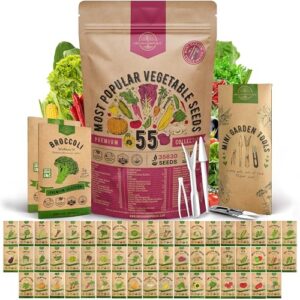
With trays and soil in hand, you’ll want seeds that pay off season after season. The Organo Republic Heirloom Vegetable Seed Variety Pack bundles 55 non-GMO varieties—35,600+ seeds total—into waterproof craft packets with QR codes linking to growing guides and recipe collections.
Open-pollinated genetics mean you can save seed from this year’s harvest for next spring’s planting, preserving true type and flavor while slashing your annual seed budget.
Mini tools, labels, and a resealable bag keep everything organized from sowing through succession crops.
| Best For | Gardeners who want to grow a wide variety of vegetables without buying new seeds every year, thanks to open-pollinated genetics that let you save and replant seeds from your own harvest. |
|---|---|
| Primary Use | Vegetable & fruit seeds |
| Indoor/Outdoor | Both |
| Material | Non-GMO heirloom |
| Reusable | No |
| Weight | 12.3 ounces |
| Skill Level | All levels |
| Additional Features |
|
- 55 different varieties give you tons of options for diversity in your garden, from vegetables to fruits, all in one convenient pack
- High seed count (35,600 seeds total) means you can plant generously, share with friends, or save extras for future seasons
- Waterproof packaging with QR codes for growing guides makes it beginner-friendly while keeping seeds protected and organized
- Germination rates can be inconsistent across different seed types, particularly with peas, beets, and carrots
- Seed packets don’t tell you how big plants will get or their growth habits, which makes garden planning trickier
- The included mini tools may not be useful for everyone, especially if you already have your own gardening equipment
4. Vivosun Seedling Heat Mat
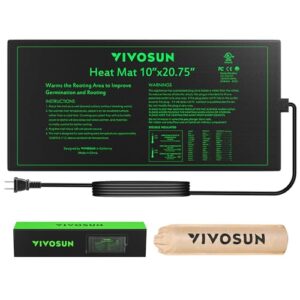
Seeds alone won’t launch on schedule unless the soil hits that critical 68–86°F sweet spot where roots wake up and push through.
The VIVOSUN Seedling Heat Mat slips under your 1020 trays, delivering stable warmth through far-infrared elements that spread evenly across the 10″ × 20.75″ surface—no scorching, no cold corners.
Its waterproof PVC shell manages humidity-dome drips, and at 20 watts you’re barely nudging your electric bill while tomatoes and peppers sprint past their neighbors stuck in cool soil.
| Best For | Gardeners who need to jumpstart seed germination indoors and want consistent, gentle bottom heat without babysitting temperature swings. |
|---|---|
| Primary Use | Seedling heat regulation |
| Indoor/Outdoor | Indoor only |
| Material | PVC |
| Reusable | Yes |
| Weight | 13.44 ounces |
| Skill Level | Intermediate |
| Additional Features |
|
- Far-infrared heating spreads warmth evenly across the mat, so seeds germinate at the same pace instead of some racing ahead while others lag
- Waterproof PVC surface handles spills and humidity without shorting out, and the flexible material stores flat when you’re done with spring planting
- Runs on just 20 watts, so you can leave it on for weeks without watching your power bill climb
- No built-in thermostat means the mat can overheat sensitive seeds unless you add a separate controller
- Indoor-only design limits where you can set up trays, ruling out greenhouse benches or covered porches
- Standard 10″ × 20.75″ size fits common trays but won’t cover custom or oversized setups without buying multiples
5. Bestva Led Grow Light
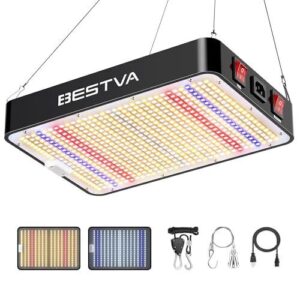
Seedlings stretch and topple when natural windowsill light can’t deliver the 12–16 hours they crave each day.
The BESTVA DC1000 LED Grow Light mounts above your trays with 640 diodes pumping full-spectrum wavelengths—3000K and 5000K for leafy vigor, 460nm blue for compact stems, 660nm red to prime flowering once you flip the Bloom switch.
At 100 watts it covers a 2×2-foot footprint without scorching delicate cotyledons, and the aluminum radiators paired with a whisper-quiet fan keep operating temps low enough to hang just inches overhead.
| Best For | Indoor gardeners with small to medium growing spaces who want full-spectrum lighting that adapts from seedling stage through flowering without breaking the bank. |
|---|---|
| Primary Use | Indoor plant growth |
| Indoor/Outdoor | Indoor only |
| Material | Aluminum |
| Reusable | Yes |
| Weight | 2.9 pounds |
| Skill Level | All levels |
| Additional Features |
|
- Full-spectrum diodes (3000K, 5000K, 460nm, 660nm) with separate Veg and Bloom switches let you dial in the right light recipe for each growth phase
- Runs cool and quiet thanks to aluminum heat sinks and a low-noise fan, so you can hang it close to plants without scorching leaves
- Covers a 2×2-foot area at just 100 watts, making it energy-efficient for year-round use on vegetables, herbs, and seedlings
- Some users report the fan can get noisy over time or the diodes may fail earlier than expected
- Setup instructions don’t always spell out optimal hanging distances, so you’ll need to experiment to avoid burning or stretching your plants
- The 2×2-foot coverage won’t scale for larger gardens or commercial operations without buying multiple units
Frequently Asked Questions (FAQs)
When to start seeds indoors for spring planting?
Count backward from your area’s last spring frost date. Most vegetables need 2 to 16 weeks indoors before transplanting, with tomatoes at 6 weeks and peppers at 9 to 10 weeks.
What vegetable seeds should be started indoors?
Strike while the iron is hot—warm-season vegetables like tomatoes, peppers, and eggplants thrive with indoor starts, needing 70 to 100 days of frost-free growing. Cool-weather brassicas also benefit immensely.
What seeds should not be started indoors?
Root crops like carrots and beets don’t transplant well because moving them damages developing taproots, causing twisted, forked roots.
Fast growers such as beans and radishes sprout quickly outdoors, making indoor starting unnecessary.
When can I plant seeds indoors?
You can plant most spring seeds indoors 6 to 8 weeks before your area’s last frost date, though cool-season crops like broccoli need 8 to 12 weeks, while fast growers require just 3 to 4 weeks.
When should I start planting seeds?
Most gardeners wait until spring to sow, yet the best time to start seeds is actually late winter—count backward from your last frost date to determine your ideal indoor sowing window.
Should I start seeds indoors or outside?
It depends on the crop. Warm-season vegetables like tomatoes need indoor starting for a long growing season, while root crops such as carrots perform better when direct-sown outside.
When should you plant seeds in the winter?
You’ll want to start winter sowing anytime from January through March, depending on the crop. Slow growers like onions go in first, while tomatoes and peppers wait until late winter.
How do I start seeds indoors?
Starting seeds indoors begins with filling clean trays with seed starting mix, sowing at the proper depth, then covering to hold warmth and moisture until germination begins.
When is the best time to plant a garden?
The best time is after your average last spring frost date, when nightly lows stay above 32°F. Warm-season crops go out then, while cool-season vegetables can handle early spring planting.
Is January too early to start seeds indoors?
January suits slow growers like onions, leeks, and hardy brassicas in most zones, but warm-season crops like tomatoes started this early become leggy and root-bound before your last frost arrives.
Conclusion
Your garden’s success won’t arrive by carrier pigeon—it demands precise timing. Knowing when to start spring gardening seeds indoors transforms you from spectator to orchestrator, wielding control over variety, vigor, and harvest timing.
Count backward from your frost date, match each crop to its ideal indoor timeline, and you’ll transplant seedlings that hit the ground running. Master this six-week advantage, and you’ve unlocked the season’s full potential before most gardeners even break ground.
- https://www.plantmaps.com/en/us/lf/state/virginia/average-last-frost-dates-map
- https://www.johnnyseeds.com/growers-library/seed-planting-schedule-calculator.html
- https://garden.org/apps/frost-dates/Ashburn,+Virginia/
- https://empressofdirt.net/indoor-seed-starting-schedule/
- https://simplifylivelove.com/when-to-start-seeds-indoors/