This site is supported by our readers. We may earn a commission, at no cost to you, if you purchase through links.

A single pot of basil on a sunny windowsill can outproduce a garden row twice its size—if you set it up right.
Most people who’ve tried growing herbs in containers and failed made the same handful of fixable mistakes: wrong pot depth, poor drainage, herbs crammed together that hate each other’s company.
The good news is that containers actually give you more control than an in‑ground garden ever could. You decide the soil, the drainage, the placement. Get those fundamentals dialed in, and fresh herbs become something you reach for every single day.
Table Of Contents
- Key Takeaways
- How to Grow Herbs in Containers
- Choose The Best Herb Containers
- Prepare Soil and Plant Herbs
- Care for Potted Herbs Seasonally
- Harvest and Maintain Container Herbs
- Top 4 Container Herb Garden Items
- Frequently Asked Questions (FAQs)
- Can you grow herbs in containers?
- What herbs grow well in containers?
- What is a container herb garden?
- How do you plant herbs in a container?
- What herbs are best to grow in pots?
- What herbs should not be potted together?
- What is the mother of all herbs plant?
- What are common herb growing mistakes?
- What three herbs can be planted together in pots?
- What is the queen of all herbs?
- Conclusion
Key Takeaways
- Containers give you more control than in-ground beds — manage drainage, soil mix, and sunlight, and your herbs will outperform a garden twice its size.
- Group herbs by what they need: woody types like rosemary and thyme want dry, sunny spots, while basil and parsley prefer more moisture and some afternoon shade.
- Always cut just above a leaf node and pinch off flower buds the moment they appear — these two habits keep your plants bushy, productive, and flavorful all season.
- Start with just three herbs you actually cook with, master those first, then expand — consistency beats variety every time.
How to Grow Herbs in Containers

Growing herbs in containers comes down to a few key decisions made before you ever put a plant in the ground. Where you grow, what you grow, and how you group your herbs will shape everything that follows. Here’s what to sort out first.
Pairing the right plants together is just as important as pot size or sun exposure — some herbs genuinely thrive side by side, and knowing which herbs grow well together can save you a lot of trial and error.
Pick Your Growing Location
Before you plant a single herb, get your location right. Most herbs need 6–8 hours of direct sunlight daily, so a south-facing spot works best. Morning sun with a touch of afternoon shade keeps tender leaves from scorching.
Keep containers within 50 feet of water, and provide moderate airflow around pots to discourage fungal problems. Ensuring a well-draining soil condition helps prevent root rot in container herbs.
Choose Beginner-friendly Herbs
With your location locked in, it’s time to pick what you’ll actually grow. For beginners, start with fast growers: basil sprouts in 5–10 days and hits harvest size in 60–90 days. Chives tolerate partial shade, parsley stays manageable with steady moisture, and oregano practically thrives on neglect.
Top picks for new container gardeners:
- Basil — quick, rewarding, and adaptable in the kitchen
- Mint — hardy and vigorous, though it needs its own pot
- Chives — low-maintenance and ready to harvest in about 60 days
Match Herbs by Needs
Picking the right herbs isn’t just about what you want to cook with — it’s about pairing plants that want the same things. Woody herbs like rosemary, sage, and thyme love full sun and dry soil. Group them together.
Tender herbs like basil and parsley prefer more moisture and appreciate some afternoon shade when temperatures climb.
Keep Invasive Herbs Separate
Mint is the herb most likely to take over your garden if you let it. Its underground runners spread fast and quietly. Give it a dedicated 5–10 gallon container with at least a 12-inch diameter, and keep it at least 12 inches away from other pots. Inspect it weekly and trim any runners the moment they appear.
Plan for Year-round Harvests
Think of your container herb garden as a living calendar.
Stagger new plantings of fast-cycling herbs like cilantro and dill every two to four weeks. Pair them with perennial herbs — thyme, chives, oregano — that produce year-round.
Track your local frost dates, move tender herbs indoors before cold hits, and you’ll never face a harvest gap.
Choose The Best Herb Containers

The container you pick shapes everything about how your herbs grow — from root health to how often you’re watering. Not every pot works for every herb, so matching the right container to the right plant is worth getting right. Here’s what to look for when weighing your options.
Drainage Hole Requirements
Every container herb garden lives or dies by one simple feature: drainage holes. Without them, water pools at the roots, and root rot follows fast.
Aim for holes ¼–⅜ inch in diameter. For pots over 12 inches wide, add one hole per every 8–12 inches of diameter. Key rules to follow:
- Space holes evenly across the bottom — never cluster them
- Terracotta needs slightly larger holes (around ⅜ inch) since clay has a tendency to seal smaller openings
- Use mesh or grommet inserts to stop soil from washing out
- If soil stays wet beyond 24 hours, drill additional holes immediately
After watering, excess water should drain within 15–30 minutes. That’s your reference point for good drainage. Yellowing leaves despite regular watering? Check your holes first — waterlogging prevention starts there.
Pot Depth and Width
Depth and width work together to determine how well your herbs thrive. Most culinary herbs need at least 6–8 inches deep for healthy roots, while deep-tap-rooted herbs like fennel need 10–12 inches.
Pairing the right depth with proper drainage is equally important — a pot with adequate drainage holes for indoor herb containers prevents waterlogged roots even in deep planters.
For width, aim for 1.5 to 2 times the depth — this facilitates horizontal expansion and keeps taller herbs stable when wind hits.
Terracotta Versus Plastic
The pot material you choose quietly shapes how your herbs grow. Terracotta’s porosity lets air and moisture move through the walls, keeping roots fresher and reducing rot risk — ideal for rosemary, sage, and lavender. Lightweight plastic pots hold moisture longer, cutting watering frequency. Consider these four quick comparisons:
- Aeration – Terracotta wins
- Moisture retention – Plastic wins
- Thermal root protection – Terracotta stays cooler
- Weight and mobility – Plastic is easier to move
Fabric Grow Bag Benefits
Fabric grow bags might be the smartest upgrade you make to your herb garden. Water drains freely through breathable walls, so root rot prevention becomes almost easy. Air pruning happens naturally when roots reach the bag’s edge — instead of circling endlessly, they stop and branch inward, building a denser, more resilient root network that drinks up nutrients efficiently.
Fabric grow bags naturally air-prune roots, building denser networks that drain freely and resist rot
| Benefit | What It Means for You |
|---|---|
| Excellent drainage | No soggy soil, healthier roots |
| Air pruning | Bushier, stronger root systems |
| Lightweight portability | Move bags anywhere, anytime |
These bags also moderate soil temperature, keeping roots cooler on scorching summer days. Many are made from recycled fibers, so you’re gardening sustainably without sacrificing results.
Containers for Perennial Herbs
Perennial herbs like rosemary and thyme are long-term investments, so your container choice really matters.
Go with plastic or resin pots — 16 to 20 inches wide and at least 12 inches deep.
They insulate roots better than terracotta, handle freeze-thaw cycles without cracking, and stay light enough to move indoors when frost arrives. Add drainage holes, and you’re set for years.
Prepare Soil and Plant Herbs
Good soil is the foundation everything else builds on. Get this part right, and your herbs will root fast, grow strong, and reward you all season long. Here’s exactly what to put in your pots — and how to set each herb up for success from day one.
Use Well-draining Potting Mix

The soil mix you choose can make or break your herb garden. Skip regular garden soil — it compacts fast in pots and smothers roots.
Instead, blend equal parts potting soil, coarse sand, and perlite. Perlite creates air pockets, improves soil drainage, and prevents compaction. This keeps pH around 6.0–7.0 and stops root rot before it starts.
Add Compost or Castings

Once your potting mix is ready, a small boost of compost or worm castings goes a long way. Aim for roughly 20–30% compost in your final blend. Worm castings can replace up to 10% of the mix — they release nutrients gently, feed soil microbes, and won’t burn roots.
Here’s how to apply them:
- Mix evenly into the top 6–8 inches before planting.
- Work a small handful into each planting hole to ease transplant shock.
- Top-dress with a thin layer every 4–6 weeks during the growing season.
Choose well-aged compost — dark, crumbly, and earthy-smelling. Avoid anything with a strong ammonia odor or visible debris. Quality matters here.
Improve Drainage for Woody Herbs

Woody herbs like rosemary, sage, and lavender hate wet feet. Mix in 10–30% perlite to open up the soil structure and let water escape fast.
Add a 1–2 inch drainage layer of coarse gravel at the bottom, then raise your pot on feet to keep airflow moving underneath.
This combo stops root rot before it starts.
Space Herbs at Planting

Once your drainage layer is set, it’s time to think about spacing. Give leafy herbs like basil and cilantro 2–4 inches apart, while rosemary and thyme need 4–6 inches of breathing room.
Use vertical tiered containers to stretch a small balcony further. Label each pot and stagger your plantings — you’ll thank yourself when monitoring growth becomes second nature.
Water Deeply After Planting

Right after planting, water deeply until it drains from the bottom hole — that’s your sign that the entire root zone is saturated. Use a long-spout watering can and pour slowly, targeting the base.
Do the finger test before each follow-up watering: if the top inch feels dry, it’s time.
This prevents transplant shock and builds strong, deep roots fast.
Care for Potted Herbs Seasonally

Container herbs don’t ask for much, but they do ask for consistency — and what that looks like changes with the season. Getting the details right around sunlight, water, and temperature is what separates a thriving pot from a struggling one. Here’s what to stay on top of throughout the year.
Sunlight and Placement Needs
Most herbs are sun-hungry plants — they need 6–8 hours of direct sunlight daily to develop strong flavor and aroma. That direct exposure drives essential oil production, which is exactly what makes fresh herbs worth growing.
Place containers on a south-facing windowsill indoors, or outdoors where morning sun hits first. Rotate pots weekly for even growth. Tender herbs appreciate afternoon shade in peak summer.
Summer Watering Strategies
Summer turns containers into tiny ovens. Water between 5 and 9 a.m., so moisture reaches roots before midday heat pulls it away.
Check soil daily — if the top inch feels dry, it’s time. Soak deeply until water drains out the bottom. Apply 1–2 inches of mulch on top to slow evaporation between waterings.
Hot Climate Shade Tips
Heat above 30°C (86°F) stresses roots fast.
Block midday sun from 11 a.m. to 3 p.m. using shade cloth or a lattice screen — breathable materials keep air moving. Position tall plants on the south side to cast seasonal shade. Add light-colored reflective surfaces nearby to bounce heat away and keep your containers cooler without sacrificing airflow.
Cold Climate Frost Protection
When frost threatens, act fast.
Wrap pots with insulating frost blankets — they add 1–4°C of overnight protection. Drape reflective row covers to bounce radiant heat back toward roots. Mulch the surface 2–3 inches deep to hold soil warmth longer. Place a windbreak screen nearby to cut wind chill and shield your containers through the coldest nights.
Indoor Grow Light Setup
When natural light runs short, a grow light becomes your herbs’ best friend. Aim for 12–16 hours daily and mount your fixture 12–24 inches above the canopy. Full-spectrum LEDs work well for most leafy herbs. Keep temperatures between 65–75°F and run a small fan to prevent mold.
- Choose full-spectrum LED for broad herb growth
- Target 200–400 µmol/m²/s light intensity at canopy level
- Use a timer for consistency every day
- Position lights to avoid hotspots and uneven growth
Harvest and Maintain Container Herbs

Knowing when and how to harvest makes all the difference between herbs that keep producing and ones that fizzle out fast. A few simple habits — done consistently — will keep your containers full and your plants healthy all season long. Here’s what to do to get the most out of every pot.
Cut Above Leaf Nodes
Knowing exactly where to cut makes all the difference. Always slice your stem just above a leaf node — that small bump where leaves meet the stem. This triggers node regrowth stimulus, pushing dormant lateral buds into action. Within one to three weeks, you’ll see multiple new shoots emerge, giving you a fuller, more productive plant instead of a single leggy stem.
| Cut Type | Result |
|---|---|
| Above leaf node | Multiple new shoots, bushy growth |
| Below leaf node | Slow regrowth, weak stem |
| Random mid-stem | Poor healing, rot risk |
Preventing stem rot starts here too — cuts close to nodes heal faster and leave less exposed tissue for moisture to collect on.
Pinch Tips for Bushiness
Once you’ve mastered where to cut, the next step is working smarter with pinching frequency. Pinching — snipping the growing tip just above a stem node — triggers apical dominance disruption, signaling your plant to push energy into lateral branching instead of shooting straight up. The result? Denser, bushier growth with far more harvestable leaves.
Do it every two to three weeks during active growth.
Remove Flower Buds Early
Pinching tips keeps your herbs bushy, but letting flower buds form is where you quietly lose the harvest battle. The moment herbs bolt, leaf flavor drops fast — essential oils shift into bloom production instead.
Remove buds as soon as they appear. For basil and cilantro, this is non-negotiable. Pinch small buds with clean fingers; use scissors on clustered stems.
Divide Clumping Herbs Regularly
Removing buds keeps flavor locked in — but there’s another quiet problem brewing underground. Herbs like chives, oregano, and mint form dense clumps over time, and that crowded center stops producing well.
Divide clumping herbs every two to four years. Pull the root ball apart, verify each section has 2–3 shoots, replant in fresh mix, and water deeply.
Preserve Extra Fresh Herbs
Getting more from your harvest starts the moment you clip more than you can use.
Refrigerate leafy herbs like parsley and cilantro in a glass with an inch of water, loosely covered with a plastic bag — they’ll stay fresh for up to two weeks.
Freeze herbs in oil by spooning chopped herbs into ice cube trays, topping with olive oil, and dropping cubes straight into hot pans later.
Top 4 Container Herb Garden Items
The right tools can make or break your container herb garden before a single seed goes in the ground. A few well-chosen items will save you time, reduce guesswork, and keep your herbs healthier through every season. Here are four worth having on hand.
1. Behrens Galvanized Steel Tub
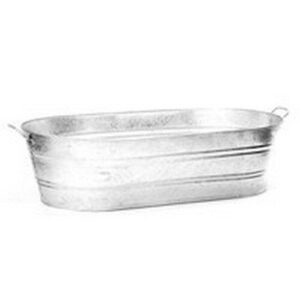
The Behrens Galvanized Steel Tub holds about 5.5 gallons — just enough space for mint, thyme, or a cluster of chives.
Its corrosion-resistant steel grips outdoor conditions without cracking or fading, and the offset bottom keeps roots off damp ground.
No lid means you’ll need to plan for drainage, but punch a few ¼″ holes in the base and it’s ready to plant.
Wire grips make moving it between sun and shade surprisingly easy.
| Best For | Home gardeners and outdoor enthusiasts who want a durable, portable container for herbs, tools, or supplies that can handle the elements without falling apart. |
|---|---|
| Primary Material | Galvanized Steel |
| Primary Use | Planting & Storage |
| Durability | Weather-proof, corrosion-resistant |
| Portability | Integrated wire handles |
| Indoor/Outdoor | Both |
| Ease of Use | Fill and carry |
| Additional Features |
|
- Galvanized steel resists rust and corrosion, making it a solid long-term choice for outdoor use
- Offset bottom design keeps contents lifted off damp surfaces, helping protect roots or stored items
- Lightweight and easy to carry between sun and shade thanks to the built-in wire handles
- No lid means contents are fully exposed to rain, pests, and debris
- At just 0.55 lb, it can feel unstable or tip-prone when loaded up with soil or heavy items
- Wire handles can dig into your hands during longer carries
2. Natural Jute Burlap Fabric Roll
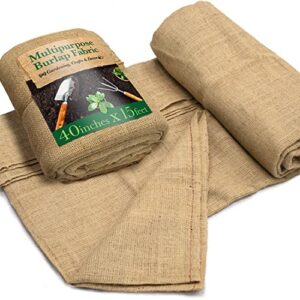
One roll of natural jute burlap does a surprising amount of work in a container herb garden. Cut it to line pot walls, lay it as a breathable mulch on the soil surface, or wrap tender herbs for wind and sun protection.
The jute fibers regulate moisture and airflow, helping roots stay healthy without getting waterlogged. It’s biodegradable, chemical-free, and easy to trim to size — though cut edges may fray, so fold them under for a cleaner finish.
| Best For | Gardeners, beekeepers, and DIY enthusiasts looking for a natural, eco-friendly fabric for lining pots, mulching beds, wrapping hives, or tackling creative décor and gifting projects. |
|---|---|
| Primary Material | 100% Jute |
| Primary Use | Garden Lining & Mulching |
| Durability | High tensile strength, biodegradable |
| Portability | Cut-by-the-yard roll |
| Indoor/Outdoor | Both |
| Ease of Use | Cut to size |
| Additional Features |
|
- Wide 40-inch roll in generous lengths (15 ft or 30 ft) makes it easy to cover large areas with minimal waste
- 100% natural jute is biodegradable, chemical-free, and produced with carbon-neutral processes — genuinely good for the environment
- Versatile enough for gardens, beekeeping, landscaping, event décor, and gift wrapping all in one roll
- Some users report a strong gasoline-like odor that can take weeks to fully dissipate
- The weave can be uneven in spots, leading to inconsistent texture and fraying when cut
- Cut edges often come out irregular, so extra trimming is usually needed for a clean, polished look
3. Yadoker 72 LED Grow Light
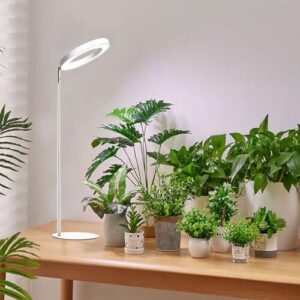
When natural light just isn’t enough, the Yadoker 72 LED Grow Light fills the gap. Its full‑spectrum coverage spans 380 nm to 780 nm, giving your herbs the same light energy they’d get from a south‑facing window.
The telescoping pole adjusts up to 20 inches, and the built‑in timer manages three preset cycles — 8, 12, or 16 hours — so your plants stay on schedule without any fuss.
It’s a solid pick for countertops and compact indoor setups.
| Best For | Indoor plant enthusiasts with limited space who want a hands-off, consistent lighting solution for herbs, succulents, or orchids. |
|---|---|
| Primary Material | Aluminum & LED Array |
| Primary Use | Indoor Plant Lighting |
| Durability | Aluminum heat-dissipating housing |
| Portability | Compact 6×6 in footprint |
| Indoor/Outdoor | Primarily Indoor |
| Ease of Use | Auto timer controls |
| Additional Features |
|
- Full-spectrum 380–780 nm light closely mimics natural sunlight, supporting healthy photosynthesis across a wide range of plants
- Built-in auto timer with three preset cycles keeps your plants on a consistent schedule without any manual effort
- Compact 6×6 inch footprint and telescoping pole make it easy to fit on countertops, under cabinets, or in small spaces
- Timer has been known to malfunction after a year or two, forcing you to switch to manual on/off control
- The small base can feel unstable, especially on uneven surfaces or when the pole is fully extended
- Some early units had finish damage and connection issues, and the warranty only covers one year
4. XLUX Soil Moisture Meter
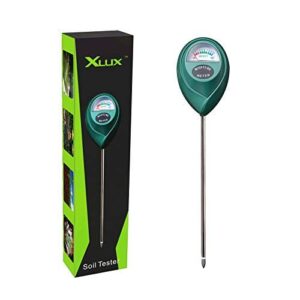
Overwatering kills more herbs than neglect ever will.
The XLUX Soil Moisture Meter takes the guesswork out of watering with a simple insert-and-read design — no batteries needed. Its slim stainless steel probe reads ten moisture levels on a color-coded dial, so you always know exactly when to water.
Just insert, check the dial, and remove.
At around $9.99, it’s one of the smartest small investments you can make for your container herb garden.
| Best For | Beginner and experienced gardeners who want a simple, no-fuss way to avoid overwatering their indoor houseplants, herb gardens, or container plants. |
|---|---|
| Primary Material | ABS Plastic & Stainless Steel |
| Primary Use | Soil Moisture Monitoring |
| Durability | Anti-abrasion probe sleeve |
| Portability | Slim 10.24 in probe |
| Indoor/Outdoor | Both |
| Ease of Use | Insert, read, remove |
| Additional Features |
|
- No batteries required — just insert the probe and read the color-coded dial instantly
- Slim stainless steel design minimizes root disturbance while working in a variety of soil types
- At ~$9.99, it’s an affordable way to prevent costly plant loss from overwatering or root rot
- May give inaccurate readings in loose, sandy, or perlite-heavy soils due to low conductivity
- The probe can be permanently damaged by drops or impacts, causing it to always read "dry"
- The 10.24-inch stem may not be long enough for very deep pots or large outdoor garden beds
Frequently Asked Questions (FAQs)
Can you grow herbs in containers?
Yes, you can. Herbs grow well in pots, window boxes, and fabric bags. Give them drainage, good soil, and six-plus hours of sun, and they’ll thrive almost anywhere.
What herbs grow well in containers?
Basil, mint, parsley, chives, and thyme all thrive in containers. So do rosemary, sage, cilantro, and oregano. Most compact or culinary herbs adapt well to pot life with the right soil and light.
What is a container herb garden?
A container herb garden is a self-contained growing system — pots, grow bags, or baskets filled with soil — that lets you raise fresh herbs on a balcony, patio, or kitchen windowsill.
How do you plant herbs in a container?
Choose your spot first — most herbs need 6–8 hours of sun daily. Fill your pot with a light, well-draining mix, add compost, plant firmly, and water deeply right away.
What herbs are best to grow in pots?
The best herbs for pots are basil, mint, thyme, parsley, and rosemary. They’re compact, practical, and productive — everything you’d want when space is limited but flavor isn’t.
What herbs should not be potted together?
Some herbs are natural rivals. Mint crowds out almost everything. Keep fennel away from basil — it releases compounds that stunt growth. Rosemary and cilantro clash over water needs. Never pot dill with fennel either.
What is the mother of all herbs plant?
Mugwort — Artemisia vulgaris — holds the title. Medieval herbalists called it the mother of herbs for its wide-ranging traditional uses, from digestive support to ritual protection, making it one of history’s most adaptable plants.
What are common herb growing mistakes?
The most common mistakes are overwatering, poor drainage, and too little sunlight. These three issues stunt growth, invite root rot, and strip herbs of flavor before you even get to harvest.
What three herbs can be planted together in pots?
Basil, oregano, and parsley make the perfect trio. They share the same sun and moisture needs, balance each other’s growth habits, and deliver flavors that complement nearly any dish you cook.
What is the queen of all herbs?
Tulsi, or Ocimum tenuiflorum, holds that crown. Revered in Ayurveda as the queen of herbs, it bolsters immunity, respiratory health, and stress relief — and it thrives beautifully in containers.
Conclusion
A chef once said her best dishes started at the windowsill, not the market. That’s the quiet power of growing herbs in containers—you’re not just tending plants, you’re building a living pantry inches from your kitchen.
Get the drainage right, match herbs to their light, harvest before they flower, and the whole system rewards you daily.
Start with three herbs you actually cook with. Master those first, then expand.