This site is supported by our readers. We may earn a commission, at no cost to you, if you purchase through links.

The first hard frost doesn’t wait for you to finish deadheading the dahlias. One night the forecast dips below 32°F, and everything tender you meant to protect turns to mush by morning. Gardeners who treat winter prep as a single autumn afternoon usually pay for it come spring, with heaved perennials, cracked bark, and beds full of dormant weed seed.
A proper preparing garden for winter checklist works differently. It moves through your landscape in order, from plant health down to the soil itself, so nothing gets rushed or skipped. Walk through it now, before the ground freezes, and your garden won’t just survive the cold; it’ll wake up ready.
Table Of Contents
- Key Takeaways
- Inspect Your Garden Before Winterizing
- Clean Up Beds and Garden Waste
- Protect Perennials, Trees, and Tender Plants
- Prepare Soil and Beds for Spring
- Winterize Lawn, Tools, and Equipment
- Frequently Asked Questions (FAQs)
- What should I do to prep my garden for winter?
- What is the 70 30 rule in gardening?
- What month do you start a winter garden?
- Should I cover my raised beds with plastic in winter?
- What is the 3 year rule in gardening?
- What should you do to prepare your garden for winter?
- Are you supposed to cut back plants for winter?
- How to prepare vegetable beds for winter?
- How should I prepare my garden for winter?
- When should I start winterizing my garden?
- Conclusion
Key Takeaways
- Walk your garden first to check plant health, spot pests, and flag tender plants before doing any winter prep work, since that inspection shapes every decision after it.
- Clean up beds by pulling healthy debris into the compost pile while bagging or burying diseased plants separately, so you don’t spread problems into next season’s soil.
- Protect what’s still standing by cutting back perennials after the first hard frost, mulching root zones, wrapping young tree trunks, and covering tender plants on cold nights.
- Feed and shield your soil now with compost, cover crops, and erosion control, because the groundwork you lay this fall determines how strong your garden comes back in spring.
Inspect Your Garden Before Winterizing

Before you touch a single pruner or bag of mulch, walk your garden with a critical eye and see what it’s really telling you. Every plant, pest sign, and patch of soil offers a clue about what winter prep actually needs to happen this year. Here’s exactly what to look for during that first walkthrough.
Once you’ve spotted where mulch is thinning or missing, follow this guide to preparing your soil for winter vegetables so roots stay protected right through the cold months.
Check Plant Health
Walk each bed slowly and read what your plants are telling you. A leaf color check should show rich, even green with no yellowing or scorched edges. Follow that with a stem firmness test—wilted or floppy growth signals stress before winter dormancy even begins.
Scan for irregular growth patterns, too. Healthy perennial care starts with knowing what "normal" looks like now. Also, perform a trunk inspection to look for cracks, oozing sap, or signs of decay that might indicate deeper issues.
Spot Pest Problems
While you’re checking stems, flip a few leaves over. Check undersides for clustered aphids or mites, and look for yellowing edges paired with sticky residue, a telltale sign of honeydew mold.
Curling foliage often means caterpillars are feeding inside the canopy, while powdery patches on stems point to fungal or scale activity worth treating before dormancy sets in.
Identify Tender Plants
Once pests are logged, turn your attention to cold sensitivity. Tender plants—tomatoes, basil, hibiscus, dahlias—can’t handle frost and falter below 32°F. Check tags for cold hardiness zones, and watch for limp, blackened leaves, a classic frost sensitivity sign.
Tropical plant care means potted specimens often need indoor overwintering, so flag anything shallow-rooted or tropical now for later protection.
Separate Annuals and Perennials
With tender plants flagged, sort what’s left by lifespan.
Annuals finish their life cycle in one season and won’t return, so pull them freely. Perennials regrow from roots each spring, so cut them back instead of yanking.
This split shapes your whole winter prep checklist, from cleanup to mulching decisions ahead.
List Needed Supplies
A well-stocked shed makes every task ahead go faster.
Grab gloves and boots, pruning tools, a rake and blower for debris, and labels/markers for overwintering plants.
Keep mulch and compost access ready for beds, plus a protective coat for cold mornings.
Don’t forget tool care and storage supplies, and drained, stored hoses before frost hits.
Clean Up Beds and Garden Waste
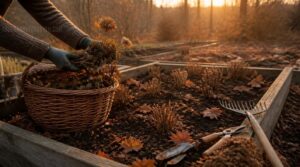
Once you’ve assessed what’s thriving and what’s struggling, it’s time to clear out the season’s leftovers. A tidy bed does more than look good; it strips away the hiding spots pests and disease love to exploit. Here’s how to work through your garden waste methodically, bed by bed.
Remove Spent Annuals
Those frost-bitten stalks won’t survive winter, so cut them now. Snip annuals at soil level before seeds drop, and lift roots fully to stop regrowth.
Once the bed is cleared, give your tools some care too—our guide on cleaning and storing garden tools for winter will keep them rust-free and ready for spring planting.
Work beds in small sections, timing removal after last bloom but before ground freeze. This limits soil compaction, exposes soil to sunlight, and curbs fungal disease—leaving beds ready for amendment and spring planting.
Compost Healthy Debris
Not everything you pull deserves the trash bin. Healthy stems, spent foliage, and grass clippings belong in the compost pile, where they’ll break down into nutrient-rich soil enrichment for spring beds.
Mixing greens with dry leaves speeds decomposition, boosts microbial activity, and improves moisture retention. Chop material first—smaller pieces process faster, releasing nutrients gradually while reducing weed seeds naturally.
Dispose Diseased Plants
One infected stem can spread spores to your entire bed—diseased plants need separate handling, never the compost pile.
- Bag material tightly in thick plastic before trashing
- Skip composting unless your pile reaches pathogen-killing temperatures
- Burn where permitted, following local safety codes
- Bury 18 inches deep, away from vegetables
Afterward, sanitize tools with a bleach solution to stop cross-contamination and protect next season’s plantings.
Harvest Remaining Vegetables
Frost isn’t the enemy here—it’s actually a flavor booster for several crops still in the ground. Brussels sprouts, kale, and cabbage sweeten after a light freeze, so harvest progressively from the outside in.
Frost isn’t the enemy—it’s a flavor booster that sweetens Brussels sprouts, kale, and cabbage still in the ground
Pull carrots and parsnips once tops yellow. Garlic needs curing 4-6 weeks after lifting. Winter squash comes off when rinds resist a fingernail scratch.
Make Leaf Mold
Those raked-up leaves are garden gold in disguise. Rather than bagging them for the curb, shred them with a mower and pile them in a shaded corner, at least three feet wide.
Keep the pile moist as a wrung-out sponge, turning it every few weeks.
Within 6-12 months, you’ll have crumbly leaf mold, a superb soil amendment for spring beds.
Protect Perennials, Trees, and Tender Plants
Once the beds are cleared, your attention turns to the plants still standing through the cold months ahead. Perennials, trees, and tender specimens each face winter’s stress differently, so they need protection matched to their specific vulnerabilities. Here’s what your garden needs before temperatures drop for good.
Cut Back Perennials

Grab your pruners once the first hard frost hits, since cutting too early invites new growth that winter will punish. Sanitize blades between plants to stop disease spread, then work your bed line:
- Peonies: cut to ground level
- Asters and Sedum: shear hard to soil
- Penstemon: trim partially for crown protection
- Grasses: leave 6 inches standing
- Healthy foliage: leave 1-2 inches of litter
Mulch Root Zones

With your beds cut back, turn to what’s underground. Spread 2 to 4 inches of organic mulch from trunk to drip line, keeping it off stems to prevent collar rot.
Wood chips moderate temperature swings best, insulating roots against freeze-thaw cycles while locking in moisture your plants need through dormancy.
Prune Damaged Branches
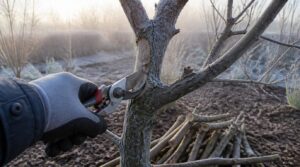
With mulch down, look up. Winter’s a natural time for dormant pruning, since plant dormancy limits stress and speeds callus formation once spring arrives.
- Assess branches for cracks or dead wood
- Choose sharp, clean tools sized to the limb
- Cut back to the branch collar
- Skip the wound sealant entirely
Wrap Young Trees

Young, thin-barked trees need a protective coat once pruning wraps up. Apply spiral tree guards or paper wrap for sunscald prevention trees, starting at the base and overlapping upward, snug but never tight.
Fall marks the right timing for tree wrap, once freezing temperatures settle in. Remove promptly come spring—leaving wraps too long invites moisture and pests.
Add Frost Covers

For that last protective coat, reach for frost cloths over plastic—breathable fabric traps heat without smothering foliage. Drape and secure with stakes or stones, layering for extra insulation on hard freezes.
Apply at dusk, remove by morning, venting during warmer spells. It’s a small habit that shields blossoms, deters wildlife, and buys tender plants real frost protection.
Prepare Soil and Beds for Spring
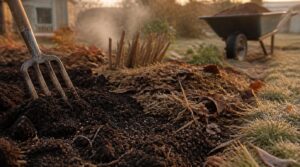
Once your plants are tucked in for the season, it’s time to turn your attention to the ground beneath them. The soil that carried your garden through summer needs its own care before spring asks anything of it again. Here’s what that groundwork looks like, step by step.
Test Soil PH
Ever wonder why last spring’s fertilizer didn’t work as hoped? The culprit is often soil pH, not nutrients.
Fall is ideal for testing, since results guide winter lime or sulfur amendments. Use a digital meter or slurry test for accuracy, aiming for 6.0-6.8. Compost naturally buffers swings, but confirm your baseline first, before your winter garden prep checklist moves forward.
Add Compost or Manure
Feed your beds now, and spring rewards you tenfold. Choose compost for structure, aged manure for nitrogen-rich punch—both boost organic matter enrichment.
- Spread 1-2 inches, working into the top 6-8 inches
- Favor fall application for slow nutrient release timing
- Split doses if soil health in fall seems depleted
This seasonal garden planning step pays off when roots wake up hungry.
Sow Cover Crops
Bare soil left over winter is an open invitation to erosion, so put it to work instead. Sow a mix of hairy vetch and cereal rye at 20-40 pounds per acre; the rye’s fibrous roots fight compaction while legumes handle nitrogen fixation, adding real fertility for spring.
- Expect emergence within 7-14 days after sowing
- Rye shades soil, delivering strong weed suppression all winter
- Legume residue breaks down fast, enriching organic matter
- Roots improve infiltration and reduce runoff during storms
- Plan termination 2-6 weeks before spring planting
This is soil health insurance you plant once and harvest all season.
Prepare New Beds
Think of a new bed as a blank canvas that punishes shortcuts.
Turn the top 6-12 inches to break compaction, then work in 2-4 inches of compost for lasting soil health.
Level the surface for even seed-to-soil contact, lay 1-2 inches of organic mulch, and mark boundaries so perennial plants stay put come spring.
Prevent Winter Erosion
Bare soil is a slope’s worst enemy come winter rain. Lay erosion control blankets on steep ground, and use check dams or landscape timbers to slow runoff.
Sow cover crops or winter-hardy grasses on vulnerable strips, and grade shallow swales to redirect water. These small stabilizers protect root zones and spare you spring’s washed-out beds.
Winterize Lawn, Tools, and Equipment

Once your soil and beds are settled for spring, it’s time to turn your attention to the lawn and the gear that keeps your garden running. Your grass and equipment take a beating over the growing season, and a little care now saves you headaches once the ground thaws.
Here’s what your lawn, tools, and irrigation system need before the cold sets in.
Aerate Compacted Lawn
Grab a plug aerator before winter sets in—soil compaction relief matters most on high-traffic lawns.
This process pulls small plugs, opening channels for oxygen, water, and nutrients.
Power-rotary machines cover ground fast; hand tools suit smaller patches.
Aim for moderate soil moisture, since waterlogged or bone-dry ground hinders plug removal.
Leave plugs to break down naturally, letting your lawn winterization efforts set the stage for spring.
Seed Bare Spots
With plugs breaking down, turn to those thin or dead patches your garden inspection flagged earlier.
- Soil loosening and debris removal before sowing
- Seed selection matching existing turf and sun exposure
- Firm contact, then a steady watering schedule for germination support
Post-emergence care matters too—your winter garden prep checklist isn’t finished until these hardy perennials of the lawn world take root.
Lower Final Mow
Once seedlings root in, shift focus to mow height adjustment for lawn winterization. Gradually lower cutting height to 1.5 to 2 inches, tucking grass in without shocking crowns.
| Grass Type | Final Height | Risk If Skipped |
|---|---|---|
| Kentucky Bluegrass | 2 in | Snow mold |
| Fescue | 2 in | Matting |
| Mild-climate turf | 1.5 in | Scalping |
This final cut timing protects blades and prevents disease.
Clean and Sharpen Tools
With the mower put away, turn attention to the tools that got you through the season. Tool maintenance basics matter now: scrub soil with a stiff brush, sharpen pruners at a 25-30 degree bevel, and oil wooden grips with linseed oil.
- Wipe blades dry before storage
- Remove rust with a wire brush
- Hang tools on sturdy hooks
- Apply rust preventive compound
Drain Hoses and Irrigation
Under every spigot lies a threat: trapped water that expands and cracks fittings once temperatures drop. Turn off and drain lines first, then tackle sprinkler head removal and drip system winterization by opening low-point valves.
| Component | Winter Action |
|---|---|
| Hoses | Drain, coil, store |
| Sprinklers | Remove, cap |
| Drip lines | Open end caps |
Finish your valve protection checklist, then store hoses indoors, safe from frost.
Frequently Asked Questions (FAQs)
What should I do to prep my garden for winter?
The quietest season demands the busiest hands. Start with a garden inspection checklist, then tackle fall cleanup, mulching, and pruning dead branches. Layer in soil prep and frost cloth for tender plants before the first hard freeze arrives.
What is the 70 30 rule in gardening?
Think of it as your garden’s design balance: 70 percent structural backbone plants (grasses, evergreens, perennials) for year-round form, and 30 percent seasonal color accents like annuals and bulbs, cutting maintenance while keeping things visually alive.
What month do you start a winter garden?
Funny how nature runs on its own calendar rather than yours: start your winter garden late August or early September, counting backward roughly 8 weeks from your first frost date for reliable cool-season crop establishment.
Should I cover my raised beds with plastic in winter?
Plastic works, but only over hoops with vented edges, never draped flat. It traps heat and blocks rain, though frost cloths or mulch often manage moisture better without risking overheating or trapped humidity underneath.
What is the 3 year rule in gardening?
Picture new perennials as sleepy tenants moving in slowly. Year one, roots settle quietly; year two, foliage creeps upward; year three, they leap into full bloom — rewarding your patience with vigorous, established growth throughout the garden.
What should you do to prepare your garden for winter?
Start with a full walkthrough: check plant vitality, inspect for pests, and identify tender species.
Separate annuals from perennials, harvest frost-sensitive crops, mulch hardy beds, cut back diseased growth, add compost, clean tools, and shelter vulnerable plants with covers.
Are you supposed to cut back plants for winter?
Think of your border like a wildlife pantry: strip it bare and birds go hungry. Cut back disease-prone perennials like bee balm and hostas after foliage dies, but leave seed heads and stalks standing for winter shelter.
How to prepare vegetable beds for winter?
Clear spent crops, checking soil moisture as you go, then add a compost layer and mulch beds with straw. Plant frost-hardy cover crops like clover or rye to guard soil pH and organic matter through winter.
How should I prepare my garden for winter?
Don’t let your garden get "frost-bitten" by neglect. Harvest tender veggies first, then work in compost, apply mulching for winter, prune damaged growth, clear diseased debris, store tools properly, and tuck in spring bulbs.
When should I start winterizing my garden?
Timing hinges on your frost timing guide: begin late summer through mid-fall, harvesting tender crops before the first freeze, then shift to soil prep and plant protection once nighttime temperatures consistently dip, signaling true dormancy.
Conclusion
Old-timers claim a garden sleeps through winter, but that’s only half true. Beneath the mulch, roots keep working, and soil biology keeps building toward spring.
A thorough preparing garden for winter checklist doesn’t just guard against cold; it channels that hidden labor into strength. Skip a step, and you’re gambling with what you can’t see. Follow it through, and your garden gets its best possible start—quietly, patiently, right on schedule.
- https://www.almanac.com/10-tips-preparing-your-garden-winter
- https://hillsidelawn.com/seasonal-lawn-care-checklist-do-you-know-what-to-do-each-month
- https://blog.ohiohealth.com/preparing-for-fall-a-checklist-for-your-lawn-and-garden
- https://solicitoandson.com/blog/fall-landscaping-checklist-how-to-prepare-your-yard-for-winter
- https://mortonarb.org/blog/10-tips-from-the-pros-to-prepare-your-garden-for-winter