This site is supported by our readers. We may earn a commission, at no cost to you, if you purchase through links.

single cold frame can push your first spring harvest four to six weeks earlier than your neighbors even think about planting. That’s not a small advantage—that’s spinach on your table while frost still coats the ground every morning.
The science behind it is straightforward: a transparent lid traps solar radiation, converts it to infrared heat, and holds that warmth around your plants like a wool blanket over bare soil.
Building a simple cold frame garden doesn’t require carpentry skills or expensive materials—a reclaimed window and a few cedar boards can do the job.
What follows breaks the whole process down, from choosing your site to keeping seedlings thriving through the coldest nights of the season.
Table Of Contents
- Key Takeaways
- What is a Cold Frame Garden?
- Choose Materials for Your Frame
- Pick and Prepare The Site
- Build The Cold Frame Step by Step
- Use and Maintain Your Cold Frame
- Frequently Asked Questions (FAQs)
- What’s a better word for building?
- What is a building definition?
- How do you prevent pests in cold frames?
- What soil mix works best for cold frames?
- When should you close the lid at night?
- Can cold frames protect from heavy snow?
- How do you manage excessive condensation buildup?
- Can cold frames work on raised garden beds?
- How long does a cold frame typically last?
- Can two cold frames be connected together?
- Conclusion
Key Takeaways
- A single cold frame built from a reclaimed window and cedar boards can push your first harvest 4–6 weeks earlier than open-ground planting, with zero electricity or heating costs.
- Cedar lasts 15–20 years without treatment, and UV-stabilized polycarbonate handles 250 times more impact than glass — so your material choice directly determines how long your frame survives.
- Placing your frame on a south-facing, well-drained slope with a nearby windbreak isn’t optional — it’s what makes the difference between a frame that thrives and one that floods, tips, or stays cold.
- Daily ventilation, early-morning watering, and overnight insulation with bubble wrap or horticultural fleece are the three habits that keep seedlings alive once the frame is built.
What is a Cold Frame Garden?

A cold frame is one of those simple garden tools that punches well above its weight. It’s basically a bottomless box with a clear lid that catches sunlight and keeps your plants warmer than the air outside.
Since heat can build up fast inside, knowing how to ventilate a cold frame properly keeps your plants from cooking on sunny days.
Here’s what you need to know before you build one.
How a Cold Frame Traps Solar Heat
Think of your cold frame’s transparent lid as a solar collector that never needs charging. Sunlight passes straight through, warming the dark soil below, which converts that radiation into infrared heat. That warm air stratifies near the lid, trapped by the greenhouse effect.
Your cold frame’s clear lid acts as a solar collector, trapping infrared heat long after the sun moves on
Add some thermal mass — a few bricks or water containers — and your frame holds that heat long after sunset.
This design also enables early spring sowing of cool‑season crops.
How It Extends The Growing Season
That solar heat doesn’t just protect plants — it buys you time. A cold frame’s seasonal temperature boost can push your early planting window back 4–6 weeks before the last frost and stretch your longer harvest window deep into autumn.
Here’s what that extended crop cycle means in practice:
- Start spinach, lettuce, and kale weeks before outdoor beds thaw
- Harvest cool-season crops well into late autumn
- Harden off seedlings without purchasing extras, cutting costs up to 30%
- Use thermal mass like bricks to hold warmth overnight
- Control ventilation daily to maintain steady germination temperatures
Extending the growing season with cold frames is simple — and the increased yield potential adds up fast.
Cold Frame Vs. Greenhouse Basics
A cold frame wins on Cost Comparison and Energy Efficiency — no heating system, no electricity bill. A greenhouse offers Temperature Stability year‑round but demands serious investment.
Cold frames are your low-cost greenhouse alternative: compact Space Utilization, simple cold frame design and placement, and real Seasonal Flexibility.
You get growing power without the overhead. Honestly, for most backyard gardeners, that’s the smarter starting point.
Best Crops for Cold Frames
Now that you know a cold frame beats a greenhouse for backyard simplicity, let’s talk about what actually grows well inside one.
- Leafy Greens and Early Harvest Crops: lettuce, spinach, and arugula thrive in cool frames
- Brassica Varieties: kale, mizuna, and tatsoi tolerate light frosts beautifully
- Root Vegetables and Herb Selections: radish, winter lettuces, and parsley stay productive all season
Choose Materials for Your Frame

Picking the right materials is what separates a cold frame that lasts from one that falls apart after a single winter. You don’t need to spend much — some of the best builds come from stuff you’d otherwise throw away.
Before you build anything, it’s worth making sure your site drains well — a quick soil drainage test can save you from a soggy, rotting frame down the road.
Here’s what you’ll want to think about for each part of your frame.
Wood, Glass, or Polycarbonate Options
Your material choices make or break a DIY cold frame.
Cedar durability is hard to beat — this timber resists rot for 15–20 years without chemical treatment.
Tempered glass safety is a real advantage over standard panes, though UV-stabilized polycarbonate wins on impact resistance comparison, handling 250 times more force than glass.
Polycarbonate sheets also weigh less, making cold frame construction steps easier solo.
Using Reclaimed Windows or Doors
Before you buy anything new, check your garage or local salvage yard — a salvaged window or old door might be your best lid yet. Glass thickness selection matters here; thicker panes hold heat better.
Preserving original hardware saves money, and weatherstripping reuse improves your seal instantly. Patina aesthetic integration gives upcycled garden structures real character.
Use custom shims, leveling your DIY cold frame with an old window, for a perfect fit.
Hinges, Screws, and Sealants
The right hardware keeps your lid tight and your heat in. For stainless hinge selection, go with ball bearing hinges — they open smoothly even on cold mornings.
Use zinc plated screws for most joints, but upgrade to stainless near wet zones.
Seal every gap with silicone caulk.
Adjustable hinge alignment lets you fine-tune the lid for a snug, draft-free close.
Thermal Mass for Extra Warmth
Think of thermal mass as your cold frame’s heat battery — it charges up during the day and pays you back at night. Dense materials like brick walls, cinder blocks, concrete blocks, and dark stone absorb sunlight and release warmth for hours after sunset.
Here are four easy options:
- Stack cinder block or brick cold frame walls inside for instant heat retention.
- Place a small concrete slab beneath your plants.
- Add dark-painted water barrels — a gallon stores 8.3 BTU per °F rise.
- Line the base with dark stone tiles for using thermal mass for temperature stability.
Pick and Prepare The Site

Where you place cold frame matters just as much as how you build it. A good site gives your plants more warmth, better drainage, and easier care all season long.
Here’s what to look for before you set anything down.
Choosing a South-facing Location
Sun is your cold frame’s engine — so place it where it gets the most. A south-facing exposure gives you optimal sunlight for cold frames all day long, which is everything for season extension and winter gardening.
Map your sun exposure mapping early.
Look for an unobstructed horizon, slight ground elevation, and adjacent wall heat to build a reliable garden microclimate.
Keep water source distance short.
Checking Drainage and Soil Level
Poor drainage quietly ruins a cold frame before you ever plant a seed. Start with a Soil Drainage Test: dig a 1-foot hole, fill it with water, and watch the clock.
- Confirm water drains within 60–120 minutes for healthy soil drainage.
- Complete a Slope Gradient Check — ground should slope 2% away from the frame for clean rain runoff.
- Lay a 2–3 inch Gravel Underlay Installation beneath the frame for rainwater management in garden enclosures.
- Use Drainage Pipe Placement under the footprint to handle heavy rain drainage and prevent waterlogging.
Finish with Level Base Preparation using a spirit level across the frame bottom.
Protecting The Frame From Wind
Once drainage is sorted, wind becomes your next challenge. A well-placed windbreak — a fence, wall, or dense hedge — cuts strong winds by up to 60%.
Keep your cold frame low-profile to reduce uplift risk.
Use reinforced brackets and strong hinges for lid windshield protection.
Smart windbreak placement and solid Wind Anchor Design are the backbone of good DIY cold frame construction guide practices.
Planning Easy Access for Care
With wind protection in place, your next move is to make the frame easy to reach every single day.
Here’s what to plan for:
- Keep a wide entryway and clear pathways free of obstacles
- Use a low threshold to avoid tripping
- Build at an adjustable height between 18–30 inches
- Mount tool storage within arm’s reach of the entry
- Install a hinged roof with a prop rod for hands-free ventilation
Build The Cold Frame Step by Step
Now that your site is ready, it’s time to put the frame together. The build breaks down into five straightforward steps, each one building on the last.
Here’s exactly what to do.
Measuring and Cutting The Lumber

Measuring your lumber carefully sets the whole build up for success. Use a steel measuring tape — keep it flat and straight — and always mark from the same reference edge.
Account for kerf compensation: your saw blade removes about ⅛ inch per cut. Mark lines with a square layout tool, secure boards with clamps for clamp stability, and choose the right saw blade selection for clean, accurate cuts.
Assembling The Base and Sides

Once lumber is cut, assembly moves fast. Start with the corner posts — attach your side panels using wood screws through pre-drilled holes, and add corner brackets at each joint for base reinforcement.
- Use leveling shims under the base feet to keep everything plumb.
- Check diagonal measurements before final fastening.
- Choose stainless steel fasteners for fastener selection in wet conditions.
Pressure-treated lumber and cinderblocks both work well for side panel attachment.
Creating The Sloped Lid
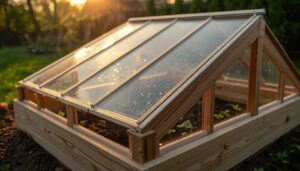
Once your base is solid, the transparent roof comes together quickly.
Cut your lid panel using Material Thickness Selection as your guide — polycarbonate at 4–6 mm or glass at 3/32 inch. Angle it 15°–35° for Lid Angle Optimization, with Back Edge Alignment at the tallest point.
Add Front Overhang Design to shed rain, and press in a Gasket Compression Fit seal around all edges.
Installing Hinges and Lid Supports
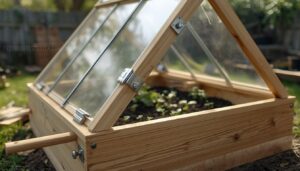
Attach 2–3 stainless steel hinges along the back edge of your triangular hinged roof — corrosion-proof fasteners are non‑negotiable outdoors. Space them evenly for adjustable hinge angles and smooth lid travel.
Add lid support brackets on each side, then cut a prop rod for placement at the front lip. Seal every mounting hole with silicone caulk to lock out moisture.
Adding Simple Ventilation Features

Good ventilation is essential — without it, your DIY cold frame becomes an oven on sunny days. Here are five cold frame ventilation strategies to build in from the start:
- Cross Vent Placement — Install two small vents on opposite sides for steady airflow.
- Adjustable Lid Vents — Fit 1–3 inch openings along the lid edge.
- Passive Flap Design — Hang UV-resistant flaps near the soil line for gentle intake.
- Wind-Driven Louvers — Mount 2×6-inch louvers facing prevailing winds.
- Thermal Mass Venting — Place a 2-liter water bottle near vents to buffer overnight temperatures.
Use and Maintain Your Cold Frame

Building the frame is only half the job. How you use and care for it day to day is what actually keeps your plants thriving through the shoulder seasons.
what you need to know to get the most out of it.
Hardening Off Seedlings Safely
Think of hardening off seedlings like easing into cold water — you don’t jump straight in.
Start with Gradual Sun Exposure: 2–3 hours of indirect light, then increase daily. Use Shade Cloth Use to block harsh afternoon sun.
Practice Leaf Color Monitoring — yellowing means slow down. Keep Soil Moisture Management consistent, and never let nights drop below 55°F during seedling hardening.
Venting on Warm Days
On a sunny day, your cold frame can turn into an oven quickly.
Ventilation is essential — open the lid before solar noon using a Daytime Opening Schedule. Top Vent Placement lets hot air escape naturally through convection.
An Adjustable Louver Design gives precise control, while a Passive Thermostat Vent automates the job. A Cross Ventilation Strategy drops interior temperatures several degrees quickly.
Watering Without Cooling The Soil
Cold water dumped on warm soil is like throwing ice in a hot bath — it shocks roots and stalls growth.
In your DIY cold frame, water early in the day using drip timing methods. Target the root zone directly, and use soil moisture sensors to avoid over-watering.
Mulch insulation holds warmth in, while thermal mass watering keeps temperature regulation steady without disrupting soil warming.
Insulating During Cold Nights
Nights are where your frame earns its keep. Layer bubble wrap blankets over the lid, then add a reflective emergency liner inside to bounce heat back down — that alone can add 5–8°F.
Place water-filled heat containers along the north wall, tuck horticultural fleece over seedlings, and seal gaps with weather stripping. Elevated base insulation cuts ground-contact heat loss by nearly 30%.
Seasonal Cleaning and Pest Checks
Once you’ve locked in warmth at night, keeping that environment clean is what protects your seedlings long-term.
Run a Spring Pest Survey around vents and hinges, clear gutters for Summer Water Management, do Autumn Leaf Clearing around the base, and seal rodent gaps during Winter Rodent Sealing checks.
A simple Quarterly Inspection Schedule ties cold frame maintenance and ventilation, pest and disease control in cold frames, and seasonal protection for seedling growth together — your best tool for reliable garden microclimate management with cold frames.
Frequently Asked Questions (FAQs)
What’s a better word for building?
Want a sharper word than "building"? Try constructing, erecting, framing, or establishing — each shifts the meaning slightly.
For DIY cold frame construction, framing and constructing best capture the hands-on assembly semantics involved.
What is a building definition?
A building is a permanent structure with a roof, walls, and a foundation that shelters people or activities.
Its structural components, building envelope, load‑bearing systems, and foundation types must all meet local building codes.
How do you prevent pests in cold frames?
Pests don’t announce themselves — they sneak in quietly.
Use Physical Barriers, Ventilation Management, Sanitation Practices, Biological Controls, and Monitoring Traps together to keep your cold frame clean, productive, and pest-free all season long.
What soil mix works best for cold frames?
Mix 60% topsoil with 40% compost for strong seedling growth. Add coconut coir inclusion at 5–10% for moisture control, perlite aeration at 10% for drainage, and biochar amendment at 5% for structure.
When should you close the lid at night?
Close the lid at night when frost forecast or wind chill threatens. For seedling hardening, shut it fully below 0°C.
Nighttime temperature control and ventilation timing protect your garden microclimate without overheating young plants.
Can cold frames protect from heavy snow?
Yes, a cold frame can handle snow — if it’s built right. A sloped lid sheds snow naturally, and reinforced hinges prevent sagging.
Clear heavy buildup after storms to protect the glazing.
How do you manage excessive condensation buildup?
Crack the lid slightly to create airflow gaps and reduce the humid environment inside.
Humidity monitoring keeps levels in check, while moisture absorbers and condensation drip trays catch excess water before it damages your plants.
Can cold frames work on raised garden beds?
Absolutely — integrating cold frames with raised beds works beautifully.
Raised bed soil warmth, proper edge sealing, and smart weight distribution make your modular frame design even more effective for extending harvests season after season.
How long does a cold frame typically last?
With proper materials selection for cold frames and regular maintenance frequency, a cold frame lasts 5 to 20 years.
Climate impact, structural degradation, and your chosen materials all shape that replacement timeline considerably.
Can two cold frames be connected together?
Two connected cold frames — perfectly paired — double your growing space.
Joint alignment keeps soil contact level, while thermal mass sharing boosts overnight warmth. Vent synchronization across both lids prevents cold pockets and keeps temperatures even throughout.
Conclusion
Here’s the quiet irony of building a simple cold frame garden: the gardeners who swear it’s too much work are the same ones buying pale, tasteless spinach in March.
A reclaimed window, a few cedar boards, and one south-facing patch of ground separate you from them.
You’ve already learned every step. The frame doesn’t care about the forecast—and now, neither do you.
Build it once. Eat earlier, longer, and better than anyone who waited.
- https://itunes.apple.com/us/podcast/epic-gardening-daily-gardening-tips-and-advice/id1221085548
- https://www.ronhazelton.com/projects/how_to_make_a_cold_frame
- https://oldworldgardenfarms.com/2014/02/25/how-to-build-and-use-a-cold-frame-to-grow-veggies-year-round-on-the-cheap/
- https://lifefromthegroundup.us/2012/12/a-diy-cold-frame/
- https://www.sengerson.com/our-home/diy-cold-frame-garden-box-greenhouse/?utm_medium=social&utm_source=pinterest&utm_campaign=tailwind_tribes&utm_content=tribes&utm_term=531699950_19414240_109687