This site is supported by our readers. We may earn a commission, at no cost to you, if you purchase through links.

Most gardeners blame the weather, the seeds, or bad luck when plants underperform—but the real culprit is often invisible, sitting right beneath the surface.
Soil pH controls how well your plants absorb nutrients, and even a small shift in either direction can lock out the minerals your crops depend on. Nitrogen, phosphorus, and potassium reach peak availability between pH 6.0 and 6.5; drift outside that window and you’re feeding your soil, not your plants.
Testing your garden soil pH is the fastest way to stop guessing and start growing with intention. This guide walks you through every method, tool, and step you need to get an accurate reading—and act on it.
Table Of Contents
- Key Takeaways
- Why Garden Soil PH Matters
- Best Time to Test Soil PH
- Gather Accurate Soil Samples
- Test Soil PH at Home
- Choose The Right PH Tester
- Top 7 Soil PH Testers
- Calibrate and Maintain Your Meter
- Read Soil PH Results Correctly
- Fix Acidic or Alkaline Soil
- Keep Soil PH Stable
- Frequently Asked Questions (FAQs)
- What soil pH is best for roses?
- Do cheap soil pH testers work?
- Are cheap soil pH testers accurate?
- What are signs of low soil pH?
- What is a good pH level for garden soil?
- Can soil pH change throughout the growing season?
- How does compost affect soil pH levels?
- Are professional lab tests worth the extra cost?
- What pH level do container gardens typically need?
- Can soil pH change between different seasons?
- Conclusion
Key Takeaways
- Soil pH between 6.0 and 6.5 is the sweet spot where nitrogen, phosphorus, and potassium are most available to your plants — drift outside that window and even the best fertilizer won’t help.
- Your plants often signal a pH problem before your meter does — yellowing new growth, stunted roots, and blossom end rot are all signs that nutrients are locked out, not missing.
- Testing method matters: digital meters give you ±0.1 accuracy for precise decisions, while strips and DIY tricks like vinegar or red cabbage juice only point you in the right direction.
- Fixing pH is a slow game — lime and sulfur both need 6 to 12 weeks to shift your soil, so apply gradually, retest often, and let organic matter and mulch do the long-term stabilizing work.
Why Garden Soil PH Matters

Soil pH is one of those invisible factors that controls almost everything happening underground. Get it wrong, and your plants struggle no matter how well you water or fertilize them.
When pH is off, even the best vegetable fertilizers get locked out of the root zone before plants ever see a benefit.
Here’s why it matters so much — and what to watch for in your own garden.
How PH Affects Nutrient Availability
Soil pH acts like a dial controlling plant nutrient uptake. Near pH 6.0 to 6.5, macro nutrient uptake peaks — nitrogen, phosphorus, and potassium are most available.
Push past 7.0, and micronutrient solubility drops, raising iron chlorosis risk in leafy crops.
Drop below 5.5, and you cross the aluminum toxicity threshold, damaging roots.
Soil pH buffering capacity determines how quickly things shift.
Most crops achieve ideal growth within a pH range of 6.0–7.5, as detailed in the ideal pH range for crops.
Acidic Vs. Alkaline Soil Conditions
Once you know how pH shapes nutrient flow, the next question is: which direction is your soil pulling?
Acidic soil and alkaline soil create very different growing environments.
- Soil acidity (below 6.0) triggers metal toxicity — aluminum and manganese reach levels that damage roots.
- Soil alkalinity (above 7.5) locks out iron and zinc, starving plants quietly.
- Microbial activity drops in both extremes, slowing decomposition and nitrogen cycling.
- Crop suitability shifts dramatically — blueberries love pH 4.5–5.5, while spinach tolerates alkaline conditions.
- pH buffering and smart amendment rates keep swings manageable over time.
Common Plant Symptoms of PH Imbalance
Your plants often show distress before your meter does.
Leaf yellowing on new growth usually signals iron lockout from high pH. Stunted growth, flower drop, and blossom end rot in tomatoes point to nutrient lockout tied to soil pH. Root discoloration is another quiet warning sign.
These common signs of pH imbalance in gardens reflect poor soil nutrient availability — both acidic soil symptoms and alkaline soil symptoms affect plant health differently.
| Symptom | Acidic Soil | Alkaline Soil |
|---|---|---|
| Leaf yellowing | Older leaves yellow from aluminum toxicity | New growth yellows; iron unavailable |
| Stunted growth | Root damage limits uptake | Micronutrient deficiency slows development |
| Root discoloration | Dark, damaged roots from metal toxicity | Pale, underdeveloped root tips |
| Flower drop | Phosphorus deficiency reduces bloom | Zinc lockout disrupts reproductive growth |
| Blossom end rot | Rare; calcium still accessible | Calcium transport impaired by high pH |
Soil PH and Healthy Root Growth
What shows up in leaves often starts underground. Root zone pH shapes how well roots grow and feed your plants. In slightly acidic soil around pH 6.0–6.5, root architecture develops fully — deeper, denser, more efficient.
- Mycorrhizal associations strengthen in slightly acidic to neutral soil.
- Microbial diversity peaks near pH 6.5, boosting nutrient cycling.
- Root biomass increases when pH matches plant preference.
- Nutrient uptake improves as aluminum toxicity drops.
Best Time to Test Soil PH

Timing your soil test isn’t just a minor detail — it shapes how useful your results actually are. A few key windows during the year give you the clearest, most actionable readings.
when to test and what to watch out for.
Seasonal Testing Schedule for Gardens
Think of garden’s pH calendar as a three-act rhythm.
Start with Spring Baseline Testing four to six weeks before planting — collecting composite samples from eight to ten spots gives you a reliable foundation.
A Summer Midseason Check catches drift from irrigation and fertilizer.
Fall Preparation Testing after harvest sets up your winter amendments.
This seasonal soil pH management practice keeps monitoring soil pH throughout the growing season, consistent and purposeful.
When to Retest After Amendments
Once you’ve applied an amendment, patience is part of the process. Amendment Reaction Lag is real — soil pH correction doesn’t happen overnight.
For four to six weeks, wait before retesting. Elemental sulfur needs six to twelve weeks, depending on microbial activity check conditions in your soil.
Root Zone Retest and Soil Buffer Evaluation confirm actual change. Build a Multi-Phase Retest Plan into your soil pH testing frequency for reliable, season-long results.
Weather and Fertilizer Timing to Avoid
Timing matters more than most gardeners realize. Poor weather choices can skew your soil pH testing frequency and waste a good amendment application:
- Skip fertilizing before heavy rain — Rainfall Scheduling prevents runoff and nutrient loss
- Avoid applications above 85°F — Temperature Limits and temperature compensation protect against volatilization
- High Humidity Effects slow uptake; target cooler, drier windows
- Liquid feeds need calm air — Wind Drift ruins foliar coverage
Fertilizer Type Matching and irrigation water quality seal the plan.
Gather Accurate Soil Samples
Getting a good pH reading starts long before you reach for your meter. The quality of your result depends almost entirely on how well you collect your soil samples.
Here’s what to get right before you test.
How Many Samples to Collect

One sample won’t cut it — soil varies more than you’d expect across even a small garden. Follow these Sample Density Guidelines to get a Representative Sample Count that actually reflects your soil:
| Garden Size | Statistical Sample Size | Zone Sampling Ratio |
|---|---|---|
| Under 100 sq ft | 5–8 samples | 1 per zone |
| 100–500 sq ft | 8–12 samples | 2–3 per zone |
| 500+ sq ft | 15–20 samples | 4–5 per zone |
Garden Size Scaling matters here. Combine your soil samples into one composite sample per bed, using solid soil sampling techniques and soil sample collection guidelines to keep results reliable.
Proper Sampling Depth for Gardens

Depth isn’t one-size-fits-all — and that’s where most gardeners go wrong.
For vegetables, target 0–6 inches, where root zone targeting matters most.
Shrubs and perennials need a second core from 6–12 inches.
Sandy soils require shallower pulls; clay soils benefit from deeper ones.
Depth consistency across all spots keeps your soil pH measurement accurate and your garden soil testing reliable.
Choosing Spots Across The Garden

Your garden isn’t uniform — soil pH variability is real, and a single scoop won’t reveal it. Pull samples from zones with different sunlight exposure, water proximity, windbreak placement, and accessibility paths. Even aesthetic integration choices like curved beds or borders can shift drainage and pH.
Follow soil sample collection guidelines: gather from 4–6 distinct spots using proper soil sampling techniques for accurate pH measurement.
Avoiding Contamination During Collection

Even a well-placed sample loses value if it’s contaminated. Follow these sterile sampling tools and glove change protocol steps every time:
- Pre-sterilize containers using container sterilization steps — 70% ethanol works well.
- Change gloves between zones to prevent residue transfer.
- Avoid tools previously used in treated areas.
- Follow labeling hygiene practices immediately after collection.
Clean technique is what separates reliable soil sampling guidelines from guesswork.
Drying and Labeling Composite Samples

Once you’ve collected your composite sample, air-dry it in a clean, dust-free spot — oven temperature control sits around 105–110°C if you need faster results, though vacuum freeze drying preserves volatile components better.
Divide it into aliquots before testing. Label each with waterproof sample labels, log every transfer in your chain of custody record, and cross-check labels after drying.
Test Soil PH at Home

You don’t need a lab to get a useful soil pH reading — your kitchen and a basic tool or two can tell you a lot. There are several ways to test at home, and each one suits a different situation or budget.
Here’s a look at your main options.
Step-by-step Meter Testing Method
digital pH meter takes the guesswork out of soil testing — if you use it right. Follow these five steps:
- Run Battery Power Checks before heading outside.
- Enable Temperature Compensation Settings on the display.
- Confirm Buffer Shelf-life Management for valid calibration.
- Apply proper Probe Insertion Technique — no air gaps.
- Wait for Stabilization Timing before logging your reading.
Using Strips or Liquid Test Kits
Meters aren’t your only option. pH test strips and liquid soil testing kits both work well for DIY soil pH testing techniques at home.
Strips give quick reads — dip, wait, match the color chart reading. Liquid kits take longer but return sharper results.
Check reagent expiration dates before use, follow pad storage guidelines carefully, and weigh kit cost comparison against how often you’ll actually test.
Vinegar and Baking Soda Checks
Testing with vinegar and baking soda is a simple DIY indicator for quick carbonate detection. Drop vinegar onto a soil sample — fizz intensity signals alkalinity.
Try the baking soda test on a separate portion; fizzing confirms soil acidity. Monitor reaction temperature and follow basic safety precautions.
These DIY soil pH testing techniques give rough directional clues, not precise soil pH testing readings.
Red Cabbage Indicator Method
Red cabbage makes a surprisingly capable DIY indicator kit for soil pH measurement. Steep chopped leaves in near-boiling water for 15–30 minutes — that’s your pigment extraction done.
The red cabbage indicator solution shifts from pink in acidic soil to green in alkaline. Use a color chart calibration reference to read results.
Mind the indicator shelf life: use it within a day. Follow basic safety guidelines when handling test liquids.
When Home Tests Are Enough
For most home gardeners, a reliable DIY soil pH test covers everything you need. Home testing works well for small plot suitability, container plant guidance, and budget monitoring across seasons.
Digital meters give you trend decisions without lab costs.
That said, there’s a lab confirmation threshold—if you’re growing plants with tight pH requirements, back up your home testing results with a professional analysis for full accuracy.
Choose The Right PH Tester

pH testers are built the same, and picking the wrong one can leave you guessing instead of growing.
right tool depends on how precise you need to be, how often you’ll test, and what conditions your garden throws at it.
what to look for before you buy.
Digital Meters Vs. Color Test Kits
Digital pH meters win on Result Precision, hitting ±0.1 pH versus the ±0.5 margin typical of pH test strips. That gap matters when you’re dialing in amendments.
Cost Comparison favors strips upfront, but Maintenance Frequency and pH calibration add meter ownership costs over time.
Strips also create Environmental Waste and carry a steeper User Learning Curve for color-matching under inconsistent light.
Probe Depth and Readability Features
Probe depth shapes every reading you take. An ideal probe length of 4–6 inches reaches the active root zone without disturbing surrounding soil.
Here’s what to look for:
- Depth Calibration Impact – Readings shift beyond 6 inches; manufacturer guidelines recommend recalibration at greater depths.
- Single-junction probe – Reliable for standard garden soils.
- Double-junction probe – Better suited for dense or mineral-rich conditions.
- LCD Backlight Benefits – A large backlit LCD display with a color-coded display and adjustable 90° rotating head lets you read 0.1-resolution values clearly in any light.
Waterproof and Durable Designs
Garden tools take a beating, and your pH meter is no exception. Look for reinforced casings, impact-absorbing bumpers, and sealed connectors that block moisture at the joints. UV-resistant materials keep housings from cracking after seasons in the sun.
compact, portable handheld pH meter with waterproof design and modular replacement parts will outlast cheaper options — and stay accurate longer.
Calibration and Accuracy Standards
A durable build only helps if your meter is reading correctly. Look for meters with ±0.1 pH accuracy, temperature compensation, and clear calibration interval planning built into the design. Good calibration options matter too.
- Use traceable calibration solutions with reference standard traceability
- Follow probe validation procedures after each cleaning
- Apply uncertainty budgeting to understand reading margins
- Maintain documentation compliance with dated calibration logs
Multi-function Tools for Garden Testing
Once accuracy is locked in, why stop at pH alone?
Multi-function tools like the VIVOSUN 3in1 Soil Tester and IRTOV 4in1 Soil Tester combine a moisture sensor, light sensor, and Soil Temperature Integration into one multifunctional design.
With Multi-Parameter Display, Bluetooth Syncing, Integrated Data Logging, and Battery Life Management built in, you get a complete soil picture — faster and with far less guesswork.
Top 7 Soil PH Testers
Not all soil pH testers are built the same, and the right one depends on how serious you’re about your garden. These seven options cover a range of budgets, features, and accuracy levels — so there’s something here whether you’re a casual grower or a dedicated plant nerd.
Here’s what made the cut.
1. Raintrip 4in1 Soil Tester
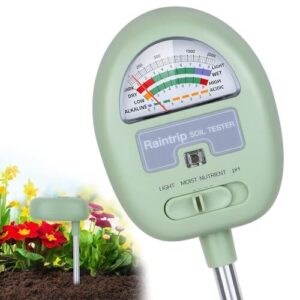
Raintrip 4in1 Soil Tester packs moisture, pH, nutrients, and light readings into one lightweight, battery-free device — a practical choice if you’re juggling multiple checks across garden beds, pots, or lawns. Its 90° rotating dial means you don’t have to crouch to read it, which is a small but genuine convenience.
Keep in mind the pH resolution stops at 0.5-unit steps, so if you’re fine-tuning blueberries or acid-lovers, you’ll want something more precise.
| Best For | Gardeners, beginners, and seniors who want a quick, no-fuss way to check soil health across multiple spots without hauling around multiple tools. |
|---|---|
| pH Range | 3.5–8.0 |
| Power Source | Battery-free |
| Form Factor | Handheld probe |
| Accuracy | Low (±0.5 pH) |
| Calibration | None required |
| Use Environment | Soil only |
| Additional Features |
|
- Reads moisture, pH, nutrients, and light all at once — no batteries needed
- The rotating dial is a real win if you’re working low beds or have back trouble
- Single probe means less root damage, which matters a lot with seedlings
- PH readings lack precision — 0.5-unit steps won’t cut it for fussy plants like blueberries
- The probe corrodes over time and needs regular sanding to keep working properly
- Some users lose pH functionality entirely after just one season
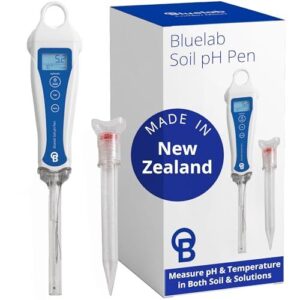
2. Bluelab pH Pen Waterproof Double Junction
If you need tighter accuracy — think hydroponics, aquariums, or dialing in pH for finicky plants — the Bluelab pH Pen steps up.
Its double-junction glass probe resists contamination and holds up in nutrient‑rich solutions, while automatic temperature compensation keeps readings honest across conditions.
You get ±0.1 pH precision, a backlit display, and a waterproof body that floats if dropped.
Two-point calibration with included buffer sachets is straightforward.
The trade-off: the probe needs regular hydration, and it costs more than basic options.
| Best For | Hobbyists and growers who need reliable, precise pH monitoring for hydroponics, aquariums, or pools and want a durable tool that holds up over time. |
|---|---|
| pH Range | 0–14 |
| Power Source | 1× AAA |
| Form Factor | Handheld pen |
| Accuracy | ±0.1 pH |
| Calibration | 2-point |
| Use Environment | Soil & liquid |
| Additional Features |
|
- Double-junction glass probe resists contamination and stays accurate in nutrient-rich solutions
- Automatic temperature compensation and ±0.1 pH accuracy make readings trustworthy across conditions
- Waterproof, floats if dropped, and comes with buffer sachets for easy two-point calibration
- Probe needs regular hydration or it’ll drift — easy to forget, costly to ignore
- Struggles with low-ion water like RO or distilled, giving slow or unstable readings
- Pricier than basic test strips, and some users find they’re replacing the probe more often than expected
3. VIVOSUN 3in1 Soil Moisture Light PH Tester
Keeping things simple has its place, and that’s where the VIVOSUN 3in1 earns its spot. It measures soil moisture, light, and pH without needing a single battery — just insert the probe and read the dial.
The pH range covers 3.5 to 8.0, which accommodates most garden crops. It’s lightweight, portable, and surprisingly practical for quick checks.
That said, don’t rely on it for precision work. pH readings can be inconsistent, and the probe tips tend to corrode over time.
| Best For | Casual home gardeners who want a no-fuss way to check on their plants without spending a lot on equipment. |
|---|---|
| pH Range | 3.5–8.0 |
| Power Source | Battery-free |
| Form Factor | Handheld probe |
| Accuracy | Low (unspecified) |
| Calibration | None required |
| Use Environment | Soil only |
| Additional Features |
|
- No batteries needed — just stick it in the soil and you’re good to go
- Covers three measurements in one tool: moisture, light, and pH
- Light and compact, so it’s easy to move between pots or garden beds
- PH and light readings can be hit or miss, so don’t count on them for anything precise
- Probe tips tend to corrode after a few months, which can kill the accuracy
- The LCD screen is small and dark, making it tough to read without good lighting
4. Bluelab Digital Soil pH Pen
If you want readings, you can actually trust, the Bluelab Digital Soil pH Pen is worth the investment.
It measures pH directly in the root zone — no slurry prep needed — and its double junction probe delivers stable, accurate results to 0.1 pH units. Automatic temperature compensation keeps readings consistent as soil conditions shift.
The waterproof housing holds up in real garden use, and the backlit display makes early-morning checks easy.
Calibration solutions are sold separately, so factor that into your budget.
| Best For | Hydroponic growers, soil gardeners, and hobbyists who want reliable, lab-quality pH readings across multiple growing environments without the hassle of test strips. |
|---|---|
| pH Range | 0–14 |
| Power Source | 1× AAA |
| Form Factor | Handheld pen |
| Accuracy | ±0.1 pH |
| Calibration | 2-point |
| Use Environment | Soil & liquid |
| Additional Features |
|
- Measures pH and temperature directly in the root zone with automatic temperature compensation, so your readings stay accurate even as conditions change.
- Fully waterproof and built for real-world use — works in soil, coco, rockwool, nutrient solutions, and even aquariums or pools.
- Digital readout to 0.1 pH units is way more precise than test strips, and the single AAA battery keeps it simple to power.
- Calibration solutions and KCl electrolyte aren’t included, so you’ll need to buy those separately right out of the gate.
- Needs regular calibration (often after every use) and careful probe storage — skip that routine and accuracy suffers fast.
- The probe has roughly an 18-month lifespan, and some users have reported erratic temperature readings and occasional calibration failures.
5. Digital Soil Moisture PH Temperature Meter
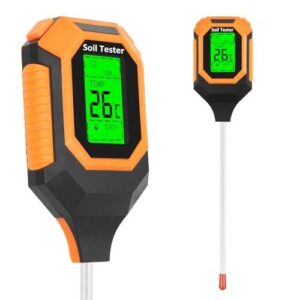
For gardeners who want one tool to do the heavy lifting, this meter covers four readings — pH, moisture, temperature, and light intensity — in a single handheld probe.
The backlit LCD makes it readable at any hour, and the 10–15 second response time keeps your workflow moving.
It weighs just 4.6 oz, so carrying it across multiple beds isn’t a chore.
Just know it needs moist soil to read pH accurately; dry or compacted ground will give you unreliable numbers.
| Best For | Home gardeners and small-scale growers who want a single, portable tool to quickly check soil conditions across multiple garden beds or indoor plants. |
|---|---|
| pH Range | Unspecified |
| Power Source | 3× AAA |
| Form Factor | Handheld probe |
| Accuracy | Low (unspecified) |
| Calibration | None required |
| Use Environment | Soil only |
| Additional Features |
|
- Measures four things at once — pH, moisture, temperature, and light — so you’re not juggling multiple tools
- Backlit LCD means you can read it clearly even in low light or early morning
- Lightweight at 4.6 oz, making it easy to carry around the yard or between plant pots
- PH readings get unreliable in dry or compacted soil, so you may need to pre-wet the area first
- Batteries aren’t included, which adds a small extra cost right out of the box
- Some users have reported inconsistent readings, so accuracy can vary from unit to unit
6. HomEnjoy Universal pH Test Strips
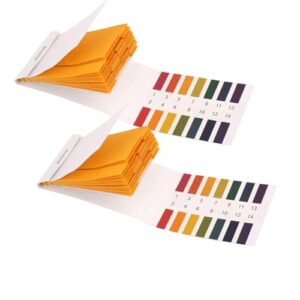
Sometimes the simplest tool gets the job done. These HomEnjoy strips cover the full pH range from 1 to 14, and you’ll have a readable result in about 5 seconds.
Each pack holds 80 strips, so you won’t run short mid-season.
The method is straightforward — mix your soil with distilled water, apply a drop to the strip, then match the color to the chart.
No calibration, no batteries. Just keep them sealed and dry between uses to prevent drift.
| Best For | Hobbyists, students, and home growers who need a fast, no-fuss way to check pH across a variety of everyday samples. |
|---|---|
| pH Range | 1–14 |
| Power Source | None required |
| Form Factor | Strip booklet |
| Accuracy | Visual/approximate |
| Calibration | None required |
| Use Environment | Liquid & soil |
| Additional Features |
|
- Quick results in about 5 seconds with no calibration or equipment needed.
- 160 strips across two packs means you’ve got plenty to work through a whole season.
- Works on a wide range of things — water, soil, food, skincare, you name it.
- Can’t submerge the strip; you’re limited to drop testing, so solid samples need prep work first.
- Lighting conditions can throw off your color reading if you’re not careful.
- Some users have reported no color change with certain nutrient solutions, which could mean compatibility issues or expired strips.
Apera Instruments P0 Waterproof PH Tester
The Apera P0 is where serious garden soil testing begins. Its IP67 Waterproof rating means rain or muddy hands won’t slow you down.
- Auto Buffer Recognition simplifies calibration — even for beginners
- Replaceable BNC Probe keeps the meter useful long‑term
- Backlit LCD Display and AAA Battery Life support early‑morning or evening testing
Accuracy hits ±0.01 pH, making it one of the sharpest digital pH meters available.
Calibrate and Maintain Your Meter

A good pH meter is only as reliable as the care you give it. Skipping calibration or neglecting the probe is one of the fastest ways to end up with readings you can’t trust.
Here’s what you need to do to keep your meter accurate and working season after season.
Using Buffer Solutions Correctly
Buffer solutions are the backbone of accurate pH calibration. Use standard pH buffer solution at three points — usually pH 4, 7, and 10 — to build a reliable calibration curve.
Temperature effects on buffers matter more than most people expect, so always match buffer temperature to your soil conditions.
Follow proper buffer preparation steps, store opened sachets sealed, and replace them if you notice drift.
Accurate soil pH measurement starts here.
Cleaning Probes After Each Use
Once calibration is done, don’t skip the cleanup.
A quick Distilled Water Rinse removes loose soil before it dries onto your single-junction or double-junction probe. Follow with a Lint-Free Cloth Wipe, then Mild Soap Cleaning if grime remains.
Thorough Drying prevents corrosion, and a quick Probe Damage Inspection catches cracks early.
Good Calibration and maintenance of pH meters start with treating the probe right after every use.
Storing Meters to Protect Accuracy
Once the probe is clean, where you store your meter matters just as much. Keep it in a Protective Case with foam padding, somewhere with steady Temperature Control — between 5 and 25°C.
Humidity Management is equally important; relative humidity above 60% corrodes metal contacts quickly.
Battery Removal during long breaks prevents leakage, and Probe Detachment reduces connector wear, protecting your meter’s durability and long-term accuracy.
Replacing Batteries and Worn Probes
Good — now I’ve solid, grounded information to write this section naturally and accurately. Let me craft the content.
Even with careful storage, components wear out. When battery life runs low, always use Battery Type Matching — replace with the exact size and voltage your meter specifies. Check Battery Polarity Checks before closing the compartment; reversed cells can damage the circuit.
For probes, watch for Probe Drift Detection — if readings shift more than 0.2 pH units against a reference, it’s time to replace.
- Follow the Probe Pre‑Soak Procedure: soak new probes in buffer solution before first use
- Always check Seal Replacement Tips — a loose O-ring breaks waterproofing fast
- A singlejunction probe works fine for standard garden soil; a doublejunction probe offers better durability in harsh conditions
- After swapping either component, always run fresh probe calibration
Common Calibration Mistakes to Avoid
Even a fresh probe won’t save you if calibration goes wrong. Skipping Warm‑Up is the most common slip — give your meter a few minutes to stabilize before you start.
Always check that your calibration solutions aren’t expired, and use the correct buffer concentration for your range.
Watch for Temperature Drift, and mind your Probe Placement: fully inserted, no air pockets.
Read Soil PH Results Correctly

Getting a number from your meter is only half the job — knowing what it means is where the real work starts. Your reading only becomes useful once you understand the scale, what your plants actually need, and whether a home test is enough or you need to go deeper.
Here’s what to look at when you’re ready to make sense of your results.
What Acidic, Neutral, and Alkaline Mean
The pH scale tells you where your soil stands chemically — acidic, neutral, or alkaline. Each zone triggers different soil chemical reactions and affects microbial activity, nutrient release, and root health.
- Acidic soil (below 7): high hydrogen ion concentration, limits calcium and phosphorus
- Neutral soil (around 7): balanced, strong buffering capacity, ideal microbial activity
- Alkaline soil (above 7): reduces iron and manganese availability
- Ideal soil pH range: 6.0–7.0 for most vegetables
- pH scale: each step shifts chemistry dramatically
Understanding The PH Scale’s Log Nature
Here’s what trips most gardeners up: the pH scale isn’t linear — it’s logarithmic. That Tenfold Ion Change between each unit means pH 5 is ten times more acidic than pH 6, not just "a little worse." Understanding the pH scale and its logarithmic nature helps you interpret readings from digital pH meters and pH test strips far more accurately.
The pH scale is logarithmic, meaning pH 5 isn’t slightly worse than pH 6 — it’s ten times more acidic
| pH Value | Hydrogen Ion Relationship | Small Shift Impact |
|---|---|---|
| 5.0 | 10× more acidic than 6.0 | Severe nutrient lockout |
| 6.0 | Baseline garden reference | Ideal availability |
| 7.0 | 10× less acidic than 6.0 | Alkalinity begins |
Log Scale Basics also explain why Temperature pH Variation matters — even a few degrees shift your pH measurement slightly, so always test under consistent conditions.
Matching Readings to Plant Preferences
Once you have a reading, the real work is matching it to what your plants actually need. Species pH Ranges vary widely:
- Blueberry plants and rhododendrons thrive in acidic soil (pH 4.5–5.5)
- Most vegetables prefer 6.0–7.0 for Nutrient Requirement Alignments
- Asparagus favors alkaline soil above pH 7
- Native woodland species need slightly acidic conditions with steady organic matter
Temperature Compatibility and Moisture Preference Matching improve this further.
Knowing When Lab Testing is Needed
Home tests work well for routine checks, but some situations call for more. If you’re seeing persistent symptoms that don’t improve after amendments, or managing specialty crops and long-term perennials, professional testing gives you the full picture.
| Situation | Home Test | Lab Test |
|---|---|---|
| Irrigation water changes | Monitor | Confirm |
| Unusual nutrient lockout | Estimate | Diagnose |
| Specialty crops | Baseline | Precise profile |
Extension services offer reliable soil testing services with solid soil testing guidelines and soil sample collection guidelines built in.
Spotting Signs of Nutrient Lockout
Your plants tell you when something’s wrong — you just need to know the language.
Leaf interveinal chlorosis, where veins stay green while tissue yellows, signals disrupted nutrient availability from soil pH imbalance.
Watch for necrotic margin spots, mottled leaf patterns, tip burn symptoms, and stunted root growth. These common signs of pH imbalance in gardens confirm soil nutrient deficiency — your cue to start soil pH troubleshooting immediately.
Fix Acidic or Alkaline Soil

Once you know where your soil stands, fixing it is mostly a matter of choosing the right amendment and giving it time to work.
The good news is you’ve got a few solid options depending on whether you’re dealing with too much acidity or too much alkalinity. Here’s what actually works.
Raising PH With Agricultural Lime
Agricultural lime is your most reliable fix for acidic soil. Work it in 6 to 8 inches deep — lime incorporation depth matters for root-zone contact.
Follow lime rate guidelines from your soil pH test results rather than guessing. Lime particle fineness affects how fast pH shifts, so finer grades act quicker.
Wear lime safety gear during application, and expect lime microbial effects to gradually improve soil biology over weeks.
Lowering PH With Elemental Sulfur
Elemental sulfur works differently than lime — it relies on microbial oxidation by soil bacteria to convert sulfur into sulfuric acid, gradually dropping pH over weeks. Sulfur application rates generally range from 10 to 20 pounds per 1,000 square feet, depending on your soil’s buffering capacity. Clay soils need more; sandy soils respond faster.
- Apply in spring or fall — seasonal timing facilitates active bacterial activity
- Work it 4–6 inches deep for even soil pH adjustment
- Wear gloves and a mask — basic safety precautions prevent irritation
- Retest every 3–6 months to track acid soil correction progress
Using Wood Ash and Aluminum Sulfate Carefully
Both wood ash and aluminum sulfate can shift garden soil pH, but each one demands respect.
Wood ash raises pH at roughly 2 pounds per 100 square feet — use protective gear, and never mix it with nitrogen fertilizers, since that releases harmful ammonia. Skip ash from painted or treated wood entirely.
Aluminum sulfate lowers pH faster than sulfur, but stick to recommended application rates and store both materials safely away from children.
Retesting After Soil Amendments
Once you’ve applied an amendment, patience becomes part of the process — but so does verification. Amendment Impact Lag is real: lime and sulfur need two to three months before soil pH adjustment settles.
For major corrections, retest after a full year to complete your pH Drift Analysis. Use the same depth and sampling spots every time to maintain soil pH testing accuracy and validate your Amendment Rate Validation.
Applying Changes Gradually Over Time
Think of soil pH like steering a ship — small, deliberate turns get you where you want to go without capsizing anything.
- Use Incremental Lime Doses of no more than 1–2 pounds per 100 square feet per application.
- Practice Stepwise Sulfur Use across 3–6 month cycles for safe Gradual pH Shifts.
- Build Microbial Buffer Support by adding organic matter between amendments.
Your Amendment Timing Strategy matters as much as the materials themselves.
Keep Soil PH Stable

Getting your pH where you want it is only half the battle — keeping it there is where the real work begins. A few ongoing habits make all the difference between a stable, thriving garden and one that keeps drifting off course.
Here’s what to watch and track consistently.
How Irrigation Water Affects PH
Your irrigation water quietly shapes soil pH over time. hard water loaded with bicarbonates — high irrigation alkalinity impact — gradually pushes pH upward, even when the water pH reads near neutral. Salinity pH interaction compounds this by shifting carbonate balance in the root zone. Rainwater collection offers a lower-pH, low-alkalinity alternative worth considering.
| Water Source | pH/Alkalinity Effect |
|---|---|
| Hard water | Raises soil pH steadily |
| Rainwater collection | Maintains or lowers pH |
| Saline irrigation | Pushes alkaline conditions |
Leaching fraction control helps flush excess salts and bicarbonates, stabilizing water pH influence before crop water pH suffers.
Fertilizer Choices That Shift PH
Every fertilizer you apply either nudges pH up or pulls it down. Ammonium fertilizer acidification is a real concern — ammonium nitrate and ammonium sulfate release hydrogen ions as they break down, gradually lowering pH.
Calcium nitrate alkalization does the opposite, buffering acidity. Phosphoric fertilizer impact and sulfur amendments compound these shifts.
Tracking your fertilizer choices is essential for soil pH and plant health.
Organic Matter for Buffering Soil
Organic matter is one of the most reliable tools for keeping soil pH steady over time. Humus buffer capacity works by releasing or absorbing hydrogen ions as conditions shift — basically acting as a natural shock absorber.
Regular compost amendment effects build this resilience gradually. Biochar pH stabilization adds stable carbon that extends buffering further.
Cover crop contributions feed soil microbes, and those soil microbial buffering communities quietly maintain balance beneath your feet.
Mulching and Long-term Soil Health
Mulch does more than tidy up a garden bed. A 2–3 inch layer drives organic matter build-up, triggers a microbial activity boost, and delivers real soil structure improvement over time.
It also manages erosion prevention and weed suppression in one move.
These mulching strategies for pH stability work gradually, supporting consistent soil pH management and protecting nutrient availability season after season.
Logging Test Results for Garden Tracking
A simple log transforms scattered readings into a clear picture of your soil’s history. Record each sample with a unique Sample ID System, noting the date, bed zone, pH value, and method used.
Link every entry to amendments via Amendment Linkage, track calibration status through a Verifier Workflow, and maintain Version Control Logs for reliable soil pH monitoring. Consistent Data Entry Standards turn soil test result reporting into a genuine garden management tool.
Frequently Asked Questions (FAQs)
What soil pH is best for roses?
Roses thrive best in a slightly acidic rose root zone, with an ideal pH of 0 to 5.
This range maximizes rose iron uptake, maintains rose bloom pH, and boosts overall plant health.
Do cheap soil pH testers work?
Think of cheap pH testers as a compass, not a GPS. They work well enough for spotting broad trends, but budget accuracy limits mean you’re getting rough guidance, not precision.
Are cheap soil pH testers accurate?
Cheap digital pH meters can work, but you should expect a margin of error of 5 to 0 pH units.
Budget meter drift, moisture level sensitivity, and temperature compensation effect all chip away at accuracy over time.
What are signs of low soil pH?
Yellowing older leaves signal iron chlorosis, while purple-tinged new growth points to phosphorus deficiency.
Stunted growth, leaf necrosis, and poor fruiting all indicate acidic soil is locking out the nutrients your plants need.
What is a good pH level for garden soil?
The sweet spot for garden soil sits between 0 and That ideal pH range keeps nutrients available and roots healthy. For most vegetables, a target pH level near 5 works best.
Can soil pH change throughout the growing season?
Yes, soil pH shifts throughout the season.
Rainfall, temperature-driven pH shifts, and microbial pH influence all move the needle — usually within 5 units, but enough to affect nutrient availability and plant health.
How does compost affect soil pH levels?
Compost rarely swings soil pH dramatically — it nudges it.
Through cation exchange and humic acid effect, mature compost gently buffers acidic soils toward neutral, improving nutrient access without the shock of harsher soil amendment recommendations.
Are professional lab tests worth the extra cost?
For complex issues or high-value crops, soil testing services deliver soil pH testing accuracy and professional interpretation that home kits can’t match.
Long-term savings, risk mitigation, and precision amendments justify the soil testing cost.
What pH level do container gardens typically need?
Most container plants thrive in an ideal pH range of 0 to 0 for best nutrient availability. Acid-loving plants like blueberries need 5 to 5, while organic mix buffering suits a tighter 0 to 5 window.
Can soil pH change between different seasons?
Soil pH stays constant — until it doesn’t. Rainfall leaching, temperature acidification, and microbial seasonal shifts all nudge your readings across the year, making regular soil pH tests essential.
Conclusion
What separates a thriving garden from a struggling one, often comes down to a number you’ve never checked. Testing your garden soil pH takes minutes, but the clarity it gives you lasts the entire season.
You stop guessing, stop wasting amendments, and start making decisions rooted in real data. The nutrients are already there—your job is simply to uncover them. Get the reading right, and the rest follows naturally.