This site is supported by our readers. We may earn a commission, at no cost to you, if you purchase through links.

Most gardeners lose more ground in winter than they realize—not from cold alone, but from the quiet damage of water expanding inside soil as it freezes, then contracting as it thaws. This cycle, repeated dozens of times between November and March, breaks down soil structure, splits wood boards, and strips roots of irreplaceable moisture.
Raised beds suffer more severely than in-ground plots because their sides expose soil to air temperature on all sides, accelerating freeze-thaw cycles.
Knowing how to protect raised garden beds in winter means less repair work come spring—and a garden that hits the ground running.
Table Of Contents
Key Takeaways
- Freeze-thaw cycles are your raised beds’ biggest winter enemy—they break down soil structure, warp wood frames, and strip roots of moisture before you even notice the damage.
- Mulching with 3–4 inches of straw or shredded leaves insulates soil, protects perennial roots, and keeps your beds from losing the nutrient-rich structure you built all season.
- Before the ground freezes, inspect your beds for rot, loose fasteners, cracks, and clogged drainage—small fixes now prevent expensive repairs come spring.
- Adding finished compost and sowing cover crops like winter rye before the first hard frost locks in nutrients, prevents erosion, and gives your soil a head start for spring planting.
Why Winter Protection Matters

Winter doesn’t have to undo all your hard work in the garden. Your raised beds face some real threats once temperatures drop, and knowing why protection matters helps you act before damage sets in.
A solid winter garden preparation plan turns those threats into manageable steps you can tackle before the first hard freeze arrives.
Here’s what’s actually at stake when you skip the winter prep: unaddressed risks can compromise your garden’s health, undoing months of effort. Proactive measures are key to safeguarding your investment.
Prevent Freeze-thaw Soil Damage
Freeze-thaw cycles are one of the sneakiest threats your raised beds face each winter. When water in the soil freezes and expands, it breaks apart soil structure — turning that carefully built texture into something compacted and uneven.
Freeze-thaw cycles silently destroy raised bed soil structure, compacting what you carefully built all season
Mulching early and focusing on garden bed insulation helps your soil hold heat more evenly. Think of it as wrapping your beds before the damage starts.
Reduce Raised Bed Warping
Soil movement from freeze damage puts real stress on your bed frames, too. Boards warp when moisture seeps in, freezes, and expands repeatedly.
That’s why moisture-resistant lumber, corner bracing, and reinforced framing matter before winter hits. Even load distribution across the bed reduces flex. Pair that with drainage management and seasonal moisture monitoring, and your frames stay straight through snow load management and cold weather protection.
Protect Perennial Plant Roots
Your bed frames are now protected — but what about the roots living beneath the surface?
Perennial roots are vulnerable to freeze-thaw cycles that crack soil and cut off oxygen. Root crown insulation through winter mulching helps buffer these swings. Maintain 3–4 inches of straw mulch in the root zone, but practice careful moisture management to avoid rot. Following proper mulch application guidelines can further protect roots during winter.
- Place mulch 2 inches from crowns
- Schedule light winter irrigation during dry freeze-thaw periods
- Check aeration techniques and pest monitoring monthly
Preserve Soil Nutrients
Roots aren’t the only thing worth guarding underground. Winter is surprisingly hard on soil nutrients, too. Without protection, erosion control breaks down, organic matter depletes, and microbial activity stalls.
Compost addition and cover crops lock nutrients in place before the freeze hits.
| Nutrient Strategy | Winter Benefit |
|---|---|
| Biochar amendment | Boosts cation exchange capacity |
| pH buffering with compost | Stabilizes soil nutrient retention |
Prevent Spring Planting Delays
Skip winter prep, and spring will punish you for it. Poor soil temperature regulation means your beds stay cold and wet long after the thaw — pushing your planting window back by weeks.
- Monitor soil warmth management daily once temperatures rise
- Use pre-plant irrigation to settle and warm soil evenly
- Follow weather-based scheduling, not fixed calendar dates
- Try seedling heat mats for cold-sensitive starts
- Begin early pest monitoring before planting begins
Inspect Beds Before Freezing

Before winter sets in, take a walk around your raised beds and give them a proper once-over.
A few small problems now — a loose bolt, a soft plank, a blocked drain — can turn into big headaches by spring. Here’s what to check before the ground freezes.
Check Wood for Rot
Wood rot is the silent threat that sneaks up before winter even arrives.
Protecting vulnerable wood with the right mulch layers is covered in detail in this guide to preparing soil and garden beds for winter.
Start your moisture testing early — press a screwdriver into any darkened or water-stained areas. Spongy, crumbly wood means decay is already spreading. Watch for fungal growth; white or gray patches signal active rot beneath the surface.
Replace damaged boards now, because freeze damage will only make things worse.
Tighten Loose Fasteners
Every loose fastener is an open invitation for freeze damage to split your raised garden beds apart. Walk the frame and hand-test each bolt and screw before temperatures drop.
- Apply thread locker application to threaded connections for chemical hold
- Use lock washer installation under bolt heads to resist seasonal movement
- Confirm preload verification with a torque wrench using the angle-tightening method
Snug joints protect raised garden beds all winter.
Repair Cracks and Warping
A minor crack can split a board completely after a single hard freeze. Don’t wait to address issues.
| Problem | Fix | Tool Needed |
|---|---|---|
| Small cracks | Epoxy Crack Fill | Putty knife |
| Wide gaps | Backer Rod Installation | Utility knife |
| Warped boards | Planed Board Repair | Hand plane |
| Loose joints | Staggered Fastening | Drill |
| Moisture risk | Moisture Monitoring | Moisture meter |
To ensure lasting winter protection, maintain wood moisture below 15%. Monitor levels consistently to prevent damage.
Clear Drainage Pathways
Water has nowhere to go when drainage pathways clog — and that’s when your beds take the real hit. Before freezing temperatures arrive, check your trench maintenance around the perimeter and clear any leaf buildup.
Place weep holes every 12–18 inches along the sides. A simple perforated pipe layout beneath the bed, wrapped in fabric drain covers and gravel filter layers, keeps soil moisture balance steady through heavy winter rains and melting snow.
Add Wind Protection
Wind can strip heat from your beds faster than frost alone. That’s why windbreak installation is a key part of winterizing raised garden beds.
Place barrier materials — wood lattice, polycarbonate panels, or metal screens — about 1.5 to 3 meters away to avoid shading:
- Match ideal height to your prevailing wind direction
- Follow spacing guidelines allowing 20–40% air passage to cut turbulence
- Use anchoring techniques like concrete footings to resist frost heave
Seasonal adjustments, like removable panels, make winter garden care and seasonal garden maintenance far easier.
Winterize Soil and Plants

Once your beds are structurally sound, it’s time to turn your attention to the soil and plants inside them. This step is where winter damage actually starts — neglected plant debris and bare soil can undo a season’s worth of hard work.
Here’s what to do before the ground freezes: Address these issues to protect your garden’s foundation.
Remove Spent Vegetable Plants
Once the growing season winds down, clean out old plant material and pull up any annuals past their prime. Glove safety matters here—roots can hide sharp debris. Use shear cutting for woody stems, then toss everything into a wheelbarrow for compost disposal.
Root inspection as you go reveals compaction or rot early. Addressing these issues now prevents future problems.
Tidy and clear away plant debris completely for a fresh fall garden cleanup. This ensures a healthy foundation for the next growing season.
Destroy Diseased Garden Debris
Not all debris is safe to compost. If you spot spots, mold, or wilting on dead plant material, bag it up and keep it out of your compost pile. Dispose of infected material by bagging and burning (if local regulations permit) or using quarantine disposal via municipal waste services.
Always practice tool disinfection with bleach or alcohol after handling contaminated material to prevent pathogen spread before spring.
Pull Late-season Weeds
Weeds don’t clock out for winter. After clearing diseased debris, turn your attention to weed control — because chickweed and henbit keep germinating long after your crops are done. Weed species ID helps you act fast.
- Time pulls using soil moisture timing — moist soil after rain lifts roots clean
- Use hand weeder tools for stubborn perennials
- Apply immediate mulch cover after pulling
Partnering in weeding speeds up seasonal garden cleanup considerably.
Add Finished Compost
Once the weeds are out, your beds are ready for a real boost. Spread finished compost across the soil surface — about 2 to 4 inches works well for most raised beds. This simple soil amendment does a lot: it improves soil structure, boosts microbial activity, and locks in nutrients over winter.
| Application Rate | Compost Depth | Best Use Case |
|---|---|---|
| Light top dressing | ½ – 1 inch | Established beds, annual refresh |
| Standard winter layer | 2 – 4 inches | Nutrient enrichment, soil health maintenance |
| Deep incorporation | 4 – 6 inches | New beds or compacted soil |
Before spreading, do a quick compost screening — remove any large clumps or debris. Dark, crumbly, earthy-smelling compost means it’s fully finished and safe for winterizing raised garden beds. It builds organic matter while you wait for spring.
Sow Winter Cover Crops
Sow cover crops right after your compost layer settles. Winter rye is your most reliable choice—it germinates at near-freezing temperatures and survives down to -30°F. Cereal rye timing matters: plant seeds at least three weeks before hard frost.
Legume mixes, like field peas, add nitrogen as green manure. These crops contribute to soil health by fixing atmospheric nitrogen, enriching the ground for subsequent plantings.
Biomass benefits accumulate through winter, and termination strategies in spring are simple—mow or roll before planting to suppress weeds and return nutrients to the soil.
Add Mulch, Covers, and Insulation
Once your soil is prepped and your plants are cleaned up, it’s time to tuck the whole bed in for winter.
The right combination of mulch, covers, and insulation does most of the heavy lifting from here. Here’s what to use and how to do it right.
Choose Straw or Shredded Leaves

Both straw and shredded leaves work well as winter mulch for raised garden beds, but they’re not interchangeable.
Straw is lightweight and easy to spread, though weed seed risk is real unless you buy certified weed-free.
Shredded leaves offer better wind resistance and stronger nutrient contribution as they break down.
Decomposition speed favors leaves, but straw attracts fewer pests in wet winters.
Match Mulch to Climate

Your climate zone changes everything about how you mulch. Check the USDA Plant Hardiness Zone Map before you buy anything.
- Mild winters: 2–3 inches of cool-season mulches like straw
- Moderate climates: 3–4 inches of shredded leaves for organic moisture balance
- Harsh zones: 4–6 inches of dense organic mulch
- Hot regions: heat-reflective mulches with lighter tones cool soil by 2–4°F
- Depth by climate matters more than mulch type alone
Keep Mulch Off Stems

Mulch piled against stems is a silent killer. Keep a 2–4 inch gap — that’s your stem gap monitoring zone — to allow airflow around bases and prevent rot.
Crown clearance timing matters too: pull mulch back before the first freeze sets in.
Check weekly using a rot detection checklist, and rake to prevent mulch shift prevention gaps from closing after snow.
Install Frost Row Covers

Row covers are your raised bed’s last line of defense before a hard freeze hits. Drape frost cloth over hoops spaced 3–5 feet apart, leaving enough fabric overlap to anchor along the edges with soil or bricks — which serves as weight anchoring.
Heavy-duty floating row cover protects plants down to 20°F.
After winter, clean and inspect for tears before seasonal storage.
Vent Cold Frames Properly

A cold frame traps heat fast — faster than you’d expect. Without proper venting, temperatures inside can spike and stress your plants more than the cold ever would.
Keep these three practices in mind:
- Use adjustable vent openings and a thermometer-driven vent schedule — prop them open 2–4 inches on warm days.
- Build dual-level airflow with base and top vents for balanced condensation mitigation.
- Calibrate automatic vent systems gradually to avoid temperature swings.
Top 4 Winter Bed Supplies
Having the right supplies on hand makes winter prep a whole lot easier. A few key items can mean the difference between beds that bounce back strongly in spring and ones that don’t.
Here are four worth keeping in your garden shed.
1. Thunder Acres Organic Oat Seed
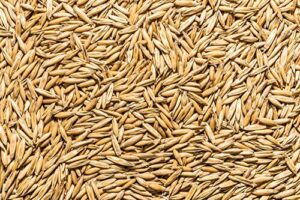
Thunder Acres Organic Oat Seed gives your raised beds a solid head start before winter. Sow it as a cover crop at least three weeks before the first hard freeze.
It’ll germinate fast — often within two to five days.
It’s USDA Certified Organic and non-GMO, so you’re not introducing anything unwanted into your soil.
The seeds bind loose soil, add organic matter, and protect your beds from erosion all winter long. A practical, clean choice.
| Best For | Pet owners who want a fresh, organic grass treat they can grow at home for cats, birds, chickens, or other small animals. |
|---|---|
| Material | Organic oat seed |
| Primary Use | Pet foraging supplement |
| Indoor/Outdoor | Both |
| Reusability | Single grow cycle |
| Assembly Required | No |
| Storage | Dry pantry storage |
| Additional Features |
|
- Germinates fast — you’ll usually see sprouts in 2 to 5 days, so your pets aren’t waiting long.
- Certified organic and non-GMO, which means no pesticides or mystery inputs in your pet’s snack.
- Flexible growing options — soil, pots, coconut coir, or hydroponics all work fine.
- Germination can be hit or miss; some batches only sprout about half the seeds.
- It needs a 24–30 hour pre-soak and consistent moisture to perform well — a bit of babysitting required.
- No nutrients included, so if your growing setup is lacking, you may need to supplement for healthy growth.
2. Panacea Galvanized Tomato Plant Support Cage
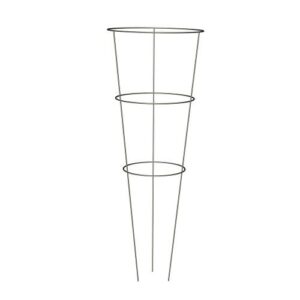
Once your cover crop is in, consider what remains in the bed over winter. The Panacea Galvanized Tomato Cage is worth retaining year-round. Each cage stands 33 inches tall with a 12-inch base, and its galvanized steel construction withstands freeze-thaw cycles without warping. The stackable design simplifies storage, and the cages support plants beyond tomatoes—such as peppers, eggplant, and vining crops.
Inspect the weld joints each fall and straighten any bent legs before the ground freezes hard. This maintenance ensures durability through seasonal changes.
| Best For | Home gardeners growing tomatoes, peppers, or eggplant in raised beds or containers who want a budget-friendly, reusable support option. |
|---|---|
| Material | Galvanized steel wire |
| Primary Use | Plant stem support |
| Indoor/Outdoor | Outdoor |
| Reusability | Multi-season |
| Assembly Required | No |
| Storage | Stackable storage |
| Additional Features |
|
- Stackable design makes off-season storage a breeze — they nest together and take up almost no space
- Galvanized steel holds up through rain and freeze-thaw cycles better than plain wire
- Works for more than just tomatoes — peppers, eggplant, and other vining plants all benefit
- Thin wire can bend under heavy fruit loads, so big tomato varieties may need extra staking
- Weld joints on some units arrive bent or weak and may need straightening right out of the box
- Prone to rust if left wet or stored damp, so you’ll want to dry and inspect them each season
3. Gardeners Supply Large Cucumber Trellis
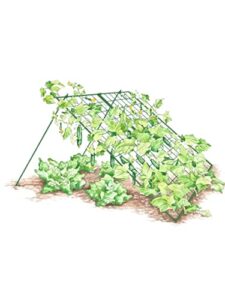
The tomato cage supports compact plants, but climbing cucumbers need something bigger. The Gardener’s Supply Large Cucumber Trellis meets this demand with a 48-inch-wide by 48-inch-tall powder-coated steel frame designed to hold heavy vines without buckling.
Before winter, fold it flat and store it dry; the rust-resistant finish ensures durability for repeated seasonal use.
Its 4-inch grid openings simplify vine training and harvesting, eliminating struggles with the structure.
| Best For | Gardeners growing cucumbers, beans, or tomatoes in raised beds who want a sturdy, easy-to-store trellis that lasts season after season. |
|---|---|
| Material | Powder-coated steel |
| Primary Use | Climbing plant support |
| Indoor/Outdoor | Outdoor |
| Reusability | Multi-season |
| Assembly Required | No |
| Storage | Folds flat |
| Additional Features |
|
- Powder-coated steel frame holds up to rust, scratches, and the elements — built to last more than one growing season.
- No tools needed to set it up, and it folds flat when you’re done, so storage is a non-issue.
- The 48×48 inch size gives climbing vines real room to spread without the trellis tipping or buckling.
- If you’ve got a lot of plants, one unit probably won’t cut it — you may need to buy multiples.
- The dark green finish can look different in person than the lighter green shown in some product photos.
- Narrow beds under two feet wide might force you to place it outside the bed, which can look a little awkward.
4. Bond Hardwood Plant Support Stakes
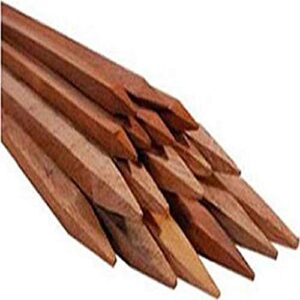
Stakes might seem simple, but the right ones make a real difference when securing plants through unpredictable weather. Bond Hardwood Plant Support Stakes are crafted from kiln-dried fir, ensuring less warping and better resistance to rot than green wood. This durable material provides reliable support for your garden needs.
Each 36-inch stake features a pencil-sharpened tip, allowing effortless insertion into soil. The design simplifies setup, saving time and effort during installation.
With six stakes per pack, you’ll have ample support for peppers, peas, or row markers across a standard raised bed. Prepare your garden before the ground freezes solid, ensuring stability through harsh conditions.
| Best For | Home gardeners who need simple, affordable support for small plants like peppers, peas, or potted houseplants. |
|---|---|
| Material | Kiln-dried fir hardwood |
| Primary Use | Plant staking support |
| Indoor/Outdoor | Both |
| Reusability | Multi-season |
| Assembly Required | No |
| Storage | Bundle storage |
| Additional Features |
|
- Kiln-dried fir holds up better than green wood — less warping, more reliable over time.
- Pencil-sharpened tips push into soil easily, so setup is quick and straightforward.
- Six stakes per pack gives you solid coverage for a raised bed or container garden without buying in bulk.
- At 3 feet, they’re too short for taller crops like tomatoes or anything that grows big.
- The wood can split when driven into wet or soft ground, and the occasional defective piece slips through.
- Surface can be rough to handle, and some users find the wood softer than expected.
Frequently Asked Questions (FAQs)
Can raised beds stay uncovered all winter?
Leaving raised beds bare all winter is like skipping a coat in a blizzard — possible, but costly.
Freeze-thaw cycles heave soil, weather wood faster, and let weeds sneak in during mild spells.
How do I protect beds from heavy snow loads?
Heavy snow can buckle even a solid frame. Space your vertical posts no more than 24 inches apart, use diagonal corner braces, and clear light accumulations before they build up.
Should I water beds right before the ground freezes?
Yes — but timing matters. Water your beds 12 to 24 hours before the freeze, not the night of. Moist soil holds heat longer, acting as a natural buffer against sudden temperature drops.
How do I keep rodents out of mulched beds?
Bury hardware cloth with 1/4-inch mesh at least 6 inches deep around your beds. Keep mulch under 3 inches thick.
Check for gaps every few weeks and apply peppermint oil to deter nesting.
When should I remove winter covers in spring?
Wait until average daytime soil temperatures hold at 50°F for several days. Remove covers gradually over one to two weeks so plants adjust without stress.
Conclusion
Prepared beds pay you back every spring. Learning how to protect raised garden beds in winter isn’t just maintenance—it’s an investment in the season ahead.
Mulch locks in moisture. Covers block the cold. These steps preserve soil health and root systems during harsh weather. A few hours of fall prep shields your garden from frost damage, eliminating weeks of spring repair.
Your soil stays structured, your roots stay safe, and your beds wake up ready to work. Winter doesn’t have to win. You’ve already done the hard part.
- https://www.vegogarden.com/blogs/academy/winter-mulch-a-garden-bed-s-best-friend?srsltid=AfmBOorYvpz3kC9ArtLlxQmFomBadEL1Vy-BoUsXiajLlz7iE7upJ8RQ
- https://wilkes.ces.ncsu.edu/news/winterizing-your-raised-garden-beds/
- https://www.creativevegetablegardener.com/fall-mulching/
- https://abundantminigardens.com/using-cold-frames/
- https://www.almanac.com/extending-growing-season-using-plastic-row-covers-and-other-techniques