This site is supported by our readers. We may earn a commission, at no cost to you, if you purchase through links.

Most raised bed gardeners water too often—and still end up with struggling plants. The problem isn’t commitment; it’s that raised beds drain faster than in-ground soil, so the rules change. A bed sitting in full sun on a breezy afternoon can lose moisture two to three times faster than one in a sheltered spot, and shallow daily watering teaches roots to stay near the surface where they’re most vulnerable.
Knowing how to water raised garden beds efficiently means understanding what’s happening below the soil, not just on top of it. The right method, timing, and tools make every drop count.
Table Of Contents
- Key Takeaways
- Assess Your Raised Bed’s Water Needs
- Choose The Most Efficient Watering Method
- Install Drip Lines Correctly
- Water Deeply, Not Shallowly
- Water at The Best Time
- Measure Soil Moisture Before Watering
- Improve Soil for Water Retention
- Mulch to Reduce Evaporation
- Automate Watering With Weather Adjustments
- Top 4 Raised Bed Watering Tools
- Frequently Asked Questions (FAQs)
- What is the most efficient way to water raised beds?
- Can rainwater harvesting supplement raised bed irrigation?
- How do self-watering wicking beds maintain moisture?
- Do hydrogels actually help retain soil moisture?
- How does wind affect raised bed water loss?
- Can soaker hoses work with rain barrel systems?
- Conclusion
Key Takeaways
- Watering deeply and infrequently trains roots to grow further underground, making your plants far more resilient to heat and drought than shallow daily watering ever could.
- Drip irrigation beats every other method for raised beds — it delivers water straight to the root zone, cuts evaporation by up to 90%, and pairs perfectly with a programmable timer for hands-off efficiency.
- Your raised bed loses moisture faster than in-ground soil, so factors like sun exposure, wind, plant type, and growth stage should drive your watering decisions — not a fixed schedule.
- Two inches of organic mulch after watering, combined with a soil moisture meter checked at two-inches deep before each session, gives you the clearest picture of what your bed actually needs.
Assess Your Raised Bed’s Water Needs

Every raised bed has its own personality — and watering it well starts with reading the room. Before you set a schedule or pick a system, a few key factors will shape how much water your bed actually needs.
If you’re growing herbs, those same factors — light, drainage, and your daily routine — matter even more, as this guide to growing herbs in raised beds makes clear.
Here’s what to look at first.
Plant Type and Root Depth
Your plant mix drives everything. Shallow root crops like lettuce and spinach stay within the top 6–12 inches, while medium root veggies like tomatoes push 18–36 inches deep. Deep root species such as corn can reach beyond 5 feet.
Understanding these root depth zones shapes how you approach root zone watering. Matching depth to plant root development prevents both drought stress and waste.
Soil Mix and Drainage
Your soil mix is the hidden variable that controls everything downstream. A good raised bed drainage setup combines roughly 20% compost for organic matter, 40% coarse sand or granite gravel proportion, and perlite-pumice balance components around 20–30%. Keep fine-textured materials under 20% to hit your soil texture target.
Use saline-free materials throughout, and follow a simple drainage testing protocol — no puddles within 30 minutes.
Understanding balanced drainage benefits helps fine-tune your mix for healthier roots.
Sun Exposure and Wind
Your bed’s position significantly influences its moisture needs. South-facing placements create intense microclimate zones, where temperature gradients between sunny and shaded edges can swing 5–15°F. Wind strips moisture quickly — sometimes 2–3 times faster than still air.
Windbreak design using low fencing reduces moisture loss by up to 20%. Pair orientation effects with early morning watering, mulching, and UV protection strategies for effective soil moisture retention.
Growth Stage Water Demand
Just as wind and sun reshape how fast your beds dry out, your plants’ growth stages quietly rewrite the watering schedule too. Seedling moisture needs are modest — keep the root zone consistently damp, not saturated. Vegetative demand climbs 20–40% as leaves expand.
Flowering irrigation must stay steady, and fruit maturation pushes water needs higher still.
Use a soil moisture meter and adjust frequency seasonally.
Seasonal Temperature Changes
Seasons quietly rewire how your raised garden beds use water. Solar angle impact shifts dramatically from winter to summer — longer days and higher sun angles raise soil temperatures by up to 6°F, driving seasonal evapotranspiration through the roof.
Adjust with purpose:
- Cut watering 15% in cool months
- Boost volume 20% during heat wave response peaks
- Use microclimate buffering with mulch for winter frost protection
Track soil moisture consistently for smart water usage optimization.
Choose The Most Efficient Watering Method

The way you water matters just as much as how often you do it. Some methods waste water before it even reaches the roots, while others deliver it precisely where plants need it most.
Here are the most efficient options worth knowing.
Drip Irrigation Systems
Drip irrigation is the sharpest tool in your watering arsenal. It delivers water directly to the root zone, cutting evaporation by up to 90%. This efficiency makes it a cornerstone of sustainable gardening.
Smart drip system design integrates Pressure Compensation emitters with Flow Rate Calibration to maintain steady output across raised beds. Complementing this are Filtration Strategies and Water Quality Management, which safeguard emitters from long-term damage. These elements work together to optimize performance and durability.
| Feature | Detail | Benefit |
|---|---|---|
| Emitter Flow Rate | 0.5–2.0 gal/hr | Matches plant needs precisely |
| Pressure Range | 15–30 psi | Ensures consistent output |
| Spacing | 12–24 inches apart | Prevents dry pockets |
| Filtration | Disk filter before regulator | Reduces clogging risk |
| System Expansion | Modular mainline design | Scales across multiple beds |
Pairing your drip setup with automatic watering timers transforms water conservation into an effortless practice. This integration ensures plants receive precise hydration while minimizing waste, aligning efficiency with convenience.
Soaker Hose Watering
Soaker hoses offer a solid middle ground between drip systems and hand watering. Made from porous rubber, they release water slowly along their full length, ensuring even water distribution—ideal for raised garden beds.
For practical setup, prioritize shorter hose runs to maintain pressure effectively. A simple inline regulator (10–12 psi) manages pressure regulation, while strategic placement optimizes coverage.
Maintenance is key: Mulch over the hose to shield it from UV damage, and flush the system before seasonal storage to prevent clogs. These steps ensure longevity and consistent performance.
Gentle Hand Watering
Hand watering raised garden beds gives you direct control — but only if you do it right. Wand ergonomics matter more than most gardeners realize. A long wand with wrist comfort built into the grip lets you target the base of each plant without straining.
- Use a gentle mist setting for seedlings
- Switch to pulse flow for deeper soil penetration
- Apply targeted base watering to cut waste
- Do the finger test at two inches before refilling
Water at the right time — early morning works best.
Garden-grid Watering Layouts
Think of a Garden Grid as your raised bed’s master plan — every plant gets exactly what it needs, nothing more.
Pre-drilled holes align perfectly with square-foot spacing, making drip line design almost foolproof.
| Feature | Benefit |
|---|---|
| Grid zone mapping | Targets watering zone control precisely |
| Lateral line planning | Simplifies irrigation efficiency across beds |
| Flow rate balancing | Prevents dry or waterlogged spots |
| Seasonal layout tweaks | Adapts output as conditions shift |
Avoid Overhead Sprinklers
Overhead sprinklers are the wrong tool for raised garden beds — full stop. Wind drift alone can slash water delivery to roots by 30 percent, while wet foliage invites disease risk from powdery mildew and leaf spot.
- Uneven coverage leaves shaded corners dry and sunlit patches waterlogged
- Soil crusting forms where heavy droplets pound bare soil
- Energy consumption climbs with zero gains over drip irrigation or soaker hoses
Install Drip Lines Correctly
Getting drip lines into the ground is only half the job — how you install them makes all the difference. A few key steps separate a system that wastes water from one that works like clockwork.
Here’s what to do to get it right.
Space Emitters Evenly

Spacing calibration makes or breaks your drip irrigation system. Place emitters in a 12×12-inch grid pattern for uniform wetting across the entire bed. This ensures consistent coverage.
A low-pressure drip system running at 8–12 psi ensures flow consistency without pooling. Pressure balancing across your emitter tubing guarantees every plant receives equal water.
Use this emitter grid design as your baseline:
| Zone | Emitter Spacing | Water Flow Control |
|---|---|---|
| Center | 12 inches | Steady, adjustable water flow |
| Edges | 12 inches | Overlapping coverage |
| Corners | 12 inches | Equal emitter output |
Place Lines Near Roots

Even placement gets water to the soil — but root‑zone alignment gets it to the plant. Position drip irrigation lines 4 to 6 inches from each root ball for direct moisture delivery.
- Use depth placement of 1 to 2 inches to suppress weeds
- Apply emitter clustering near dense root zones for high-uptake areas
- Keep root zone irrigation lines parallel to bed rows
- Calibrate flow control to match each plant type
- Set inspection frequency to every two weeks
Secure Tubing With Stakes

Once your lines sit close to the roots, keeping them there separates a reliable system from a frustrating one. Stakes lock drip irrigation tubing in place — no shifting, no kinking, no guesswork.
| Feature | Steel Stakes | Plastic Stakes |
|---|---|---|
| Material Choice | Galvanized, rust-resistant | UV-resistant polymer |
| Longevity Testing | 5–10 years | 3–5 years |
| Spacing Interval | Every 18–24 inches | Every 18–24 inches |
Angle each stake slightly toward the tubing. Seasonal inspections catch bends early, protecting your low-pressure drip system all season.
Cover Lines With Mulch

Stakes hold your lines in place — now mulch keeps them protected. Spread two inches of organic mulch like straw or wood chips over your tubing for reliable mulch benefits.
This mulch layer uniformity cuts evaporation by up to 40%, delivers real heat regulation benefits, and discourages pests naturally.
For emitter exposure gap, leave a small clearing so water flows freely to roots.
Check for Leaks Weekly

A small leak can quietly undo your entire drip irrigation setup. Every week, run through your weekly inspection checklist: look for damp pooling around emitter line integrity points, listen for hissing, and check fittings with your leak detection tools.
Log each finding using a repair log practice. Pair this with a sensor calibration routine to monitor soil moisture accurately and stop water waste before it drains your raised garden beds dry.
Water Deeply, Not Shallowly

How deep your water goes matters more than how often you water. Shallow watering keeps roots lazy and close to the surface, where heat and drought hit hardest.
Here’s what to do instead.
Aim for Root-zone Moisture
Think of your soil as a sponge — you want moisture reaching 6 to 12 inches deep, right where roots actually drink.
Capillary action pulls water downward through the soil profile, but soil texture impact matters: sandy beds drain fast, clay holds longer.
Use a moisture meter to monitor soil moisture and check root zone hydration before your next pulse duration cycle.
Encourage Deeper Root Growth
Roots follow water — so where you send moisture determines how deep your plants anchor themselves. Deep watering trains roots to pursue moisture further down, strengthening overall root development and drought resilience.
- Deep Moisture Profiling reveals where roots are actually drinking
- Loam Texture Optimization and Soil Structure Improvement open pathways for downward growth
- Root Growth Hormones activate naturally when roots search deeper soil layers
- Subsoil Structure Enhancement enables root zone hydration well below the surface
- Biodegradable Barriers break down, creating channels that guide roots deeper
Avoid Frequent Light Watering
Frequent light watering is quietly sabotaging your raised bed garden. When you only wet the top inch or two, roots never learn to reach deeper. Leaf turgor monitoring and evapotranspiration forecasting both confirm what horticulturists know: shallow soil moisture creates fragile plants.
Frequent light watering trains roots to stay shallow, where heat and drought strike hardest
Water deeply and less frequently instead. Combine deep watering with mulching techniques to keep root zone capacitance stable between sessions.
Use One-inch Weekly Guideline
One inch of water per week is your raised bed garden’s baseline — a simple Weekly Volume Calculation that eliminates guesswork in your watering schedule. Aim for 1 to 15 inches weekly, adjusting via Seasonal Adjustment Strategies during heatwaves or rainfall.
Rainfall Integration requires subtracting natural precipitation from your total.
Use Sensor‑Driven Verification to monitor soil moisture, and prioritize deep, infrequent watering through smart Guideline Calibration.
Prevent Runoff and Puddling
Runoff is just wasted effort — water that never reaches your roots. Grade your raised bed garden with at least a 1% slope away from the center, so excess drains out instead of pooling.
Permeable Edge Strips and swale edge capture redirect overflow naturally.
A mulch buffer zone slows incoming water, while soil porosity balance and drip irrigation together prevent waterlogging, ensuring simple soil compaction prevention.
Water at The Best Time

Timing your watering isn’t just a detail—it’s one of the biggest levers you have for cutting waste and keeping plants healthy. The right timing can mean the difference between water that soaks in and water that simply disappears.
Here’s what to know about when to water for the best results.
Early Morning Watering Window
Set your watering schedule between 5 and 9 a.m. — that’s your golden window for a raised bed garden. Morning humidity benefits keep soil surface moisture longer, and you’ll cut evaporation by up to 50%. Water early in the day to trigger root zone activation before heat builds.
- Dew point management reduces leaf disease risk
- Cooler air improves water usage efficiency
- Evaporation cut reaches nearly 50% versus midday
- Deep moisture enhances steady plant turgor
- Utility cost savings apply with off-peak scheduling
Avoid Hot Midday Watering
Morning momentum matters — but midday watering cancels it out fast. In a raised bed garden, peak sun can vaporize up to 50% of water before it ever reaches roots, gutting your surface evaporation losses and root zone cooling gains.
| Midday Problem | Real Impact |
|---|---|
| Surface evaporation losses | Up to 50% water lost |
| Thermal soil management failure | Roots stay dry longer |
Water early in the day instead.
Reduce Evening Leaf Wetness
Evening moisture is your garden’s quiet enemy. Wet leaves overnight invites leaf wetness disease fast.
That’s why drip irrigation beats overhead watering — it keeps foliage dry while soaking the root zone.
Combine it with mulch for dew suppression, and space plants for canopy ventilation. A shade cloth helps regulate night humidity, and weather-based watering ensures you’re never irrigating too late.
Use Off-peak Schedules
Off-peak scheduling takes timing one step further. With tariff-aware scheduling and smart controller integration, your automatic timer can run during the lowest-cost windows — usually 10 p.m. to 2 a.m. This load-shifting irrigation approach cuts energy costs by up to 50%, depending on your local rates.
Pair it with weather-based irrigation and programmable timers for seasonal window syncing, and your system runs itself — efficiently.
Adjust for Heat Waves
When temperatures spike, your raised bed garden needs a smarter game plan. A heat-triggered timer can shift your morning window earlier — before 7 a.m. — cutting evaporation loss by nearly 30 percent.
Pair that with shade cloth use and cooling fog misters to lower canopy temperature.
Add soil cooling additives to protect roots from excessive heat.
Rely on microclimate monitoring for real-time soil moisture management, letting weather-based watering handle the heavy lifting.
Measure Soil Moisture Before Watering

Watering on a fixed schedule sounds reliable, but your soil doesn’t care about your calendar. Before you turn on the tap, it’s worth taking a quick read of what’s actually happening a couple inches underground.
Here are five practical ways to measure soil moisture and water only when your plants truly need it.
Use a Moisture Meter
A moisture meter eliminates guesswork in managing soil moisture for raised bed gardens. Two primary types exist: pin meters, which penetrate soil for internal readings, and pinless sensors that scan the surface.
Accuracy typically falls within one to three percentage points, making these tools reliable enough for moisture-mapping across garden beds.
Ensure consistent results by checking calibration procedures and maintaining fresh batteries.
Check Two Inches Deep
Push your moisture meter two inches into the soil before every watering. At that depth, you’re reading the root zone that actually matters — not the dry crust on top.
For raised bed garden success, target 60 to 70 percent soil moisture content. This consistent depth sharpens your watering schedule, improves meter accuracy, and prevents shallow watering that weakens roots over time.
Test Multiple Bed Areas
Your raised bed garden isn’t one uniform environment — different corners behave differently. That’s why Microclimate Mapping and Cross‑Bed Data Logging matter. Test soil moisture content across at least two zones using moisture sensors, recording Variable Layout Trials between drip irrigation lines and soaker setups.
Bed Comparison Metrics and Statistical Moisture Analysis reveal which soil composition and layout holds water best. This data-driven approach eliminates guesswork, helping you stop guessing and start growing smarter.
Watch Plant Wilt Signals
Your plants speak before your moisture meter does. Leaf curling and wilting leaves are early stress symptoms you shouldn’t ignore. Stem softening signals rapidly dropping turgor pressure, indicating urgent hydration needs.
Check for dry soil pockets, especially around bed edges where roots often suffer first. During inspections, root discoloration—such as pale roots—confirms chronic stress. These signs demand immediate attention to prevent irreversible damage.
Water promptly to restore balance. If early recovery follows, your adjusted watering schedule is validated, ensuring healthier root systems and resilient growth.
Avoid Automatic Overwatering
Timers don’t feel soggy soil—you do. Automatic irrigation keeps your raised bed garden on schedule, but without checkpoints, it can quietly drown your roots. Build these safeguards into your watering schedule automation:
- Set Rainfall Thresholds to skip runs after 0.1 inches of rain
- Define Run-time Limits to cap daily output
- Calibrate Flow Rate Settings to match your soil drainage rate
- Enable Sensor Calibration checks monthly to maintain accuracy
- Use Manual Override whenever weather shifts unexpectedly
Overwatering kills quietly.
Improve Soil for Water Retention

Good soil is the foundation of every efficient watering system. If your mix drains too fast or holds too little moisture, even the best irrigation setup won’t save your plants.
Here’s how to build a soil blend that actually works with your water, not against it.
Add Compost Regularly
Compost is one of the most reliable soil amendments you can add to a raised bed garden. Work it in regularly, and you’ll notice the difference fast. It builds Soil Structure, boosts Nutrient Supply, and draws in Beneficial Microbes that keep your soil alive.
Organic matter from compost also improves Moisture Retention — reducing watering needs while supporting Waste Reduction and real Cost Savings.
Mix in Worm Castings
Worm castings take what compost starts and push it further. As a soil amendment, they deliver steady nutrient enrichment — feeding your raised bed garden without burning roots.
They also boost microbial diversity, which strengthens soil aggregation and improves soil water holding capacity.
The added organic matter aids root vigor from the ground up, making water conservation feel almost easy.
Use Coarse Drainage Materials
Good drainage starts at the bottom of your raised bed garden. A 2–4-inch gravel layer prevents roots from sitting in waterlogged soil. Combine this with proper geotextile selection—landscape fabric stops fine soil from clogging your base—and smart particle size grading to maintain steady flow.
- Drainage layer installation: gravel first, fabric second, soil mix on top
- Coarse media (5mm+) aids soil absorption without compaction
- Maintenance flushing after heavy rain prevents buildup in organic materials
Avoid Compacted Soil
Drainage layers protect your bed from below — but what happens above matters just as much. Soil compaction in a raised bed garden quietly kills root growth. When soil gets packed down, pore space collapses, water can’t infiltrate, and roots suffocate.
| Problem | Solution |
|---|---|
| Compacted surface | Organic amendments like compost |
| Poor soil aeration | Cover crops between seasons |
| Root restriction | Avoid wet working after rain |
| Repeated foot traffic | Traffic management with defined paths |
| Moisture management failure | Regular proper watering, deep not shallow |
Balance Retention and Drainage
Think of your raised bed garden’s soil composition as a two-way street — it needs to hold moisture long enough for roots to drink, but drain fast enough to prevent waterlogging. A fine coarse balance is the goal.
Layered media design, using compost over coarse sand, enhances capillary action naturally. Add mulch to seal it in.
Porosity management keeps your moisture management dialed in — with or without a hydrogel supplement.
Mulch to Reduce Evaporation

Mulch is one of the simplest tools you have for keeping moisture where it belongs — in the soil, not the air. A good layer cuts surface evaporation by around 40%, which means less watering and more consistent growth.
Here’s how to use it right in your raised bed.
Apply Two Inches Mulch
Two inches is your sweet spot for organic mulching in a raised bed garden. This depth significantly reduces evaporation—up to 40% less moisture loss—while maintaining essential airflow.
Apply mulch evenly, starting from the bed edge, and always keep mulch away from stems. Water the area after application to activate moisture retention. Follow these core techniques for optimal results.
Adhere to a Mulch Maintenance Schedule, including seasonal renewal, to preserve moisture-retaining benefits and enhance Mulch Weed Control. Consistent upkeep ensures long-term garden health.
Use Straw or Leaves
Choosing between straw and leaf mulch comes down to what’s available and what your bed needs most. Both are excellent moisture-retaining mulch options that cut evaporation greatly.
- Straw Benefits — reduces surface evaporation up to 60% and lowers soil temperature 3–5°C
- Leaf Mulch Advantages — composted leaf mold retains moisture 40–55% better than bare soil
- Application Rates — apply straw 2–3 inches deep; leaves at 2–4 inches, loosely layered
- Combined Mulch Strategy — use mulch layered with straw on top and tilled leaves beneath for maximum evaporation reduction
Try Wood Chips
Wood chips are a hardworking, moisture-retaining mulch that earn their place in any raised bed garden. A 3–4 inch layer delivers solid evaporation reduction while suppressing weeds for months. Use mulch from hardwoods when possible — softwoods decompose faster but may affect soil chemistry. Smart Chip Size Selection and Nitrogen Tie‑up Management keep your bed thriving long-term.
| Factor | What to Know | Why It Matters |
|---|---|---|
| Chip Size Selection | Use 1–3 inch chips for beds | Smaller chips compact; larger ones allow airflow |
| Nitrogen Tie‑up Management | Fresh chips temporarily lock soil nitrogen | Age chips 2–3 months before applying |
| Decomposition Timing | Hardwood chips last 1–2 seasons | Plan seasonal refresh accordingly |
| Carbon Soil Enrichment | Breaking-down chips feed soil microbes | Improves long-term soil structure naturally |
| Pathway Aesthetics | Chips create natural-looking garden paths | Reduces mud and tracks between beds |
Mulch After Watering
Mulch right after watering — not before. This simple switch locks in moisture before evaporation gets a chance.
Moistening mulch after laying it improves Mulch Moisture Transfer and speeds settling into the soil, boosting your raised bed garden’s water efficiency from day one.
- Settling Mulch Benefits: Watered mulch beds down firmly, cutting erosion prevention problems caused by wind.
- Nutrient Release Timing: Moisture triggers organic mulch to break down, feeding your soil biology faster.
- Compaction Risks: Water gently — hard streams compact the layer and block moisture-retaining mulch from working.
- Mulch Moisture Transfer: Even light watering after application improves contact between mulch and soil surface.
- Water Holding Capacity: A settled mulch layer maintains near-surface moisture, reducing how often you need to water.
Refresh Mulch Seasonally
Think of mulch as a living layer — it breaks down, thins out, and loses its edge over time. Refresh your raised bed garden each spring for Spring Mulch Renewal and again in fall for a Fall Insulation Layer.
Consistent Mulch Depth Monitoring is essential: once depth drops below an inch, top it up to two or three inches. Maintaining this depth sustains water-holding capacity, supports seasonal watering adjustments, and ensures Weed Suppression Check results remain effective throughout the season.
Automate Watering With Weather Adjustments

Smart automation takes the guesswork out of watering — and keeps your raised bed thriving even when life gets busy.
The right tools can read the weather, sense the soil, and adjust on their own without you lifting a finger.
Here’s what to set up.
Use Programmable Timers
A programmable timer turns your drip system into a true automated irrigation system — eliminating guesswork and forgotten watering days. Set zone programming for early morning operation and calibrate flow rates per bed size, ensuring tailored coverage.
Solar-powered timers excel in off-grid applications, while integrated battery backup safeguards schedules during power outages. These features maintain reliability across diverse conditions.
Smart hose timer models further enhance efficiency by supporting weather-based watering adjustments automatically, optimizing irrigation based on real-time conditions.
Add Rain Sensors
Once your timer is properly set up, pair it with a rain sensor to complete the system. Ideal placement matters — mount it in an open spot, away from trees.
Set threshold calibration to pause when 0.1 inches of rain is detected, preventing overwatering.
Wireless connectivity ensures effortless integration with your existing setup.
A simple cleaning schedule will keep sensor readings remain accurate year-round.
Connect Moisture Sensors
Rain sensors indicate when it rains, while moisture sensors reveal the soil’s actual water content. This distinction fundamentally transforms irrigation scheduling for raised bed gardens.
Wireless sensor setups simplify this process through:
- Zone sensor mapping to independently monitor distinct bed areas
- MQTT data logging for tracking historical moisture trends
- Power optimization via sleep-mode cycling to maximize battery life
Calibrate each sensor against known references—dry and saturated soil—before relying on them for garden automation and weather-based watering decisions.
Skip Watering After Rain
Once your moisture sensors are dialed in, integrate them with your weather data. After rainfall, pause your garden watering schedule for 24 to 48 hours. Check two inches deep first—waterlogging prevention hinges on understanding subsurface conditions.
Weather forecast integration enables your controller to skip runs automatically, eliminating manual adjustments. This supports smart water budgeting without overthinking every weather shift.
Adjust Schedules by Season
Spring Thaw Start means waking roots slowly with moderate frequency. Summer Heat Boost kicks evapotranspiration into overdrive—increase run times by about 20%. Autumn Rain Buffer lengthens intervals as temperatures drop. Winter Freeze Hold pauses irrigation almost entirely.
Seasonal Timer Tuning, guided by weather forecasts and real climate conditions, keeps weather-based watering precise year-round.
Top 4 Raised Bed Watering Tools
The right tools make all the difference between a thriving raised bed and a frustrating watering routine.
Whether you’re starting fresh or upgrading what you already have, a few well-chosen tools can save you time, water, and guesswork.
Here are four worth considering.
1. Rain Bird Gardenkit Drip Irrigation Kit
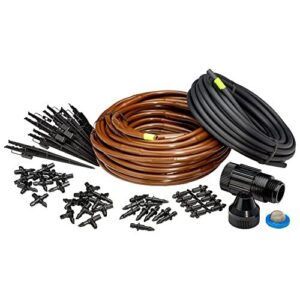
If you want root-zone precision without overcomplicating your setup, the Rain Bird Garden Kit is worth a close look. It covers a full 4×8 ft raised bed using 35 ft of emitter tubing with 70 pressure-compensating emitters spaced every 6 inches. Each emitter delivers 0.8 gal/hr directly to plant roots, cutting water use by up to 80% versus overhead methods.
The kit ships with fittings, stakes, a 25 psi regulator, and a clear illustrated manual. Setup is genuinely beginner-friendly, making it accessible for gardeners of all skill levels.
Priced at $51.29, this system balances efficiency, simplicity, and affordability for targeted irrigation.
| Best For | Home gardeners who want a simple, low-maintenance drip system for a single raised bed without spending a lot of time on setup. |
|---|---|
| Wi-Fi Control | No (hose timer compatible) |
| Weather Adaptation | No built-in |
| Power Source | Hose pressure (passive) |
| Housing Material | Resin (weather-resistant) |
| Rain Delay | Not applicable |
| B-Hyve Compatible | No |
| Additional Features |
|
- Covers a full 4×8 ft raised bed with 70 built-in emitters — no extra parts needed
- Can save up to 80% water compared to overhead watering by delivering moisture straight to the roots
- Comes with everything to get started, including fittings, stakes, a pressure regulator, and an illustrated manual
- Not expandable — adding extra tubing drops the flow and isn’t recommended
- Some users run into leaks where the distribution tubing meets the hose adapter and end up needing a separate barb fitting
- No backflow preventer included, which some local codes require for hose-connected irrigation
2. Orbit Bhyve XD WiFi Smart Hose Timer
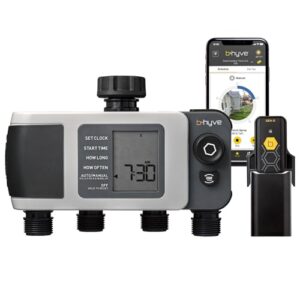
The Orbit B-Hyve XD takes scheduling control to another level. This four-port smart hose timer lets you run up to four independent watering zones from your phone — no matter where you are.
Pair it with the Gen 2 Wi-Fi Hub, and WeatherSense technology automatically skips watering when rain is on the way.
It runs on two AA batteries for a full growing season. At 2.2 lb with UV-resistant housing, it’s built to stay outside and keep your beds on schedule.
| Best For | Homeowners managing multiple garden zones who want smart, hands-off watering they can control from anywhere. |
|---|---|
| Wi-Fi Control | Yes, B-Hyve app |
| Weather Adaptation | WeatherSense technology |
| Power Source | 2 × AA batteries |
| Housing Material | UV-resistant plastic |
| Rain Delay | Yes, auto rain-delay |
| B-Hyve Compatible | Yes |
| Additional Features |
|
- Controls up to four zones independently — great if you’ve got a lawn, garden beds, and a drip system all running on different schedules.
- WeatherSense skips watering when rain’s coming, so you’re not soaking a yard that’s already getting wet.
- Battery lasts a whole season, and the app lets you adjust or pause schedules remotely — handy when you’re out of town.
- The rain-delay can be overly cautious in rainy climates, sometimes skipping watering when it really wasn’t necessary.
- No manual valve override — if you want to trigger a zone by hand, you have to open the unit itself.
- Some users report valve failures around the two-year mark, which is a real concern given that’s right when the warranty runs out.
3. Orbit Bhyve Smart Hose Timer
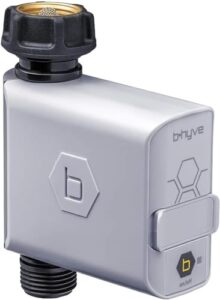
The B-Hyve Smart Hose Timer simplifies single-hose setups without unnecessary complexity. Its built-in 2.9-inch LCD screen allows on-the-spot adjustments, while Wi-Fi control through the B-Hyve app enables remote scheduling updates.
WeatherSense technology automatically pauses watering during forecasted rain, preventing overwatering.
Powered by a single AA battery, this device offers a clean, low-fuss upgrade ideal for any single-zone raised bed setup.
| Best For | Homeowners who want a simple, app-controlled watering solution for a single hose zone without dealing with complex irrigation systems. |
|---|---|
| Wi-Fi Control | Yes, B-Hyve app |
| Weather Adaptation | WeatherSense technology |
| Power Source | 1 × AA battery |
| Housing Material | Plastic with brass threads |
| Rain Delay | Yes, auto rain-delay |
| B-Hyve Compatible | Yes (Gen 1 hub only) |
| Additional Features |
|
- Control your watering from anywhere — great if you travel or just forget to turn the hose off
- WeatherSense skips watering when rain is coming, so you’re not wasting water (or money)
- Runs on one AA battery and has a built-in screen, so setup is quick and straightforward
- The app can be finicky — firmware updates have caused freezes, and Bluetooth mode is limited compared to Wi-Fi
- Only works with Gen 1 B-Hyve hubs, so it won’t play nice if you’ve upgraded to newer hardware
- No Alexa or Google Home support, so voice control isn’t an option here
4. Orbit Bhyve Gen2 Wi Fi Hub

Think of this hub as the command center for your entire B-hyve setup. The Gen 2 Wi-Fi Hub bridges your Bluetooth B-hyve devices to your home’s 2.4 GHz network, enabling remote control from anywhere.
One hub covers up to 150 feet, managing multiple timers and sensors through a single app. It auto-adjusts watering schedules based on weather data, ensuring your raised beds stay on track without constant manual input.
For larger properties, adding a second hub fills any coverage gaps, maintaining seamless functionality across your entire setup.
| Best For | Homeowners with multiple Orbit B-hyve devices who want to control their irrigation and leak sensors remotely from one app. |
|---|---|
| Wi-Fi Control | Yes, Wi-Fi bridge |
| Weather Adaptation | Weather-responsive scheduling |
| Power Source | Wall adapter (plug-in) |
| Housing Material | Plastic |
| Rain Delay | Yes, frost/rain delay |
| B-Hyve Compatible | Yes (Gen 2 devices) |
| Additional Features |
|
- Connects all your B-hyve Bluetooth devices to Wi-Fi with a single hub, no extra adapters needed.
- Automatically adjusts watering schedules based on real-time weather, so you’re not wasting water before a rainstorm.
- Easy remote access from anywhere means you can tweak settings or catch alerts without being home.
- Walls and obstructions cut into that 150-foot range, and bigger yards may need a second hub to get full coverage.
- Some users hit connectivity hiccups or app freezes during setup, which can be frustrating out of the box.
- Only works with specific B-hyve Gen 2 models, so it’s useless if your devices aren’t on the compatibility list.
Frequently Asked Questions (FAQs)
What is the most efficient way to water raised beds?
Drip irrigation wins, hands down. It puts water right at the root zone, cutting evaporation by up to 90% compared to sprinklers.
Pair it with early-morning timing and you’ve got a nearly unbeatable system.
Can rainwater harvesting supplement raised bed irrigation?
Yes, rainwater harvesting can absolutely supplement your raised bed irrigation. A simple barrel connected to a downspout gives you free, mineral-soft water your plants love — and cuts your water bill in the process.
How do self-watering wicking beds maintain moisture?
Like a silent pump, a wicking bed pulls water up from a built-in reservoir through capillary action. Moisture reaches roots steadily, keeping soil consistently hydrated without surface watering or guesswork.
Do hydrogels actually help retain soil moisture?
Hydrogels do help, but they are a supplement, not a solution.
They absorb water and release it slowly as soil dries out — useful in sandy mixes, but won’t fix poor drainage or bad watering habits.
How does wind affect raised bed water loss?
Wind is basically a silent thief for your raised bed. It strips moisture from the soil surface, speeds up evaporation, and dries out corners faster than the center.
This relentless action demands more frequent watering, as the soil loses humidity unevenly across the bed.
Can soaker hoses work with rain barrel systems?
Soaker hoses can work with rain barrels, but only if you use low-pressure models designed for gravity feed. Standard hoses need 8–10 psi — most barrels deliver under 1 psi.
Conclusion
Water is patient—it always finds the path of least resistance. Your raised bed rewards the same quiet discipline. When you learn how to water raised garden beds efficiently, you stop reacting and start leading: deep roots, steady soil, and plants that don’t beg for survival.
The meter, the mulch, the timer—each tool is just a translator between you and what grows beneath the surface. Master the language, and your garden speaks back clearly.
- https://www.bootstrapfarmer.com/blogs/backyard-gardening/best-drip-irrigation-for-raised-beds?srsltid=AfmBOortwelyyDRv9_4mbTp5Zf4TSF6GIWzADp6V6ZVpyujOJGpjC_aj
- https://gardenbasics.substack.com/p/more-effective-raised-bed-drip-irrigation
- https://thrivegarden.com/pages/how-to-optimize-irrigation-scheduling-for-raised-beds?srsltid=AfmBOoqIkJiucEgJT_8l24iaHnKRcg1Umfzv6SeeyWBJ0C-O5C5SeiE7
- https://www.gardenary.com/blog/the-best-way-to-water-a-raised-garden-bed
- https://www.piedmontmastergardeners.org/planning-a-vegetable-garden-irrigation-system/