This site is supported by our readers. We may earn a commission, at no cost to you, if you purchase through links.

Growing your own herbs costs a fraction of what grocery stores charge for those sad, wilting bunches—and the flavor difference is startling. A sprig of basil snipped seconds before it hits your pasta tastes nothing like the packaged version sitting under fluorescent lights for a week.
The good news: herbs are forgiving, fast-growing, and don’t demand much space. A sunny windowsill or a corner of your patio is enough to get started.
Whether you’re working with a single pot or a raised bed, starting an easy herb garden as a beginner comes down to a few key decisions—where to place it, which herbs to grow first, and how to keep them thriving long-term.
Table Of Contents
- Key Takeaways
- Pick Your Herb Garden Spot
- Choose Easy Beginner Herbs
- Select Pots, Beds, or Planters
- Prepare Healthy Herb Garden Soil
- Plant Herbs Step by Step
- Care for Herbs Weekly
- Harvest Fresh Herbs Correctly
- Frequently Asked Questions (FAQs)
- What herbs should never be planted together?
- How do you start an herb garden for beginners?
- What are the easiest herbs to grow for beginners?
- What is the mother of all herbs?
- What are the easiest herbs to grow in the garden?
- Which herbs should not be planted together?
- What are the best herbs for beginners?
- How do I start a herb garden?
- Can you grow herbs from a garden?
- Are herbs easy to grow?
- Conclusion
Key Takeaways
- Sunlight is the make-or-break factor—most herbs need six or more hours daily, so place your garden in a south-facing spot before you plant a single seed.
- Start with forgiving, fast-growing herbs like basil, chives, or mint, since they bounce back from beginner mistakes and reward you with a harvest within weeks.
- Every container must have drainage holes and well-draining soil, because waterlogged roots kill herbs faster than almost any other mistake you can make.
- Harvest regularly by cutting just above a leaf node and never taking more than a third of the plant at once—this keeps your herbs bushy, productive, and coming back all season.
Pick Your Herb Garden Spot

Where you put your herb garden matters more than most beginners expect. Light, airflow, and your local climate all play a role in whether your plants thrive or struggle. Here’s what to evaluate before you pick your spot.
Once you’ve nailed your location, a seasonal herb gardening calendar helps you time each plant’s growth to your local conditions.
Sunlight Needs by Herb
Sunlight is the single biggest factor in how well your herbs grow. Full sun herbs like basil, oregano, thyme, and rosemary need at least six hours of direct sunlight daily.
Parsley and chives do fine with four to six. Morning sun with afternoon shade protects tender varieties from heat stress, keeping leaves flavorful and growth steady.
Additionally, group herbs by preference to guarantee they thrive.
Indoor Window Options
Once you know your herbs’ light needs, your windows become your most powerful growing tool. A south-facing window is the ideal choice for a windowsill herb garden — it delivers the longest daily sun exposure for basil and oregano.
- Light shelves bounce daylight deeper into the room
- Reflective film amplifies intensity on the sill
- Casement windows open fully for fresh air circulation
Thermal curtains pulled back during the day help regulate temperature swings, while skylight inserts add bonus light without structural changes.
Outdoor Patio Placement
Moving your herb garden outside opens up a whole new level of growing potential. A south or southwest-facing patio catches the longest daylight hours — ideal for sun-hungry herbs like basil and oregano. Before you set anything down, spend a full day watching how the sun moves across your space.nn| Placement Factor | What to evaluate |n|—|—|n| Sunlight orientation | South-facing spots optimize daily light exposure |n| Kitchen proximity | Stay within 10–20 feet for easy harvest access |n| Drainage solutions | Slight slope away from house prevents waterlogging |n| Privacy screens | Fences or tall planters block wind and neighbors |nnPosition your patio or balcony herb garden close to the kitchen — you’ll actually use those herbs when they’re steps away, not a trek across the yard. Make sure your containers sit on a surface with a slight slope so water drains cleanly away. View framing matters too; a few well-placed pots along a fence line can turn a bare wall into something worth looking at. Use well-draining soil in every container, and you’re already ahead of most beginners.
Shade-Tolerant Herb Choices
Not every spot gets full sun — and that’s actually fine. Shade-tolerant herbs like mint, parsley, chives, and cilantro thrive with just 4 to 6 hours of light. Parsley even tightens its leaf clusters in cooler, shadier corners.
Keep soil evenly moist and well-drained, and these herbs will reward you reliably without needing a prime sunny spot.
Climate Considerations
Climate shapes your herb garden more than most beginners expect. Most culinary herbs thrive in 60 to 75°F, with 40–60% humidity keeping leaves crisp and fungal problems at bay.
Watch for these three conditions that can quietly derail your garden:
- Frost risk — bring containers indoors or use cloches on cold nights.
- Wind exposure — shield small pots to prevent roots drying out fast.
- Seasonal light shifts — adjust placement or add grow lights as days shorten.
Choose Easy Beginner Herbs

Starting with the right herbs makes all the difference between a garden that thrives and one that frustrates you by August. Some herbs are just naturally forgiving — they grow fast, bounce back from mistakes, and actually taste better the more you use them. Here are five that belong in every beginner’s first garden.
Basil for Fresh Meals
Basil is the go-to herb for beginners who want instant kitchen results. It grows fast, thrives in a sunny container, and rewards you with fragrant leaves for salads, pastas, and sauces.
That bright, peppery flavor with floral notes? It comes alive when you crush the leaves fresh. Add them last to your dish to keep those essential oils intact.
Chives for Quick Harvests
Chives are probably the fastest payoff you’ll get from a beginner herb garden. Snip leaves just above the soil line, and new growth returns within days. In warm conditions, you’re looking at harvestable greens within 3 to 4 weeks of planting.
Grow them in a container with well-drained soil around pH 6.5, and they’ll stay compact and productive all season long.
Parsley for Partial Shade
Parsley is one of those herbs that actually does better with a little shade. Give it 4 to 6 hours of morning sun, then let afternoon shade protect it from wilting. In a container near an east-facing window or a shaded patio corner, it stays productive all season.
Keep soil consistently moist, harvest frequently, and it’ll keep rewarding you.
Mint in Separate Pots
Mint is a runner — it will take over your whole garden if you let it. Keep mint in separate pots to stop those roots from crowding out everything else.
Here’s your beginner setup:
- Use 10–12 inch diameter containers
- Pick terracotta for moisture control
- Water when the top inch feels dry
- Separate different mint varieties
Oregano and Thyme
Two herbs you’ll never regret planting are oregano and thyme. Both thrive in a sunny location with well-drained soil and need minimal fuss.
Oregano’s carvacrol antimicrobial power makes it a surprisingly potent herb — not just for flavor, but for your health.
Thyme brings a warm, earthy depth to roasted dishes, and its rosmarinic acid benefits support your immune system quietly in the background.
Select Pots, Beds, or Planters
Where you grow your herbs matters just as much as what you grow. The right container or bed can mean the difference between a thriving harvest and a frustrating season. Here are a few solid options to help you figure out what works best for your space.
Container Garden Benefits
Growing herbs in containers puts you in complete control. Portable Garden Flexibility means you can chase sunlight across a balcony or pull pots indoors when frost hits, keeping your harvest going year-round.
Containers also deliver Targeted Water Delivery straight to the roots, cutting waste. Fresh soil in each pot means fewer pests, fewer diseases, and a cleaner start for beginners.
Raised Bed Herb Gardens
Raised beds take container gardening further. A well-built raised bed herb garden gives your herbs deeper root space, warmer soil in spring, and excellent drainage — all in one tidy setup.
Build yours from untreated cedar or redwood for lasting durability, fill it with a mix of topsoil, compost, and perlite, and group herbs by water needs for simple care.
Small Space Herb Ideas
You don’t need a yard to grow a serious herb garden. Small space gardening opens up more options than most beginners expect.
- Vertical herb towers stack five to seven pockets on a single wall
- Balcony rail planters turn unused railing into three to four rows of herbs
- Self-watering containers keep moisture steady with less effort
- Magnetic herb pots free up counter space entirely
Drainage Hole Requirements
Every pot in your herb garden needs drainage holes — no exceptions. Without them, water pools at the roots and rot sets in fast.
For plastic planters, aim for holes between 1/4 and 1/2 inch wide. Larger pots up to 18 inches wide do best with 3 to 5 evenly spaced holes across the base.
| Pot Size | Hole Count | Hole Size |
|---|---|---|
| Small (under 8 in) | 1–2 holes | 1/4 inch |
| Medium (8–14 in) | 2–3 holes | 1/4–1/2 inch |
| Large (14–18 in) | 3–5 holes | 1/2 inch |
| Ceramic/Terracotta | 1–2 (pre-soaked) | 1/4 inch |
Space holes evenly — clustering them causes uneven moisture and soil washout. Always add a gravel layer at the bottom and cover holes with mesh to keep well-draining soil in place. Check holes periodically for root or mineral buildup.
Galvanized Metal Herb Planter
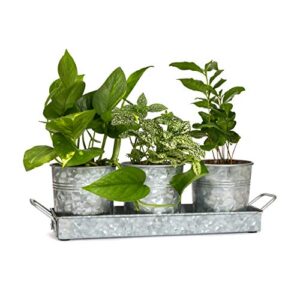
Galvanized metal herb planters are one of the smartest picks for beginners. The weather-resistant steel withstands outdoor heat, humidity, and rain without warping or rusting quickly. A standard set includes small pots — about 4 inches wide and tall — nestled in a 15.6-inch tray with handholds, making it easy to move from windowsill to patio.
One heads-up: check that every pot has a drainage hole. Some middle pots in these sets don’t, which puts your herbs at risk.
- Galvanized steel holds up to rain, heat, and humidity without rusting quickly
- The integrated tray with handles makes it easy to move the whole set in one go
- Light enough (just over a pound) to sit comfortably on a windowsill or shelf
- Some middle pots may be missing a drainage hole, which can lead to root rot
- The tray can leak in certain units, so put a towel or mat underneath just in case
- Handles aren’t built for heavy-duty use, so treat them gently
Prepare Healthy Herb Garden Soil

Good soil is the foundation every herb garden is built on. Get it right from the start, and your plants will have everything they need to thrive. Here’s what goes into a mix that actually works.
Best Soil Texture
Soil texture is the silent make-or-break factor in herb growing. Loam balanced texture is your best starting point — it drains well, holds just enough moisture, and nurtures almost every herb from basil to thyme.
If you’re growing in pots, container-friendly texture like sandy loam keeps roots happy without waterlogging. Avoid heavy clay unless you amend it heavily first.
Compost for Nutrients
Adding compost is one of the smartest moves you can make for your herb garden. Think of it as slow, steady nourishment — not a quick jolt, but a sustained nutrient release that feeds your plants over weeks.
Here’s what compost quietly does for you:
- Supplies nitrogen, potassium, and phosphorus in organic forms your herbs actually absorb
- Boosts microbial activity, helping roots access nutrients more efficiently
- Buffers soil pH naturally, keeping most herbs in their happy range
- Improves soil structure without risking nutrient burn
Sand or Perlite Drainage
Poor drainage is the silent killer of most herb gardens. When water sits too long around roots, you’re not just risking rot — you’re suffocating the plant.
That’s where sand or perlite earns its place in the mix. Both improve water flow, but perlite wins in containers since it stays light, resists compaction, and keeps air moving around roots without waterlogging your herbs.
Ideal Herb Soil PH
Think of pH as your soil’s mood — and most herbs like it somewhere in the middle. A pH between 6.0 and 7.0 keeps nutrients available and roots happy. Basil, chives, and parsley all fall comfortably in this range. Mint tolerates slightly higher, up to 7.5.
A simple pH testing kit from any garden center tells you exactly where you stand.
Worm Castings Fertilizer
Worm castings are one of the best-kept secrets in organic potting mix preparation. They deliver slow nutrient release rate — no burn, no spike, just steady plant nutrition your herbs can actually use.
Here’s what they bring to your soil:
- Soil aeration benefits — castings loosen compaction, letting roots breathe
- Water retention capacity — they hold moisture longer, reducing how often you water
- Microbial colonization — beneficial microbes move in and keep nutrients cycling
Mix a few handfuls into your beds as a soil amendment before planting.
Plant Herbs Step by Step
Getting your herbs in the ground is where the real fun starts. A few simple steps make all the difference between a garden that struggles and one that takes off. Here’s what to do from the moment you open that seed packet or bring home a starter plant.
Seeds Versus Starter Plants

Seeds give you genetic diversity and access to rare cultivars, but starter plants win on speed. A nursery start can go from pot to plate within weeks.
Growing herbs from seed takes 7 to 14 days just to germinate — and basil only hits 80 to 90 percent germination under ideal conditions. For beginner gardeners, starter plants mean fewer early failures.
Proper Plant Spacing

Once your starter plants are ready, spacing them right makes all the difference. Basil needs 12 to 18 inches between plants so it can spread without overlap. Compact herbs like chives do fine at 6 to 12 inches.
In containers, keep smaller herbs 4 to 6 inches apart, and always give mint its own pot — it’ll take over anything nearby.
Planting Depth Basics

Depth matters more than most beginners expect. Basil seeds go just 1/8 to 1/4 inch deep — barely covered. Chives, oregano, and thyme sit around 1/4 to 1/2 inch down.
For transplants, set the root ball level with the soil surface. Planting too deep invites collar rot. In containers or raised beds with well-draining potting soil, water right after planting to settle everything snugly around the roots.
Label Each Herb

Once everything is in the ground, label each herb right away — before you forget what went where. Use a weatherproof tag that shows the common name, Latin name, and the part you’ll harvest, like leaves or flowers. Add a harvest date too.
It keeps you organized and takes the guesswork out of your herb garden as it grows.
Water After Planting

Right after planting, water immediately and thoroughly — this settles the soil around the roots and closes any air pockets. Moisten the top 6 to 8 inches without creating runoff.
For containers, check that drainage holes are clear so excess water escapes freely, preventing root rot. Then water again each morning, keeping soil feeling like a damp sponge throughout that first week.
Care for Herbs Weekly

Once your herbs are in the ground, the real rhythm begins. A few simple habits each week make the difference between a struggling plant and one that actually thrives. Here’s what to keep up with regularly.
Watering Without Overwatering
Overwatering is the most common herb killer — and it’s easy to avoid once you know what to watch for.
- Deep Watering Schedule: water slowly until it drains from the drainage holes, then wait
- Moisture Meter Use: insert a finger 2 inches into soil — water only when it feels dry
- Bottom Watering Technique: set pots in a shallow dish for 10–30 minutes
- Seasonal Watering Adjustments: water more in summer heat, less during cool, cloudy stretches
Good well-draining soil with perlite keeps roots breathing. Your watering needs shift with the seasons, so stay flexible.
Feeding Every Few Weeks
Herbs don’t need heavy feeding — but they do need consistency. A diluted liquid fertilizer applied every two to four weeks keeps growth steady without overwhelming tender roots. For a lower-maintenance approach, slow-release granules like Osmocote break down over six to nine months, quietly feeding your plants as soil temperature and moisture do the work.
| Fertilizer Type | Feeding Frequency | Key Benefit |
|---|---|---|
| Liquid fertilizer | Every 2–4 weeks | Fast nutrient delivery |
| Slow-release granules | Once per season | Low-maintenance soil health |
| Compost topdress | Monthly | Promotes organic gardening |
Always water well after applying to move nutrients into the root zone. Keep your soil pH between 6.0 and 7.0 — that sweet spot is where herbs absorb nutrients most efficiently. Skip feeding on saturated soil to avoid root stress.
Pinching for Bushy Growth
Think of pinching as a reset button for your herb garden. When stems hit 4 to 6 inches tall, snip just above a leaf node using clean scissors or your fingers. This redirects energy into side shoots, giving you a fuller, bushier plant instead of one tall, leggy stem.
- Pinch basil every 2 to 4 weeks during active growth
- Cut above a leaf pair — never at the node itself
- Sanitize your tools between plants to stop disease spread
For fast-growing herbs, this simple habit accelerates new leaf growth and keeps your harvest coming strong all season.
Preventing Pests Naturally
Your herbs don’t need harsh chemicals to stay pest-free — nature already has a plan.
Strategic companion planting is your first line of defense. Rosemary, lavender, mint, and thyme naturally repel insects, so tuck them near more vulnerable herbs like basil. Nearby dill and chamomile pull in ladybugs and lacewings — natural aphid hunters that do your pest control for free.
| Natural Pest Defense | What It Does |
|---|---|
| Neem oil spray | Controls aphids and spider mites organically |
| Diatomaceous earth | Creates a barrier against soft-bodied pests |
| Fine mesh row covers | Blocks moths and beetles physically |
| Morning watering | Keeps foliage dry, discouraging fungal pests |
| Yearly crop rotation | Disrupts pest cycles in the soil |
Mulch around your containers too. Organic mulch stabilizes soil temperature and reduces the moisture swings that attract pests. Replacing it annually prevents fungal buildup.
For active infestations, a diluted neem oil or organic soap spray eliminates aphids quickly without harming beneficial insects. Catch problems early — scout your plants weekly, and remove damaged leaves immediately.
Fixing Yellow Leaves
Yellow leaves are your herb garden’s distress signal — don’t ignore them.
The fix depends on the cause. Soggy soil and poor drainage usually mean root rot; cut back watering and let the top two inches dry out first. Too little light causes downward yellowing, so move the pot closer to a south-facing window. Pale leaves with green veins often point to an iron or nutrient deficiency — a dose of diluted organic fertilizer usually turns things around fast.
Harvest Fresh Herbs Correctly

Knowing when and how to harvest makes all the difference between a thriving herb garden and one that fizzles out fast. A few simple techniques will keep your plants producing all season long. Here’s what you need to know to harvest like a pro.
Cut Above Leaf Nodes
Where you make the cut matters more than most beginners realize. Always snip just above a leaf node — that small joint where leaves meet the stem. This wakes up the dormant bud sitting there, triggering new shoots within 7 to 10 days. Use sharp, sterilized shears to keep cuts clean and disease-free.
Here’s what proper node pruning does for your herb garden:
- Triggers lateral branching — new stems sprout from the node point
- Prevents woody stubs that don’t produce fresh growth
- Maintains compact shape and stops leggy, unruly stems
- Speeds up regrowth — perennials recover in 1 to 2 weeks
- Increases yield across the entire growing season
Make your cut at a slight angle, just above the node — never through it.
Follow One-Third Rule
One cut isn’t enough on its own — how much you take matters just as much. The one-third rule is simple: never harvest more than a third of any herb at once.
Pull too much, and the plant can’t recover fast enough. Leave two-thirds behind, and you’ll have fresh herbs coming back week after week.
Remove Flowers Early
When you keep taking leaves but ignore the flowers, your herbs start working against you. Remove flowers early — as soon as you spot those buds forming.
This is especially true for basil. Once basil flowers, leaf production slows and flavor fades fast. Simply pinch blooms above the first leaf pair, and the plant refocuses its energy on fresh, fragrant growth.
Harvest Morning Leaves
Timing your harvest makes a real difference. Morning harvest timing — after dew dries but before midday heat sets in — captures the highest essential oil concentration in your herbs. Basil gets more peppery, mint more intense, oregano brighter.
- Harvest between 7 and 10 a.m. for peak flavor
- Dew drying benefits your leaves by reducing surface moisture before cutting
- Fresh morning cuts encourage rapid regrowth after cutting
Use Herbs Garden-To-Table
Snip your herbs and head straight to the kitchen — that’s the whole point of a kitchen garden. Fresh herbs hit differently when they go from plant to plate within the hour. Basil into pasta, chives over eggs, mint into a yogurt dressing. No travel time, no wilting, no flavor lost.
The best herb garden ends at your kitchen door, where fresh basil, mint, and chives go from plant to plate in minutes
Frequently Asked Questions (FAQs)
What herbs should never be planted together?
Some herbs are basically drama queens when neighbors get too close. Mint and basil clash badly — mint’s aggressive roots crowd basil out. Keep fennel isolated; it chemically inhibits nearly everything nearby.
How do you start an herb garden for beginners?
Start with a sunny spot, good soil, and a few easy herbs like basil, chives, or mint. Plant in containers with well-draining soil, water consistently, and harvest regularly.
What are the easiest herbs to grow for beginners?
Basil, mint, and chives are the easiest herbs for beginners. They grow fast, forgive mistakes, and thrive in pots. Rosemary and oregano are nearly indestructible — perfect if you’re just starting out.
What is the mother of all herbs?
Plectranthus amboinicus — better known as Indian Borage or Cuban Oregano — holds the title. Its bold, oregano-like flavor and natural medicinal properties make it one of the most flexible herbs you can grow.
What are the easiest herbs to grow in the garden?
Mint, thyme, and basil grow fast, forgive beginner mistakes, and need minimal fuss. These hardy picks thrive in simple soil, tolerate irregular watering, and reward you with a generous harvest all season.
Which herbs should not be planted together?
Some herbs are natural troublemakers when grown side by side. Mint and basil clash over moisture and space. Fennel releases compounds that stunt neighbors. Keep dill away from parsley.
What are the best herbs for beginners?
Chances are, the herbs you cook with most are the easiest to grow. Basil, parsley, chives, mint, oregano, and thyme are ideal for beginners — fast-growing, low-maintenance, and endlessly useful in the kitchen.
How do I start a herb garden?
Pick a spot that gets at least 6 hours of sunlight, grab a pot with drainage holes, fill it with well-draining soil, and plant one beginner herb like basil or chives.
Can you grow herbs from a garden?
Yes, you can absolutely grow herbs from a garden. Whether outdoors or on a windowsill, most culinary herbs thrive with decent sunlight, well-drained soil, and consistent watering.
Are herbs easy to grow?
Most herbs are forgiving. Basil, chives, and thyme grow well even with minimal experience. Give them sun, decent soil, and regular water — and they’ll reward you fast.
Conclusion
What starts as a single pot of basil has a way of turning into something much bigger—more pots, more flavors, more confidence in the kitchen.
An easy herb garden for beginners isn’t just about saving money or skipping the grocery store. It’s about learning to grow something alive and genuinely useful with your own hands.
Once you taste the difference, you won’t go back. The garden always gives back more than you put in.
- https://www.learningwithexperts.com/blogs/articles/my-top-ten-herbs-to-grow-in-pots-and-on-the-windowsill
- https://tagawagardens.com/blog/grow-your-own-herb-garden-in-containers
- https://savvygardening.com/best-herbs-for-container-gardening
- https://www.daviddomoney.com/how-to-grow-a-beginners-herb-garden
- https://hennepinmastergardeners.org/container-gardening-tickle-your-senses-with-herbs