This site is supported by our readers. We may earn a commission, at no cost to you, if you purchase through links.

Most people treat spring like a reset button — yank out the dead stuff, throw in some new plants, and hope for the best. A few weeks later, the garden looks roughly the same as it did before.
A real garden makeover for spring starts before you touch a single shovel. It starts with understanding what your outdoor space actually needs — where the light falls, which soil is compacted and lifeless, and where your eye lands (and doesn’t) when you look out the window.
Get those foundations right, and everything else — the plants, the paths, the raised beds — clicks into place with far less effort than you’d expect.
Table Of Contents
- Key Takeaways
- Assess Your Spring Garden Goals
- Refresh Soil and Garden Beds
- Choose Spring Plants Wisely
- Add Edible Garden Features
- Finish With Smart Garden Upgrades
- Frequently Asked Questions (FAQs)
- What is the 70 30 rule for gardening?
- What to add to a garden in spring?
- What is the 3-hour gardening rule?
- What to plant in October for spring flowers?
- What are some DIY garden makeover ideas?
- How do you make a Spring Garden more creative?
- How do you plan a Spring Garden?
- What is a Spring Gardening checklist?
- How do you make a garden look better?
- How do you make a garden look good all year long?
- Conclusion
Key Takeaways
- Before touching a single tool, walk your garden and read what it’s already telling you — where light falls, where soil compacts, and where your eye never quite lands.
- Soil is the real foundation: a mix of compost, topsoil, and perlite, topped with 2–3 inches of mulch, does more for your plants than any specific variety ever could.
- Layer your planting strategy — quick annuals for fast color, perennials for lasting structure, and native wildflowers to keep pollinators coming back season after season.
- Smart upgrades like drip irrigation, clean edging, and vertical supports aren’t finishing touches — they’re what makes a garden low-effort to maintain and genuinely beautiful year-round.
Assess Your Spring Garden Goals

Before anything gets planted or purchased, it pays to slow down and take a good look at what you’re actually working with. Your garden is already telling you what it needs — you just have to walk it with fresh eyes. Here’s where to start.
For deeper guidance on reading your landscape before the cold sets in, these winter permaculture gardening tips can help you spot what your soil, light, and drainage are quietly communicating.
Walk The Garden First
Step outside before you plan a single thing. A slow 360-degree visual survey tells you more than any sketch ever could.
This practice can serve as a tool for personal growth and reflection as you connect with your environment.
Notice:
- Where morning light pools and fades by noon
- Any uneven terrain or hidden dips along your path
- Which areas look tired versus thriving
Your outdoor space is already telling you what it needs — just listen.
Note Bare or Crowded Areas
Once you’ve done your walkthrough, slow down where things look off. Bare patches lose moisture fast and invite weeds, so cover exposed soil with mulch until you’re ready to plant.
Crowded spots are just as telling — poor airflow between stems sets up fungal disease. Aim for 6 to 12 inches of breathing room, and pull anything weak or leggy without hesitation.
Choose Food, Flowers, or Both
Now comes the fun part — deciding what your garden actually does for you.
A kitchen garden keeps herbs and greens steps from your door. A flower-focused bed feeds pollinators and your eyes. You don’t have to choose, though. Edible landscaping blends nasturtiums alongside kale, making beds both beautiful and useful. Knowing your priority now shapes every planting decision ahead.
Plan Before-and-after Improvements
With your priorities clear, document where you’re starting from — sun exposure, drainage patterns, and existing gaps.
Define success criteria like plant survival rate or reduced watering time. Set phased project milestones so progress feels measurable, not overwhelming.
Three things worth capturing now:
- Current soil health
- Problem zones needing drainage fixes
- Target bloom periods
That record becomes your garden installation roadmap.
Set a Realistic Budget
Money has a way of disappearing fast once you’re excited about a garden makeover. Before buying a single plant, sketch out your total spending limit and divide it roughly — 30 to 40 percent toward soil and bed prep, 20 to 30 percent for quick-color annuals, and a 5 to 15 percent contingency for surprises.
Track actual spend weekly so small overruns don’t quietly snowball.
Refresh Soil and Garden Beds
Good soil is where every successful garden makeover actually begins. Before you start planting anything, you’ll want to get your beds into shape so your plants have the best possible foundation. Here’s what to tackle first.
Once your beds are ready, mapping out a raised bed companion planting plan helps you make the most of every inch while keeping plants healthy and productive.
Clear Winter Debris

Winter leaves a mess worth dealing with before anything else. Fallen branches, leaf litter, and storm debris smother young shoots and harbour disease-causing pathogens if left in place.
Clear beds in this order:
- Remove large storm branches first
- Rake out dense leaf layers
- Pull leftover stems from last season
- Bag diseased material; compost the rest
Exposed soil warms faster, giving spring plants a real head start.
Improve Soil With Compost

Good soil is the engine behind everything that grows. Work in a mix of 40% compost, 40% topsoil, and 20% perlite to open up dense ground and give roots room to breathe.
Compost doesn’t just feed plants — it feeds the microbes that feed the plants. That microbial activity slowly unlocks nitrogen, phosphorus, and potassium, while helping soil hold moisture longer between waterings.
Compost feeds more than plants — it fuels the microbes that unlock nutrients and lock in moisture
Build Raised Garden Beds
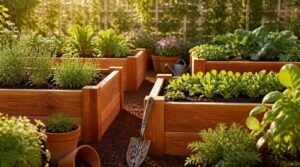
Raised garden beds give you something ground-level planting rarely does — complete control. Cedar and redwood are the go-to materials for rot resistance, while galvanized steel holds up with almost no upkeep.
Keep beds no wider than four feet so you can reach the center without stepping in. Fill them with a topsoil, compost, and aged manure mix, and you’re set.
Add Clean Bed Edging

Edging is what separates a tidy garden from one that just looks busy. A sharp spade or half-moon edger cuts a clean 3 to 4-inch trench along any bed, and that alone transforms the look instantly.
For lasting definition, metal or steel edging holds curves and straight runs without shifting after rain, keeping mulch where it belongs.
Mulch for Moisture Control
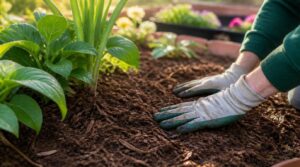
Spread 2 to 3 inches of shredded hardwood mulch across your beds and you’ve done more than tidy things up — you’ve cut evaporation losses by up to 35 percent and kept roots cooler through summer heat waves.
As it breaks down, organic mulch feeds the soil beneath, slowly building the kind of rich, moisture-holding earth that makes everything grow better.
Choose Spring Plants Wisely

Getting your plant selection right is honestly where a spring makeover starts to feel real. The wrong choices can leave your beds looking flat by June, while the right ones carry color and life from the first warm week all the way through fall. Here’s what to put in the ground.
Plant Quick-color Annuals
Zinnias and marigolds are your fastest allies — both hit full color in 6 to 10 weeks from seed. Tuck them into bare spots and they’ll carry the garden while slower plants settle in.
For containers, layer by height: trailing petunias up front, mid-height cosmos in the middle. Stick to two or three complementary colors so the display feels intentional, not chaotic.
Add Long-blooming Perennials
Annuals set the stage, but perennials own it season after season. Pick five to seven varieties with staggered bloom times — black-eyed Susans, daylilies, and coneflowers carry color from early summer well into fall.
For shadier corners, try astilbe or heuchera. Deadhead spent blooms regularly and divide clumps every few years to keep them vigorous.
Include Pollinator-friendly Flowers
Perennials give you the structure, but pollinator-friendly flowers bring the garden to life. Zinnias and cosmos deliver nectar all season, while native black-eyed Susans and coneflowers support local bees through coevolution.
- Choose open-faced blooms for easy bee and butterfly landing
- Plant in warm-colored clusters — yellow, orange, and pink draw the most activity
- Avoid pesticides to protect visiting pollinators
Mix Shrubs and Flowering Trees
Pollinators follow the flowers, but shrubs and flowering trees give your garden its bones. Think of them as the framework everything else leans on.
Evergreen shrubs hold structure through winter, while flowering trees like dogwood or redbud add height and seasonal drama. Layer them by placing taller trees behind rounded shrubs, staggering bloom times so color carries from early spring well into summer.
Tuck in Spring Wildflowers
Slip a few native wildflowers into shaded corners and watch the garden feel genuinely alive. Bloodroot, trout lily, and spring beauty emerge before the tree canopy fills in, catching early light.
They need humus-rich, moist soil — cluster them in drifts of three to seven plants to draw pollinators. Their bloom is brief, but the pulse of life they trigger isn’t.
Add Edible Garden Features
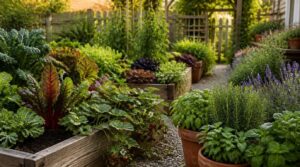
A spring makeover isn’t complete until something edible earns its place in the mix. Growing your own food — even a little of it — changes how you relate to your garden entirely. Here are a few ways to bring that into your space this season.
Start a Kitchen Garden
A kitchen garden earns its place when it’s steps from your back door, soaking up 6 to 8 hours of daily sun.
Get the soil right first — loamy, with a pH between 6.0 and 7.0, enriched with compost:
- Clear perennial weeds before planting
- Build raised beds 12 to 18 inches tall
- Water mornings only
- Use succession planting every few weeks
- Try companion planting for natural pest control
Grow Spring Salad Greens
Scatter lettuce seed the moment soil hits 40°F — it’s that ready.
Succession sow every two weeks to keep harvests rolling rather than peaking all at once.
| Green | Days to Harvest | Flavor |
|---|---|---|
| Arugula | 30–40 | Peppery |
| Butterhead | 45–55 | Mild, crisp |
| Tatsoi | 35–45 | Mellow, earthy |
Clip outer leaves at 4 to 6 inches, and the plant regrows. Consistent moisture prevents bolting.
Plant Herbs Near Pathways
Brushing past creeping thyme or lavender on your way to the garden door is one of those small pleasures that costs almost nothing to design. Tuck them along path edges where feet and hands naturally graze.
Corsican mint, oregano, and chamomile hold up to light traffic, stay tidy with minimal pruning, and shift your whole garden’s scent profile from season to season.
Use Containers for Vegetables
A balcony or patio can feed you just as well as a full yard. Selecting container sizes matters — use 5-gallon pots or larger for tomatoes and peppers, window boxes for leafy greens.
- Fill pots with high-quality potting mix that drains without compacting
- Try self-watering systems to reduce daily watering
- Move planters regularly to get the most sunlight
- Replenish nutrients every two to four weeks
Blend Edibles With Flowers
Edible flowers aren’t just pretty — they pull double duty. Tuck nasturtiums between tomatoes for a peppery harvest and natural pest deterrence. Calendula petals brighten salads with a saffron-like hue.
Place taller blooms at the back, low edibles up front for easy snipping. Only harvest from pesticide-free beds, and use petals within a day or two for peak flavor.
Finish With Smart Garden Upgrades
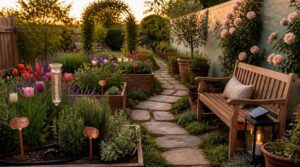
The bones of your garden are in place — now it’s time to add the upgrades that make everything work better and look more intentional. A few smart finishing touches can turn a decent garden into one that practically runs itself. Here’s what’s worth adding before the season really gets going.
Install Drip Irrigation
A drip system is the quiet workhorse your spring garden beds deserve. Run mainline tubing along bed edges, then branch to individual plants with emitters placed within six inches of each root zone.
Always install a pressure regulator and backflow preventer near the faucet. Add a timer to automate cycles, and check emitters monthly — clogs are easy to miss but quick to fix.
Create Gravel Walking Paths
Once your irrigation is humming, paths are the next thing worth getting right. A good gravel path starts with a 4 to 6 inch compacted base, geotextile fabric, and rigid edging to hold everything in place.
Pea gravel feels comfortable underfoot; crushed stone locks tighter. Slope it slightly — about 1 to 2 percent — so rain drains away cleanly. Drop in stepping stones where traction matters most.
Add Vertical Growing Supports
Paths frame the garden; upright structures claim the sky above it. A panel trellis or arch trellis turns unused air into real, productive growing space.
Train these climbers upward:
- Tomatoes — sturdy cages or rigid trellises
- Pole beans — cling readily to mesh or netting
- Cucumbers — less ground contact means less disease
- Peas — prefer lighter, flexible structures
Always install structures before planting.
Repair Bare Lawn Patches
Once the verticals are sorted, look down. Bare patches drag the whole garden back, and they’re easy to trace — pet urine, heavy foot traffic, drought stress, pests, or compaction.
| Patch Cause | Best Fix |
|---|---|
| Pet urine spots | Flush soil deeply, then reseed |
| Traffic wear | Deeply aerate 2–3 inches, overseed |
| Drought stress | Amend soil, install turf plugs |
| Pest damage | Treat first, seed after |
| Compaction | Aerate, loosen top 2–3 inches |
Loosen the seedbed, level it flush with surrounding turf, and match your existing grass variety. Water lightly but often — several times daily — until germination. Don’t mow until new blades reach 3–4 inches tall.
Use Lights and Focal Points
Lighting transforms your garden after dark. A few well-placed fixtures do more than a dozen random ones.
- Uplight a specimen tree to silhouette its canopy
- Anchor a seating area with warm white (2700K–3000K) glow
- Downlight paths from a pergola — no glare, just guidance
- Spotlight one sculpture or fountain as your outdoor focal point
- Add a smart timer so it all runs itself
Frequently Asked Questions (FAQs)
What is the 70 30 rule for gardening?
Ironically, the best gardens look natural because of careful math. The 70/30 rule splits your space into a structural backbone of durable perennials and shrubs, with 30% reserved for seasonal accent plants that rotate in fresh color.
What to add to a garden in spring?
Spring calls for seasonal color, edible garnishes like nasturtiums, and pollinator attractors such as bee balm. Tuck in spring-blooming bulbs, add vertical structures for climbers, and place a focal point to anchor it all.
What is the 3-hour gardening rule?
The 3-hour gardening rule means avoiding heavy outdoor work between 11 am and 2 pm when UV radiation peaks and heat stress risks run highest — for you and your plants.
What to plant in October for spring flowers?
Plant tulips, daffodils, and hyacinths in October, 2–3 times their height deep, spaced 4–6 inches apart. Choose early to late varieties and pair warm and cool tones for color from March through May.
What are some DIY garden makeover ideas?
A DIY garden makeover starts with a walk-through and a clear plan. Set a budget of 300–800 euros, pick your priorities — food, flowers, or both — and work section by section.
How do you make a Spring Garden more creative?
Pick a 2–3 color palette and let it lead every plant choice. Anchor the space with one bold focal point — a sculptural grass, a bright bench — then layer textures and staggered blooms around it.
How do you plan a Spring Garden?
Think of your garden like a blank canvas — before the first brushstroke, you study the light. Walk every area, note sun, shade, and drainage, then let your goals, budget, and seasonal planting vision guide the rest.
What is a Spring Gardening checklist?
A spring gardening checklist covers soil pH testing, nutrient checks, irrigation inspection, frost protection planning, and tool sharpening — giving you a clear, confident starting point before a single seed goes in the ground.
How do you make a garden look better?
Start with clean edges and a clear focal point. Color rhythm and texture contrast do the heavy lifting — repeat a bold hue across beds, vary leaf shapes, and let the eye move naturally through the space.
How do you make a garden look good all year long?
A garden that looks good in July is easy. Keeping it beautiful in February? That’s the real test. Evergreen structural silhouettes, rotating blooms, and textured foliage combinations with winter branch interest carry color and form through every season.
Conclusion
There’s a theory that garden transformations require talent, time, and endless money. It’s not true. What they require is intention.
A real garden makeover for spring begins the moment you stop guessing and start reading your space honestly — the light, the soil, the sight lines. Get the foundations right, and the rest follows naturally.
Your garden doesn’t need to be perfect. It needs to be yours, and it needs to actually work.
- https://www.mikesevergreen.com/landscaping-tips/spring-gardening-trends-in-2025/
- https://www.gardenary.com/blog/garden-trends
- https://tomlinsonbomberger.com/blog/dig-deep-2025-garden-design-trends-for-a-sustainable-modern-outdoor-space/
- https://gardeningfamily.com/home-gardening-statistics/
- https://www.sure-green.com/blog/spring-2025-the-ultimate-guide-to-sustainable-landscaping.html