This site is supported by our readers. We may earn a commission, at no cost to you, if you purchase through links.

Here’s the thing: that mess isn’t a disaster, it’s a blank canvas. Spring garden revival isn’t about flawlessness—it’s about working with what survived, ditching what didn’t, and getting your hands dirty with techniques that actually move the needle. The gap between ‘winter aftermath’ and ‘thriving plot’ is shorter than you think, once you know which levers to pull.
Table Of Contents
- Key Takeaways
- Assess Your Garden After Winter
- Clean Up and Remove Debris
- Inspect and Maintain Gardening Tools
- Prune and Shape Existing Plants
- Test and Improve Soil Quality
- Divide and Transplant Perennials
- Apply Mulch and Control Weeds
- Implement Sustainable Garden Practices
- Frequently Asked Questions (FAQs)
- Conclusion
Key Takeaways
- Spring garden revival starts with a thorough post-winter assessment—document damaged areas, bare patches, and drainage issues before touching a single plant, because this observation data becomes your strategic roadmap for every decision that follows.
- Soil testing and amendment aren’t optional steps—professional lab analysis reveals pH imbalances and nutrient deficiencies that blind guesswork misses, while properly timed compost integration and lime application can transform struggling beds into thriving ecosystems before you plant anything.
- Strategic pruning and plant division rejuvenate overgrown gardens by redirecting energy where it matters—remove diseased wood six inches below visible damage, divide root-bound perennials every three to five years, and time cuts to each species’ growth cycle to maximize blooms without sacrificing plant health.
- Sustainable practices like native plant selection, drip irrigation, and organic mulching create low-maintenance gardens that outperform conventional approaches—native species use 20-40% less water while supporting 100% more pollinators, and proper mulch application suppresses 80% of weeds naturally while enriching soil structure.
Assess Your Garden After Winter
Before you can breathe new life into your garden, you need to see what winter left behind. Walk your plot with fresh eyes, looking for what survived, what struggled, and what gave up completely.
Here’s what to check first.
Identifying Damaged and Overgrown Areas
Walk your garden with fresh eyes and a critical gaze—you’re hunting for three telltale signs of trouble: branches that didn’t make it through the cold months, shrubs that’ve staged a hostile takeover of their neighbors, and plants showing that sickly, half-hearted growth that screams "I’m struggling here."
Your yard evaluation becomes your garden renewal roadmap, so grab your phone and snap photos of overgrown shrubs blocking pathways, note plant damage from frost, and mark anything that needs pruning or outright removal during spring revival.
Noting Empty Spaces and Plant Loss
Those bare patches staring back at you aren’t just eyesores—they’re your garden telling you exactly where winter claimed its victims and where you’ve got room to shake things up with something new.
Your plant gap analysis during garden prep reveals prime real estate for spring revival—mark each empty space, assess what failed and why, then plan your space optimization strategy around lost plant assessment data that’ll guide smarter garden renewal choices for stronger plant growth and less garden maintenance headaches down the line.
Documenting Observations for Planning
Grab a notepad, fire up your phone’s camera, or sketch a quick map—because those mental notes you think you’ll remember will vanish faster than morning dew once you’re elbow-deep in compost and planting decisions.
Your garden planning gets serious when you capture:
- Microclimates with unusual frost damage patterns
- Drainage issues revealed by spring thaw
- Sun exposure shifts from bare winter trees
- Structural damage to hardscaping or bracing
- Wildlife damage zones requiring protection
These observation logs transform scattered impressions into actionable garden maintenance tips, turning your spring gardening chaos into strategic garden preparation that actually sticks.
Clean Up and Remove Debris
Once you’ve mapped out your garden’s needs, it’s time to roll up your sleeves and clear away winter’s leftovers. A thorough cleanup sets the stage for everything that comes next, from healthier soil to stronger plant growth.
Here’s how to tackle the debris and get your beds ready for their spring comeback.
Clearing Fallen Leaves and Branches
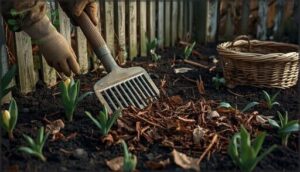
Winter’s debris doesn’t just look messy—it’s suffocating your soil and turning your beds into a breeding ground for fungal spores and overwintering pests. Grab your leaf rake and work systematically from back to front, clearing matted layers that block air circulation. For branch removal and yard cleanup, sort debris as you go—this makes debris disposal easier and keeps your garden safety game strong.
| Material | Best Disposal Method |
|---|---|
| Small leaves & twigs | Compost bin or mulch |
| Large branches | Chip or municipal pickup |
| Disease-infected debris | Bag and trash (never compost) |
| Healthy green waste | Layer for spring gardening beds |
Spring gardening starts with this foundation work, setting the stage for garden maintenance tips like pruning and weed control later.
Disposing of Dead Plants and Weeds
Pull every dead plant—roots and all—because leaving even a scrap behind invites disease to crash your spring comeback party. Bag diseased debris separately for disposal, never your compost bin. Weeds get the same treatment:
- Yank taproots completely to stop regrowth cycles
- Apply organic weed killers on stubborn patches before mulching
- Sterilize pruning shears between cuts if you’ve spotted fungal issues
- Clear debris piles where pests overwinter and breed
This weed control sets up clean beds for your garden’s transformation.
Preparing Beds for New Growth
Loosen compacted soil now—three inches deep—so roots can breathe and spring rains actually penetrate instead of pooling on the surface like a sad pond. Soil aeration powers growth enhancement before bed preparation advances. Mix compost and mulch into cleared patches—soil health depends on it.
| Bed Preparation Task | Soil Care Benefit |
|---|---|
| Fork topsoil layers | Improves drainage and root penetration |
| Blend compost 2:1 ratio | Boosts microbial activity for plant selection |
| Level beds with rake | Creates uniform planting zones for garden mapping |
| Edge borders cleanly | Prevents weed invasion after pruning |
Inspect and Maintain Gardening Tools
You can’t wrestle a garden back to life with rusty shears and dull blades—your tools need to be in fighting shape before you tackle spring revival. Think of this as arming yourself properly for the work ahead, so you’re not battling your equipment while trying to rescue overgrown beds.
Here’s how to get your arsenal ready.
Sharpening and Oiling Blades
A dull blade doesn’t just slow you down—it tears plant tissue like a blunt knife through tomato skin, leaving ragged wounds that invite disease and stress your garden before it even gets started. Here’s how to avoid those pruning mistakes and keep your edge sharp:
- Hand sharpening pruning shears with a mill file or whetstone takes five minutes and restores clean cuts
- Blade oiling after sharpening prevents rust and keeps the mechanism smooth
- Edge care means checking your tools before each major pruning session
- Tool maintenance transforms dull tools into precision instruments that heal, not harm
Replacing Broken or Rusty Tools
Rusty tools aren’t just eyesores—they’re ticking time bombs that can introduce tetanus risk, spread pathogens between plants, and crumble mid-cut when you need them most. If rust has eaten through metal or grips have split beyond repair, replacement beats frustration every time.
| Tool Type | Replace When | Priority Level |
|---|---|---|
| Pruning Shears | Blade pitted, spring broken | High—direct plant contact |
| Garden Fork | Tines bent, rust flaking | Medium—soil work only |
| Wheelbarrow | Frame cracked, wheel seized | High—gardening safety risk |
| Watering Can | Holes present, spout detached | Low—easy budget fix |
Invest in quality garden tools now, and you’ll skip the mid-season scramble when your spade snaps or your watering can springs a leak during transplanting.
Storing Tools Properly for Longevity
Toss your tools in a shed corner after spring cleanup, and you’ll be wrestling with rust, splintered grips, and seized pivot points come summer—proper storage isn’t fussy housekeeping, it’s the difference between gear that lasts decades and junk you replace every season.
Hang pruning shears and garden gloves on pegboard hooks, wipe down your wheelbarrow and watering can before stowing, and coat metal surfaces with a thin rust prevention layer—shed organization transforms tool storage tips from afterthought to ritual that pays dividends every time you reach for equipment that works.
Prune and Shape Existing Plants
Once you’ve cleared away the chaos, it’s time to give your plants a proper haircut. Pruning isn’t just about aesthetics—it’s about redirecting energy where it matters and stopping problems before they spiral. Here’s how to wield those shears with confidence and precision.
Removing Dead or Diseased Branches
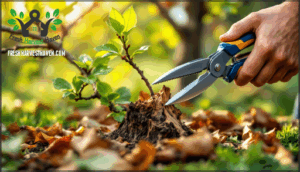
When you’re looking at lifeless limbs and branches dotted with cankers or fungal growth, you’re not just seeing damage—you’re watching disease spread through your garden like wildfire. Grab your sharpest pruners and get surgical, because deadwood management isn’t optional—it’s your first line of defense.
Smart pruning techniques start here:
- Cut 6 inches below visible disease into healthy wood
- Sterilize blades between cuts with rubbing alcohol
- Remove branches at the collar, never flush to the trunk
- Dispose of infected material away from your compost
- Prune perennials when dormant to minimize stress
Make clean cuts at 45-degree angles, and don’t second-guess removing suspicious growth—pruning mistakes happen when you’re too cautious, not too bold.
Pruning Overgrown Shrubs
Overgrown shrubs that are swallowing your garden paths or blocking every ray of sun from reaching your understory plants need more than just a trim—they need a serious haircut.
Use sharp pruning shears and hedge trimming tools to cut back one-third of the total mass, targeting oldest stems at the base first. This plant reshaping approach forces vigorous renewal growth without shocking the root system—skip this step, and you’re making one of the biggest pruning mistakes in shrub care.
Timing Pruning for Optimal Growth
Knowing how to prune matters just as much as when you do it—cut at the wrong time, and you’ll sacrifice an entire season of blooms or trigger weak, frost-vulnerable growth. Match your pruning schedules to growth cycles:
- Spring-blooming perennials: Prune immediately after flowering ends
- Summer bloomers: Trim in late winter before buds swell
- Evergreens: Shape during dormancy for plant hardiness
- Frost-tender shrubs: Wait until danger passes in your zone
- Dead wood: Remove anytime with sharp pruning shears
Seasonal trimming respects each plant’s biological clock—prune timing determines whether you’re working with nature or against it.
Test and Improve Soil Quality
You can’t build a thriving garden on guesswork—your soil needs to be dialed in before you plant anything. Testing reveals what’s missing, what’s off-balance, and what needs a fix to support vigorous growth.
Here’s how to get your soil in fighting shape for spring.
Conducting Soil PH and Nutrient Tests
Soil testing is your garden’s truth serum—skip it, and you’re flying blind. Pull samples from 6–8 spots in your beds, dig down 4–6 inches, mix them together, then send the composite off for lab analysis. Professional testing reveals pH levels, major nutrients like nitrogen, phosphorus, and potassium, plus micronutrients that DIY kits often miss.
| Soil Condition | What It Means |
|---|---|
| pH 6.1–7.0 | Ideal range for nutrient uptake and soil fertility |
| pH below 5.0 | Too acidic—nutrients locked up, compost won’t help much |
| pH above 7.0 | Alkaline soil blocks iron and phosphorus |
| Low P or K | Nearly half of U.S. soils test deficient—your plants are starving |
| Organic matter Native plants slash your water use by 20–40%, thrive without fussing, and turn your yard into a pollinator paradise that practically runs itself |
Local species benefits extend beyond ecological balance: you’re creating regional biodiversity that feeds 96% of terrestrial birds through native insects. These adapted gardening champions are plant selection strategies that actually work with nature, not against it, turning sustainable gardening from a chore into pure rebellion against cookie-cutter lawns.
By incorporating native plant species into your garden, you can markedly improve the local ecosystem and promote biodiversity.
Opting for Disease-Resistant Varieties
Disease-resistant varieties aren’t just a nice-to-have—they’re your front-line defense against the fungal invasions, bacterial blights, and viral wilts that can torch a season’s worth of work in two weeks flat.
Modern plant breeding has produced hybrids that shrug off powdery mildew, late blight, and rust—giving you disease prevention without constant chemical pest management.
Pair resistant cultivars with crop rotation, and you’ve built sustainable gardening armor that keeps plant health rock-solid all season.
Incorporating Perennials and Annuals
Mixing perennials with annuals gives you the best of both worlds—reliable backbone plants that return year after year, plus seasonal color bombs you can swap out when the mood strikes.
Plant layering creates garden texture—stack tall perennials behind low-growing annuals for depth. Coordinate color schemes through spring bloom times, then refresh with annuals as seasons shift.
Mulching and proper perennial care keep plant health bulletproof, while smart annual selection lets you experiment without long-term commitment.
Divide and Transplant Perennials
Perennials don’t just sit still—they grow, spread, and sometimes crowd each other out. Dividing them gives you more plants, healthier roots, and a garden that doesn’t look like it’s staging a turf war.
Here’s how to split and move them without losing your nerve or your blooms.
When and Why to Divide Perennials
Perennials signal their need for division in two unmistakable ways—crowded centers that stop blooming and sprawling clumps that flop over like exhausted marathon runners.
Spring perennial care becomes essential when you spot these signs, usually every three to five years depending on species.
Dividing perennials isn’t just garden renewal—it’s liberation for root-bound plants suffocating in their own success, multiplying your stock while restoring vigorous growth and abundant blooms.
Step-by-Step Division Techniques
Armed with that knowledge, it’s time to get your hands dirty—literally—and slice through those root-bound clumps with the confidence of a surgeon and the precision of a horticulturist who’s done this a hundred times before.
- Water plants 24 hours before dividing perennials to guarantee soil readiness and minimize root separation shock
- Lift entire clumps with a spading fork, preserving maximum root mass for successful spring perennial care
- Cut through crowns using sharp blades or knives, creating divisions with 3–5 healthy shoots each
- Replant immediately after plant segmentation, keeping roots moist during the division timing window
Tips for Successful Transplanting
Once those divisions are back in the ground, you’ll want to give them every advantage—because moving a plant is stressful, and how you manage the first few weeks can make or break their comeback. Ease transplant shock by watering deeply right after transplanting divided perennials, then mulching to lock in moisture during soil acclimation.
Root pruning stragglers prevents competition, while plant hardening through gradual exposure strengthens resilience.
Monitor plant health daily—wilting signals trouble, but proper soil conditioning and pruning perennials keeps them thriving through dividing perennials season.
Apply Mulch and Control Weeds
Mulch isn’t just ground cover—it’s your frontline defense against weeds and your secret weapon for locking in soil moisture. Getting the mulch right means choosing materials that feed your soil while choking out competition, then laying it down thick enough to actually work.
Here’s how to mulch like you mean it and keep those weeds from staging a comeback.
Choosing The Best Mulch Types
Think of mulch as your garden’s security blanket—it protects the soil, keeps moisture locked in, and tells weeds they’re not welcome. But picking the wrong type can backfire fast. Organic mulch enriches your beds while promoting carbon sequestration, while inorganic mulch materials last longer but won’t feed your soil. Here’s your breakdown:
- Shredded bark – breaks down slowly, excellent weed suppression
- Wood chips – affordable, prevents soil erosion effectively
- Straw – lightweight, ideal for veggie gardens
- Compost – double-duty nutrition and mulching
- Pine needles – acidic-loving plants thrive underneath
Proper Mulching Techniques
Dumping mulch on your beds won’t cut it—you need to apply it with the precision of a horticulturist who actually wants their plants to thrive, not suffocate. Pull weeds first, then lay organic mulch 2–3 inches deep, keeping it away from stems to prevent rot.
This regulates soil temperature, acts as a natural weed barrier, and boosts carbon sequestration while your perennials establish strong roots.
Effective Weed Removal Strategies
Weeds don’t play fair, so neither should you—grab them at the root when soil’s moist, yank hard, and don’t give them a second chance to colonize your beds.
For aggressive invaders, slice below the crown with a sharp hori-hori knife, then layer 2–3 inches of mulch as your organic weed barrier—it starves seeds of light while feeding soil health and keeping your pruning efforts from getting buried under new growth.
Implement Sustainable Garden Practices
Reviving your garden means thinking beyond the quick fix—it’s about building a space that thrives without draining resources or your wallet. Sustainable practices keep soil rich, plants healthy, and water bills low, all while cutting down on chemicals and waste.
Here’s how to make your garden work smarter, not harder.
Using Organic Fertilizers and Mulch
Switching to organic fertilizers and mulch is like giving your soil a superfood shake that keeps on giving. These sustainable practices boost your garden’s vitality while slashing your environmental footprint—organic fertilizers can increase vegetable yields by 45% and cut nitrous oxide emissions by 70%.
- Apply compost or aged manure to raise organic matter and soil structure
- Layer 5–10 cm of organic mulch (bark, wood chips, straw) to lock in moisture and regulate temperature
- Maintain 75–90% mulch coverage to suppress 80% of weed growth naturally
- Reapply mulch every 2–3 years as it degrades and enriches the substrate
- Combine with composting to create a closed-loop system that increases carbon storage by 25%
Installing Efficient Watering Systems
An efficient watering system is your garden’s insurance policy against drought, disease, and those inevitable weeks when life gets too hectic for daily hand-watering.
Drip irrigation paired with smart timers slashes water use by 50% while keeping soil moisture exactly where roots need it—no more guesswork with the watering can.
Add rainwater harvesting to capture free irrigation, and you’ve built a bulletproof system that conserves water while your plants absolutely thrive.
Starting and Managing a Compost Bin
Your kitchen scraps aren’t trash—they’re the raw material for black gold that’ll energize your spring beds and close the loop on garden waste. Layer nitrogen-rich greens with carbon-heavy browns in a three-bin system, turn weekly to accelerate decomposition, and you’ll harvest finished compost that boosts soil organic matter by 25% while sequestering carbon right in your backyard.
- Compost materials: Alternate fruit peels, coffee grounds, and veggie scraps with dry leaves, cardboard, and straw
- Bin maintenance: Turn your pile weekly and keep it moist as a wrung-out sponge for faster breakdown
- Waste reduction: Divert 30% of household waste from landfills while creating premium soil amendment
- Soil enrichment: Apply finished compost as mulch or work it into beds for sustained nutrient release
Frequently Asked Questions (FAQs)
How do I protect spring bulbs from pests?
Picture crocuses as treasure buried just beneath the surface—hidden, but never safe from raiders. Wire mesh barriers sunk around bulbs block digging varmints like squirrels, while natural repellents such as cayenne or garlic spray deter nibbling.
Soil treatments with beneficial nematodes tackle grubs and other underground pest infestations before spring bloom.
What watering schedule works best for new plantings?
Water deeply but infrequently—about one inch per week, including rain. Check soil moisture two inches down before watering; if it’s damp, delay.
Drip irrigation beats sprinkler systems for water conservation and prevents waterlogged soil, while rainwater harvesting stretches resources further.
Should I fertilize before or after planting?
Getting it backwards is like putting the cart before the horse. Fertilize during soil preparation, before planting—it lets nutrients integrate and prevents root burn.
Post-planting fertilization works for top-dressing established plants, but spring demands proper nutrient cycling from the start.
How can I attract pollinators to my garden?
Plant native flowers, install bee hotels, and add butterfly gardens to boost biodiversity. Hummingbird feeders and pollinator-friendly perennials support sustainable gardening while enhancing plant health and garden revival naturally.
When is it safe to plant after frost?
Check your last frost dates and soil temperature—most plants need soil at 50°F or warmer.
Watch the weather forecast closely, use frost protection if needed, and prioritize plant hardiness for successful spring gardening and ideal plant health.
Conclusion
Think of your garden as a dormant volcano—not dead, just gathering energy beneath the surface. The garden revival techniques for spring you’ve deployed aren’t cosmetic fixes; they’re catalysts that release what’s already there, waiting to erupt.
You’ve cleared the rubble, fed the soil, pruned the excess. Now step back and watch something fierce take shape—not because you forced flawlessness, but because you trusted the process and your own dirt-caked hands.


