This site is supported by our readers. We may earn a commission, at no cost to you, if you purchase through links.

Most herb gardens fail not from neglect, but from a mismatch—basil planted in poor-draining soil, rosemary crowded beside moisture-hungry mint, cilantro bolting before you’ve clipped a single leaf.
Growing herbs successfully comes down to understanding what each plant actually needs, not just poking seeds into whatever patch of dirt sits closest to your back door.
The good news: once you crack that code, fresh thyme, fragrant basil, and prolific parsley practically take care of themselves.
This herb garden planting guide walks you through every stage—from choosing the right herbs for your climate and cooking style to harvesting and preserving them at peak flavor.
Table Of Contents
- Key Takeaways
- Choose Herbs for Your Garden
- Pick Herbs Based on Cooking Habits and Flavor Goals
- Match Annual, Biennial, Perennial, and Tender Perennial Herbs to Your Climate
- Choose Beginner-friendly Herbs Like Basil, Dill, Parsley, Mint, and Chives
- Separate Mediterranean Herbs From Moisture-loving Herbs for Better Growth
- Plan for Bolting-prone Herbs With Succession Sowing
- Pick The Best Garden Site
- Compare Indoor, Outdoor, Container, Raised Bed, and In-ground Herb Gardens
- Choose a Location With 6–8 Hours of Direct Sunlight
- Use Partial Shade for Cilantro and Dill When Summer Heat is Intense
- Keep The Garden Close to The Kitchen for Easy Harvesting
- Account for Wind, Heat, Humidity, and Drainage Before Planting
- Prepare Soil and Containers
- Plant Seeds, Starts, and Cuttings
- Direct Sow Fast Herbs Like Basil, Dill, Cilantro, and Parsley in Spring
- Start Most Herb Seeds Indoors 6–10 Weeks Before The Last Frost
- Transplant Seedlings After Frost When Nights Stay Above 50°F
- Set Nursery Starts at The Same Depth as Their Containers
- Root Cuttings in Water or Soil for Herbs Like Rosemary, Sage, and Mint
- Space Plants Properly So Mature Herbs Have Room to Spread
- Water, Feed, and Mulch Herbs
- Water Tender Herbs Regularly, but Let Woody Herbs Dry Slightly Between Waterings
- Avoid Soggy Soil to Prevent Root Rot and Yellowing Leaves
- Feed Herbs Lightly With Diluted Organic Liquid Fertilizer During The Growing Season
- Mulch Cold-hardy Perennials to Protect Roots and Hold Moisture
- Pinch Back Flowers and Prune Lightly to Keep Plants Leafy and Productive
- Top 3 Herb Garden Products
- Harvest, Store, and Fix Problems
- Harvest Before Flowering for The Best Flavor and Strongest Leaf Production
- Cut Stems at Leaf Nodes and Avoid Taking More Than One-third of The Plant
- Store Fresh Herbs in Water, Damp Towels, or The Refrigerator for Short-term Use
- Dry Herbs Upside Down or in a Dehydrator for Long-term Storage
- Freeze Chopped Herbs in Ice-cube Trays for Quick Cooking Use
- Watch for Aphids, Spider Mites, Poor Drainage, Low Light, and Premature Bolting
- Frequently Asked Questions (FAQs)
- What herbs should never be planted together?
- What herbs can be planted in October?
- What is the best layout for an herb garden?
- Which herbs should not be planted together?
- What time of year should I plant an herb garden?
- What herbs grow well together chart?
- Can herbs survive winter temperatures outdoors?
- How much does herb gardening typically cost?
- Which herbs grow fastest from seed?
- Do herbs need special lighting indoors?
- Conclusion
Key Takeaways
- Match herbs to their actual water and sun needs from the start — pairing drought-lovers like rosemary with thirsty mint is one of the fastest ways to lose both plants.
- Bolting herbs like cilantro and dill won’t wait for you, so sow a fresh batch every 2–3 weeks and tuck them into afternoon shade when summer heat picks up.
- Harvest just before flowering, cut no more than a third of the plant at a time, and always snip above a leaf node — your herbs will branch out fuller and keep producing longer.
- Store what you cut right away: water-glass for basil, damp towel for parsley, or freeze chopped herbs in ice cube trays for soups and sauces within 3–6 months.
Choose Herbs for Your Garden

Choosing the right herbs starts with being honest about what you actually cook and where you actually live. A few smart decisions upfront will save you a season of frustration.
Matching herbs to your local seasons makes all the difference, and these seasonal herb garden plans can help you map it out before you plant a single seed.
Here’s what to think through before you plant a single seed.
Pick Herbs Based on Cooking Habits and Flavor Goals
Before you buy a single seed packet, think about what you actually cook.
If Italian nights are your thing, basil, oregano, and thyme cover most of your flavor profile needs.
fresh summer salads? Dill and parsley are your go-to picks. Matching culinary herb flavor to cuisine-specific herbs you already use means you’ll harvest more and waste less — fresh vs dried decisions included.
Match Annual, Biennial, Perennial, and Tender Perennial Herbs to Your Climate
Your climate is the real boss here. Understanding herb life cycles — annual, biennial, perennial — helps you match plants to what your zone can actually support. succession planting extends harvest.
- Annuals (basil, cilantro): one season, frost-sensitive
- Biennials (parsley): two seasons, cold-hardy enough to overwinter
- Perennials (thyme, chives): return yearly with strong frost hardiness
- Tender perennials (rosemary, tarragon): need winter protection in colder zones
Check your herb planting calendar before committing.
Choose Beginner-friendly Herbs Like Basil, Dill, Parsley, Mint, and Chives
Once you know your climate’s limits, picking your first herbs gets a lot easier.
Basil rewards you with high aroma intensity and frequent leaf harvest. Dill offers feathery garden aesthetics and clear seed harvest timing after flowering. Parsley produces steady leaf harvest frequency through the season. Mint deters pests naturally. Chives bring both flavor and edible purple blooms. All five forgive beginner mistakes.
Separate Mediterranean Herbs From Moisture-loving Herbs for Better Growth
grouping by water needs is just as important as grouping by flavor. Mediterranean type herbs like rosemary, thyme, and sage are dry climate plants that thrive in full sun with excellent soil drainage and a soil pH adjustment toward 6.5–8.0.
Moisture-lovers like mint and basil want the opposite. smart irrigation zoning and microclimate partitioning keep both groups productive:
- Place Mediterranean herbs in raised beds for drainage zoning that prevents root rot.
- Use companion planting zones to keep thirsty herbs near your water source.
- Match soil drainage to each group’s water requirements for herbs.
- Apply mulch around Mediterranean beds to reduce evaporation in full sun.
- Separate beds allow targeted fertilization without overfeeding either group.
Plan for Bolting-prone Herbs With Succession Sowing
Bolting happens fast — one heat wave and your cilantro is flowering before you’ve used a single stem. That’s why a solid Batch Replanting Schedule matters.
Sow every two to three weeks, and use Microclimate Management to position new batches in morning sun with afternoon shade.
Watch for Bolting Indicators, like elongated stems, to guide your Yield Forecasting.
| Herb | Succession Timing | Bolting Indicators |
|---|---|---|
| Cilantro | Every 2–3 weeks | Tall stems, lacy leaves |
| Basil | Every 3 weeks | Flower buds forming |
| Dill | Every 2 weeks | Umbrella blooms appearing |
Pick The Best Garden Site

Where you grow your herbs matters just as much as what you grow. The right site sets the stage for everything from how often you water to how big your plants get.
Here are the main options to evaluate before you start planting.
Compare Indoor, Outdoor, Container, Raised Bed, and In-ground Herb Gardens
Each setup has trade-offs worth thinking through before you dig in.
Raised beds warm up faster in spring, giving you a head start through better root zone aeration and seasonal temperature control. Containers with terracotta or ceramic pots offer space efficiency and microclimate adaptation — move them as needed.
Indoor vs outdoor herb growing methods differ mainly in maintenance frequency, natural light, and soil preparation and compost use.
Choose a Location With 6–8 Hours of Direct Sunlight
Most herbs aren’t asking for much — just a sunny location that delivers six to eight hours of sunlight daily. South-facing orientation maximizes that window in the Northern Hemisphere, keeping light consistent from morning through late afternoon. Smart sunlight planning pays off fast.
- Track a sun exposure chart for several days
- Identify your microclimate ridge or elevated planting mound
- Confirm full sun by checking shadows at noon
- Use a reflective wall boost near white fences
- Mark your sunniest windowsill for container backup
Use Partial Shade for Cilantro and Dill When Summer Heat is Intense
Cilantro and dill are notorious bolters — once summer heat spikes, they race to seed almost overnight. Positioning them where they receive morning sun but benefit from afternoon shade buys you weeks of extra harvest.
A 30–50% shade cloth or a taller companion plant creates a cooler microclimate, retains soil moisture longer, and eases your watering schedule by slowing evaporation during peak heat stress.
Keep The Garden Close to The Kitchen for Easy Harvesting
The closer your kitchen garden sits to your back door, the more you’ll actually use it. Kitchen Proximity Benefits are real — studies show harvesting trips drop by nearly 50% when herbs are within 2–3 meters of your kitchen door, making a quick pruning routine feel smooth rather than a chore. Step‑Free Access turns daily cooking into an indoor‑outdoor shift you’ll look forward to.
The closer your herb garden sits to your kitchen door, the more you will actually use it
- Place a container garden directly outside the kitchen door for herb harvesting tips you can act on instantly.
- Grow a sunny windowsill collection indoors for cold months, supporting smooth seasonal herb rotation.
- Keep basil, chives, and parsley closest — you’ll reach for them daily.
- Use containers for indoor herb cultivation during winter transitions.
- Arrange pots along a well-lit path so harvesting never interrupts your cooking flow.
Account for Wind, Heat, Humidity, and Drainage Before Planting
Your site’s microclimate can make or break a herb garden before you plant a single seed. Wind pulls moisture from leaves quickly, but a well-placed windbreak — like a staggered evergreen row or low fence — cuts that loss by nearly half. Use this quick reference for Windbreak Placement, Heat-Resistant Mulch, and Humidity-Driven Spacing before you dig.
| Condition | Solution |
|---|---|
| High wind exposure | Windbreak Placement on leeward side of building |
| Summer heat stress | Heat-Resistant Mulch + reflective coverage for heat tolerance |
| High humidity | Humidity-Driven Spacing for humidity tolerant plants |
Apply Microclimate Monitoring early — note how nearby surfaces heat up throughout the day. For Drainage Bed Design, test your soil: water pooling beyond 30 minutes means you need drainage holes or soil drainage improvement with coarse sand. Matching your setup to your climate zones protects every plant from the start.
Prepare Soil and Containers

Good soil is the foundation of everything else builds on.
Before you drop a single seed or seedling into the ground, it’s worth knowing what your herbs actually need beneath the surface.
Here’s what to focus on when preparing your soil and containers.
Use Well-draining Soil With Compost for Stronger Root Growth
Think of compost as your soil’s best investment — it builds structure, feeds roots, and keeps drainage honest. Well-draining soil with the right compost ratio optimization gives roots the air and minerals they need to thrive.
Here’s what compost does for your soil:
- Root Aeration Techniques — Drainage layer design creates macropores that deliver oxygen directly to young roots
- Microbial Activity Boost — Organic matter fuels beneficial bacteria that continuously improve soil structure benefits
- Soil Drainage Improvement — A compost-enriched soil amendment prevents waterlogging without drying out too fast
Mix Topsoil, Compost, and Coarse Sand for Container Herbs
Once your compost is doing its job, the soil mix around it matters just as much. For container gardening, a reliable starting ratio is 40% topsoil, 40% compost, and 20% coarse sand. That balance manages nutrient balance and drainage together.
Bump sand proportions to 25% for Mediterranean herbs. Add perlite as an aeration additive if compaction becomes an issue, and check pH adjustment stays near 6.5–7.0.
Choose Pots at Least 6 Inches Deep, or 12 Inches for Tap-rooted Herbs
Pot depth affects more than root space — it shapes how your herbs drink, breathe, and handle heat. A 6-inch depth suits basil and chives perfectly, while tap-rooted herbs like parsley and cilantro need 12 inches to avoid circling roots and transplant stress.
Four Pot Depth Benefits worth remembering:
- Root Space Optimization — deeper soil lets roots reach down without crowding
- Temperature Buffering — more soil volume keeps roots cooler on hot days
- Material Water Retention — terracotta pots in deeper sizes hold steady moisture while supporting drainage hole design
- Drainage Hole Design — proper drainage prevents soggy potting mix and root rot
Add Extra Sand for Rosemary, Thyme, Sage, and Other Mediterranean Herbs
Once you’ve sorted depth, think about what goes inside the pot.
Mediterranean-type herbs like rosemary, thyme, and sage need well-draining soil that dries quickly between waterings.
Follow sand ratio guidelines of 20–40% coarse sand in your soil mix — never play sand.
This aeration enhancement improves root penetration benefits, gives a soil temperature boost in spring, and keeps drainage strong.
Flush containers occasionally to handle salt accumulation management.
Plant Seeds, Starts, and Cuttings
Getting your herbs in the ground — or into pots — is where the real fun begins. The method you choose depends on the herb, your timeline, and how much patience you’re working with.
Here’s what you need to know to get started the right way.
Direct Sow Fast Herbs Like Basil, Dill, Cilantro, and Parsley in Spring

Spring is prime time to direct sow basil, dill, cilantro, and parsley straight into the garden. Each herb has a sweet spot:
- Germination temperature matters — basil needs 70–85°F soil; cilantro prefers a cooler 60–75°F.
- Seed depth varies: press basil and cilantro ¼ inch down, dill and parsley ½ inch.
- Row spacing of 12–18 inches, and seedling thinning to 6–8 inches apart, keeps plants healthy.
Start Most Herb Seeds Indoors 6–10 Weeks Before The Last Frost
If you’re keen to get a head start, seed starting indoors 6–10 weeks before your last frost date gives herbs like basil, parsley, and dill a real advantage.
Use a bottom heat mat to hit the right germination temperature range, keep grow light intensity at 12–16 hours daily, and practice seed tray sanitation to avoid damping off before seedlings ever hit the soil.
Transplant Seedlings After Frost When Nights Stay Above 50°F
Once your frost date clears and nighttime warmth monitoring shows nights consistently above 50°F, you’re ready to transplant outside.
But don’t skip your hardening off schedule — move seedlings outdoors for a few hours daily over 7–10 days to prevent transplant shock.
Do a quick soil temperature check too; aim for 60°F before planting. Row cover usage buys you insurance if your hardiness zone runs unpredictable.
Set Nursery Starts at The Same Depth as Their Containers

Depth matters more than most gardeners realize. When you bring home nursery starts, match the soil level exactly to where it sat in its original pot — that’s your uniform soil depth target. Root collar positioning at or just above the surface prevents crown rot and reduces transplant shock substantially.
- Align the root collar with the new soil surface
- Avoid air pocket prevention failures by firming soil gently around roots
- Maintain labeling consistency so you track each variety’s depth during container gardening
- Water in immediately to settle soil and support seed germination-level root contact
Root Cuttings in Water or Soil for Herbs Like Rosemary, Sage, and Mint

Propagating cuttings is one of the most rewarding shortcuts in herb gardening. For rosemary and sage, Cutting Node Selection matters — snip a 3–4 inch stem just below a node, strip the lower leaves, and apply Root Hormone Use to boost success.
Mint roots faster in water, often within 7–14 days.
| Herb | Method | Timeline |
|---|---|---|
| Mint | Water | 7–14 days |
| Rosemary | Soil | 3–6 weeks |
| Sage | Soil | 3–6 weeks |
Maintain Light Temperature Balance — bright indirect light, 65–75°F — and mind your Water Change Frequency every 3–4 days to keep things fresh.
Once roots hit 1–2 inches, the Transplant Hardening Process begins: ease them into normal conditions gradually.
Herb Propagation done right saves money and multiplies your garden freely.
Space Plants Properly So Mature Herbs Have Room to Spread

crowding herbs is like packing suitcases — something always gets crushed. Good Garden Planning and Plant Spacing give roots room to breathe and leaves room to fill out.
Spacing Grid Layout for healthy, productive plants:
- Give basil and oregano 12–18 inches apart for full canopy spread
- Allow mint 18–24 inches for Root Space Management and runner control
- Use one plant per 8–12 inch pot for Container and Raised Bed Gardening Techniques
- Plan Vertical Clearance of 12–18 inches above spreading herbs for airflow
- Apply Companion Herb Spacing when Companion Planting sun-lovers behind shorter cool-season herbs
Water, Feed, and Mulch Herbs

Once your herbs are in the ground, how you water, feed, and prune them makes all the difference between a thriving garden and a struggling one. Each herb has its own preferences, and matching your care routine to those needs keeps plants healthy and productive all season long.
Here’s what to focus on.
Water Tender Herbs Regularly, but Let Woody Herbs Dry Slightly Between Waterings
Think of your herbs as two different house guests: basil and mint are like a steady drink of water, while rosemary and thyme prefer to dry out between visits.
Check soil dryness by lifting your pot — a light container means it’s time.
Keep a simple watering schedule, and your soil moisture management will make all the difference for root zone hydration.
Avoid Soggy Soil to Prevent Root Rot and Yellowing Leaves
Soggy soil is where root rot starts — and yellowing leaves are its early warning sign. Make sure your pots have drainage holes, and add a bottom drainage layer of perlite amendment or coarse grit to keep roots breathing.
A moisture meter usage check beats guessing every time.
In raised beds, a slight raised bed slope improves runoff, while air-pruned pots naturally prevent waterlogging for well-draining soil conditions.
Feed Herbs Lightly With Diluted Organic Liquid Fertilizer During The Growing Season
Once drainage is sorted, feeding becomes your next lever for lush growth. Stick to half-strength dilution ratios using fish emulsion or kelp extract every two to four weeks through summer — that’s your fertilization schedule sweet spot.
Mediterranean herbs like rosemary need far less nitrogen than basil or parsley.
Every four to six weeks, flush containers with plain water to handle salt buildup prevention naturally.
Mulch Cold-hardy Perennials to Protect Roots and Hold Moisture
After the first hard frost, layer 2 to 4 inches of shredded hardwood or pine straw around your cold‑hardy perennials — chives, thyme, oregano, sage. This insulation depth stabilizes root zone temperature and manages soil moisture through freeze‑thaw cycles.
For your mulch material mix, keep it away from crowns to prevent rot. Seasonal mulch timing really does make or break overwintering success.
Pinch Back Flowers and Prune Lightly to Keep Plants Leafy and Productive
When basil starts reaching for the sky, that’s your cue to pinch it back. Snip just above a leaf node once the plants hit 4–6 inches, and you’ll trigger two new shoots instead of one — that’s Leafy Growth working in your favor.
- Pinch Timing: Pinch every 2–4 weeks during active growth
- Pruning Frequency: Remove only the top one-third to avoid stress prevention issues
- Tool Sterilization: Use clean, sharp scissors between plants to block disease spread
- Flowering Inhibition: Pinching redirects energy from blooms back into leaves
- Herb Trimming: Morning cuts, when plants are hydrated, heal fastest
Top 3 Herb Garden Products
The right tools can make or break your herb garden, especially when you’re just getting started. A few well-chosen products take the guesswork out of growing, whether you’re working with a backyard plot or a sunny windowsill.
Here are three worth adding to your setup.
1. Behrens Hot Dipped Round Steel Tub
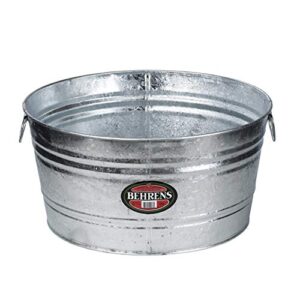
The Behrens Hot Dipped Round Steel Tub is one of those products that just makes sense for herb gardening. At 17 gallons and roughly 25 inches across, it gives roots real room to spread — and the offset bottom keeps water moving away from the crown, where rot likes to start.
The hot-dipped zinc coating resists rust without leaching anything into your soil, so your herbs stay food-safe.
It’s sturdy enough for Mediterranean herbs, withstands outdoor weather without complaint, and moves easily when you need to chase the sun.
| Best For | Home gardeners and outdoor entertainers who want a durable, food-safe container that pulls double duty — from herbs and bulbs to iced drinks at a backyard party. |
|---|---|
| Primary Use | Outdoor gardening container |
| Skill Level | Beginner to advanced |
| Plant Capacity | Large volume (17 gal) |
| Maintenance Level | Low (weather-resistant) |
| Space Requirement | Outdoor or patio |
| Limitations | Possible bottom hole defect |
| Additional Features |
|
- Built to last outside — the hot-dipped zinc finish shrugs off rust and won’t leach anything into your soil or food
- Generous 17-gallon size gives roots (or a big bag of ice) plenty of room to breathe
- Lightweight at 6.5 lbs, so chasing the sun or moving it to the truck is actually doable
- Some units ship with a hole in the bottom — fine for drainage, but you’ll need to seal it if you want to hold water or ice
- A few buyers have reported sharp edges or dents on the rim, so give it a quick check when it arrives
- The name includes "3," which sounds like a 3-pack — it’s just one tub, so don’t get caught off guard at checkout
2. Southeast Vegetable Gardening Guide

If you’re gardening anywhere from Virginia to Louisiana, this 130-page guide was written with your exact conditions in mind. It covers month-by-month planting calendars for the Upper, Deep, and Coastal South, with profiles of 50+ heat‑tolerant varieties — including Southern staples like okra, collards, and field peas.
Soil guidance for red clay and sandy loam makes it genuinely practical, not generic.
At $9.99, it’s an easy investment that helps you stop guessing and start growing with confidence.
| Best For | Home gardeners in the Southeast—from beginners figuring out their first raised bed to experienced growers tired of advice that doesn’t account for Southern heat and humidity. |
|---|---|
| Primary Use | Vegetable planting guide |
| Skill Level | Beginner to experienced |
| Plant Capacity | 50+ vegetable varieties |
| Maintenance Level | Low (reference only) |
| Space Requirement | No space required |
| Limitations | Limited to 11 Southern states |
| Additional Features |
|
- Month-by-month calendars for three distinct Southern regions take the guesswork out of timing your planting and harvest
- Soil advice tailored to red clay and sandy loam makes it genuinely useful, not just a rehash of generic gardening tips
- At $9.99 for 130 pages, it’s a low-risk way to get region-specific guidance that actually matches your backyard
- The 130-page format gives you a solid overview, but serious or advanced growers may want something with more agronomic depth
- It’s print-only—no app, no digital updates, so you’re working with a static snapshot of the information
- Coverage stops at 11 states, so if you’re just outside that range, some of the advice may not translate well
3. Click and Grow Indoor Smart Garden
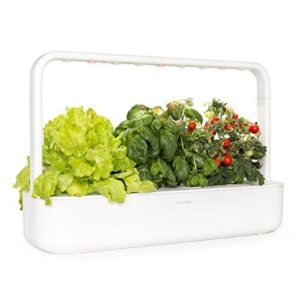
No outdoor space? No problem. The Click & Grow Smart Garden 9 ($249.95) turns any countertop into a productive herb garden, year‑round.
Its patented Smart Soil pods deliver pre‑measured water, nutrients, and air directly to roots — no fertilizer math, no guesswork.
The starter kit includes nine pre‑seeded pods: mini tomatoes, basil, and lettuce, all with a 21‑day germination guarantee.
It’s compatible with 75+ pod varieties, so once you’re comfortable, you can branch out into whatever herbs your kitchen craves most.
| Best For | Anyone who wants fresh herbs and greens at home but doesn’t have outdoor space, gardening experience, or much time to spare. |
|---|---|
| Primary Use | Indoor herb garden |
| Skill Level | Beginner friendly |
| Plant Capacity | 9 plant pods |
| Maintenance Level | Low (plug-and-play) |
| Space Requirement | Countertop or windowsill |
| Limitations | No built-in light timer |
| Additional Features |
|
- Truly plug-and-play — just drop in a pod, add water, and you’re done; no soil mixing or fertilizer needed.
- Works year-round on any countertop, and the 75 pod varieties give you plenty of room to experiment.
- The 21-day germination guarantee takes the risk out of getting started.
- At $249.95, it’s a real investment — and the ongoing pod costs add up over time.
- No built-in light timer on the standard model, which is a bit surprising at this price point.
- Growth can be slow in cooler rooms, and some users have had issues with uneven water delivery to pods.
Harvest, Store, and Fix Problems

Getting herbs from garden to kitchen—and keeping them tasting great—comes down to few key habits. Knowing when to harvest, how to store what you’ve cut, and what to watch out for makes all the difference.
Here’s what you need to know to finish strong.
Harvest Before Flowering for The Best Flavor and Strongest Leaf Production
Timing your harvest right is everything — and your herbs will tell you when they’re ready. Just before flowering, the leaf oil peak hits, meaning aroma development is at its highest.
Temperature influence and daylength effects both drive this window, so watch your plants closely. With proper nutrient balance and smart harvest timing, you’ll preserve full leaf flavor and keep preventing bolting and managing growth naturally.
Cut Stems at Leaf Nodes and Avoid Taking More Than One-third of The Plant
Where you cut matters as much as when. Find a leaf node — the point where leaves branch off the stem — and snip just above it.
This simple leaf node identification technique triggers bushier regrowth instead of a bare stub.
The cut-and-come-again approach works beautifully here: never remove more than one-third of the plant per session, and always use clean, sharp shears to protect against disease.
Store Fresh Herbs in Water, Damp Towels, or The Refrigerator for Short-term Use
Once herbs are cut, get them into storage fast.
The Water Glass Method works well for basil and mint — trim stems at a 45-degree angle, set them upright in a narrow jar, and change the water every two days.
Prefer the Paper Towel Method for cilantro and parsley. Wrap them in a lightly damp towel, seal in a bag, and they’ll hold for 5–7 days.
Plastic Bag Storage with a dry paper towel inside manages dill and chives nicely.
Good Moisture Management is the whole game here.
Dry Herbs Upside Down or in a Dehydrator for Long-term Storage
When short-term storage isn’t enough, drying is your best move for long-term herb preservation. Herb drying timing matters — harvest before flowering for peak essential oil content.
Hang small bundles upside down in a dark, ventilated spot for 1–3 weeks. For faster results, dehydrator rack arrangement on single layers at 95–115°F dries basil in under 4 hours.
Humidity control methods and airtight packaging for longevity seal the deal.
Freeze Chopped Herbs in Ice-cube Trays for Quick Cooking Use
If drying feels like too much fuss, freeze herbs instead — it’s honestly one of the smartest herb preservation moves you can make. Chop them into uniform pieces, pack tightly into ice cube trays, then fill with water or oil base for your Cube Flavor Retention.
Label bags with herb type and Labeling Dates. Drop cubes straight into soups — no thawing needed.
Use within 3–6 months for Freezer Odor Prevention and peak flavor.
Watch for Aphids, Spider Mites, Poor Drainage, Low Light, and Premature Bolting
Even with a solid harvest routine, problems sneak up fast. Stick to a Pest Scouting Schedule every 7–14 days — aphids curl leaves and spider mites leave fine webbing.
Your Drainage Inspection Tips start simple: poke the soil; soggy roots rot quickly. Run Light Level Checks for leggy growth.
Use Bolting Prevention Strategies like succession sowing for bolting basil, and try Beneficial Insect Introduction with lady beetles.
Frequently Asked Questions (FAQs)
What herbs should never be planted together?
Some pairings just don’t get along.
Rue releases allelopathic compounds that suppress basil, while dill and cilantro compete for the same shallow root space — keep these apart for healthier companion planting herbs.
What herbs can be planted in October?
October is surprisingly herb-friendly.
Parsley, cilantro, chives, mint, and thyme are all cool-season herbs worth planting now — especially if you’re mindful of hardiness zone considerations for perennial herbs in your area.
What is the best layout for an herb garden?
Group herbs by water needs and sun exposure — that’s the heart of a smart herb garden layout.
Keep Mediterranean types like rosemary at the edges, and place thirsty herbs like basil closer to your water source.
Which herbs should not be planted together?
Think of your herb garden as a neighborhood — some plants are great neighbors, others cause drama. Mint invasion is real; keep it contained.
Avoid fennel suppression near basil or sage, and separate moisture-loving basil from drought-tolerant rosemary.
What time of year should I plant an herb garden?
Spring is your sweet spot. Cool-season herbs like cilantro and dill go in after the last frost date; warm-season herbs like basil wait until soil hits 65°F.
What herbs grow well together chart?
Birds of a feather flock together — and herbs are no different. Pairing by sunlight, moisture compatibility, and flavor synergy keeps your garden thriving and simplifies herb garden planning considerably.
Can herbs survive winter temperatures outdoors?
Yes, many herbs handle winter just fine outdoors.
Chives, thyme, sage, and mint survive in zones 3–9 with snow cover insulation, burlap wrapping, or windbreak placement, keeping roots safe through the cold.
How much does herb gardening typically cost?
Starting a herb garden runs $50–150 upfront. Starter Kit Expenses cover seeds and pots, Potting Costs average $10–20, and ongoing Pest Control Budget stays under $10 seasonally.
Which herbs grow fastest from seed?
Basil wins the race, sprouting in just 5–7 days with warm soil around 75°F and consistent moisture. Dill and cilantro follow at 7–14 days.
Do herbs need special lighting indoors?
Herbs don’t always need special lights, but indoors, a sunny windowsill rarely delivers enough.
Most herbs want 6–8 hours of bright light daily, and cloudy winters make that nearly impossible without help.
Conclusion
Think of your herb garden as a living pantry—one that rewards you every time you reach for a handful of fresh basil or snip a sprig of thyme, minutes before dinner. This herb garden planting guide gave you the tools: the right plants, the right soil, the right care.
Now the rest is yours to grow. Start with two or three herbs you actually cook with, build from there, and don’t overthink it.