This site is supported by our readers. We may earn a commission, at no cost to you, if you purchase through links.

Most gardeners lose their best growing weeks to one avoidable mistake: starting cleanup too early.
Compacted, waterlogged soil—disturbed before it’s ready—can set back root development for the entire season.
The difference between a thriving yard and a struggling one often comes down to timing and sequence, not effort.
Your local last-frost date is the anchor.
From there, soil temperature, drainage, and plant condition tell you exactly what to tackle first.
This spring garden cleanup guide walks you through each step—assessment, pruning, soil prep, and planting—so nothing gets missed and nothing gets rushed.
Table Of Contents
- Key Takeaways
- When to Start Spring Cleanup
- Check Garden After Winter
- Clear Debris and Old Mulch
- Prune Plants Safely
- Use Clean, Sharp Tools Before Making Any Cuts
- Prune Dormant Deciduous Trees and Shrubs in Early Spring
- Wait to Prune Spring-blooming Shrubs Until After Flowering
- Remove Dead Wood, Crossing Branches, and Storm Damage
- Cut Perennials Back Carefully While Preserving Healthy Base Growth
- Thin Overcrowded Growth to Improve Airflow and Sunlight
- Weed and Edge Garden Beds
- Prepare Soil for Planting
- Refresh Lawns and Hardscapes
- Rake Lawns to Remove Leftover Winter Debris
- Inspect Turf for Bare Spots, Compacted Areas, and Damage
- Clean Patios, Decks, Walkways, and Outdoor Furniture
- Rake Gravel Back Into Place and Refill Low Spots
- Inspect Fences, Trellises, and Railings for Rot or Wear
- Repaint or Stain Outdoor Structures Once Temperatures Are Warm Enough
- Top 7 Cleanup Tools
- Finish Spring Planting Prep
- Spread Fresh Mulch in Cleaned Beds After Pruning and Weeding
- Add Light Fertilizer Around Newly Planted Shrubs and Bulbs
- Plan The First Spring Planting Based on Soil Readiness
- Check Moisture Levels Before Planting Seeds or Transplants
- Set a Post-cleanup Maintenance Schedule for Weeds, Pests, and Watering
- Frequently Asked Questions (FAQs)
- What is the 70 30 rule in gardening?
- What is the average price for a spring cleanup?
- When should I start cleaning my garden in the spring?
- What do landscapers do for spring clean up?
- How do I safely dispose of garden waste?
- What plants benefit most from spring fertilizers?
- Are there common cleanup mistakes to avoid?
- How can I prevent soil compaction during cleanup?
- Should I water my garden after spring cleanup?
- How do you clean up a garden with pets?
- Conclusion
Key Takeaways
- Your last-frost date is the anchor for everything — start cleanup 2–4 weeks early only if daytime temperatures are above 40°F and the soil crumbles instead of clumping.
- Walking on soggy soil crushes the pore spaces that roots depend on, so wait until the ground passes the squeeze test before stepping into your beds.
- Prune spring-blooming shrubs like forsythia and lilac only after they flower, since cutting early removes the buds they set on last year’s wood.
- Feed, mulch, and check soil moisture before planting — nutrients won’t move to roots if the soil is below 40°F or too wet to absorb water evenly.
When to Start Spring Cleanup

Timing is everything in spring cleanup — start too early and you’ll do more harm than good. few simple signals tell you when your yard is actually ready to work on.
Knowing exactly what to watch for makes all the difference — a spring garden preparation guide for beginners can help you read those signals before you pick up a single tool.
Here’s what to check before you grab your first tool.
Use Your Local Average Last-frost Date as The Starting Point
Your last frost date is the anchor point for all spring garden preparation and cleanup. It’s built from 30 years of historical data analysis specific to your region — so trust it, but don’t treat it as absolute.
Frost date variability is real, especially with microclimate mapping showing how a low-lying corner of your yard can freeze days after your neighbor’s beds are safe.
Begin 2–4 Weeks Before Frost Ends if Conditions Are Mild
Once your last-frost date is on the calendar, you don’t have to wait until the final freeze to get moving. If conditions are mild, start your spring garden cleanup checklist 2–4 weeks early.
Watch for these green lights before you begin:
- Daytime soil warmth check confirms temps above 40°F
- Microclimate mapping shows frost-free window in sheltered beds
- Soil surface is dry enough for light-duty irrigation
- Early seed sowing candidates are ready for cool-season prep
- No overnight freeze forecast for the coming week
Wait Until Daytime Temperatures Stay in The 50 °F Range
Even after early prep, your real green light is consistent daytime temperatures in the 50°F range. That warmth signals microbial activity boost in the soil and marks safe territory for your spring yard cleanup checklist.
Temperature monitoring matters here — 50°F days reduce frost risk assessment concerns, support pollinator emergence, and give roots time to adjust. Soil warmth timing at this level makes your effort count.
Confirm The Soil is Thawed, Dry, and Crumbly
Once temperatures hold steady at 50°F, do a quick crumbly soil test before grabbing your tools.
Pinch a small handful — healthy soil breaks apart into loose grains, a reliable soil temperature indicator that roots can breathe again.
Watch for earthworm activity signs near the surface and soil cracking observation along bed edges.
Both confirm soil aeration is underway, and moisture level check looks good.
You can also perform a squeeze test for moisture to verify appropriate moisture levels.
Avoid Walking on Soggy Ground to Prevent Compaction
Soggy soil is fragile — one wrong step crushes pore spaces that took seasons to build. Foot traffic management protects everything you’re working toward.
- board pathways or stepping stones as temporary walkways across wet beds.
- soft-soled footwear to minimize surface pressure.
- traffic rotation, shifting paths daily to distribute stress.
- Stay off areas where puddles linger longest.
- Return only when soil crumbles, not smears.
Check Garden After Winter

Before you touch a single tool, take a slow walk through your yard and see what winter left behind.
You’re looking for specific things — damage, weak spots, plants that need extra attention before any work begins.
Here’s what to check as you go.
Walk The Yard and Assess Overall Plant Health
Your garden’s been quiet all winter — now it’s time to read what it’s telling you.
Start with a slow walk through the yard. This garden inspection isn’t casual. You’re mapping Leaf Color Mapping signals, checking Stem Integrity Check clues, and noting Soil Moisture Indicators underfoot. Watch for yellowing leaves, pale new shoots, or powdery residue — early signs of disease prevention failures or nutrient gaps.
| What to Look For | What It Means |
|---|---|
| Yellowing or pale leaves | Possible nutrient deficiency |
| Powdery white leaf coating | Powdery mildew risk |
| Soft or mushy soil patches | Poor drainage or Root Zone Observation concern |
| Sparse new growth | Pest Activity Survey needed |
| Dark or translucent leaf spots | Fungal or bacterial infection |
Tree health monitoring and soil health go hand in hand — don’t rush past either during your assessment of winter damage in gardens.
Look for Broken Branches, Frost Damage, and Bent Stems
Once you’ve scanned for general health, look closer — Branch Failure Signs and Frost Burn Indicators tell a deeper story. Check stems for V-shaped bends, torn bark, or exposed wood.
Frost damage shows as bronzed, blackened, or rubbery leaf edges. Use Damage Assessment Techniques like gentle flexing to test Stem Deformation Types.
Note anything needing Repair and Support before you prune trees, or prune and trim plants after a hard frost.
Identify Shrubs, Trees, and Perennials That Need Special Timing
Not every plant follows the same clock. Sap Flow Timing varies by species — maples wake up fast, oaks lag behind.
Forsythia and lilac follow a strict Bloom Budding Schedule, so don’t prune shrubs like these before they flower.
Fruit Set Timing guides when to prune your trees. Match your tree and shrub pruning timing and Perennial Division Timing to each plant’s Root Activity Window for best results.
Note Wet Spots, Compacted Areas, and Poor Drainage
Walk your beds with fresh eyes and look for shiny surface patches or pooling water — these are your Drainage Diagnostics in action.
Low spots collect runoff, while soil compaction squeezes out the pore space roots need.
Press a pinch of soil: if it holds shape instead of crumbling, compaction is your problem.
Note these zones now — they’ll need French Drain Installation, Surface Grading Strategies, or Raised Bed Construction before planting begins.
Mark Plants Showing Disease, Dieback, or Pest Damage
Flag your sick plants now — before cleanup masks the clues. Look for spotted or yellowing leaves, which signal fungal leaf spot, and check stems for sunken cankers or dry, corky bark.
Evaluating pest frass at the base confirms active infestations.
Visual symptom identification early guides smarter pruning for disease prevention and garden pest management.
Mark each affected plant so nothing gets missed.
Clear Debris and Old Mulch

Once the walk-through is done, it’s time to get your hands dirty. Winter leaves behind a surprising amount of clutter — dead leaves, broken stems, soggy mulch — and clearing it out is what actually wakes your garden up.
Here’s how to work through it step by step.
Rake Up Leaves, Twigs, Pinecones, and Winter Debris
Start by raking leaves into manageable sections, using your wheelbarrow for efficient loading and transport. Brush back leaves from bed edges to expose hidden debris. Leaf bagging strategies matter here — wet debris bags separately to prevent mold.
For pinecone decomposition rate, small ones under two inches can stay in soil. Sort the rest into your compost bin for spring nutrient return.
Remove Dead or Winter-bitten Plant Material From Beds
Once the loose debris is cleared, turn your attention to the beds themselves. Dead plant stems and leaves left in place are pest habitat — slugs, aphids, and fungal spores overwinter right there.
Pull dead annuals out root and all. For perennials, remove dead growth carefully while leaving healthy crowns untouched.
- Bag diseased material separately — don’t compost it
- Sanitize your tools between plants for pathogen management
- Check local disposal regulations before curbside collection
Pull Back Old Mulch to Expose The Soil Surface
Once dead material is cleared, pull back your old winter mulch to expose the soil beneath.
This kickstarts a Soil Temperature Boost, warms root zones faster, and brings Weed Seed Visibility to the surface — making early removal easy. Exposed soil also wakes up Beneficial Microbes and simplifies Moisture Monitoring.
Plan Mulch Reapplication Timing for one to two weeks out.
Collect Debris in a Wheelbarrow for Composting or Disposal
With your mulch pulled back, grab your wheelbarrow and start collecting. Wheelbarrow material matters here — aluminum manages wet compost without rusting, while steel bears heavier loads.
For loading balance, keep heavy branches near the wheel, and don’t fill beyond two-thirds.
Sort as you go: compostable plant debris in one pile, and inorganic waste separate.
Good sanitation practices and safety maintenance keep cleanup efficient and your tools lasting longer.
Remove Diseased Material From Garden Zones to Limit Spread
Once you spot disease — powdery mildew, blackened canes, wilted stems — act fast. Disease identification is your first defense.
Bag those dead plant stems and leaves in sealed bags, and skip the compost pile entirely. Tool sanitization matters too: wipe blades with a 10% bleach solution between cuts.
Treat affected zones as isolation zones, and keep garden debris removal thorough to stop pathogens from spreading further.
Prune Plants Safely
Pruning is where a lot of gardeners hesitate — cut too much, cut at the wrong time, and you can set a plant back by a full season. The good news is that a few simple rules cover most of what you’ll face in spring.
Here’s what to follow when you pick up those shears.
Use Clean, Sharp Tools Before Making Any Cuts

Before your pruners touch a single stem, make sure they’re clean and sharp — a dull blade tears tissue instead of slicing it, leaving wounds that invite disease. Good tool maintenance and preparation for planting season start here.
- Blade Sharpening Tips: Restore the bevel with a whetstone before your first cut.
- Tool Disinfection Practices: Wipe blades with a disinfectant between plants to stop pathogen spread.
- Cleaning Protocols: Oil blades after each session to prevent rust and preserve sharpness.
Prune Dormant Deciduous Trees and Shrubs in Early Spring

Early spring is your best window for seasonal pruning — buds are swelling but leaves haven’t pushed yet, which means clean cuts and faster wound healing.
Prune trees and prune shrubs before new growth surges, when sap flow is low.
Use sharp pruning shears, practice tool sanitization between plants, and follow tree pruning best practices: target branch angles, remove crossing wood, and let natural healing do the rest.
Wait to Prune Spring-blooming Shrubs Until After Flowering

Spring-blooming plants like forsythia, lilac, and weigela set their flower buds on last year’s wood — prune too soon, and you’ve cut away next spring’s show.
Follow these species pruning windows for best results:
- Forsythia & lilac – prune 4–6 weeks after peak bloom
- Weigela & spirea – cut right after flowers fade
- Rhododendron & azalea – minimal pruning, always post-bloom
Waiting also helps pollinator safety, airflow improvement, and disease prevention across your spring garden cleanup checklist.
Remove Dead Wood, Crossing Branches, and Storm Damage

Dead wood doesn’t just look bad — it’s a doorway for pests and fungal rot to spread into healthy tissue. Start by pruning trees with clean, sharp cuts, removing anything brittle, barkless, or budless. Then tackle crossing branches and wind damage assessment after storms.
| Problem | What to Look For | What to Do |
|---|---|---|
| Dead plant stems and leaves | Brown, brittle, no buds | Cut back to healthy tissue |
| Cankering identification | Sunken, discolored bark | Remove past the infected zone |
| Storm damage | Torn, split, exposed wood | Prune to clean collar tissue |
| Crossing branches | Rubbing wounds, bark scarring | Remove the weaker limb |
| Branch wound care | Open cuts after pruning | Skip sealant; apply post-pruning mulch |
Cut Perennials Back Carefully While Preserving Healthy Base Growth

Perennials are more fragile at the base than they look. Crown Tissue Protection starts with removing dead growth from perennials only — keep green, healthy stems intact. Make an angle cut so moisture sheds away from the crown.
Temperature Timing matters too; wait until daytime highs hold above 50°F. Selective Stem Thinning beats wholesale cutting every time. Finish with post-cut mulching to stabilize moisture around the base.
Thin Overcrowded Growth to Improve Airflow and Sunlight

Once you’ve cleaned up your perennials, turn your attention to anything that looks packed too tight. When you thin out crowded beds, you’re not just tidying — you’re opening the canopy for better Canopy Airflow and Light Penetration.
That spacing fights Disease Suppression naturally, improves Structural Stability, and enhances Bloom Timing.
Remove dead growth from perennials and overcrowded stems during shrub pruning to breathe real life into your garden bed preparation.
Weed and Edge Garden Beds

Weeds don’t wait, and neither should you. Early spring is actually the best time to pull them — the soil is soft, the roots come out clean, and they haven’t had a chance to seed yet.
Here’s how to weed and edge your beds the right way.
Pull Weeds Before They Spread and Set Seed
The best time to pull weeds is before they set seed — and timing really does make all the difference. Good soil moisture timing matters here: weeds come out cleanly when the ground is damp but not soggy.
Early weed control through consistent garden sanitation can cut future weed pressure by up to 70 percent.
Consistent garden sanitation in early spring can slash future weed pressure by up to 70 percent
Don’t wait. Pull weeds now, and mulch right after to block what’s left.
Remove Roots From Early Spring Weeds When The Soil is Workable
Timing root removal right makes all the difference. When soil temperature hovers around 40–50°F and crumbles when squeezed, roots lift cleanly — that’s your window for effective weed management in early spring.
Follow this root extraction timing sequence:
- Use a hand weeder technique to pry shallow roots from the top 2 inches.
- Apply CobraHead usage for deeper taproots without disrupting surrounding soil.
- Practice fragment prevention by removing every root piece — even small fragments regrow.
Edge Beds to Define Borders and Stop Turf Creep
Once the weeds are out, it’s time to draw the line — literally. Edging beds is one of the most impactful steps on any spring yard clean‑up checklist.
| Edging Material | Best Use |
|---|---|
| Steel edging | Crisp, durable borders |
| Plastic flexible | Curved, budget-friendly beds |
| Brick or stone | High-traffic, decorative edges |
Material selection, installation techniques, and drainage considerations all affect how well your edge garden beds hold long‑term.
A lawn edger or weed whacker keeps garden bed edging and grass control simple.
Design aesthetics matter too — a clean line changes how the whole yard feels.
Maintenance practices are minimal once it’s set.
Clear Weeds From Pathways, Fence Lines, and Bed Edges
Pathways, fence lines, and bed edges are where weeds stage their comeback every spring. Stay ahead with three targeted approaches:
- Use Hand Pulling or a Cobrahead weeder for bed edges after rain softens the soil.
- Apply a stiff broom for Broom Weed Removal between pathway cracks, then fill gaps with Jointing Material.
- Lay Fence Mulch Strips with Landscape Fabric underneath along fence lines to choke future growth.
A hand rake clears loose debris fast.
Use Hand Tools for Precise Cleanup Around New Growth
Near new growth, every cut counts.
Use garden shears or heavy-duty hand pruners with sharp blades — Blade Sharpness prevents ragged wounds that invite disease.
Grip Enhancements on your gloves improve control so you don’t slip.
Sterilize tools between plants for Tool Sterilization that stops cross-contamination.
Cobrahead weeder lets you work tight spots without disturbing roots, keeping Root Protection and Precision Cutting your priority.
Prepare Soil for Planting

Good soil is the foundation that everything else builds on. Before you plant a single seed or transplant, few key steps will set your beds up for a strong season.
Here’s what to work through.
Test Soil PH and Nutrient Levels Before Amending
Think of your soil as a report card — you can’t fix what you don’t measure. Before any soil amendment mixing begins, get a soil pH test done. A basic pH kit accuracy check works for most home gardens, but lab comparison gives precise nutrient ratios down to two decimal places.
Use these smart sampling technique tips:
- Pull cores from several spots and combine them for a representative sample
- Sample 6–8 inches deep and let it air-dry before testing
- Avoid sampling right after rain to prevent skewed results
Good soil testing and nutrient management set the foundation for smarter amendment planning and real soil fertility gains.
Aim for a PH Near 6.0–7.0 Where Appropriate
Most plants hit their stride when soil pH sits between 6.0 and 7.0 — that’s the sweet spot where pH nutrient uptake really works.
Your soil testing and nutrient management results will guide your pH adjustment strategies: add lime to raise it, sulfur to lower it.
Compost naturally boosts buffering capacity too.
Match your pH-friendly plants to your readings, and soil fertility follows.
Loosen The Top 6–12 Inches of Soil
Once pH is dialed in, loosening the top 6–12 inches unlocks everything that follows. Use a broadfork technique for minimal disturbance, or a digging fork in dense spots.
Only work when soil is at field capacity — it should crumble, not clump.
Run a soil probe check at both depths.
Compaction prevention starts here, setting the foundation for strong root penetration.
Mix in Finished Compost or Well-rotted Manure
Now your soil is loose and ready — this is when organic matter does its best work. Spread finished compost or well‑rotted manure and work it in at the right compost incorporation depth: about 6–8 inches down.
- Microbial boost benefits start fast, improving nutrient cycling
- Soil structure improvement reduces compaction over time
- Nutrient release timing stays gradual, protecting young roots
- Manure application rate should stay light — 1–2 inches max
- Integrating compost into spring beds lifts moisture retention noticeably
Apply Balanced Slow-release Fertilizer After Soil Amendments
Once your compost is worked in, reach for a slow-release fertilizer. A balanced formula — something like 5-10-10 — feeds roots steadily over 3 to 6 months, so nutrient release timing aligns with actual plant demand.
Sprinkle it evenly around the drip line, not against stems.
Sandy or clay soils respond differently, so let your earlier soil testing guide your application rate.
Water The Bed Lightly to Activate Nutrients
After spreading fertilizer, give the bed a gentle drink. Light irrigation timing matters here — a slow, even soak moves nutrients toward the root zone without washing them past it.
That moisture triggers microbial activation, waking up soil biology that converts organic matter into plant-available forms.
Keep soil moisture management steady, and warmer soil temperatures will accelerate nutrient mobilization right when new growth needs it most.
Refresh Lawns and Hardscapes

Once your beds are prepped, it’s time to shift focus to the lawn and hardscapes. Winter leaves its mark on both — thin turf, grimy patios, and weathered structures all need attention before the season really gets going.
Here’s what to work through first.
Rake Lawns to Remove Leftover Winter Debris
Raking your lawn is the handshake between winter and spring — it tells your yard you’re paying attention. Use a hand rake with medium stiffness and work from the edges inward. This simple rake technique jumpstarts soil aeration boost and helps garden sanitation from day one.
- Remove fallen leaves, twigs, and pine needles using short, firm passes
- Stick to dry days to avoid compacting soft soil
- Bag diseased debris separately — skip the compost pile for those
- Use leaf removal and composting strategies to turn clean debris into future mulch
- Switch to a hand rake near tight corners for thorough lawn surface inspection
Inspect Turf for Bare Spots, Compacted Areas, and Damage
Once the debris is cleared, get down to business with a proper turf inspection. Walk slowly and scan for bare spot mapping — patches where grass cover looks thin or absent.
Press your heel into suspicious areas to check for compaction signs; hard, unyielding ground means roots are struggling.
Drainage issues where water lingers, and map traffic wear patterns near doorways and paths.
Clean Patios, Decks, Walkways, and Outdoor Furniture
Your hardscape deserves the same attention as your beds. Start by sweeping the deck, patio, and porch to clear loose debris before any washing begins.
- Pressure Washing concrete pavers removes algae in 15–30 minutes.
- Soft Wash at 60–90 psi protects wood and composite decks.
- Deck Stain goes on only after wood dries completely.
- Walkway Sealant extends clean results 1–3 years.
- Furniture UV Protection sealant shields teak and cedar yearly.
Wash patio furniture with mild soap, then follow consistent patio and deck cleaning routines to keep your spring yard clean-up checklist on track.
Rake Gravel Back Into Place and Refill Low Spots
Winter shifts gravel constantly — low spots appear, edges thin out, and drainage suffers.
Start your yard clean up by using a landscape rake to move gravel from high points into depressions, applying long, even strokes.
Crown grading at 2–3 percent guides runoff sideways.
Choose angular 3/4-inch crushed rock for better interlock during surface leveling.
After redistribution, light compaction sets everything firmly in place.
Inspect Fences, Trellises, and Railings for Rot or Wear
fences and trellises took a beating this winter — now’s the time to find out how bad they are.
press your thumb firmly into posts and rails. soft or spongy wood signals rot, and that means replacement, not repair.
Check hardware for rust staining, loose screws, and cracked brackets.
Look for surface checking, peeling finishes, and any posts tilting at the base.
Structural stability starts here.
Repaint or Stain Outdoor Structures Once Temperatures Are Warm Enough
Fresh paint is the final handshake between effort and results. Before you open a can, check your Temperature Window — daytime highs need to stay between 50 and 85°F, with no rain forecast within 24 hours.
- Surface Preparation — scrape, sand, and rinse thoroughly
- Humidity Control — keep it under 70%
- Primer Choice — bare wood needs bonding primer first
- Stain Techniques — work with the grain, not against it
- Apply thin coats — never rush cure time
Top 7 Cleanup Tools
The right tools make spring cleanup faster and a lot less frustrating. You don’t need a shed full of gear — just seven well‑chosen picks that handle everything from tight pruning cuts to stubborn weeds.
Here’s what’s worth having in your hands this season.
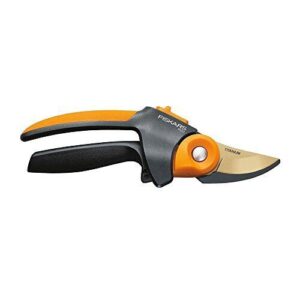
1. Felco Pruning Shears Garden Clippers

Felco pruning shears are the leading reference for a reason. These forged steel clippers weigh just 11.2 oz, yet they handle branches up to an inch thick with clean, precise cuts.
The rubberized grip reduces hand fatigue during long pruning sessions, and everything on them is replaceable — blades, springs, screws. That means one pair can last decades with basic care.
At $36.17, you’re investing in a tool that won’t quit when your spring cleanup hits full stride.
| Best For | Gardeners, landscapers, and hobbyists who want a long-lasting, reliable pruning tool that can handle daily use without falling apart. |
|---|---|
| Material | Carbon steel |
| Price (USD) | $36.17 |
| Weight | 11.2 oz |
| Grip Type | Rubberized |
| Maintenance | Sharpen and oil |
| Primary Use | Branch pruning |
| Additional Features |
|
- Everything is replaceable — blades, springs, screws — so this pair can last you decades with basic upkeep
- The rubberized grip is easy on your hands, which makes a real difference during long pruning sessions
- A tapered head gets into tight spots other clippers can’t reach, giving you cleaner, more precise cuts
- At $36.17, it costs more upfront than the basic options you’d find at a big-box store
- It needs regular maintenance — sharpening, oiling, rust prevention — to stay in top shape
- At 11.2 oz, it’s not the lightest tool out there, so very delicate or detailed work might feel a little clunky
2. Fiskars PowerGear Pruning Shears
If your hands tire quickly during pruning, the Fiskars PowerGear shears are worth a close look. The gear-reduction mechanism gives you up to twice the cutting power with the same hand effort — a real advantage during long sessions.
The rotating handle aligns naturally with each cut, reducing wrist strain.
Bypass blades keep cuts clean on live wood, and the narrow tip lets you reach tight spots easily.
One note: these are right-hand only, so left-handed gardeners will need another option.
| Best For | Gardeners with arthritis, weak grip, or wrist issues who need a little mechanical help to get through longer pruning sessions. |
|---|---|
| Material | Steel/titanium |
| Price (USD) | Not listed |
| Weight | Not listed |
| Grip Type | Soft-grid rubber |
| Maintenance | Blade replacement |
| Primary Use | Branch pruning |
| Additional Features |
|
- The gear-reduction system cuts the hand force needed almost in half — your hands will thank you by the end of the day.
- The rotating handle moves with your wrist naturally, so you’re not fighting the tool on every cut.
- Bypass blades make clean cuts on live branches, which helps plants heal faster and stay healthy.
- The plastic gear mechanism has a reputation for breaking sooner than you’d hope, especially with heavy use.
- These only work for right-handed users — if you’re a lefty, you’ll need to look elsewhere.
- They run on the larger side, so if you have small hands, they might feel bulky and hard to control.
3. Fiskars Extendable Bypass Lopper
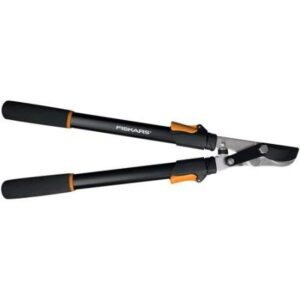
When shears can’t reach, a lopper steps in. The Fiskars Extendable Bypass Lopper telescopes from 26 to 32 inches, giving you clean access to branches that would otherwise mean climbing a ladder.
The bypass blade cuts live wood up to 1.5 inches in diameter without tearing the tissue — so your plants recover faster. under 2.5 pounds, it doesn’t tire your arms during longer sessions.
Lock the extension, position your cut, and let the leverage do the work.
| Best For | Gardeners and homeowners who need extra reach for trimming branches on trees and shrubs without hauling out a ladder. |
|---|---|
| Material | Hardened steel |
| Price (USD) | Not listed |
| Weight | Not listed |
| Grip Type | Cushioned rubber |
| Maintenance | Non-stick coating |
| Primary Use | Overhead pruning |
| Additional Features |
|
- Telescoping handles (25–36 in) let you reach high branches comfortably and lock in place with a simple flip tensioner
- The power-lever mechanism does the heavy lifting, making clean cuts through branches up to 1–2 inches thick with less effort
- Cushioned grips and a shock-absorbing bumper keep hand fatigue low, even during longer trimming sessions
- The price feels steep compared to similar tools made in China — and this one is too, despite the branding
- Fully extending the handles to reach higher branches can make it awkward to maneuver in tight or crowded garden spots
- Anything thicker than about 2 inches is beyond its range — you’ll need a saw for bigger limbs
4. Fiskars Big Grip Garden Cultivator
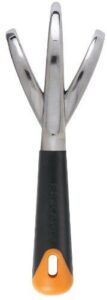
Once you’ve handled the overhead work, it’s time to get into the beds. The Fiskars Big Grip Garden Cultivator weighs just 0.4 lb, so your hand won’t tire halfway through a row.
The wide ergonomic grip lets you hold it naturally — no squeezing, no strain. Offset tines bite into compacted soil and pull weeds without snapping.
At $12.99, it punches well above its price. This is the tool you’ll reach for every single time you kneel beside a bed.
| Best For | Gardeners who want a lightweight, easy-grip tool for weeding, planting, and turning soil in beds or containers — especially those with hand fatigue or limited strength. |
|---|---|
| Material | Aluminum/steel |
| Price (USD) | $12.99 |
| Weight | 0.4 lb |
| Grip Type | Big grip ergonomic |
| Maintenance | Rust-resistant coating |
| Primary Use | Soil cultivation |
| Additional Features |
|
- At just 0.4 lb, it’s easy to use for long stretches without wearing out your hands
- Offset, cast tines dig into compacted soil and pull weeds without bending or breaking
- Great value at $12.99 — tough to find this kind of quality at that price
- Wide tine spacing makes it less useful for fine, tight-spaced soil work
- Aluminum feels less heavy-duty than steel to some gardeners
- Handle color can fade from orange to yellow with a lot of outdoor exposure
5. CobraHead Original Garden Weeder Cultivator
If the Fiskars covers the wide open spaces, the CobraHead Original Garden Weeder Cultivator is built for the tight ones.
That curved, forged-tempered steel blade slides right under a weed’s root and pops it out clean — tap roots and all.
It weighs under two pounds, so your wrist stays fresh after a long session.
At $39, it costs a little more than a basic weeder, but it pulls double duty as a cultivator and seed‑furrow maker.
| Best For | Gardeners who work in raised beds, tight rows, or rocky soil and want one tool that weeds, cultivates, and furrows without killing their wrists. |
|---|---|
| Material | Tempered steel |
| Price (USD) | $39.00 |
| Weight | 1.76 oz |
| Grip Type | Ergonomic recycled plastic |
| Maintenance | Resharpenable |
| Primary Use | Weeding/edging |
| Additional Features |
|
- Curved forged-steel blade gets under deep tap roots and pops them out clean
- Light enough to use all day without hand or wrist fatigue
- Works as a weeder, cultivator, and seed-furrow maker all in one
- Short length means bending over — your lower back will feel it on long sessions
- Too narrow for transplanting bigger seedlings or doing any serious digging
- The tip can slide off tap roots; some users have to modify it with a notch to get a better grip
6. Corona Forged Hedge Shears
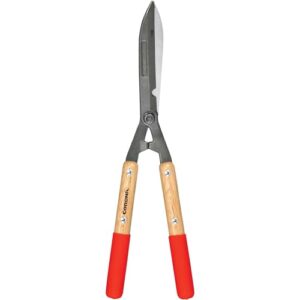
Where the CobraHead pops out roots, the Corona Forged Hedge Shears handle what’s above the soil — shaping hedges, cutting back ornamental grasses, and trimming shrubs cleanly.
Those 8¼-inch forged steel blades hold an edge and stay aligned even after a full afternoon’s work. The limb notch on the lower blade catches branches up to half an inch thick so they don’t slip.
At $38, you get respenpenable blades and a lifetime warranty.
| Best For | Home gardeners and weekend DIYers who want a reliable, no-fuss manual tool for shaping hedges, shrubs, and ornamental grasses. |
|---|---|
| Material | Forged steel alloy |
| Price (USD) | $38.02 |
| Weight | 2.3 lb |
| Grip Type | Round hardwood |
| Maintenance | Resharpenable |
| Primary Use | Hedge trimming |
| Additional Features |
|
- Forged steel blades stay sharp and aligned through long trimming sessions
- The limb notch keeps branches from slipping, giving you cleaner, more controlled cuts
- Resharpenable blades and a lifetime warranty mean this tool can last for years
- Short handles limit your leverage, so thick or dense foliage takes more effort
- Not built for branches over ½ inch — you’ll want loppers for anything bigger
- New units may come slightly dull or with a small blade gap, so an initial sharpening might be needed right out of the box
7. Grampa Stand Up Weed Puller
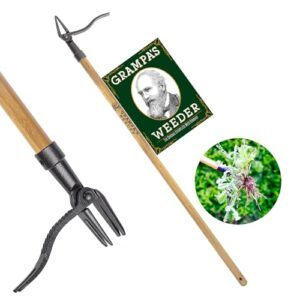
Grampa’s Stand Up Weed Puller solves a problem every gardener knows — weeds don’t care about your back. The 45-inch bamboo handle keeps you upright while the four-pronged steel claw grips the root and pulls it clean.
no bending, no chemicals, no repeat visits to the same dandelion.
At 2.3 pounds and $39.97, it’s light enough for extended sessions.
Works best in moist soil after rain. Dry, compacted clay will fight you — water first, then pull.
| Best For | Gardeners with back, knee, or joint pain who want a simple, chemical-free way to pull weeds without bending down. |
|---|---|
| Material | Steel/bamboo |
| Price (USD) | $39.97 |
| Weight | 2.3 lb |
| Grip Type | Bamboo handle |
| Maintenance | Low maintenance |
| Primary Use | Weed removal |
| Additional Features |
|
- Keeps you fully upright — no kneeling, no crouching, no wrecked back at the end of the day.
- Pulls the root, not just the top, so weeds are less likely to come right back.
- Light, simple, and kid-friendly — no fuel, batteries, or chemicals involved.
- Struggles in hard, dry, or clay-heavy soil — you’ll want to water first or it may not grip.
- The long handle can feel awkward for shorter users during extended weeding sessions.
- Thin-stalked or shallow-rooted weeds can slip the claw, so you may still need to finish by hand.
Finish Spring Planting Prep

You’ve done the hard work — now it’s time to set the stage for a strong growing season. A few finishing touches will make all the difference between a garden that limps along and one that hits the ground running.
Here’s what to do to wrap up your spring prep the right way.
Spread Fresh Mulch in Cleaned Beds After Pruning and Weeding
Fresh mulch is your garden’s best defense after all that cleanup work. Spread a 2–3 inch fresh mulch layer over prepared beds to lock in moisture and regulate soil temperature.
| Mulch Types | Key Benefit |
|---|---|
| Cedar bark | Pest deterrence via natural oils |
| Wood chips | Moisture retention up to 50% |
| Shredded leaves | Gradual soil amendment |
Keep mulch depth consistent — and leave a 1-inch gap around stems.
Add Light Fertilizer Around Newly Planted Shrubs and Bulbs
Once the mulch is down, your shrubs and bulbs need one more thing: a light feeding. Fertilizer placement matters — keep granular slow-release fertilizer 6–12 inches from the crown, never touching stems or bulbs directly.
- Spread 1–2 tablespoons per bulb at soil surface
- Use slow-release granular fertilizer for 8–12 weeks of steady feeding
- Choose granular vs liquid based on soil moisture conditions
- Apply a micro nutrient boost to prevent yellowing new foliage
- Follow safety precautions — keep fertilizer off leaves
Water in after application. Fertilizer application timing is key: soil must be above 40°F for proper uptake. This small step drives your spring garden cleanup toward real results.
Plan The First Spring Planting Based on Soil Readiness
soil readiness is your green light.
Before you plant anything, confirm your soil temperature targets are met — cool-season crops need at least 40–45°F, while warm-season crops want 60°F or above.
Pair that with soil testing and nutrient management to catch any pH adjustment needs early.
Compaction prevention matters too — avoid pressing into loose, freshly amended beds.
Nail these checkpoints, and your seed timing will fall naturally into place.
Check Moisture Levels Before Planting Seeds or Transplants
Before a single seed goes in, check your soil moisture — soggy ground drowns seeds before they sprout.
Use the finger test: press one inch deep; if soil clings, you’re good.
A moisture meter gives more precision for watering and moisture management.
Pair that with mulch retention to stabilize conditions.
Irrigation timing matters most in those first critical days after planting.
Set a Post-cleanup Maintenance Schedule for Weeds, Pests, and Watering
Cleanup done — now the real work begins. A simple PostCleanup Maintenance Checklist keeps everything from slipping.
Schedule Weed Monitoring every two to three weeks, hand-pulling during cool mornings when soil moisture is high and roots release easily. Build in weekly Pest Inspection rounds, logging what you find. Set Irrigation Timing for early morning, adjusting with Moisture Tracking data. Align Fertilizer Scheduling with active growth for best results.
Frequently Asked Questions (FAQs)
What is the 70 30 rule in gardening?
Think of it like a recipe: 70 percent structural backbone plants — reliable perennials and natives — and 30 percent experimental plantings for seasonal color.
This biodiversity balance guides smart budget allocation while keeping your garden ever‑changing year‑round.
What is the average price for a spring cleanup?
Most spring cleanups run $175–$600 for average yards, though large properties can hit $1,500 or more. Yard size pricing, regional cost variations, and service packages all shape your final quote.
When should I start cleaning my garden in the spring?
Ironically, the best time to start isn’t when everything looks ready — it’s just before.
Check your Regional Frost Calendar, watch for Ground Thaw Progress, and begin once daytime temperatures consistently hit 50°F.
What do landscapers do for spring clean up?
Landscapers handle yard clean up by combining pruning trees, mulch removal and soil amendment, lawn aeration and soil preparation, pest management, tree health diagnostics, landscape lighting inspection, seasonal color design, and equipment calibration into one efficient spring garden clean up checklist.
How do I safely dispose of garden waste?
Garden waste doesn’t have to be a headache. Compost yard trimmings, use green waste collection for excess, chip branches into mulch, and keep hazardous materials out of your bins entirely.
What plants benefit most from spring fertilizers?
Leafy vegetables, flowering perennials, fruit-bearing shrubs, root crops, and herbaceous annuals all respond well to early season fertilization.
Pair organic compost with soil testing and nutrient management for real plant revitalization and lasting plant health.
Are there common cleanup mistakes to avoid?
Yes.
Common mistakes include skipping tool sanitation, applying too much mulch depth, mishandling compost disposal, overwatering after amendment, and ignoring pest signs early.
A simple spring yard clean up checklist keeps you on track.
How can I prevent soil compaction during cleanup?
Stick to dry days and use Ground Cover Mats over beds. Rotate your path each visit, keep tools lightweight, and check soil moisture before stepping in.
Healthy soil stays loose when you plan ahead.
Should I water my garden after spring cleanup?
Think of water as the signal that wakes your garden up. After cleanup, yes — water it.
Early Morning Watering reduces disease and evaporation, and Moisture Monitoring ensures you’re not overdoing it.
How do you clean up a garden with pets?
Keep pets out of work zones while you clean.
Remove waste daily, use pet safe mulch, set up designated pet zones, and choose non-toxic plants to protect curious animals throughout the process.
Conclusion
Your garden doesn’t need a miracle—it needs a plan. As the old almanac keepers once said, "The soil remembers every hand that rushed it."
This spring garden cleanup guide gives you the sequence that actually works: read the ground first, move in the right order, and let timing do half the work. Follow these steps once, and you’ll stop guessing every season.
The yard rewards patience. Go earn it.