This site is supported by our readers. We may earn a commission, at no cost to you, if you purchase through links.

Most gardeners treat fall like the closing credits—something to skim through before the real show next year. That’s a mistake that costs them months of progress.
The soil you build now, the bulbs you drop in October, the diseased foliage you leave rotting under a leaf pile—all of it shapes what grows (or doesn’t) next spring.
Fall isn’t the end of the gardening season. It’s the foundation of the next one.
This seasonal fall gardening checklist breaks down exactly what to do before the ground freezes, from soil pH to irrigation blowouts, so spring feels less like starting over and more like picking up where you left off.
Table Of Contents
- Key Takeaways
- Prepare Soil for Winter
- Clear Disease and Pest Risks
- Plant for Spring Success
- Protect Lawns, Irrigation, and Plants
- Top 4 Tools and Supplies for Fall Gardening
- Frequently Asked Questions (FAQs)
- How often should I water my garden in fall?
- When should I apply fall lawn fertilizer?
- Can I plant vegetables in the fall season?
- Should I cover outdoor containers before winter arrives?
- How do I protect plants from early frost?
- When should I stop watering outdoor plants completely?
- How do I winterize my irrigation system properly?
- Should I fertilize trees and shrubs in fall?
- Whats the best way to store garden tools?
- Can I still plant perennials this late in fall?
- Conclusion
Key Takeaways
- Fall is when real garden progress happens — the soil you amend, the bulbs you plant, and the diseased debris you remove now directly determine how strong your spring starts.
- Skipping a soil test before adding amendments is the most common and costly fall mistake, since pH imbalances quietly sabotage everything you grow the following season.
- Clearing out diseased foliage, mummified fruit, and wet leaf mats isn’t just cleanup — it’s cutting off the pest and fungal problems before they overwinter and explode in spring.
- Winterizing your irrigation, mowing to the right height, aerating, and mulching after the ground freezes aren’t optional chores — they’re the difference between a lawn that thrives in April and one that needs rescuing.
Prepare Soil for Winter

Think of your soil as the foundation of everything you’ll grow next year — get it right now and spring becomes a whole lot easier. Fall is actually the best time to fix problems, add nutrients, and set your beds up while the ground is still workable.
A solid checklist of fall soil prep and garden tasks can help you tackle the right fixes in the right order before the first frost hits.
Here’s exactly where to start.
Get a Soil Test and Check PH
Before you dump anything on your beds this fall, get a soil test — it’s the one step most gardeners skip and then regret.
Grab a soil testing kit or send samples to a lab for true result interpretation.
Good sampling technique means pulling from several spots, not just one corner.
Most vegetables want a pH between 6.0 and 7.0, so knowing where you stand makes amendment timing actually matter.
Consult the soil pH colour chart to interpret your results accurately.
Add Lime or Sulfur Based on Results
Once soil test results are in, it’s time to act on them. If pH sits below 6.5, lime is your fix — it neutralizes acidity and boosts phosphorus availability.
Too high? Sulfur brings it back down, though microbial impact means it takes weeks to work. Match your amendment timing and rate calculations to your soil’s buffer capacity, not guesswork.
Top-dress Beds With Finished Compost
Now that your pH is dialed in, topdress with compost — your soil’s best winter investment. Spread a 1–2 inch layer of finished compost across empty beds.
Compost timing matters here: fall application gives microbial benefits all season as organic matter breaks down slowly.
You’ll gain natural weed suppression, better moisture retention, and steady nutrient release — without lifting much more than a rake.
Work in Shredded Leaves or Straw
Shredded leaves are basically free organic matter — don’t bag them, use them. Work a 2–3 inch layer into heavy clay beds to open up drainage and cut down compaction. Good mulch moisture control means less watering come spring.
- Leaf mulch depth: 2–3 inches max
- Straw layer uniformity matters — keep it even
- Mix leaves with compost for faster breakdown
- Keep mulch away from plant stems
Plant Cover Crops Before First Frost
Think of cover crops as your soil’s winter bodyguard. Sow Cover Crop Mixes — cereal rye, hairy vetch, or winter peas — at least four weeks before the first frost.
Seeding Timing matters: too late and Root Biomass stays weak. These crops lock in Soil Nitrogen, block weeds, and make Termination Methods simple come spring.
That’s real soil health improvement in autumn.
Clear Disease and Pest Risks

Fall is basically nature’s way of sending you a to-do list, and clearing out disease and pest risks is at the top of it. What you leave behind now becomes tomorrow’s problem—think of it as evicting troublemakers before they settle in for winter.
Fall’s unfinished business becomes spring’s pest problem — evict the troublemakers now
Here’s exactly what to tackle before the cold locks everything in place.
Remove Diseased Plants and Foliage
Diseased leaves don’t just look bad — they’re a ticking clock. Pull diseased annuals the moment you spot spots, wilting, or mold.
Bag sealed waste securely and toss it in the trash. Wear disposable gloves, sanitize pruning tools between cuts, and quarantine infected zones so healthy plants stay clean.
weekly inspections through fall — catching trouble early is half the battle.
Pull Mummified Fruit From Trees and Beds
Spotting mummified fruit clinging to branches is your cue to act fast — these shriveled leftovers are pathogen prevention nightmares in disguise. Remove mummy fruit now before it spreads fungal spores to next season’s crop. Timing frequency matters: check trees weekly in late fall.
- Grab safety gear — gloves, eye protection, sealed bags
- Pull mummies from branches and rake bed debris thoroughly
- Prioritize tool sanitization between trees to stop cross‑contamination
Dispose of Infected Debris Safely
Once the mummified fruit is bagged, don’t just toss it in your regular bin. Bagging protocols matter here — double-bag infected debris in heavy-duty bags, add hazardous waste labels, and follow your county’s regulatory compliance rules for garden waste disposal best practices.
Disinfection practices for tools come next.
Timing strategies are everything: remove diseased annuals within 48 hours to stop fall garden cleanup and disease prevention from becoming a losing battle.
Rake Wet Plant Mats That Shelter Slugs
Wet leaf mats are basically a slug hotel — cool, damp, and full of room service. That’s why slug habitat disruption starts with clear, heavy leaf mats as soon as fall sets in.
Use a light rake technique, working edges inward so you’re not just shuffling slugs around. Toss the debris far from crops.
Surface moisture control after raking dries things out fast, cutting shelter options down dramatically.
Record Crop Locations for Rotation
Think of your garden beds as a crime scene — what grew where matters more than most people realize. Sketch a GPS Bed Mapping layout, assign crop families using Color-Coded Legends, and log everything in a Digital Crop Log.
Family Rotation Charts keep Solanaceae and Brassicaceae from haunting the same soil. Zone-by-zone Yield Trend Analysis turns that data into smarter crop rotation planning next season.
Plant for Spring Success

Fall is honestly the best time to set yourself up for a stunning spring garden. A little work now — planting garlic, tucking in bulbs, getting trees and shrubs settled — pays off big when everything wakes up in March.
Here’s what to get in the ground before winter shuts the door.
Plant Garlic Cloves in Fall
Fall is garlic season — don’t wait. For planting garlic and spring bulbs to pay off, start with a soil test to guide your amendments.
Choose hardneck varieties through variety selection for cold climates, plant certified seed (certification seed matters for disease-free results), and nail your clove spacing at 4–6 inches apart.
Cover with straw for winter cover, and harvest timing lands next summer.
Set Spring Bulbs at Proper Depth
Garlic’s in — now bury spring bulbs before the ground locks up.
The depth ratio rule is simple: plant two to three times a bulb’s height. That puts tulips and daffodils at 6–8 inches, crocus around 3–4 inches.
Planting orientation matters too — pointed end up, always.
Proper depth and root establishment timing together are your best defense against heaving and squirrel raids.
Include Deer-resistant Bulbs Like Alliums
Squirrels aren’t your only problem — deer will bulldoze a tulip bed overnight. That’s where allium variety selection pays off. Their onion scent acts as a natural deer scent barrier that protects neighboring bulbs too.
- Companion bulb pairings: Mix alliums with daffodils for season-long coverage
- Bulb spacing strategies: Space 8–12 inches apart for maximum scent density
- Post-bloom care: Leave dried heads standing to strengthen next year’s bulbs
Plant Trees, Shrubs, and Perennials Now
Those allium scents fade fast — but the planting window for trees, shrubs, and perennials.
That closes even faster.
Root Zone Preparation starts with a hole as wide as the root ball, never deeper.
Nail your Site Selection now, because fall planting cuts transplant shock considerably.
| Plant Type | Key Focus | Winter Watering |
|---|---|---|
| Trees | Staking Techniques | Deep soak weekly |
| Shrubs | Companion Planting | Reduce gradually |
| Perennials | Mulching for Cold Protection | Monitor soil moisture |
Label Bulb Spots Before Mulching
Once the bulbs are in, don’t trust your memory — it will absolutely fail you by March. Push durable landscape stakes or permanent garden markers to the edge of each planting hole so roots stay undisturbed.
Note the bulb type and planting depth on each label for your seasonal mapping. After mulching, do a quick visibility check to make sure nothing got buried.
Protect Lawns, Irrigation, and Plants
Your lawn and garden gear need just as much attention as your plants do before winter hits. A few smart moves now can mean the difference between a thriving spring and a soggy, frost-damaged mess come March.
Here’s what to tackle before the ground freezes.
Aerate Lawns Before Winter

core aeration as giving your lawn room to breathe before winter locks everything down. Timing matters — aerate when soil moisture is just right, ideally after a rainfall, so core plug extraction is clean and easy.
Those holes boost microbial activity, break down thatch, and improve soil health dramatically. Fill them with compost for real aeration depth control and lasting results.
Mow Grass to Winter Height

Your final mow of the season isn’t just cleanup — it’s protection. Cool-season grasses like Kentucky bluegrass and fescues need 2.5–3 inches heading into winter. Too short, and frost burns the crown. Too tall, and snow mold moves in fast.
- Blade Sharpness matters: dull blades tear grass, inviting disease during dormancy.
- Dry Day Timing keeps soil firm and cuts clean — skip mowing on wet days.
- Post-Mow Cleanup removes clippings that mat down and fuel fungal problems.
Apply Fall Fertilizer at The Right Time

Timing is everything with fall lawn fertilization. Soil temperature needs to sit between 50–65°F — too warm, and your grass can’t absorb nutrients efficiently.
cool-season grasses, that weather window usually hits late August to early September.
Use a nutrient ratio like 5-10-15, apply via broadcast spreader, and consider split doses on sandy soil.
soil testing confirms exactly what your lawn needs.
Drain Hoses and Empty Rain Barrels

Frozen hoses crack. Frozen barrels split. It’s that simple — and totally avoidable.
- Empty rain barrels completely, then store them upside down to nail proper Barrel Drainage Slope and block ice damage.
- Follow smart Overflow Hose Placement — discharge onto grass, never near foundations.
- Install a Debris Prevention Screen on barrel inlets before shutdown.
- Check every Hose Connection Seal, then Drain Store Hoses indoors.
Blow Out Irrigation Lines Before Freeze

Your irrigation lines need to be blown out before the first hard freeze — no shortcuts. Compressor Selection matters: grab one with at least 80–150 CFM capacity. Keep Pressure Settings between 40–60 psi to avoid cracking pipes. Suit up with Safety Gear — gloves and eye protection, always.
Work through Zone Sequencing from highest elevation down, then do your Post-Blowout Inspection to catch any cracked heads.
Add Mulch After The Soil Freezes

Mulch timing is everything — wait until the soil actually freezes before you spread anything. Too early, and you’re just insulating warm, wet ground, which invites rot.
Once it’s solid, add a 3–4 inch layer of straw or shredded leaves for proper insulation thickness. Pick loose materials for smart material selection, keep a stem gap of 1–2 inches, and you’ll nail moisture retention all winter.
Wrap Trunks and Guard Young Trees

Young trees need trunk wrapping just like your perennials need mulch — skip it, and you’re gambling with sunscald and rodent damage.
- Wrap Material Choice: Use white or reflective plastic spiral guards, not burlap — they hold moisture and rot
- Installation Timing: Apply after leaf drop, before hard frost
- Rodent Exclusion: Guards block voles and rabbits at the bark line
- Moisture Control: Breathable materials prevent mold buildup under wraps
- Spring Removal: Pull them off early spring — girdling sneaks up fast
Trunk wrapping and animal protection for young trees is a non‑negotiable part of winterizing garden beds and plants.
Top 4 Tools and Supplies for Fall Gardening
Having the right tools on hand makes fall garden work faster and a lot less frustrating. A few well‑chosen supplies can handle everything from heavy pruning to protecting plants through the first hard freeze.
Here are four worth keeping in your shed this season.
1. Tabor Tools Anvil Lopper
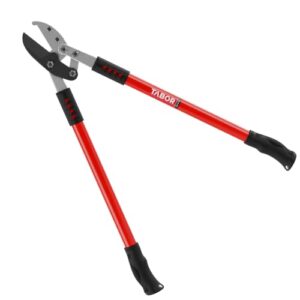
When fall pruning season hits, having the right lopper makes all the difference.
The TABOR TOOLS GG12A manages branches up to 2 inches thick — that’s most of what you’ll tackle, cleaning up overgrown shrubs and perennials before winter.
Its compound-action mechanism multiplies your force, so your wrists aren’t screaming by noon.
At 30 inches with rubberized grips, it stays comfortable through long sessions.
Just remember: anvil loppers can crush very thin, green stems, so save those cuts for woody growth.
| Best For | Gardeners with wrist pain or mobility issues who need to prune woody branches up to 2 inches thick without a ton of effort. |
|---|---|
| Primary Use | Branch pruning |
| Durability | Hardened carbon-steel blade |
| Ease of Use | Compound-action mechanism |
| Weather Resistance | Corrosion-resistant coating |
| Target Surface | Woody branches up to 2″ |
| Notable Limitation | Crushes thin green stems |
| Additional Features |
|
- The compound-action mechanism does the heavy lifting — thick branches take way less force to cut through.
- Extends up to 40 inches, so you can reach higher limbs without dragging out a ladder.
- Hardened carbon-steel blade with a non-stick coating stays sharp longer and holds up through seasons of regular use.
- At full extension, it gets a bit awkward in tight or bushy spots.
- Anvil-style cutting can crush thin, green stems instead of making a clean slice — not great for delicate new growth.
- Maxes out at 2-inch branches, so anything thicker means reaching for a saw.
2. Workpro Hori Hori Garden Knife Tool

Once you’ve handled the big cuts, you need something nimble for the detail work — and that’s where the WORKPRO Hori Hori knife earns its spot. The 7-inch stainless blade does double duty: sharp edge for slicing roots and twine, serrated side for tougher stuff.
The etched depth markings mean you’re planting garlic at exactly 4–6 inches without hunting for a ruler.
Full-tang construction keeps it solid when you’re prying through compacted fall soil.
One tool, a dozen jobs.
| Best For | Gardeners who want one versatile tool that handles digging, cutting, and measuring without hauling around a whole kit. |
|---|---|
| Primary Use | Digging & cutting |
| Durability | Full-tang stainless steel |
| Ease of Use | Single multi-purpose tool |
| Weather Resistance | Rust-resistant stainless steel |
| Target Surface | Soil and roots |
| Notable Limitation | Poor for delicate pruning |
| Additional Features |
|
- Double-edged blade handles both clean slicing and tough root-cutting, so you’re not swapping tools mid-task.
- Depth markings etched right on the blade take the guesswork out of planting — no ruler needed.
- Full-tang build and non-slip grip make it feel solid and comfortable even after a long session in the dirt.
- Not the best choice for delicate pruning or fine trimming work — it’s built for tougher jobs.
- Dense, large root balls can take real effort to get through, which might be a struggle for some users.
- A few units ship with an oily residue on the blade, so give it a quick wipe before you dig in.
3. DeaGenlte Plant Frost Protection Covers
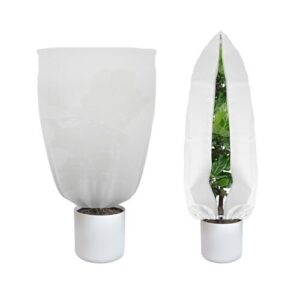
Cold snaps don’t wait for you to be ready — and that’s exactly why the DeaGenlte Frost Protection Covers deserve a spot in your fall kit. The breathable non-woven fabric lets through 60–70% of sunlight, so your plants keep photosynthesizing while staying insulated against temperatures down to about -4°C.
Setup takes under five minutes, the drawstring cinches tight against wind, and the whole thing folds into a 12‑inch square for storage.
Reusable for 2–3 seasons. Simple math.
| Best For | Gardeners who want a quick, reusable way to protect shrubs and small trees from frost, wind, and snow without blocking out the sun. |
|---|---|
| Primary Use | Frost protection |
| Durability | 2–3 season reusable fabric |
| Ease of Use | Under 5-minute setup |
| Weather Resistance | Wind & frost protection |
| Target Surface | Shrubs and small trees |
| Notable Limitation | Not fully waterproof |
| Additional Features |
|
- Breathable fabric keeps light coming through, so plants stay healthy even when covered for days
- Drawstring closure is simple and snug — no fumbling around in cold weather
- Reusable season after season, which beats buying plastic bags every fall
- Not fully waterproof, so heavy rain can still get through to your plants
- Fixed size may leave too much slack on smaller plants, reducing how well it seals out cold
- If the drawstring isn’t tightened properly, wind can still get in and undo the whole point
4. Glaze N Seal Paver Sealer
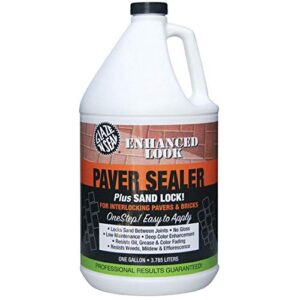
patios and walkways take a beating every fall — rain, freeze-thaw cycles, and shifting sand joints all chip away at them. The Glaze ‘N Seal Paver Sealer fixes that.
At $60.61, it covers about 144 square feet and resists oil, UV fade, and efflorescence while locking in joint sand so weeds can’t creep through.
Spray or brush it on, let it dry, and foot traffic resumes within hours.
Low odor, water-based cleanup, and no special ventilation needed. That’s a hard deal to pass up.
| Best For | Homeowners who want to protect and refresh the look of outdoor pavers, flagstone, or masonry without a shiny, plastic-looking finish. |
|---|---|
| Primary Use | Surface sealing |
| Durability | Polymeric liquid sealer |
| Ease of Use | Spray or brush application |
| Weather Resistance | UV & stain resistance |
| Target Surface | Pavers, stone, masonry |
| Notable Limitation | Odor up to 2 weeks |
| Additional Features |
|
- Locks in joint sand so weeds and shifting are less of a headache over time
- Deepens color and improves curb appeal on older, dull-looking patios or walkways
- Easy to apply — just spray or brush it on, no special equipment needed
- Durability can be iffy in wet or snowy climates — some users noticed sand loss and discoloration within a couple months
- Surface prep is non-negotiable; skip it and you’re looking at an uneven finish or early failure
- The synthetic odor sticks around for up to two weeks, and the packaging isn’t great for shipping
Frequently Asked Questions (FAQs)
How often should I water my garden in fall?
In fall, water when the top inch of soil feels dry. Most established plants need it every 7–14 days. Skip it if you’ve had half an inch of rain that week.
When should I apply fall lawn fertilizer?
Aim for late October to early November. That’s when soil temps hover around 50–65°F for cool-season grasses — prime time for roots to store energy heading into winter.
Can I plant vegetables in the fall season?
Yes — fall is prime time to get growing. Kale, spinach, and radishes thrive in cool weather and taste even better after a light frost hits them.
Should I cover outdoor containers before winter arrives?
Absolutely cover them. Wrap pots in burlap or frost fabric, raise them on bricks for drainage, and clear any standing water beforehand. Terracotta especially cracks fast once ice gets in.
How do I protect plants from early frost?
Drape frost blankets over hoops before temps drop below 40°F. Water plants the afternoon before a frost — moist soil holds heat overnight. Move pots indoors when a hard freeze hits.
When should I stop watering outdoor plants completely?
Stop watering once daily temperatures stay below 40°F for a full week. If the top 6 inches of soil stay moist from rain, you’re done — hold off until spring.
How do I winterize my irrigation system properly?
Shut off the main valve, drain the backflow preventer, then blow out each zone with a compressor set to 50–80 psi. Work zone by zone until only mist comes out.
Should I fertilize trees and shrubs in fall?
Fall fertilizing fuels root growth before dormancy sets in. Use a low-nitrogen, phosphorus-rich blend after leaf drop. Avoid high-nitrogen formulas — they push tender new growth that frost will kill.
Whats the best way to store garden tools?
Clean tools well, dry them completely, then hang long-handled ones on wall-mounted racks. Store small tools in labeled bins.
A light coat of oil before storage keeps rust away all winter.
Can I still plant perennials this late in fall?
Yes, but the clock’s ticking. You’ve got until the first hard frost — ideally with 4 to 6 weeks to spare — so roots can settle before the ground locks up tight.
Conclusion
gardeners rest in fall. You’re building.
real difference between a garden that limps into June and one that explodes in April. Every bulb you drop, every diseased stem you pull, every irrigation line you blow out—it all compounds.
Your seasonal fall gardening checklist isn’t busywork. It’s leverage.
The ground freezes, everything goes quiet, and underneath it all, your preparation is already working. Spring doesn’t reward luck. It rewards October.